
Users Manual - English
Page 3
... the shaded parts shown in the illustrations below. When you have turned off the power switch and unplugged the printer from the AC power outlet. Fuser is HOT! Before you clean the printer, clear a paper jam or replace parts, make sure you an electrical shock. it might give you have ...just used the printer, some parts inside the printer. Inside the printer ii Open the face-up output tray WARNING Do not handle ...
... the shaded parts shown in the illustrations below. When you have turned off the power switch and unplugged the printer from the AC power outlet. Fuser is HOT! Before you clean the printer, clear a paper jam or replace parts, make sure you an electrical shock. it might give you have ...just used the printer, some parts inside the printer. Inside the printer ii Open the face-up output tray WARNING Do not handle ...
Users Manual - English
Page 107
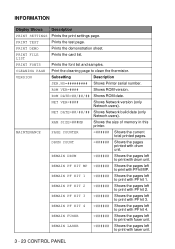
...the demonstration sheet. REMAIN PF KIT 1 =###### Shows the pages left to print with fuser unit. REMAIN PF KIT 4 =###### Shows the pages left to print with laser unit. 3 - 23 CONTROL PANEL REMAIN LASER =###### Shows the pages left to print with PF kit 4. PRINT FONTS Prints the font... REMAIN PF KIT 2 =###### Shows the pages left to clean the thermistor. RAM SIZE=###MB Shows the size of memory in this printer. DRUM COUNT =###### Shows the pages printed with drum unit. PRINT TEST Prints the test page. INFORMATION Display Shows Description PRINT SETTINGS...
...the demonstration sheet. REMAIN PF KIT 1 =###### Shows the pages left to print with fuser unit. REMAIN PF KIT 4 =###### Shows the pages left to print with laser unit. 3 - 23 CONTROL PANEL REMAIN LASER =###### Shows the pages left to print with PF kit 4. PRINT FONTS Prints the font... REMAIN PF KIT 2 =###### Shows the pages left to clean the thermistor. RAM SIZE=###MB Shows the size of memory in this printer. DRUM COUNT =###### Shows the pages printed with drum unit. PRINT TEST Prints the test page. INFORMATION Display Shows Description PRINT SETTINGS...

Users Manual - English
Page 160
Replacing Maintenance Parts You will appear on the LCD. REPLACE FUSER See Maintenance Messages in this chapter. When it is time to replace these parts, the following messages will need to replace the maintenance parts regularly to maintain print quality. REPLACE PF KIT See Maintenance Messages in this chapter. ROUTINE MAINTENANCE 5 - 11 REPLACE LASER See Maintenance Messages in this chapter.
Replacing Maintenance Parts You will appear on the LCD. REPLACE FUSER See Maintenance Messages in this chapter. When it is time to replace these parts, the following messages will need to replace the maintenance parts regularly to maintain print quality. REPLACE PF KIT See Maintenance Messages in this chapter. ROUTINE MAINTENANCE 5 - 11 REPLACE LASER See Maintenance Messages in this chapter.

Users Manual - English
Page 163
Figure 5-19 Clean the inside of the printer as follows: 1 Turn off the toner with a dry cloth and immediately wash the clothes in cold water to avoid stains. ■ Never touch the hot fuser. ■ Be careful not to inhale the toner. Fuser is HOT! Cleaning the inside of the printer When you clean the inside of the printer, pay attention to the following: ■ If your clothes are smeared with toner, wipe off the printer power switch, and then unplug the printer power cord. 2 Open the top cover. 3 Take out the drum unit assembly. 5 - 14 ROUTINE MAINTENANCE
Figure 5-19 Clean the inside of the printer as follows: 1 Turn off the toner with a dry cloth and immediately wash the clothes in cold water to avoid stains. ■ Never touch the hot fuser. ■ Be careful not to inhale the toner. Fuser is HOT! Cleaning the inside of the printer When you clean the inside of the printer, pay attention to the following: ■ If your clothes are smeared with toner, wipe off the printer power switch, and then unplug the printer power cord. 2 Open the top cover. 3 Take out the drum unit assembly. 5 - 14 ROUTINE MAINTENANCE

Users Manual - English
Page 164
Inside the printer Open the face-up output tray Figure 5-20 4 Wipe off toner and paper dust from the metal plate in the printer with a dry, soft cloth. Fuser is HOT! Metal plate Figure 5-21 5 Wipe the scanner window with a dry, soft cloth. Figure 5-22 ROUTINE MAINTENANCE 5 - 15 When you have just used the printer, some parts inside the printer are extremely hot. WARNING After you open the top cover of the printer, never touch the fuser and fixing roller.
Inside the printer Open the face-up output tray Figure 5-20 4 Wipe off toner and paper dust from the metal plate in the printer with a dry, soft cloth. Fuser is HOT! Metal plate Figure 5-21 5 Wipe the scanner window with a dry, soft cloth. Figure 5-22 ROUTINE MAINTENANCE 5 - 15 When you have just used the printer, some parts inside the printer are extremely hot. WARNING After you open the top cover of the printer, never touch the fuser and fixing roller.

Users Manual - English
Page 168
...KIT 1 Paper feeding kit REPLACE PF KIT 2 Paper feeding kit REPLACE PF KIT 3 Paper feeding kit REPLACE PF KIT 4 Paper feeding kit REPLACE FUSER Fixing unit REPLACE LASER Scanner unit Approximate Life 100,000 pages *1 100,000 pages *1 100,000 pages *1 100,000 pages *1 100,000 pages *1 200,000 pages...Call Customer Support Call Customer Support Call Customer Support Call Customer Support *1 At 5% print coverage (A4 or Letter size). Maintenance Messages This printer will vary depending on the print jobs and paper you can rely upon it to replace parts so you use. The actual number of ...
...KIT 1 Paper feeding kit REPLACE PF KIT 2 Paper feeding kit REPLACE PF KIT 3 Paper feeding kit REPLACE PF KIT 4 Paper feeding kit REPLACE FUSER Fixing unit REPLACE LASER Scanner unit Approximate Life 100,000 pages *1 100,000 pages *1 100,000 pages *1 100,000 pages *1 100,000 pages *1 200,000 pages...Call Customer Support Call Customer Support Call Customer Support Call Customer Support *1 At 5% print coverage (A4 or Letter size). Maintenance Messages This printer will vary depending on the print jobs and paper you can rely upon it to replace parts so you use. The actual number of ...
Users Manual - English
Page 172
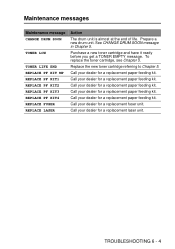
... toner cartridge, see Chapter 5. Replace the new toner cartridge referring to Chapter 5. Call your dealer for a replacement laser unit. Call your dealer for a replacement fuser unit. Maintenance messages Maintenance message CHANGE DRUM SOON TONER LOW TONER LIFE END REPLACE PF KIT MP REPLACE PF KIT1 REPLACE... PF KIT2 REPLACE PF KIT3 REPLACE PF KIT4 REPLACE FUSER REPLACE LASER Action The drum unit is almost at the end of life. Call your dealer for a replacement paper feeding kit. TROUBLESHOOTING 6 -...
... toner cartridge, see Chapter 5. Replace the new toner cartridge referring to Chapter 5. Call your dealer for a replacement laser unit. Call your dealer for a replacement fuser unit. Maintenance messages Maintenance message CHANGE DRUM SOON TONER LOW TONER LIFE END REPLACE PF KIT MP REPLACE PF KIT1 REPLACE... PF KIT2 REPLACE PF KIT3 REPLACE PF KIT4 REPLACE FUSER REPLACE LASER Action The drum unit is almost at the end of life. Call your dealer for a replacement paper feeding kit. TROUBLESHOOTING 6 -...

Users Manual - English
Page 182
...hands and clothes with cold water. Inside the printer Open the face-up output tray Figure 6-7 ■ After you have just used the printer, some parts inside the printer, follow these steps: 1 Open the top cover of the printer, never touch the fuser or the fixing roller. JAM B (paper ...jam inside the printer) JAM B If a paper jam occurs inside the printer are extremely hot. ■ When you ...
...hands and clothes with cold water. Inside the printer Open the face-up output tray Figure 6-7 ■ After you have just used the printer, some parts inside the printer, follow these steps: 1 Open the top cover of the printer, never touch the fuser or the fixing roller. JAM B (paper ...jam inside the printer) JAM B If a paper jam occurs inside the printer are extremely hot. ■ When you ...


