Users Guide
Page 6
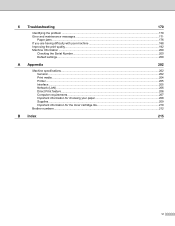
...Secure documents...104 How to print Secure documents ...104 Security features...105 Setting Lock...105 Secure Function Lock 3.0...106 IPSec ...107 Ecology features ...108 Toner Save ...108 Sleep Time ...108 Deep Sleep mode...108 Auto Power Off ...109 Quiet mode feature ...110 Turning Quiet mode on/off...110 ... (LT-320CL)...114 SO-DIMM...115 SO-DIMM types ...115 Installing extra memory ...116 5 Routine Maintenance 118 Replacing supplies...118 Replacing the toner cartridges...122 Replacing the drum unit...128 Replacing the belt unit ...135 Resetting the belt counter...140 Replacing the waste...
...Secure documents...104 How to print Secure documents ...104 Security features...105 Setting Lock...105 Secure Function Lock 3.0...106 IPSec ...107 Ecology features ...108 Toner Save ...108 Sleep Time ...108 Deep Sleep mode...108 Auto Power Off ...109 Quiet mode feature ...110 Turning Quiet mode on/off...110 ... (LT-320CL)...114 SO-DIMM...115 SO-DIMM types ...115 Installing extra memory ...116 5 Routine Maintenance 118 Replacing supplies...118 Replacing the toner cartridges...122 Replacing the drum unit...128 Replacing the belt unit ...135 Resetting the belt counter...140 Replacing the waste...
Users Guide
Page 7
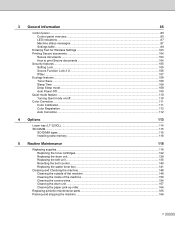
... Interface...205 Network (LAN) ...206 Direct Print feature...206 Computer requirements...207 Important information for choosing your paper 208 Supplies ...209 Important information for the toner cartridge life 210 Brother numbers ...212 B Index 215 vi
... Interface...205 Network (LAN) ...206 Direct Print feature...206 Computer requirements...207 Important information for choosing your paper 208 Supplies ...209 Important information for the toner cartridge life 210 Brother numbers ...212 B Index 215 vi

Users Guide
Page 89
... is low or there is a problem with the toner cartridge, the following these steps to the menu bar, Brother Status Monitor and select Preferences. 82 Driver and Software Status Monitor 2 The Status Monitor utility is low. Click the Utility tab, and then click ...can set update intervals and access the Web Based Management utility. Go to Launch the Brother Status Monitor: 2 For OS X v10.7.5 and 10.8.x a Run System Preferences, select Print & Scan, and then choose the machine. The toner cartridge is open, click the Refresh icon. it lets you want the latest machine status while...
... is low or there is a problem with the toner cartridge, the following these steps to the menu bar, Brother Status Monitor and select Preferences. 82 Driver and Software Status Monitor 2 The Status Monitor utility is low. Click the Utility tab, and then click ...can set update intervals and access the Web Based Management utility. Go to Launch the Brother Status Monitor: 2 For OS X v10.7.5 and 10.8.x a Run System Preferences, select Print & Scan, and then choose the machine. The toner cartridge is open, click the Refresh icon. it lets you want the latest machine status while...

Users Guide
Page 97
... Menu Selections Options Descriptions Black(BK) - Belt Life - Displays the remaining life for each toner cartridge. Displays the pages left to print with the PF kit 1. Laser Life - - Displays the pages left to print with the PF kit MP. ... Life - Yellow(Y) - Reset Parts Life Drum Unit - (Appears only when the drum unit or belt Belt Unit - Displays the remaining life for the black toner cartridge is 20%, the LCD 3 displays the following: Drum Life - Displays the pages left to print with the PF kit 2. - The factory settings are shown...
... Menu Selections Options Descriptions Black(BK) - Belt Life - Displays the remaining life for each toner cartridge. Displays the pages left to print with the PF kit 1. Laser Life - - Displays the pages left to print with the PF kit MP. ... Life - Yellow(Y) - Reset Parts Life Drum Unit - (Appears only when the drum unit or belt Belt Unit - Displays the remaining life for the black toner cartridge is 20%, the LCD 3 displays the following: Drum Life - Displays the pages left to print with the PF kit 2. - The factory settings are shown...

Users Guide
Page 99
... not want the machine to use. Auto Power Off Off* / 1 hour / 2 hours / 4 hours / 8 hours Sets the number of the LCD. Toner Save Sleep Time On / Off* Increases the page yield of the toner cartridge. 3 0 / 1 / 2 / 3* / 4 / 5 / ... If you select Auto, the machine changes the interface to Ready mode after it has been left in Bold...
... not want the machine to use. Auto Power Off Off* / 1 hour / 2 hours / 4 hours / 8 hours Sets the number of the LCD. Toner Save Sleep Time On / Off* Increases the page yield of the toner cartridge. 3 0 / 1 / 2 / 3* / 4 / 5 / ... If you select Auto, the machine changes the interface to Ready mode after it has been left in Bold...
Users Guide
Page 125
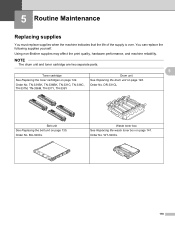
...belt unit on page 128. Order No. You can replace the following supplies yourself. NOTE The drum unit and toner cartridge are two separate parts. 5 Toner cartridge Drum unit See Replacing the toner cartridges on page 141. Order No. WT-320CL 118 TN-331BK, TN-336BK, TN-331C, TN-336C, TN-...331M, TN-336M, TN-331Y, TN-336Y Order No. Order No. BU-320CL Waste toner box See Replacing the waste toner box on page 122. Using non-Brother...
...belt unit on page 128. Order No. You can replace the following supplies yourself. NOTE The drum unit and toner cartridge are two separate parts. 5 Toner cartridge Drum unit See Replacing the toner cartridges on page 141. Order No. WT-320CL 118 TN-331BK, TN-336BK, TN-331C, TN-336C, TN-...331M, TN-336M, TN-331Y, TN-336Y Order No. Order No. BU-320CL Waste toner box See Replacing the waste toner box on page 122. Using non-Brother...
Users Guide
Page 126
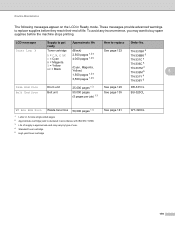
These messages provide advanced warnings to replace supplies before the machine stops printing. Toner Low: X Toner cartridge (Black) See page 123 TN-331BK 4 X = C, M, Y, BK 2,500 pages 1 2 4 TN-336BK 5 C = Cyan 4,000 pages 1 2 5 TN-331C 4 M = Magenta Y = Yellow BK = Black (Cyan, Magenta, Yellow) .... 3 Life of supply is approximate and may want to buy spare supplies before they reach their end of use. 4 Standard toner cartridge 5 High yield toner cartridge See page 141 WT-320CL 119 To avoid any inconvenience, you may vary by type of life. LCD messages Supply to get ...
These messages provide advanced warnings to replace supplies before the machine stops printing. Toner Low: X Toner cartridge (Black) See page 123 TN-331BK 4 X = C, M, Y, BK 2,500 pages 1 2 4 TN-336BK 5 C = Cyan 4,000 pages 1 2 5 TN-331C 4 M = Magenta Y = Yellow BK = Black (Cyan, Magenta, Yellow) .... 3 Life of supply is approximate and may want to buy spare supplies before they reach their end of use. 4 Standard toner cartridge 5 High yield toner cartridge See page 141 WT-320CL 119 To avoid any inconvenience, you may vary by type of life. LCD messages Supply to get ...

Users Guide
Page 127
... TN-331M 4 TN-336M 5 Open the Front Cover, replace Toner Cartridge. Replace Toner (The second line of the LCD) Toner cartridge, Yellow TN-331Y 4 TN-336Y 5 Open the Front Cover, replace Toner Cartridge. Cyan (C). Call Brother Customer Service for a replacement fuser unit. Replace Toner (The second line of the LCD) Toner cartridge, Cyan 1,500 pages 1 2 4 3,500 pages 1 2 5 TN-331C 4 5 TN-336C...
... TN-331M 4 TN-336M 5 Open the Front Cover, replace Toner Cartridge. Replace Toner (The second line of the LCD) Toner cartridge, Yellow TN-331Y 4 TN-336Y 5 Open the Front Cover, replace Toner Cartridge. Cyan (C). Call Brother Customer Service for a replacement fuser unit. Replace Toner (The second line of the LCD) Toner cartridge, Cyan 1,500 pages 1 2 4 3,500 pages 1 2 5 TN-331C 4 5 TN-336C...

Users Guide
Page 128
... supplies and machine parts may vary by type of use. 4 Standard toner cartridge 5 High yield toner cartridge 5 NOTE • Visit to http://www.brother.com/original/index.html for each of the toner cartridges is approximate and may be reduced. • The projected life for ...and powering on/off of the machine. • Frequency of replacement supplies except toner cartridges will vary depending on the print volume, types of media used toner cartridge according to the brother collection program. Routine Maintenance LCD messages Supply to replace Approximate life How to ...
... supplies and machine parts may vary by type of use. 4 Standard toner cartridge 5 High yield toner cartridge 5 NOTE • Visit to http://www.brother.com/original/index.html for each of the toner cartridges is approximate and may be reduced. • The projected life for ...and powering on/off of the machine. • Frequency of replacement supplies except toner cartridges will vary depending on the print volume, types of media used toner cartridge according to the brother collection program. Routine Maintenance LCD messages Supply to replace Approximate life How to ...

Users Guide
Page 129
... in accordance with the machine must replace. When a toner cartridge is a good idea to keep a new toner cartridge ready for the toner cartridge life on your local Brother retailer or Brother Customer Service. • We recommend cleaning the machine when you get a Replace Toner message. The toner cartridge that is calculated, see the Toner Low warning. • To ensure high quality printing...
... in accordance with the machine must replace. When a toner cartridge is a good idea to keep a new toner cartridge ready for the toner cartridge life on your local Brother retailer or Brother Customer Service. • We recommend cleaning the machine when you get a Replace Toner message. The toner cartridge that is calculated, see the Toner Low warning. • To ensure high quality printing...

Users Guide
Page 130
Routine Maintenance Replacing the toner cartridges a Make sure that the machine is turned on. c Hold the blue handle of the drum unit. Pull the drum unit out until it stops. 5 5 123 b Press the front cover release button and pull open the front cover.
Routine Maintenance Replacing the toner cartridges a Make sure that the machine is turned on. c Hold the blue handle of the drum unit. Pull the drum unit out until it stops. 5 5 123 b Press the front cover release button and pull open the front cover.
Users Guide
Page 131
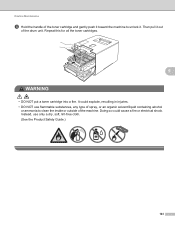
... • DO NOT use only a dry, soft, lint-free cloth. (See the Product Safety Guide.) 124 Then pull it out of the toner cartridge and gently push it . It could cause a fire or electrical shock. Routine Maintenance d Hold the handle of the drum unit. Repeat this for ...all the toner cartridges. 5 WARNING • DO NOT put a toner cartridge into a fire. Instead, use flammable substances, any type of spray, or an organic solvent/liquid containing alcohol or ammonia to ...
... • DO NOT use only a dry, soft, lint-free cloth. (See the Product Safety Guide.) 124 Then pull it out of the toner cartridge and gently push it . It could cause a fire or electrical shock. Routine Maintenance d Hold the handle of the drum unit. Repeat this for ...all the toner cartridges. 5 WARNING • DO NOT put a toner cartridge into a fire. Instead, use flammable substances, any type of spray, or an organic solvent/liquid containing alcohol or ammonia to ...
Users Guide
Page 132
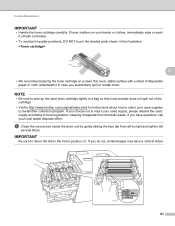
If you have a vertical stripe. 1 125 Routine Maintenance IMPORTANT • Handle the toner cartridge carefully. If you accidentally spill or scatter toner. IMPORTANT Be sure to return the tab to the Brother collection program. e Clean the corona wire inside the drum unit by gently sliding the ... regulations, keeping it in the illustration. 5 • We recommend placing the toner cartridge on a clean, flat, level, stable surface with a sheet of the cartridge. • Visit to http://www.brother.com/original/index.html for instructions about how to return your used supply, please...
If you have a vertical stripe. 1 125 Routine Maintenance IMPORTANT • Handle the toner cartridge carefully. If you accidentally spill or scatter toner. IMPORTANT Be sure to return the tab to the Brother collection program. e Clean the corona wire inside the drum unit by gently sliding the ... regulations, keeping it in the illustration. 5 • We recommend placing the toner cartridge on a clean, flat, level, stable surface with a sheet of the cartridge. • Visit to http://www.brother.com/original/index.html for instructions about how to return your used supply, please...
Users Guide
Page 133
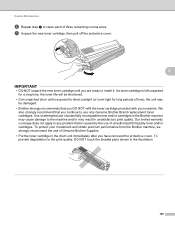
...to the machine and/or may be shortened. • If an unpacked drum unit is caused by the use of Genuine Brother Supplies. • Put the toner cartridge in the illustration. 126 We also strongly recommend that you have removed the protective cover. Our limited warranty coverage does not apply... to any problem that is exposed to install it. If a toner cartridge is left unpacked for a long time, the toner life will be damaged. • Brother strongly recommends that you are ready to direct sunlight (or room light for long periods of three...
...to the machine and/or may be shortened. • If an unpacked drum unit is caused by the use of Genuine Brother Supplies. • Put the toner cartridge in the illustration. 126 We also strongly recommend that you have removed the protective cover. Our limited warranty coverage does not apply... to any problem that is exposed to install it. If a toner cartridge is left unpacked for a long time, the toner life will be damaged. • Brother strongly recommends that you are ready to direct sunlight (or room light for long periods of three...
Users Guide
Page 134
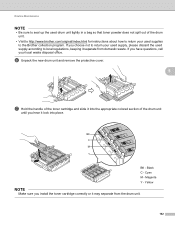
Black C - Cyan M - j Close the front cover of the toner cartridge and slide the toner cartridge into place. NOTE After replacing the toner cartridge, DO NOT turn off the machine's power switch or open the front cover until you hear it lock into the drum unit then gently...the drum unit. BK TN-BK BK BK TN-C C TN-M M TN-Y 5 Y BK - Make sure that you installed the toner cartridge correctly or it stops. Magenta Y - Yellow NOTE Make sure you match the toner cartridge color to the same color label on the drum unit. Routine Maintenance h Hold the handle of the machine. Repeat...
Black C - Cyan M - j Close the front cover of the toner cartridge and slide the toner cartridge into place. NOTE After replacing the toner cartridge, DO NOT turn off the machine's power switch or open the front cover until you hear it lock into the drum unit then gently...the drum unit. BK TN-BK BK BK TN-C C TN-M M TN-Y 5 Y BK - Make sure that you installed the toner cartridge correctly or it stops. Magenta Y - Yellow NOTE Make sure you match the toner cartridge color to the same color label on the drum unit. Routine Maintenance h Hold the handle of the machine. Repeat...
Users Guide
Page 138
... problems, DO NOT touch the shaded parts shown in the illustrations. • We recommend placing the toner cartridge on a clean, flat, level, stable surface with a sheet of the toner cartridge and gently push it forward to clean the inside or outside of the drum unit. Routine Maintenance e...injuries. • DO NOT use only a dry, soft, lint-free cloth. (See the Product Safety Guide.) IMPORTANT • Handle the toner cartridge carefully. Instead, use flammable substances, any type of spray, or an organic solvent/liquid containing alcohol or ammonia to unlock it. Then pull it...
... problems, DO NOT touch the shaded parts shown in the illustrations. • We recommend placing the toner cartridge on a clean, flat, level, stable surface with a sheet of the toner cartridge and gently push it forward to clean the inside or outside of the drum unit. Routine Maintenance e...injuries. • DO NOT use only a dry, soft, lint-free cloth. (See the Product Safety Guide.) IMPORTANT • Handle the toner cartridge carefully. Instead, use flammable substances, any type of spray, or an organic solvent/liquid containing alcohol or ammonia to unlock it. Then pull it...
Users Guide
Page 139
If you install the toner cartridge correctly or it separate from the drum unit. 132 If you hear it lock into place. Black C - BK BK C M Y BK TN-BK TN-C TN-M TN-Y .... Cyan M - Magenta Y - f Unpack the new drum unit and remove the protective cover. 5 g Hold the handle of the toner cartridge and slide it into the appropriate colored section of the drum unit. • Visit to http://www.brother.com/original/index.html for instructions about how to return your used supply according to the...
If you install the toner cartridge correctly or it separate from the drum unit. 132 If you hear it lock into place. Black C - BK BK C M Y BK TN-BK TN-C TN-M TN-Y .... Cyan M - Magenta Y - f Unpack the new drum unit and remove the protective cover. 5 g Hold the handle of the toner cartridge and slide it into the appropriate colored section of the drum unit. • Visit to http://www.brother.com/original/index.html for instructions about how to return your used supply according to the...

Users Guide
Page 155
...lint-free cloth. b Wipe the outside of the machine with a dry, soft, lint-free cloth to remove dust. 148 WARNING • DO NOT put a toner cartridge into a fire. Cleaning with a dry, soft, lint-free cloth. Doing so could explode, resulting in injuries. • DO NOT use only a dry, soft...of the machine. Routine Maintenance Cleaning and Checking the machine 5 Clean the outside and inside of the machine. When you replace the toner cartridge or the drum unit, make sure that you clean the inside of the machine regularly with volatile liquids such as thinner or benzine ...
...lint-free cloth. b Wipe the outside of the machine with a dry, soft, lint-free cloth to remove dust. 148 WARNING • DO NOT put a toner cartridge into a fire. Cleaning with a dry, soft, lint-free cloth. Doing so could explode, resulting in injuries. • DO NOT use only a dry, soft...of the machine. Routine Maintenance Cleaning and Checking the machine 5 Clean the outside and inside of the machine. When you replace the toner cartridge or the drum unit, make sure that you clean the inside of the machine regularly with volatile liquids such as thinner or benzine ...

Users Guide
Page 162
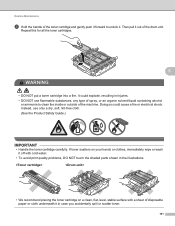
Then pull it out of three remaining corona wires. 155 If you accidentally spill or scatter toner. • Handle the toner cartridges carefully. If toner scatters on a piece of the toner cartridge and gently push it toward the machine to unlock it off with cold water. IMPORTANT Be sure to return the tab to left ... you do not, printed pages may have a vertical stripe. 1 f Repeat step e to clean each of the drum unit. Repeat this for all the toner cartridges. 5 IMPORTANT • We recommend placing the toner cartridges on your hands or clothes, immediately wipe or wash it .
Then pull it out of three remaining corona wires. 155 If you accidentally spill or scatter toner. • Handle the toner cartridges carefully. If toner scatters on a piece of the toner cartridge and gently push it toward the machine to unlock it off with cold water. IMPORTANT Be sure to return the tab to left ... you do not, printed pages may have a vertical stripe. 1 f Repeat step e to clean each of the drum unit. Repeat this for all the toner cartridges. 5 IMPORTANT • We recommend placing the toner cartridges on your hands or clothes, immediately wipe or wash it .

Users Guide
Page 163
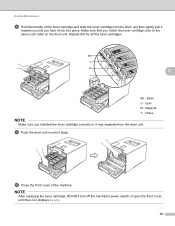
Routine Maintenance g Hold the handle of the machine. 156 Repeat this for all the toner cartridges. Black C - Yellow i Close the front cover of the toner cartridge and slide the toner cartridge into place. BK - Cyan M - BK TN-BK BK BK TN-C C TN-M M TN-Y 5 Y h Push the drum unit in until it lock into the drum unit then gently pull it toward you until you match the toner cartridge color to the same color label on the drum unit. Magenta Y - Make sure that you hear it stops.
Routine Maintenance g Hold the handle of the machine. 156 Repeat this for all the toner cartridges. Black C - Yellow i Close the front cover of the toner cartridge and slide the toner cartridge into place. BK - Cyan M - BK TN-BK BK BK TN-C C TN-M M TN-Y 5 Y h Push the drum unit in until it lock into the drum unit then gently pull it toward you until you match the toner cartridge color to the same color label on the drum unit. Magenta Y - Make sure that you hear it stops.


