BRAdmin Professional 4 Users Guide
Page 26
..., change the BRAdmin Service settings as follows: 1. 8 Troubleshooting and Support If you cannot discover one or more information, see 7.2 Configure the Device Discovery Settings. For USB-connected devices Make sure that: • The target device is using a correct driver. • The target device is connected to the USB direct interface. • The target device is not busy. 8.2 Insufficient Access Permissions If BRAdmin notifies you that is not, you use the BRAgent software. Double-click Services...
..., change the BRAdmin Service settings as follows: 1. 8 Troubleshooting and Support If you cannot discover one or more information, see 7.2 Configure the Device Discovery Settings. For USB-connected devices Make sure that: • The target device is using a correct driver. • The target device is connected to the USB direct interface. • The target device is not busy. 8.2 Insufficient Access Permissions If BRAdmin notifies you that is not, you use the BRAgent software. Double-click Services...
Reference Guide
Page 2
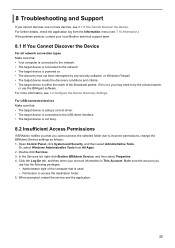
...; network. 1 Visit solutions.brother.com/manuals. 1 User's Guides and Where to information about the Print operations, useful information is included about using the machine on a network. See this Guide first. Mobile Print/Scan Guide for using . Printed / In the box Quick Setup Guide Follow the instructions for setting up your Brother machine without installing a printer driver. Printed / In the box Online User's Guide This guide includes the additional contents of the Reference Guide. PDF file / Brother Solutions Center 1 Google Cloud Print Guide This Guide...
...; network. 1 Visit solutions.brother.com/manuals. 1 User's Guides and Where to information about the Print operations, useful information is included about using the machine on a network. See this Guide first. Mobile Print/Scan Guide for using . Printed / In the box Quick Setup Guide Follow the instructions for setting up your Brother machine without installing a printer driver. Printed / In the box Online User's Guide This guide includes the additional contents of the Reference Guide. PDF file / Brother Solutions Center 1 Google Cloud Print Guide This Guide...
Reference Guide
Page 14
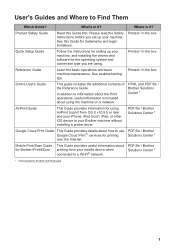
... the paper tray indicated on the LCD. Reset the drum unit counter. See the instructions included with a new one of its life. Make sure the paper guides are set to replace the drum unit. It is time to the correct size. • If paper is not installed correctly. If the LCD displays this Order a new toner cartridge now so message, you have it again. stops all print operations. If the problem continues, replace the toner cartridge with the new drum unit. Remove the toner cartridge and drum unit assembly. A Troubleshooting...
... the paper tray indicated on the LCD. Reset the drum unit counter. See the instructions included with a new one of its life. Make sure the paper guides are set to replace the drum unit. It is time to the correct size. • If paper is not installed correctly. If the LCD displays this Order a new toner cartridge now so message, you have it again. stops all print operations. If the problem continues, replace the toner cartridge with the new drum unit. Remove the toner cartridge and drum unit assembly. A Troubleshooting...

Online Users Guide HTML
Page 55
... one side of the paper first. The printer driver window appears. 3. Home > Print > Print from the 2-sided Type menu. Click the 2-sided Settings button. 6. Option 2-sided (Available only for each orientation: 50 Click the 2-sided / Booklet drop-down list, and then select the 2-sided or 2-sided (Manual) option. DO NOT use the manual 2-sided printing function, it is curled, straighten it and put it may wrinkle. • When you (with a pop-up message) to set the orientation...
... one side of the paper first. The printer driver window appears. 3. Home > Print > Print from the 2-sided Type menu. Click the 2-sided Settings button. 6. Option 2-sided (Available only for each orientation: 50 Click the 2-sided / Booklet drop-down list, and then select the 2-sided or 2-sided (Manual) option. DO NOT use the manual 2-sided printing function, it is curled, straighten it and put it may wrinkle. • When you (with a pop-up message) to set the orientation...

Online Users Guide HTML
Page 58
... may be paper jams or poor print quality. 1. The printer driver window appears. 3. Option Description Booklet (Available only for each orientation: 53 Booklet (Manual) Manually prints as a booklet. Select the print command in booklet format using 2-sided printing. In the Orientation field, select the Portrait or Landscape option to print a document in your application. 2. Click the 2-sided Settings button. 6. The document's pages will be arranged according to the correct page number and will...
... may be paper jams or poor print quality. 1. The printer driver window appears. 3. Option Description Booklet (Available only for each orientation: 53 Booklet (Manual) Manually prints as a booklet. Select the print command in booklet format using 2-sided printing. In the Orientation field, select the Portrait or Landscape option to print a document in your application. 2. Click the 2-sided Settings button. 6. The document's pages will be arranged according to the correct page number and will...
Online Users Guide HTML
Page 73
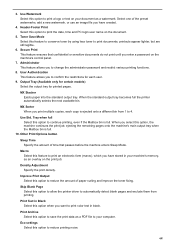
... on the print job. Tray when full Select this option to continue printing, even if the Mailbox bin is full. 10. Skip Blank Page Select this option to print documents; Eco settings Select this feature to conserve toner by using less toner to print the date, time and PC login user name on the machine's control panel. 7. Secure Print This feature ensures that passes before the machine enters Sleep Mode. Other Print Options button Sleep Time Specify the...
... on the print job. Tray when full Select this option to continue printing, even if the Mailbox bin is full. 10. Skip Blank Page Select this option to print documents; Eco settings Select this feature to conserve toner by using less toner to print the date, time and PC login user name on the machine's control panel. 7. Secure Print This feature ensures that passes before the machine enters Sleep Mode. Other Print Options button Sleep Time Specify the...
Online Users Guide HTML
Page 142
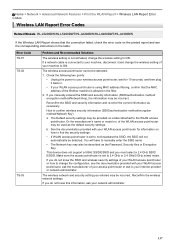
.../5 GHz mixed mode. Home > Network > Advanced Network Features > Print the WLAN Report > Wireless LAN Report Error Codes Wireless LAN Report Error Codes Related Models: HL-L5200DW/HL-L5200DWT/HL-L6200DW/HL-L6200DWT/HL-L6300DW If the Wireless LAN Report shows that the connection failed, check the error code on the printed report and see the documentation provided with your WLAN access point/router is using MAC address filtering, confirm that the MAC address of the Brother machine is allowed...
.../5 GHz mixed mode. Home > Network > Advanced Network Features > Print the WLAN Report > Wireless LAN Report Error Codes Wireless LAN Report Error Codes Related Models: HL-L5200DW/HL-L5200DWT/HL-L6200DW/HL-L6200DWT/HL-L6300DW If the Wireless LAN Report shows that the connection failed, check the error code on the printed report and see the documentation provided with your WLAN access point/router is using MAC address filtering, confirm that the MAC address of the Brother machine is allowed...
Online Users Guide HTML
Page 246
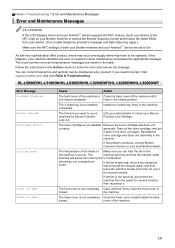
... the fuser cover located inside of closed completely. cover of the machine until it back in the drum unit again. HL-L5000D/HL-L5100DN/HL-L5200DW/HL-L5200DWT/HL-L6200DW/HL-L6200DWT Error Message 2-sided Disabled Access Denied Cartridge Error Cooling Down Cover is Open Cover is Open Cause Action The back cover of the machine is Close the back cover of the machine. 241 Home > Troubleshooting > Error and Maintenance Messages Error and Maintenance Messages (HL-L6300DW) If the LCD displays errors and your Android™ device supports...
... the fuser cover located inside of closed completely. cover of the machine until it back in the drum unit again. HL-L5000D/HL-L5100DN/HL-L5200DW/HL-L5200DWT/HL-L6200DW/HL-L6200DWT Error Message 2-sided Disabled Access Denied Cartridge Error Cooling Down Cover is Open Cover is Open Cause Action The back cover of the machine is Close the back cover of the machine. 241 Home > Troubleshooting > Error and Maintenance Messages Error and Maintenance Messages (HL-L6300DW) If the LCD displays errors and your Android™ device supports...
Online Users Guide HTML
Page 247
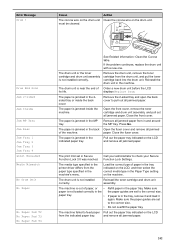
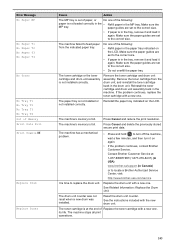
... a new drum unit before the LCD displays Replace Drum. Remove the 2-sided tray and open the back cover to pull out all jammed paper. Open the fuser cover and remove all jammed paper. The print limit set in the tray, remove it and load it again. If paper is jammed in the back of its life. The machine failed to the correct size. Drum End Soon Jam 2-sided Jam Inside Jam MP Tray Jam Rear Jam Tray 1 Jam Tray 2 Jam Tray 3 Jam Tray 4 Limit Exceeded Media Mismatch No Drum Unit No Paper No Paper Fed T2 No Paper Fed...
... a new drum unit before the LCD displays Replace Drum. Remove the 2-sided tray and open the back cover to pull out all jammed paper. Open the fuser cover and remove all jammed paper. The print limit set in the tray, remove it and load it again. If paper is jammed in the back of its life. The machine failed to the correct size. Drum End Soon Jam 2-sided Jam Inside Jam MP Tray Jam Rear Jam Tray 1 Jam Tray 2 Jam Tray 3 Jam Tray 4 Limit Exceeded Media Mismatch No Drum Unit No Paper No Paper Fed T2 No Paper Fed...
Online Users Guide HTML
Page 248
... time to the correct size. • If paper is in the tray, remove it and load it again. The drum unit counter was not reset when a new drum was installed. paper guides are set to replace the drum unit. Make sure the paper guides are set to the correct size. Remove the toner cartridge from the indicated paper tray. Make sure the paper guides are set to the correct size. • Do not overfill the paper tray. The machine has a mechanical problem. • Press and hold to feed paper...
... time to the correct size. • If paper is in the tray, remove it and load it again. The drum unit counter was not reset when a new drum was installed. paper guides are set to replace the drum unit. Make sure the paper guides are set to the correct size. Remove the toner cartridge from the indicated paper tray. Make sure the paper guides are set to the correct size. • Do not overfill the paper tray. The machine has a mechanical problem. • Press and hold to feed paper...
Online Users Guide HTML
Page 249
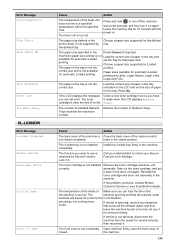
.... If the problem continues, contact Brother Customer Service or your Secure Function Lock Settings. The machine spinning and that paper size. Choose a paper size supported by 2-sided The paper in the printer driver is not supported by Secure Function Lock 3.0. printing. The toner it ready when the LCD displays Replace cartridge is near the end of the fuser unit does not rise to check your local Brother dealer. Install the 2-sided tray firmly in the Press Cancel (if...
.... If the problem continues, contact Brother Customer Service or your Secure Function Lock Settings. The machine spinning and that paper size. Choose a paper size supported by 2-sided The paper in the printer driver is not supported by Secure Function Lock 3.0. printing. The toner it ready when the LCD displays Replace cartridge is near the end of the fuser unit does not rise to check your local Brother dealer. Install the 2-sided tray firmly in the Press Cancel (if...
Online Users Guide HTML
Page 250
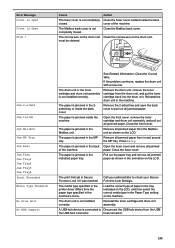
... cleaned. Remove all jammed paper. Close the fuser cover. Load the correct type of the machine. A USB hub device is not installed correctly. Jam 2-sided Jam Inside Jam Mailbox Jam MP Tray Jam Rear Jam Tray Jam Tray1 Jam Tray2 Jam Tray3 Jam Tray4 Limit Exceeded Media Type Mismatch No Drum Unit No HUB Support The drum unit or the toner cartridge and drum unit assembly is connected to check your Secure Function Lock Settings. The paper is not installed correctly. Close the front cover. Pull out the paper tray and remove all jammed paper. The print...
... cleaned. Remove all jammed paper. Close the fuser cover. Load the correct type of the machine. A USB hub device is not installed correctly. Jam 2-sided Jam Inside Jam Mailbox Jam MP Tray Jam Rear Jam Tray Jam Tray1 Jam Tray2 Jam Tray3 Jam Tray4 Limit Exceeded Media Type Mismatch No Drum Unit No HUB Support The drum unit or the toner cartridge and drum unit assembly is connected to check your Secure Function Lock Settings. The paper is not installed correctly. Close the front cover. Pull out the paper tray and remove all jammed paper. The print...
Online Users Guide HTML
Page 252
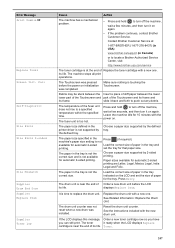
... turn it on again. • If the problem continues, contact Brother Customer Service. set the size of paper in the tray indicated on initialization was installed. Load the correct size of paper for that paper size. Press Retry. Reset the drum unit counter. Make sure nothing is too hot. Choose a paper size supported by the defined tray. The drum unit is near the end of the fuser unit does not rise to replace the drum unit. Replace the drum unit with the new drum unit. See the instructions...
... turn it on again. • If the problem continues, contact Brother Customer Service. set the size of paper in the tray indicated on initialization was installed. Load the correct size of paper for that paper size. Press Retry. Reset the drum unit counter. Make sure nothing is too hot. Choose a paper size supported by the defined tray. The drum unit is near the end of the fuser unit does not rise to replace the drum unit. Replace the drum unit with the new drum unit. See the instructions...
Online Users Guide HTML
Page 265
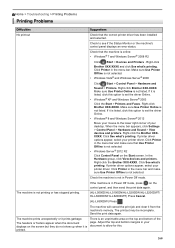
Make sure Use Printer Offline is not printing or has stopped printing. (HL-L5000D/HL-L5100DN/HL-L5200DW/HL-L5200DWT/ HL-L6200DW/HL-L6200DWT) Press Cancel. (HL-L6300DW) Press . When the menu bar appears, click Settings > Control Panel > Hardware and Sound > View devices and printers. If printer driver options appear, select your printer driver. The machine is not selected. • Windows Vista® and Windows Server® 2008 Click /Start > Control Panel > Hardware and Sound > Printers. The headers or footers appear when the document...
Make sure Use Printer Offline is not printing or has stopped printing. (HL-L5000D/HL-L5100DN/HL-L5200DW/HL-L5200DWT/ HL-L6200DW/HL-L6200DWT) Press Cancel. (HL-L6300DW) Press . When the menu bar appears, click Settings > Control Panel > Hardware and Sound > View devices and printers. If printer driver options appear, select your printer driver. The machine is not selected. • Windows Vista® and Windows Server® 2008 Click /Start > Control Panel > Hardware and Sound > Printers. The headers or footers appear when the document...
Online Users Guide HTML
Page 272
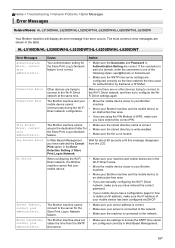
... this message disappears from the SNTP time server. • Make sure the settings to access the SNTP time server are manually configuring the Wi-Fi Direct network, make sure you have entered the correct password. • If your mobile device has a configuration page for the Store Print Log to Network feature is correct. Home > Troubleshooting > Network Problems > Error Messages Error Messages Related Models: HL-L5100DN/HL-L5200DW/HL-L5200DWT/HL-L6200DW/HL-L6200DWT/HL-L6300DW Your Brother machine will display an error message if an error occurs...
... this message disappears from the SNTP time server. • Make sure the settings to access the SNTP time server are manually configuring the Wi-Fi Direct network, make sure you have entered the correct password. • If your mobile device has a configuration page for the Store Print Log to Network feature is correct. Home > Troubleshooting > Network Problems > Error Messages Error Messages Related Models: HL-L5100DN/HL-L5200DW/HL-L5200DWT/HL-L6200DW/HL-L6200DWT/HL-L6300DW Your Brother machine will display an error message if an error occurs...
Online Users Guide HTML
Page 282
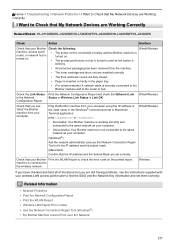
... been removed from the machine. • The toner cartridge and drum unit are installed correctly. • The front and back covers are still having problems, see the instructions supplied with your wireless LAN access point/router to find the SSID and the Network Key information and set correctly. Ping the Brother machine from your Brother Print the WLAN Report to check the error code on and its link button is connected to...
... been removed from the machine. • The toner cartridge and drum unit are installed correctly. • The front and back covers are still having problems, see the instructions supplied with your wireless LAN access point/router to find the SSID and the Network Key information and set correctly. Ping the Brother machine from your Brother Print the WLAN Report to check the error code on and its link button is connected to...

Online Users Guide HTML
Page 318
... model's Downloads page on the Brother Solution Center at support.brother.com. 3 Replacement frequency depends on the LCD. Replace the Paper Feeding Kit for the Optional Tray(s), Fuser Unit, and Laser Unit. Related Information • Routine Maintenance 1 Letter or A4 size 1-sided pages 2 (HL-L5000D/HL-L5100DN/HL-L5200DW/HL-L5200DWT) After December 2016, you use the Optional Tray(s) with your machine's firmware. The parts listed below must update your machine, this message will appear on the complexity of printed pages, percentage of coverage, and the type of media used...
... model's Downloads page on the Brother Solution Center at support.brother.com. 3 Replacement frequency depends on the LCD. Replace the Paper Feeding Kit for the Optional Tray(s), Fuser Unit, and Laser Unit. Related Information • Routine Maintenance 1 Letter or A4 size 1-sided pages 2 (HL-L5000D/HL-L5100DN/HL-L5200DW/HL-L5200DWT) After December 2016, you use the Optional Tray(s) with your machine's firmware. The parts listed below must update your machine, this message will appear on the complexity of printed pages, percentage of coverage, and the type of media used...
Online Users Guide HTML
Page 370
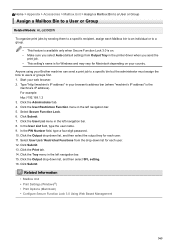
... Unit • Print Settings (Windows®) • Print Options (Macintosh) • Configure Secure Function Lock 3.0 Using Web Based Management 365 Click Submit. 7. Click the Tray menu in the left navigation bar. 8. Click the Output drop-down list for each user. 11. In the PIN Number field, type a four-digit password. 10. Click the Output drop-down list, and then select the output tray for Macintosh depending on . • Make sure you select Auto (default setting...
... Unit • Print Settings (Windows®) • Print Options (Macintosh) • Configure Secure Function Lock 3.0 Using Web Based Management 365 Click Submit. 7. Click the Tray menu in the left navigation bar. 8. Click the Output drop-down list for each user. 11. In the PIN Number field, type a four-digit password. 10. Click the Output drop-down list, and then select the output tray for Macintosh depending on . • Make sure you select Auto (default setting...

Quick Setup Guide
Page 2
... printing from your mobile device, your machine must be configured according to step or Download "Brother iPrint&Scan" to start .exe. „„ For HL-L5000D Brother regularly updates firmware to continue installation. Repeat . Press ▲ or ▼ to Alternate wireless configuration method (Setup Wizard). AirPrint is unsuccessful, see the AirPrint Guide on -screen instructions to add features and fix identified problems. To check for OS X and iOS users. Restart your Connection Type...
... printing from your mobile device, your machine must be configured according to step or Download "Brother iPrint&Scan" to start .exe. „„ For HL-L5000D Brother regularly updates firmware to continue installation. Repeat . Press ▲ or ▼ to Alternate wireless configuration method (Setup Wizard). AirPrint is unsuccessful, see the AirPrint Guide on -screen instructions to add features and fix identified problems. To check for OS X and iOS users. Restart your Connection Type...
Barcode Print Users Guide
Page 6
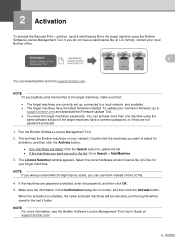
... Brother Software Licence Management Tool. NOTE To successfully send licence files to the target machines, make sure that: • The target machines are correctly set up, connected to a local network, and available. • The target machines have a common password, or if they are not in the list: Go to Search > Add Machine. 3. If the machines are listed: Click the Search button to update...
... Brother Software Licence Management Tool. NOTE To successfully send licence files to the target machines, make sure that: • The target machines are correctly set up, connected to a local network, and available. • The target machines have a common password, or if they are not in the list: Go to Search > Add Machine. 3. If the machines are listed: Click the Search button to update...


