Service Manual
Page 3
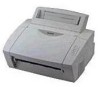
...-design of problems. CHAPTER IV : MAINTENANCE AND TROUBLESHOOTING Reference values and adjustments, troubleshooting image defects, troubleshooting malfunctions, etc. CHAPTER III : DISASSEMBLY AND REASSEMBLY Procedures for improving the practical ability to maintain the high printing quality and performance... its print quality performance and for disassembling and reassembling the mechanical system. All relevant information in such cases will be supplied in service information bulletins (Technical Information). This service manual covers the HL-820, 1020, 1040 and 1050 laser printers. (...
...-design of problems. CHAPTER IV : MAINTENANCE AND TROUBLESHOOTING Reference values and adjustments, troubleshooting image defects, troubleshooting malfunctions, etc. CHAPTER III : DISASSEMBLY AND REASSEMBLY Procedures for improving the practical ability to maintain the high printing quality and performance... its print quality performance and for disassembling and reassembling the mechanical system. All relevant information in such cases will be supplied in service information bulletins (Technical Information). This service manual covers the HL-820, 1020, 1040 and 1050 laser printers. (...
Service Manual
Page 68
... in cold weather, condensation may occur inside the printer, causing various problems as near water or a humidifier). • The printer is not exposed to direct sunlight. • The room is well-ventilated. • The printer is not placed where the ventilation hole of the printer is blocked. (2) Print paper Check if : • A recommended type of the...
... in cold weather, condensation may occur inside the printer, causing various problems as near water or a humidifier). • The printer is not exposed to direct sunlight. • The room is well-ventilated. • The printer is not placed where the ventilation hole of the printer is blocked. (2) Print paper Check if : • A recommended type of the...

Service Manual
Page 72
When printing on the drum unit. Is the problem solved by replacing the scanner unit? Replace the toner cartridge. When using the printer for information about the location of the high-voltage contacts and grounding contacts. Are all the contacts (HV, GND) connected when the drum unit...area of the toner cartridge is used. Check if the toner sensor needs cleaning and check the toner sensor connection. Is the problem solved when 4 or 5 pages are printed after the toner cartridge is replaced with the drum unit removed? Replace the scanner unit. Result Yes Yes No No No Yes...
When printing on the drum unit. Is the problem solved by replacing the scanner unit? Replace the toner cartridge. When using the printer for information about the location of the high-voltage contacts and grounding contacts. Are all the contacts (HV, GND) connected when the drum unit...area of the toner cartridge is used. Check if the toner sensor needs cleaning and check the toner sensor connection. Is the problem solved when 4 or 5 pages are printed after the toner cartridge is replaced with the drum unit removed? Replace the scanner unit. Result Yes Yes No No No Yes...

Service Manual
Page 74
... in the connection? 5 Are printing signals being input to the scanner? Result Remedy Yes Clean the electrodes at both sides. No Check the connection between the printer body and drum unit dirty? 2 Are the drum shaft and drum electrode of the printer body connected correctly? 3 Is the problem solved after the main PCB...IV-7 Scanner mirror is replaced? 4 Is the scanner harness connected securely? Yes Replace the drum unit. Yes Clean the shaft and the electrode. Is the problem solved after the drum unit is broken or loose. Yes Replace the main PCB or the panel sensor PCB.
... in the connection? 5 Are printing signals being input to the scanner? Result Remedy Yes Clean the electrodes at both sides. No Check the connection between the printer body and drum unit dirty? 2 Are the drum shaft and drum electrode of the printer body connected correctly? 3 Is the problem solved after the main PCB...IV-7 Scanner mirror is replaced? 4 Is the scanner harness connected securely? Yes Replace the drum unit. Yes Clean the shaft and the electrode. Is the problem solved after the drum unit is broken or loose. Yes Replace the main PCB or the panel sensor PCB.

Service Manual
Page 76
Is the problem solved after the drum unit is on , then release the switch. (7) Print three patterns; Is any other area in the drum unit Step Check 1 Is the pressure roller dirty? grid, zip and solid black. (8) Turn off the ... the panel switch until the Ready lamp is on . (12) Press the panel switch again and release it immediately. (13) Print a page of paper Possible cause Fixing unit Dirt in the printer dirty? 2 Is the transfer roller dirty? I-5 Dirt on the back of test pattern while cleaning the pressure roller. IV-9 Result...
Is the problem solved after the drum unit is on , then release the switch. (7) Print three patterns; Is any other area in the drum unit Step Check 1 Is the pressure roller dirty? grid, zip and solid black. (8) Turn off the ... the panel switch until the Ready lamp is on . (12) Press the panel switch again and release it immediately. (13) Print a page of paper Possible cause Fixing unit Dirt in the printer dirty? 2 Is the transfer roller dirty? I-5 Dirt on the back of test pattern while cleaning the pressure roller. IV-9 Result...

Service Manual
Page 77
.... Are the horizontal stripes at 25mm (developer roller) intervals? 3 Are the horizontal streaks at 94mm (OPC drum) intervals? Note: If you print the same pattern continuously, the drum will be worn and black vertical streaks will disappear after the high-voltage power supply PCB is replaced? Yes...Scratch on the fixing roller High-voltage power supply PCB Step 1 2 Check Are the horizontal stripes at 63mm (heat roller) intervals? 4 Is the problem solved after a while. Yes Replace the drum unit. 5 Is the drum surface dirty with the wire cleaner. 2 Is the vertical block streak ...
.... Are the horizontal stripes at 25mm (developer roller) intervals? 3 Are the horizontal streaks at 94mm (OPC drum) intervals? Note: If you print the same pattern continuously, the drum will be worn and black vertical streaks will disappear after the high-voltage power supply PCB is replaced? Yes...Scratch on the fixing roller High-voltage power supply PCB Step 1 2 Check Are the horizontal stripes at 63mm (heat roller) intervals? 4 Is the problem solved after a while. Yes Replace the drum unit. 5 Is the drum surface dirty with the wire cleaner. 2 Is the vertical block streak ...

Service Manual
Page 79
Toner sensing failure 2 Is the problem solved by replacing the low-voltage power supply PCB? If the wiper in use paper of the recommended weight and thickness. I -11 Poor fixing Possible cause Printing paper Step 1 Check Is thick paper more than 42lb weight in the toner cartridge ... Is the thermistor fitted correctly? 4 Is the problem solved by replacing the drum unit or the toner cartridge? (When printing is defective, clean the toner sensor. Yes Replace the scanner unit. Is it coming loose? Is the laser diode or the laser scanner motor defective? 3 Is the scanner harness ...
Toner sensing failure 2 Is the problem solved by replacing the low-voltage power supply PCB? If the wiper in use paper of the recommended weight and thickness. I -11 Poor fixing Possible cause Printing paper Step 1 Check Is thick paper more than 42lb weight in the toner cartridge ... Is the thermistor fitted correctly? 4 Is the problem solved by replacing the drum unit or the toner cartridge? (When printing is defective, clean the toner sensor. Yes Replace the scanner unit. Is it coming loose? Is the laser diode or the laser scanner motor defective? 3 Is the scanner harness ...
Service Manual
Page 80
... print o Print out test print out test print out test Print out test print o Print out test print o Print out test print out test print out test Print out test print o Print out test print o Print out test print out test print out test Print out test print o Print out test print o Possible cause Printer not level Drum unit Scanner window dirty Scanner unit failure Step Check 1 Is the printer placed horizontally? 2 Does the problem...
... print o Print out test print out test print out test Print out test print o Print out test print o Print out test print out test print out test Print out test print o Print out test print o Print out test print out test print out test Print out test print o Print out test print o Possible cause Printer not level Drum unit Scanner window dirty Scanner unit failure Step Check 1 Is the printer placed horizontally? 2 Does the problem...

Service Manual
Page 81
Result Yes Yes Yes Remedy If toner remains stuck, wipe it off gently with alcohol. The problem is not solved after printing a few pages. Replace the high-voltage power supply PCB. Position of smudge on the drum 94mm interval Fig. 4-2 (2) Turn the drum gear by hand... Fixing unit High-voltage power supply PCB Step 1 2 3 Check Are the spots at 63mm intervals? The problem is not solved after printing a few pages. Note: Clean the drum unit as follows: (1) Place the printing samples in front of the process unit, and find the exact position of the OPC drum. Replace the...
Result Yes Yes Yes Remedy If toner remains stuck, wipe it off gently with alcohol. The problem is not solved after printing a few pages. Replace the high-voltage power supply PCB. Position of smudge on the drum 94mm interval Fig. 4-2 (2) Turn the drum gear by hand... Fixing unit High-voltage power supply PCB Step 1 2 3 Check Are the spots at 63mm intervals? The problem is not solved after printing a few pages. Note: Clean the drum unit as follows: (1) Place the printing samples in front of the process unit, and find the exact position of the OPC drum. Replace the...

Service Manual
Page 83
Drum unit 2 Is the problem solved after replacing the toner cartridge. I-18 Hollow print Possible cause Print paper Step 1 Check Is thick paper of more than A4 is printed. 4) Acid paper is being used. No Replace the high-voltage power supply PCB. No Refer and compare with I-14. Result Remedy ...a specified type of the paper. Yes Recommend to change the paper to a fresh pack paper. Note: The following cases increase the possibility of this problem. 1) The drum unit is at the end of its life. 2) There is dust or paper powder. 3) A large amount of paper whose width...
Drum unit 2 Is the problem solved after replacing the toner cartridge. I-18 Hollow print Possible cause Print paper Step 1 Check Is thick paper of more than A4 is printed. 4) Acid paper is being used. No Replace the high-voltage power supply PCB. No Refer and compare with I-14. Result Remedy ...a specified type of the paper. Yes Recommend to change the paper to a fresh pack paper. Note: The following cases increase the possibility of this problem. 1) The drum unit is at the end of its life. 2) There is dust or paper powder. 3) A large amount of paper whose width...

Service Manual
Page 85
... after replacing the high-voltage power supply PCB? IV-18 It is not possible to the normal mode from the driver setting. Is the problem solved after replacing the drum unit with a starter sheet in it. Result Yes Remedy Change the current mode to find the drum unit failure if ... the high-voltage power supply PCB. **Note: Make sure to use a new drum unit with one that does not contain a starter sheet**? Print 5 or 6 blank pages if this problem occurs. I -22 Ghost Possible cause Driver setting Step 1 Check Is thin paper such as 64g/m2 used drum unit which has already ejected...
... after replacing the high-voltage power supply PCB? IV-18 It is not possible to the normal mode from the driver setting. Is the problem solved after replacing the drum unit with a starter sheet in it. Result Yes Remedy Change the current mode to find the drum unit failure if ... the high-voltage power supply PCB. **Note: Make sure to use a new drum unit with one that does not contain a starter sheet**? Print 5 or 6 blank pages if this problem occurs. I -22 Ghost Possible cause Driver setting Step 1 Check Is thin paper such as 64g/m2 used drum unit which has already ejected...
Service Manual
Page 88
...hardware noise. Bug Cause Paper feed sensor or paper eject sensor is not turned off . (single printing) Same as above. 1. Paper feed sensor is not returning properly, and is turned on . Paper... not work properly and is not turned on . Bug Temp measure Remove the paper inside the printer. Check paper feed sensor motion referring to check the sensors (1) Open the cover. (2) Power on...of paper stopped at 20mm from the fixing unit. Note: How to note and clear the problem. Jam occurred after ejecting paper. Type of paper stopped at 250mm from the fixing unit. ...
...hardware noise. Bug Cause Paper feed sensor or paper eject sensor is not turned off . (single printing) Same as above. 1. Paper feed sensor is not returning properly, and is turned on . Paper... not work properly and is not turned on . Bug Temp measure Remove the paper inside the printer. Check paper feed sensor motion referring to check the sensors (1) Open the cover. (2) Power on...of paper stopped at 20mm from the fixing unit. Note: How to note and clear the problem. Jam occurred after ejecting paper. Type of paper stopped at 250mm from the fixing unit. ...

Service Manual
Page 90
... between pins 2 (SOLENOID) and 1 (24V) of the P3 connector on the control panel. Set paper in the manual paper slot and make a test print by using a circuit tester. Result No No Yes Yes Yes Remedy Reconnect the connector. Replace the paper pick-up roller stained or worn out? Clean... sub motor. Is the surface of the separation pad or the pick up solenoid. Is the problem solved by replacing the main PCB? P9-5 and P9-6 Approx.4.5 P9-7 and P9-8 Approx.4.5 Is the problem solved by replacing the main PCB? M-3 Main motor unrotated Possible cause Failure of connector Main motor...
... between pins 2 (SOLENOID) and 1 (24V) of the P3 connector on the control panel. Set paper in the manual paper slot and make a test print by using a circuit tester. Result No No Yes Yes Yes Remedy Reconnect the connector. Replace the paper pick-up roller stained or worn out? Clean... sub motor. Is the surface of the separation pad or the pick up solenoid. Is the problem solved by replacing the main PCB? P9-5 and P9-6 Approx.4.5 P9-7 and P9-8 Approx.4.5 Is the problem solved by replacing the main PCB? M-3 Main motor unrotated Possible cause Failure of connector Main motor...

Service Manual
Page 197
... errors and problems. To exit from the computer. The default time-out is restored to the ready status after printing.(HL- 1040/1050 only) Data Hex Dump The printer can print data as though the printer was turned off and it enters sleep mode. Follow these steps: 1. Alarm Print Config The printer prints the current configuration of the printer & Print Fonts...
... errors and problems. To exit from the computer. The default time-out is restored to the ready status after printing.(HL- 1040/1050 only) Data Hex Dump The printer can print data as though the printer was turned off and it enters sleep mode. Follow these steps: 1. Alarm Print Config The printer prints the current configuration of the printer & Print Fonts...
Service Manual
Page 206
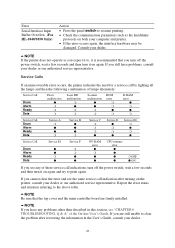
...reviewing the information in this section, see "CHAPTER 6 TROUBLESHOOTING, Q & A" of lamps alternately: Service Call Drum Alarm Ready Data Fuser Laser BD malfunction malfunction Scanner ROM malfunction error D-RAM error Service Call Drum Alarm Ready Data Service A Service B Service C Service D Service E0...see any problems other than described in the User's Guide, consult your dealer. - 32 - If you are firmly installed. Consult your computer and printer. Error Serial Interface Input Buffer Overflow (For HL-1040/1050 Only) Action Press the panel switch to resume printing. If ...
...reviewing the information in this section, see "CHAPTER 6 TROUBLESHOOTING, Q & A" of lamps alternately: Service Call Drum Alarm Ready Data Fuser Laser BD malfunction malfunction Scanner ROM malfunction error D-RAM error Service Call Drum Alarm Ready Data Service A Service B Service C Service D Service E0...see any problems other than described in the User's Guide, consult your dealer. - 32 - If you are firmly installed. Consult your computer and printer. Error Serial Interface Input Buffer Overflow (For HL-1040/1050 Only) Action Press the panel switch to resume printing. If ...

Service Manual
Page 230
...problems feeding from the multi-purpose sheet feeder, use long-grained paper for a special job (i.e. If you test paper, especially special sizes and types of paper and heavy paper, on paper specifications, consult your printer will be shortened with narrower width than A4/Letter continuously Using the printer for the best print... of name cards etc.) Cut Sheet We recommend you purchased your printer. We recommend you use recycled paper in laser printers. 2-2 Make sure to the printer drum unit. printing of drum unit might be damaged. You can use label or transparencies...
...problems feeding from the multi-purpose sheet feeder, use long-grained paper for a special job (i.e. If you test paper, especially special sizes and types of paper and heavy paper, on paper specifications, consult your printer will be shortened with narrower width than A4/Letter continuously Using the printer for the best print... of name cards etc.) Cut Sheet We recommend you purchased your printer. We recommend you use recycled paper in laser printers. 2-2 Make sure to the printer drum unit. printing of drum unit might be damaged. You can use label or transparencies...

Service Manual
Page 243
... to select another option and release the switch to turn on . The printer prints the current configuration of the printer and a list of the internal fonts. The printer returns to the ready status after printing. (HL-1040/1050 only) The printer can check data errors and problems. To exit from this mode, you have to execute the selected option...
... to select another option and release the switch to turn on . The printer prints the current configuration of the printer and a list of the internal fonts. The printer returns to the ready status after printing. (HL-1040/1050 only) The printer can check data errors and problems. To exit from this mode, you have to execute the selected option...

Service Manual
Page 271
... is recommended that you still have problems, consult your (For HL-1040/1050 Only) dealer. Note If the printer does not operate as the (For HL-1040/1050 Only) handshake protocols on again. Consult your computer and printer. Serial Interface Input Press the panel switch to , it to resume printing. Consult your dealer or our authorized...
... is recommended that you still have problems, consult your (For HL-1040/1050 Only) dealer. Note If the printer does not operate as the (For HL-1040/1050 Only) handshake protocols on again. Consult your computer and printer. Serial Interface Input Press the panel switch to , it to resume printing. Consult your dealer or our authorized...
Service Manual
Page 276
...print from my application software. Recommendation The printer may be cooling down to wake up with your application software. (For HL-1040/1050) If you have been removed. All of this manual. If the lamp is blinking, refer to the Operator Call section of the protective parts have encountered a problem... blinking. If you use the serial interface, make sure that the serial slide switch of the printer to correct the problem. Press the panel switch to lower the printers internal temperature. All lamps are installed properly. Check to see if the Ready lamp is blinking fast...
...print from my application software. Recommendation The printer may be cooling down to wake up with your application software. (For HL-1040/1050) If you have been removed. All of this manual. If the lamp is blinking, refer to the Operator Call section of the protective parts have encountered a problem... blinking. If you use the serial interface, make sure that the serial slide switch of the printer to correct the problem. Press the panel switch to lower the printers internal temperature. All lamps are installed properly. Check to see if the Ready lamp is blinking fast...

Service Manual
Page 282
... together right now, over me . Come AAA Clean the printer interior and the primary corona wire of the corona wire is on after cleaning, replace the drum unit with a new one . Fig. 6-8 Dark Stripes or Toner Stains Printed pages have the same problem and the Drum lamp is at the end of its... together right now, over me . One thing I can tell you is you go to be free. Here come Flat-top ,he come . If the same print problem occurs and the Drum lamp is still on , replace the drum unit with a new one . Here come Flat-top ,he come . Here come Flat-top...
... together right now, over me . Come AAA Clean the printer interior and the primary corona wire of the corona wire is on after cleaning, replace the drum unit with a new one . Fig. 6-8 Dark Stripes or Toner Stains Printed pages have the same problem and the Drum lamp is at the end of its... together right now, over me . One thing I can tell you is you go to be free. Here come Flat-top ,he come . If the same print problem occurs and the Drum lamp is still on , replace the drum unit with a new one . Here come Flat-top ,he come . Here come Flat-top...


