Users Manual - English
Page 17
... 4-4 Paper orientation for printing on both sides of the paper 4-5 Mailbox unit 4-6 Network option NC-4100h (For HL-7050 only 4-8 Installing the Network board 4-8 CompactFlash card 4-11 Installing the CompactFlash card 4-12 RAM expansion 4-13 ...4-22 Optional barcode fonts package (BT-1000 4-22 Routine maintenance 5-1 Replacing the consumables 5-1 Toner cartridge 5-2 TONER LOW Message 5-2 (Appears at intervals 5-2 TONER LIFE END message 5-2 Replacing the toner cartridge 5-3 Drum unit 5-6 CHANGE DRUM SOON message 5-6 Replacing the drum unit 5-6 Replacing Maintenance Parts...
... 4-4 Paper orientation for printing on both sides of the paper 4-5 Mailbox unit 4-6 Network option NC-4100h (For HL-7050 only 4-8 Installing the Network board 4-8 CompactFlash card 4-11 Installing the CompactFlash card 4-12 RAM expansion 4-13 ...4-22 Optional barcode fonts package (BT-1000 4-22 Routine maintenance 5-1 Replacing the consumables 5-1 Toner cartridge 5-2 TONER LOW Message 5-2 (Appears at intervals 5-2 TONER LIFE END message 5-2 Replacing the toner cartridge 5-3 Drum unit 5-6 CHANGE DRUM SOON message 5-6 Replacing the drum unit 5-6 Replacing Maintenance Parts...
Users Manual - English
Page 20
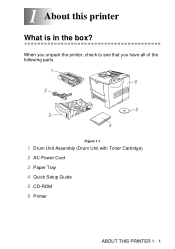
When you unpack the printer, check to see that you have all of the following parts. 1 6 2 5 3 4 Figure 1-1 1 Drum Unit Assembly (Drum Unit with Toner Cartridge) 2 AC Power Cord 3 Paper Tray 4 Quick Setup Guide 5 CD-ROM 6 Printer ABOUT THIS PRINTER 1 - 1 1 About this printer 1 What is in the box?
When you unpack the printer, check to see that you have all of the following parts. 1 6 2 5 3 4 Figure 1-1 1 Drum Unit Assembly (Drum Unit with Toner Cartridge) 2 AC Power Cord 3 Paper Tray 4 Quick Setup Guide 5 CD-ROM 6 Printer ABOUT THIS PRINTER 1 - 1 1 About this printer 1 What is in the box?
Users Manual - English
Page 150
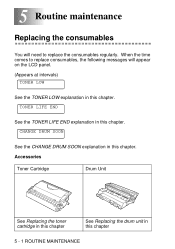
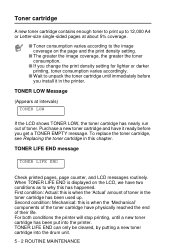
Accessories Toner Cartridge Drum Unit See Replacing the toner cartridge in this chapter See Replacing the drum unit in this chapter. TONER LIFE END See the TONER LIFE END explanation in this chapter 5 - 1 ROUTINE MAINTENANCE When the time comes to replace the consumables regularly. 5 Routine maintenance 5 Replacing the consumables You will need to replace consumables, the following messages will appear on the LCD panel. (Appears at intervals) TONER LOW See the TONER LOW explanation in this chapter. CHANGE DRUM SOON See the CHANGE DRUM SOON explanation in this chapter.
Accessories Toner Cartridge Drum Unit See Replacing the toner cartridge in this chapter See Replacing the drum unit in this chapter. TONER LIFE END See the TONER LIFE END explanation in this chapter 5 - 1 ROUTINE MAINTENANCE When the time comes to replace the consumables regularly. 5 Routine maintenance 5 Replacing the consumables You will need to replace consumables, the following messages will appear on the LCD panel. (Appears at intervals) TONER LOW See the TONER LOW explanation in this chapter. CHANGE DRUM SOON See the CHANGE DRUM SOON explanation in this chapter.
Users Manual - English
Page 151
... ■ The greater the image coverage, the greater the toner consumption. ■ If you change the print density setting for lighter or darker printing, toner consumption varies accordingly. ■ Wait to unpack the toner cartridge until a new toner cartridge has been put into the drum unit. 5 - 2 ...TONER LOW If the LCD shows TONER LOW, the toner cartridge has nearly run out of their life. TONER LIFE END can only be cleared, by putting a new toner cartridge into the printer. When TONER LIFE END is when the 'Actual' amount of toner in the printer. TONER LIFE END message TONER...
... ■ The greater the image coverage, the greater the toner consumption. ■ If you change the print density setting for lighter or darker printing, toner consumption varies accordingly. ■ Wait to unpack the toner cartridge until a new toner cartridge has been put into the drum unit. 5 - 2 ...TONER LOW If the LCD shows TONER LOW, the toner cartridge has nearly run out of their life. TONER LIFE END can only be cleared, by putting a new toner cartridge into the printer. When TONER LIFE END is when the 'Actual' amount of toner in the printer. TONER LIFE END message TONER...

Users Manual - English
Page 152
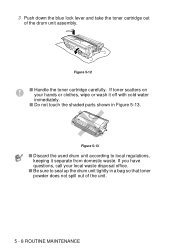
When you want to buy toner cartridges, call the dealer you use quality toner cartridges. If toner scatters on your hands or clothes, immediately wipe or wash it off with cold water. ■ Do not touch the shaded parts shown in Figure 5-3 and Figure 5-4. Figure 5-1 2 Push down the blue lock lever and take out the toner cartridge. Figure 5-2 ■ Handle the toner cartridge carefully. Figure 5-3 Figure 5-4 ROUTINE MAINTENANCE 5 - 3 Replacing the toner cartridge To make sure you get high quality print, make sure you bought the printer from. 1 Open the top cover of the printer.
When you want to buy toner cartridges, call the dealer you use quality toner cartridges. If toner scatters on your hands or clothes, immediately wipe or wash it off with cold water. ■ Do not touch the shaded parts shown in Figure 5-3 and Figure 5-4. Figure 5-1 2 Push down the blue lock lever and take out the toner cartridge. Figure 5-2 ■ Handle the toner cartridge carefully. Figure 5-3 Figure 5-4 ROUTINE MAINTENANCE 5 - 3 Replacing the toner cartridge To make sure you get high quality print, make sure you bought the printer from. 1 Open the top cover of the printer.

Users Manual - English
Page 153
Hold the cartridge level with both hands and gently rock it from side to side several times to local regulations, keeping it separate from domestic waste. Figure 5-5 4 Pull ... 5-7. Figure 5-6 ■ Put the toner cartridge in the printer immediately after you have questions, call your local waste disposal office. 3 Unpack the new toner cartridge. Figure 5-7 5 - 4 ROUTINE MAINTENANCE ■ Be sure to seal the toner cartridge tightly so toner powder does not spill out of the cartridge. ■ Discard the used toner according to spread the toner evenly inside the...
Hold the cartridge level with both hands and gently rock it from side to side several times to local regulations, keeping it separate from domestic waste. Figure 5-5 4 Pull ... 5-7. Figure 5-6 ■ Put the toner cartridge in the printer immediately after you have questions, call your local waste disposal office. 3 Unpack the new toner cartridge. Figure 5-7 5 - 4 ROUTINE MAINTENANCE ■ Be sure to seal the toner cartridge tightly so toner powder does not spill out of the cartridge. ■ Discard the used toner according to spread the toner evenly inside the...
Users Manual - English
Page 154
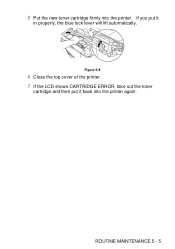
ROUTINE MAINTENANCE 5 - 5 Figure 5-8 6 Close the top cover of the printer. 7 If the LCD shows CARTRIDGE ERROR, take out the toner cartridge and then put it back into the printer. 5 Put the new toner cartridge firmly into the printer again. If you put it in properly, the blue lock lever will lift automatically.
ROUTINE MAINTENANCE 5 - 5 Figure 5-8 6 Close the top cover of the printer. 7 If the LCD shows CARTRIDGE ERROR, take out the toner cartridge and then put it back into the printer. 5 Put the new toner cartridge firmly into the printer again. If you put it in properly, the blue lock lever will lift automatically.
Users Manual - English
Page 156
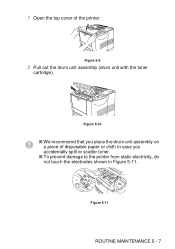
Figure 5-10 ■ We recommend that you place the drum unit assembly on a piece of the printer. Figure 5-11 ROUTINE MAINTENANCE 5 - 7 Figure 5-9 2 Pull out the drum unit assembly (drum unit with the toner cartridge). 1 Open the top cover of disposable paper or cloth in case you accidentally spill or scatter toner. ■ To prevent damage to the printer from static electricity, do not touch the electrodes shown in Figure 5-11.
Figure 5-10 ■ We recommend that you place the drum unit assembly on a piece of the printer. Figure 5-11 ROUTINE MAINTENANCE 5 - 7 Figure 5-9 2 Pull out the drum unit assembly (drum unit with the toner cartridge). 1 Open the top cover of disposable paper or cloth in case you accidentally spill or scatter toner. ■ To prevent damage to the printer from static electricity, do not touch the electrodes shown in Figure 5-11.
Users Manual - English
Page 157
... off with cold water immediately. ■ Do not touch the shaded parts shown in a bag so that toner powder does not spill out of the drum unit assembly. Figure 5-12 ■ Handle the toner cartridge carefully. If you have questions, call your hands or clothes, wipe or wash it separate from domestic waste...
... off with cold water immediately. ■ Do not touch the shaded parts shown in a bag so that toner powder does not spill out of the drum unit assembly. Figure 5-12 ■ Handle the toner cartridge carefully. If you have questions, call your hands or clothes, wipe or wash it separate from domestic waste...

Users Manual - English
Page 158
Exposure to unpack a drum unit until immediately before you put the cartridge in Figure 5-14. If you put it may damage the drum unit. ■ Do not touch the shaded parts shown in properly, the blue lock lever is lifted automatically. Figure 5-15 ■ Make sure you install the toner cartridge properly, or it in the new drum unit. 4 Unpack the new drum unit. ■ Wait to direct sunlight or room light may separate from the drum when you pick up the drum unit. Figure 5-14 5 Put the toner cartridge in the printer. ROUTINE MAINTENANCE 5 - 9
Exposure to unpack a drum unit until immediately before you put the cartridge in Figure 5-14. If you put it may damage the drum unit. ■ Do not touch the shaded parts shown in properly, the blue lock lever is lifted automatically. Figure 5-15 ■ Make sure you install the toner cartridge properly, or it in the new drum unit. 4 Unpack the new drum unit. ■ Wait to direct sunlight or room light may separate from the drum when you pick up the drum unit. Figure 5-14 5 Put the toner cartridge in the printer. ROUTINE MAINTENANCE 5 - 9

Users Manual - English
Page 159
Figure 5-16 ■ We recommend that you clean the inside of the printer when you replace only the toner cartridge, do not reset the page counter. 8 Close the top cover of the printer. 5 - 10 ROUTINE MAINTENANCE 6 Put the drum unit assembly in this chapter. 7 Reset the page counter following the instructions we have supplied with the new drum unit. ■ If you replace the drum unit. See Cleaning in the printer.
Figure 5-16 ■ We recommend that you clean the inside of the printer when you replace only the toner cartridge, do not reset the page counter. 8 Close the top cover of the printer. 5 - 10 ROUTINE MAINTENANCE 6 Put the drum unit assembly in this chapter. 7 Reset the page counter following the instructions we have supplied with the new drum unit. ■ If you replace the drum unit. See Cleaning in the printer.
Users Manual - English
Page 166
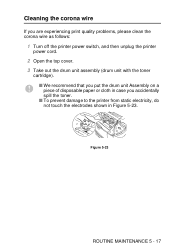
Figure 5-23 ROUTINE MAINTENANCE 5 - 17 Cleaning the corona wire If you are experiencing print quality problems, please clean the corona wire as follows: 1 Turn off the printer power switch, and then unplug the printer power cord. 2 Open the top cover. 3 Take out the drum unit assembly (drum unit with the toner cartridge). ■ We recommend that you put the drum unit Assembly on a piece of disposable paper or cloth in case you accidentally spill the toner. ■ To prevent damage to the printer from static electricity, do not touch the electrodes shown in Figure 5-23.
Figure 5-23 ROUTINE MAINTENANCE 5 - 17 Cleaning the corona wire If you are experiencing print quality problems, please clean the corona wire as follows: 1 Turn off the printer power switch, and then unplug the printer power cord. 2 Open the top cover. 3 Take out the drum unit assembly (drum unit with the toner cartridge). ■ We recommend that you put the drum unit Assembly on a piece of disposable paper or cloth in case you accidentally spill the toner. ■ To prevent damage to the printer from static electricity, do not touch the electrodes shown in Figure 5-23.
Users Manual - English
Page 169
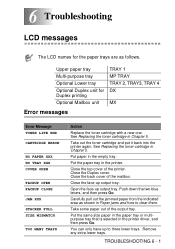
... 4 DX MX Error messages Error Message TONER LIFE END CARTRIDGE ERROR NO PAPER XXX NO TRAY XXX COVER OPEN FACEUP OPEN FACEUP CLOSE JAM XXX STACKER FULL SIZE MISMATCH TOO MANY TRAYS Action Replace the toner cartridge with a new one. See Replacing the toner cartridge in Paper jams and how to three ...lower trays. Take out the toner cartridge and put it back into the printer again. Take some paper out of the...
... 4 DX MX Error messages Error Message TONER LIFE END CARTRIDGE ERROR NO PAPER XXX NO TRAY XXX COVER OPEN FACEUP OPEN FACEUP CLOSE JAM XXX STACKER FULL SIZE MISMATCH TOO MANY TRAYS Action Replace the toner cartridge with a new one. See Replacing the toner cartridge in Paper jams and how to three ...lower trays. Take out the toner cartridge and put it back into the printer again. Take some paper out of the...
Users Manual - English
Page 172
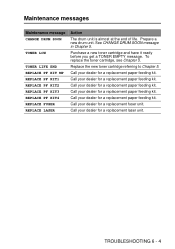
... your dealer for a replacement fuser unit. Call your dealer for a replacement paper feeding kit. Call your dealer for a replacement paper feeding kit. To replace the toner cartridge, see Chapter 5. See CHANGE DRUM SOON message in Chapter 5. Call your dealer for a replacement paper feeding kit. Maintenance messages Maintenance message CHANGE DRUM SOON...of life. TROUBLESHOOTING 6 - 4 Call your dealer for a replacement paper feeding kit. Call your dealer for a replacement laser unit. Prepare a new drum unit. Replace the new toner cartridge referring to Chapter 5.
... your dealer for a replacement fuser unit. Call your dealer for a replacement paper feeding kit. Call your dealer for a replacement paper feeding kit. To replace the toner cartridge, see Chapter 5. See CHANGE DRUM SOON message in Chapter 5. Call your dealer for a replacement paper feeding kit. Maintenance messages Maintenance message CHANGE DRUM SOON...of life. TROUBLESHOOTING 6 - 4 Call your dealer for a replacement paper feeding kit. Call your dealer for a replacement laser unit. Prepare a new drum unit. Replace the new toner cartridge referring to Chapter 5.

Users Manual - English
Page 182
...on them before you restart the print job. ■ Remove the jammed paper carefully so you do not spread toner. ■ Take care not to stain your hands and clothes with toner. Inside the printer Open the face-up output tray Figure 6-7 ■ After you have just used the printer... parts inside the printer, follow these steps: 1 Open the top cover of the printer, never touch the fuser or the fixing roller. Wash toner stains immediately with the toner cartridge). JAM B (paper jam inside the printer) JAM B If a paper jam occurs inside the printer are extremely hot. ■ When you ...
...on them before you restart the print job. ■ Remove the jammed paper carefully so you do not spread toner. ■ Take care not to stain your hands and clothes with toner. Inside the printer Open the face-up output tray Figure 6-7 ■ After you have just used the printer... parts inside the printer, follow these steps: 1 Open the top cover of the printer, never touch the fuser or the fixing roller. Wash toner stains immediately with the toner cartridge). JAM B (paper jam inside the printer) JAM B If a paper jam occurs inside the printer are extremely hot. ■ When you ...
Users Manual - English
Page 183
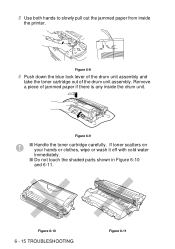
3 Use both hands to slowly pull out the jammed paper from inside the drum unit. Figure 6-9 ■ Handle the toner cartridge carefully. If toner scatters on your hands or clothes, wipe or wash it off with cold water immediately. ■ Do not touch the shaded parts shown in Figure 6-10 and 6-11. Figure 6-10 6 - 15 TROUBLESHOOTING Figure 6-11 Figure 6-8 4 Push down the blue lock lever of the drum unit assembly and take the toner cartridge out of jammed paper if there is any inside the printer. Remove a piece of the drum unit assembly.
3 Use both hands to slowly pull out the jammed paper from inside the drum unit. Figure 6-9 ■ Handle the toner cartridge carefully. If toner scatters on your hands or clothes, wipe or wash it off with cold water immediately. ■ Do not touch the shaded parts shown in Figure 6-10 and 6-11. Figure 6-10 6 - 15 TROUBLESHOOTING Figure 6-11 Figure 6-8 4 Push down the blue lock lever of the drum unit assembly and take the toner cartridge out of jammed paper if there is any inside the printer. Remove a piece of the drum unit assembly.
Users Manual - English
Page 191
...drum unit. See What kind of paper can increase the amount of paper can I use ? in a new drum unit. See Replacing the toner cartridge in Chapter 5. ■ Make sure that you use paper that meets our specifications. See Replacing the drum unit in Chapter 5. ■ ... soft cloth. Put in Chapter 1. ■ Check the printer's environment - See Positioning the printer in Chapter 5. ■ Try using a new toner cartridge. high temperatures and high humidity can I use ? See What kind of background shading. See Cleaning the inside of paper can I use ? See What...
...drum unit. See What kind of paper can increase the amount of paper can I use ? in a new drum unit. See Replacing the toner cartridge in Chapter 5. ■ Make sure that you use paper that meets our specifications. See Replacing the drum unit in Chapter 5. ■ ... soft cloth. Put in Chapter 1. ■ Check the printer's environment - See Positioning the printer in Chapter 5. ■ Try using a new toner cartridge. high temperatures and high humidity can I use ? See What kind of background shading. See Cleaning the inside of paper can I use ? See What...

Users Manual - English
Page 193
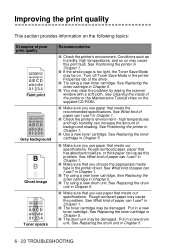
... print the cleaning page again. Black spots Black spots at 108 mm (4.25 in Chapter 5. ■ Print the cleaning page. Put in .) ■ The toner cartridge may clear the problem by cleaning the primary corona wire inside the drum unit by sliding the blue tab. Make sure to return the blue...; The drum unit may clear the problem by cleaning the primary corona wire inside the drum unit by sliding the blue tab. See Replacing the toner cartridge in Chapter 5. See Replacing the drum unit in Chapter 5. ■ You may be damaged. To print these two sheets, use the control panel ...
... print the cleaning page again. Black spots Black spots at 108 mm (4.25 in Chapter 5. ■ Print the cleaning page. Put in .) ■ The toner cartridge may clear the problem by cleaning the primary corona wire inside the drum unit by sliding the blue tab. Make sure to return the blue...; The drum unit may clear the problem by cleaning the primary corona wire inside the drum unit by sliding the blue tab. See Replacing the toner cartridge in Chapter 5. See Replacing the drum unit in Chapter 5. ■ You may be damaged. To print these two sheets, use the control panel ...

Users Manual - English
Page 252
... 3-6 Reset menu 3-33 S SB-4000 4-2 scalable font A-10 secure data 3-9 Set button 3-2, 3-13 Setup menu 3-25, 3-38 small pad 4-2, 4-3 Sorter 4-7 Stabilizer 4-2 Stacker 4-7 T TCP/IP 3-31 toner cartridge 5-1, 5-2 top cover 1-6 tray 1 1-6 INDEX I - 2
... 3-6 Reset menu 3-33 S SB-4000 4-2 scalable font A-10 secure data 3-9 Set button 3-2, 3-13 Setup menu 3-25, 3-38 small pad 4-2, 4-3 Sorter 4-7 Stabilizer 4-2 Stacker 4-7 T TCP/IP 3-31 toner cartridge 5-1, 5-2 top cover 1-6 tray 1 1-6 INDEX I - 2

Quick Setup Guide - English
Page 6
...-ROM (including User's Guide) Quick Setup Guide 5 1 Control Panel 2 Extension Flap 3 Top cover 4 Multi-purpose Tray 5 Paper Tray Drum Unit Assembly AC Power Cord (including Toner Cartridge) Carton components may differ from the control panel menu. See Chapter 3 in the printer buffer. Reprint setting or clear error messages. Back Go back one...
...-ROM (including User's Guide) Quick Setup Guide 5 1 Control Panel 2 Extension Flap 3 Top cover 4 Multi-purpose Tray 5 Paper Tray Drum Unit Assembly AC Power Cord (including Toner Cartridge) Carton components may differ from the control panel menu. See Chapter 3 in the printer buffer. Reprint setting or clear error messages. Back Go back one...


