
Quick Setup Guide - English
Page 3
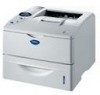
... not handle the plug or AC power cord with a caution label. Inside the printer (Front View) Open the Back Output Tray (Back View) The fuser unit is on the CD-ROM we have just used the printer, some internal parts of the printer, never touch the shaded parts shown in the illustration. User's Guide Network...
... not handle the plug or AC power cord with a caution label. Inside the printer (Front View) Open the Back Output Tray (Back View) The fuser unit is on the CD-ROM we have just used the printer, some internal parts of the printer, never touch the shaded parts shown in the illustration. User's Guide Network...

Users Manual - English
Page 3
... handle the plug with volatile liquids such as thinner or benzene will damage the surface of the printer, never touch the shaded parts shown in the illustrations below. They will be extremely hot. The fuser unit is marked with a caution label. Please do NOT remove or damage the label. When you ...an electrical shock. Before you clean the printer, clear a paper jam or replace parts, make sure you have just used ...
... handle the plug with volatile liquids such as thinner or benzene will damage the surface of the printer, never touch the shaded parts shown in the illustrations below. They will be extremely hot. The fuser unit is marked with a caution label. Please do NOT remove or damage the label. When you ...an electrical shock. Before you clean the printer, clear a paper jam or replace parts, make sure you have just used ...
Users Manual - English
Page 85
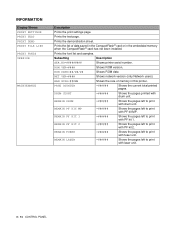
... date. REMAIN DRUM =###### Shows the pages left to print with fuser unit. REMAIN FUSER =###### Shows the pages left to print with drum unit. INFORMATION ...Prints the demonstration sheet. REMAIN PF KIT MP =###### Shows the pages left to print with laser unit. 3 - 14 CONTROL PANEL REMAIN LASER =###### Shows the pages left to print with PF kit MP. ROM VER=#### Shows ROM ...unit. RAM SIZE=###MB Shows the size of data saved in the CompactFlash® card or in this printer. REMAIN PF KIT 2 =###### Shows the pages left to print with PF kit 2. NET VER=#### ...
... date. REMAIN DRUM =###### Shows the pages left to print with fuser unit. REMAIN FUSER =###### Shows the pages left to print with drum unit. INFORMATION ...Prints the demonstration sheet. REMAIN PF KIT MP =###### Shows the pages left to print with laser unit. 3 - 14 CONTROL PANEL REMAIN LASER =###### Shows the pages left to print with PF kit MP. ROM VER=#### Shows ROM ...unit. RAM SIZE=###MB Shows the size of data saved in the CompactFlash® card or in this printer. REMAIN PF KIT 2 =###### Shows the pages left to print with PF kit 2. NET VER=#### ...

Users Manual - English
Page 128
... KIT 1 REPLACE PF KIT 2 REPLACE FUSER REPLACE LASER See Maintenance Messages below. When it is time to maintain print quality. ROUTINE MAINTENANCE 5 - 13 Maintenance Messages LCD Message REPLACE PF KITMP REPLACE PF KIT 1 REPLACE PF KIT 2 REPLACE FUSER REPLACE LASER Item Paper feeding kit for MP tray ...*1 Paper feeding kit for Tray 1 *2 Paper feeding kit for Tray 2 *2 Fuser unit Scanner unit Approximate Life 100,000 pages *3 100,000 pages *3 100,000 ...
... KIT 1 REPLACE PF KIT 2 REPLACE FUSER REPLACE LASER See Maintenance Messages below. When it is time to maintain print quality. ROUTINE MAINTENANCE 5 - 13 Maintenance Messages LCD Message REPLACE PF KITMP REPLACE PF KIT 1 REPLACE PF KIT 2 REPLACE FUSER REPLACE LASER Item Paper feeding kit for MP tray ...*1 Paper feeding kit for Tray 1 *2 Paper feeding kit for Tray 2 *2 Fuser unit Scanner unit Approximate Life 100,000 pages *3 100,000 pages *3 100,000 ...

Users Manual - English
Page 130
... the clothes in cold water to avoid stains. ■ Be careful not to inhale the toner. ■ After you open the front cover of the printer, never touch the fuser and fixing roller. Figure 5-24 3 Take out the drum unit assembly (drum unit with the toner cartridge). Cleaning the inside of the...
... the clothes in cold water to avoid stains. ■ Be careful not to inhale the toner. ■ After you open the front cover of the printer, never touch the fuser and fixing roller. Figure 5-24 3 Take out the drum unit assembly (drum unit with the toner cartridge). Cleaning the inside of the...
Users Manual - English
Page 133
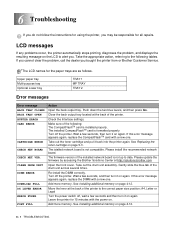
... may be responsible for the paper trays are as follows. Take the appropriate action, referring to alert you bought the printer from or Brother Customer Service. Please install the recommended network board. See Installing additional memory on again. A4, Letter or Legal Turn the power switch off,...of the printer. Leave the printer for 15 minutes with the power on again. See Installing additional memory on the LCD to the following : The CompactFlashTM card is not compatible. The LCD names for all repairs. CLEAN DRUM UNIT DIMM ERROR DOWNLOAD FULL DX LEVER ERROR ERROR FUSER FONT FULL...
... may be responsible for the paper trays are as follows. Take the appropriate action, referring to alert you bought the printer from or Brother Customer Service. Please install the recommended network board. See Installing additional memory on again. A4, Letter or Legal Turn the power switch off,...of the printer. Leave the printer for 15 minutes with the power on again. See Installing additional memory on the LCD to the following : The CompactFlashTM card is not compatible. The LCD names for all repairs. CLEAN DRUM UNIT DIMM ERROR DOWNLOAD FULL DX LEVER ERROR ERROR FUSER FONT FULL...
Users Manual - English
Page 134
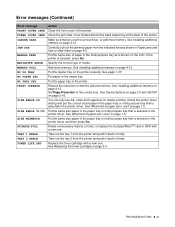
.... TROUBLESHOOTING 6 - 2 See What kind of paper can only use ? Put the same size paper in the printer driver, and then press Go. Error messages (Continued) Error message FRONT COVER OPEN FUSER COVER OPEN IGNORE DATA JAM XXX MANUAL FEED MEDIATYPE ERROR MEMORY FULL NO DX TRAY NO PAPER XXX NO TRAY XXX... PRINT OVERRUN SIZE ERROR DX SIZE ERROR T1/T2 SIZE MISMATCH STORAGE FULL TRAY 1 ERROR TRAY 2 ERROR TONER LIFE END Action Close the front cover of the printer. Carefully...
.... TROUBLESHOOTING 6 - 2 See What kind of paper can only use ? Put the same size paper in the printer driver, and then press Go. Error messages (Continued) Error message FRONT COVER OPEN FUSER COVER OPEN IGNORE DATA JAM XXX MANUAL FEED MEDIATYPE ERROR MEMORY FULL NO DX TRAY NO PAPER XXX NO TRAY XXX... PRINT OVERRUN SIZE ERROR DX SIZE ERROR T1/T2 SIZE MISMATCH STORAGE FULL TRAY 1 ERROR TRAY 2 ERROR TONER LIFE END Action Close the front cover of the printer. Carefully...
Users Manual - English
Page 135
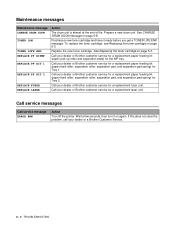
...replacement paper feeding kit (paper pick up roller and separation plate) for Tray 2. Call service messages Call service message ERROR ### Action Turn off the printer. See CHANGE DRUM SOON message on page 5-3. To replace the toner cartridge, see Replacing the toner cartridge on page 5-8. If this does not ...SOON TONER LOW TONER LIFE END REPLACE PF KITMP REPLACE PF KIT 1 REPLACE PF KIT 2 REPLACE FUSER REPLACE LASER Action The drum unit is almost at the end of life. Call your dealer or Brother customer service for Tray 1. Wait a few seconds, then turn it ready before you get a TONER...
...replacement paper feeding kit (paper pick up roller and separation plate) for Tray 2. Call service messages Call service message ERROR ### Action Turn off the printer. See CHANGE DRUM SOON message on page 5-3. To replace the toner cartridge, see Replacing the toner cartridge on page 5-8. If this does not ...SOON TONER LOW TONER LIFE END REPLACE PF KITMP REPLACE PF KIT 1 REPLACE PF KIT 2 REPLACE FUSER REPLACE LASER Action The drum unit is almost at the end of life. Call your dealer or Brother customer service for Tray 1. Wait a few seconds, then turn it ready before you get a TONER...
Users Manual - English
Page 141
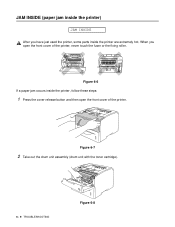
Figure 6-7 2 Take out the drum unit assembly (drum unit with the toner cartridge). 6 - 9 TROUBLESHOOTING Figure 6-8 When you have just used the printer, some parts inside the printer, follow these steps: 1 Press the cover release button and then open the front cover of the printer. Figure 6-6 If a paper jam occurs inside the printer are extremely hot. JAM INSIDE (paper jam inside the printer) JAM INSIDE After you open the front cover of the printer, never touch the fuser or the fixing roller.
Figure 6-7 2 Take out the drum unit assembly (drum unit with the toner cartridge). 6 - 9 TROUBLESHOOTING Figure 6-8 When you have just used the printer, some parts inside the printer, follow these steps: 1 Press the cover release button and then open the front cover of the printer. Figure 6-6 If a paper jam occurs inside the printer are extremely hot. JAM INSIDE (paper jam inside the printer) JAM INSIDE After you open the front cover of the printer, never touch the fuser or the fixing roller.
Users Manual - English
Page 144
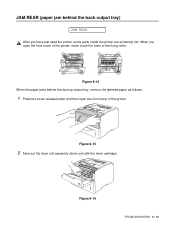
Figure 6-15 2 Take out the drum unit assembly (drum unit with the toner cartridge). When you have just used the printer, some parts inside the printer are extremely hot. JAM REAR (paper jam behind the face-up output tray, remove the jammed paper as follows: 1 Press the cover release button and then open the front cover of the printer. Figure 6-16 TROUBLESHOOTING 6 - 12 Figure 6-14 When the paper jams behind the back output tray) JAM REAR After you open the front cover of the printer, never touch the fuser or the fixing roller.
Figure 6-15 2 Take out the drum unit assembly (drum unit with the toner cartridge). When you have just used the printer, some parts inside the printer are extremely hot. JAM REAR (paper jam behind the face-up output tray, remove the jammed paper as follows: 1 Press the cover release button and then open the front cover of the printer. Figure 6-16 TROUBLESHOOTING 6 - 12 Figure 6-14 When the paper jams behind the back output tray) JAM REAR After you open the front cover of the printer, never touch the fuser or the fixing roller.

Users Manual - English
Page 146
Pull the jammed paper out of the printer. Jam clear cover Figure 6-21 7 Close the jam clear cover. 8 Close the back output tray. 9 Put the drum unit assembly back in the printer (press firmly). 10 Close the front cover of the fuser unit. Figure 6-20 6 Open the jam clear cover by pushing the levers inward at the left and right hand sides. TROUBLESHOOTING 6 - 14 5 Push down the blue tabs at the left and right hand sides.
Pull the jammed paper out of the printer. Jam clear cover Figure 6-21 7 Close the jam clear cover. 8 Close the back output tray. 9 Put the drum unit assembly back in the printer (press firmly). 10 Close the front cover of the fuser unit. Figure 6-20 6 Open the jam clear cover by pushing the levers inward at the left and right hand sides. TROUBLESHOOTING 6 - 14 5 Push down the blue tabs at the left and right hand sides.

Users Manual - English
Page 147
If the paper jam cannot be cleared, go to slowly pull the jammed paper out of the fuser unit. Figure 6-22 2 Use both hands to the next step. 6 - 15 TROUBLESHOOTING Figure 6-23 3 Close the back output tray. JAM DUPLEX (paper jam in the duplex unit) JAM DUPLEX Follow the instructions below to clear a paper jam: 1 Open the back output tray.
If the paper jam cannot be cleared, go to slowly pull the jammed paper out of the fuser unit. Figure 6-22 2 Use both hands to the next step. 6 - 15 TROUBLESHOOTING Figure 6-23 3 Close the back output tray. JAM DUPLEX (paper jam in the duplex unit) JAM DUPLEX Follow the instructions below to clear a paper jam: 1 Open the back output tray.

Users Manual - English
Page 149
If the same problem occurs again, call your dealer or Brother Customer Service. Turn off Toner Save Mode in the printer Properties tab of the driver. ■ Put in the printer driver. See Replacing the toner cartridge on page 5-8. See Replacing the drum unit on page 5-3. ■ Use a ...in a new drum unit. See Cleaning the inside of paper can cause this print fault. See Replacing the toner cartridge on page 5-8. ■ The fuser unit may be contaminated. on page 1-4. ■ Use a new toner cartridge. Put in a new toner cartridge. See Replacing the drum unit on ...
If the same problem occurs again, call your dealer or Brother Customer Service. Turn off Toner Save Mode in the printer Properties tab of the driver. ■ Put in the printer driver. See Replacing the toner cartridge on page 5-8. See Replacing the drum unit on page 5-3. ■ Use a ...in a new drum unit. See Cleaning the inside of paper can cause this print fault. See Replacing the toner cartridge on page 5-8. ■ The fuser unit may be contaminated. on page 1-4. ■ Use a new toner cartridge. Put in a new toner cartridge. See Replacing the drum unit on ...

Users Manual - English
Page 151
... on page 5-14. ■ The drum unit may clear the problem by printing a black page. See Replacing the drum unit on page 5-8. ■ The fuser unit may be damaged. Put in a new toner cartridge. See Replacing the drum unit on page 5-8. ■ You may be smudged. Make sure you return... Lines across the page ABCDEFGH abcdefghijk ABCD abcde 01234 White lines down the page. ■ You may be damaged. See Cleaning the inside of the printer on page 5-15 or the Maintenance Tutorial video on page 5-3. ■ The drum unit may be smudged. Black spots Black spots at 108 mm ...
... on page 5-14. ■ The drum unit may clear the problem by printing a black page. See Replacing the drum unit on page 5-8. ■ The fuser unit may be damaged. Put in a new toner cartridge. See Replacing the drum unit on page 5-8. ■ You may be smudged. Make sure you return... Lines across the page ABCDEFGH abcdefghijk ABCD abcde 01234 White lines down the page. ■ You may be damaged. See Cleaning the inside of the printer on page 5-15 or the Maintenance Tutorial video on page 5-3. ■ The drum unit may be smudged. Black spots Black spots at 108 mm ...


