User's Guide - English
Page 5
... the machine ...116 Cleaning the outside of the machine 116 Cleaning the corona wire...118 Cleaning the drum unit ...120 Cleaning the paper pick-up roller...125 Packing and shipping the machine ...126 6 Troubleshooting 129 Identifying your problem ...129 Error and maintenance messages...130 Paper jams ...134 If you are having...
... the machine ...116 Cleaning the outside of the machine 116 Cleaning the corona wire...118 Cleaning the drum unit ...120 Cleaning the paper pick-up roller...125 Packing and shipping the machine ...126 6 Troubleshooting 129 Identifying your problem ...129 Error and maintenance messages...130 Paper jams ...134 If you are having...
User's Guide - English
Page 12
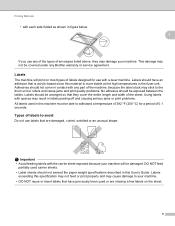
..., wrinkled or an unusual shape. Labels exceeding this machine must be able to the drum unit or rollers and cause jams and print quality problems. No adhesive should not come in contact with any Brother warranty or service agreement. This damage may damage your machine. Adhesives should be exposed between the labels...
..., wrinkled or an unusual shape. Labels exceeding this machine must be able to the drum unit or rollers and cause jams and print quality problems. No adhesive should not come in contact with any Brother warranty or service agreement. This damage may damage your machine. Adhesives should be exposed between the labels...

User's Guide - English
Page 128
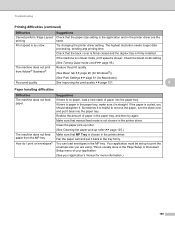
Routine Maintenance i Turn the drum unit as shown in the "2" region of the drum. 122 For example, a dot in column 2 on the left hand side. 1 5 j Use the numbered markers next to the drum roller to find the mark. Make sure that the drum unit gear (1) is on the check sheet would mean that there is a mark in the illustration.
Routine Maintenance i Turn the drum unit as shown in the "2" region of the drum. 122 For example, a dot in column 2 on the left hand side. 1 5 j Use the numbered markers next to the drum roller to find the mark. Make sure that the drum unit gear (1) is on the check sheet would mean that there is a mark in the illustration.

User's Guide - English
Page 131
... tray back in lukewarm water, and then wipe the separator pad (1) of the paper tray with it to remove dust. 5 1 e Wipe the two pick-up roller periodically may prevent paper jams by insuring the proper feeding of the machine. g Plug the machine's power cord back into the AC power outlet first...
... tray back in lukewarm water, and then wipe the separator pad (1) of the paper tray with it to remove dust. 5 1 e Wipe the two pick-up roller periodically may prevent paper jams by insuring the proper feeding of the machine. g Plug the machine's power cord back into the AC power outlet first...
User's Guide - English
Page 154
... the paper tray, and then try again. Reduce the amount of paper in the paper tray, make sure it . Your application must be set up roller uu page 125.) Make sure that the paper size setting in the application and in the printer driver are using. Print speed is too slow... Setup or Document Setup menu of paper into the paper tray. If the paper is curled, you are the printing. Clean the paper pick-up roller. (See Cleaning the paper pick-up to remove the paper, turn the stack over and put it back into the paper tray. Troubleshooting Printing difficulties...
... the paper tray, and then try again. Reduce the amount of paper in the paper tray, make sure it . Your application must be set up roller uu page 125.) Make sure that the paper size setting in the application and in the printer driver are using. Print speed is too slow... Setup or Document Setup menu of paper into the paper tray. If the paper is curled, you are the printing. Clean the paper pick-up roller. (See Cleaning the paper pick-up to remove the paper, turn the stack over and put it back into the paper tray. Troubleshooting Printing difficulties...

