Users Manual - English
Page 9
...DIMM (memory module)...90 SO-DIMM types ...90 Installing extra memory ...91 6 Routine Maintenance 93 Replacing the consumable items...93 Consumables...93 Toner cartridge ...94 Drum unit ...101 Cleaning ...106 Cleaning the outside of the printer 106 Cleaning the inside of the printer...108 Cleaning the paper pick-up roller...111 ...MP tray / Tray1 / Tray2 / Tray3 / Inside 120 Jam Rear / Duplex...125 Improving the print quality...129 Solving print problems ...136 Network problems (For HL-5350DN and HL-5370DW 137 Other problems ...137 For Macintosh with USB ...137 BR-Script 3 ...138 viii
...DIMM (memory module)...90 SO-DIMM types ...90 Installing extra memory ...91 6 Routine Maintenance 93 Replacing the consumable items...93 Consumables...93 Toner cartridge ...94 Drum unit ...101 Cleaning ...106 Cleaning the outside of the printer 106 Cleaning the inside of the printer...108 Cleaning the paper pick-up roller...111 ...MP tray / Tray1 / Tray2 / Tray3 / Inside 120 Jam Rear / Duplex...125 Improving the print quality...129 Solving print problems ...136 Network problems (For HL-5350DN and HL-5370DW 137 Other problems ...137 For Macintosh with USB ...137 BR-Script 3 ...138 viii
Users Manual - English
Page 11
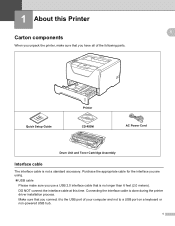
... at this Printer1 1 1 1 Quick Setup Guide Printer CD-ROM AC Power Cord Drum Unit and Toner Cartridge Assembly Interface cable 1 The interface cable is not a standard accessory. Connecting the interface cable is no longer than 6 feet (2.0 meters). Make sure that is done during the printer driver installation process. Purchase the appropriate cable for the...
... at this Printer1 1 1 1 Quick Setup Guide Printer CD-ROM AC Power Cord Drum Unit and Toner Cartridge Assembly Interface cable 1 The interface cable is not a standard accessory. Connecting the interface cable is no longer than 6 feet (2.0 meters). Make sure that is done during the printer driver installation process. Purchase the appropriate cable for the...

Users Manual - English
Page 83
...to check items such as page counts, toner and drum status and the firmware version. This allows the administrator to ease or even automate the installation of a locally connected or network connected printer. For more information see Chapter 14 of ... for installation. Driver Deployment Wizard (for Windows®) 3 Driver Deployment Wizard is an original Brother page description language and a PostScript® language emulation interpreter. This printer supports level 3. Using this printer supports the PCL6 language of the Hewlett-Packard LaserJet laser printer. The...
...to check items such as page counts, toner and drum status and the firmware version. This allows the administrator to ease or even automate the installation of a locally connected or network connected printer. For more information see Chapter 14 of ... for installation. Driver Deployment Wizard (for Windows®) 3 Driver Deployment Wizard is an original Brother page description language and a PostScript® language emulation interpreter. This printer supports level 3. Using this printer supports the PCL6 language of the Hewlett-Packard LaserJet laser printer. The...
Users Manual - English
Page 88
... drum unit out of the printer has cooled down . See Toner cartridge on page 95. The Toner LED will turn on for 0.5 seconds and off for when Replace Toner is indicated. Cartridge error The drum unit assembly is not installed correctly. Replace toner Replace the toner cartridge with a new one. Buy a new toner cartridge and have it back...
... drum unit out of the printer has cooled down . See Toner cartridge on page 95. The Toner LED will turn on for 0.5 seconds and off for when Replace Toner is indicated. Cartridge error The drum unit assembly is not installed correctly. Replace toner Replace the toner cartridge with a new one. Buy a new toner cartridge and have it back...
Users Manual - English
Page 125
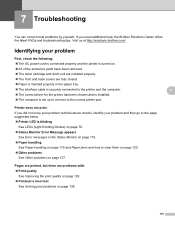
...First, check the following: „ The AC power cord is connected properly and the printer is turned on. „ All of the protective parts have been removed. „ The toner cartridge and drum unit are installed properly. „ The front and back covers are problems with: 7 „ ...is securely connected to the printer and the computer. „ The correct driver for the printer has been chosen and is installed. „ The computer is set up to connect to the correct printer port. 7 7 7 Printer does not print: 7 If you need additional help, the Brother Solutions Center offers the ...
...First, check the following: „ The AC power cord is connected properly and the printer is turned on. „ All of the protective parts have been removed. „ The toner cartridge and drum unit are installed properly. „ The front and back covers are problems with: 7 „ ...is securely connected to the printer and the computer. „ The correct driver for the printer has been chosen and is installed. „ The computer is set up to connect to the correct printer port. 7 7 7 Printer does not print: 7 If you need additional help, the Brother Solutions Center offers the ...
Users Manual - English
Page 126
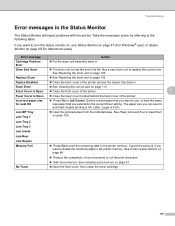
...Status Monitor on page 47 (For Windows® user) or Status Monitor on page 91. „ Open the front cover, then install the toner cartridge. 116 See Installing extra memory on page 63(For Macintosh users). See Replacing the drum unit on page 102 Duplex Disabled „ Close the back cover... of the printer. Replace Drum „ See Replacing the drum unit on page 102. Jam MP Tray Jam Tray 1 „ Clear the ...
...Status Monitor on page 47 (For Windows® user) or Status Monitor on page 91. „ Open the front cover, then install the toner cartridge. 116 See Installing extra memory on page 63(For Macintosh users). See Replacing the drum unit on page 102 Duplex Disabled „ Close the back cover... of the printer. Replace Drum „ See Replacing the drum unit on page 102. Jam MP Tray Jam Tray 1 „ Clear the ...
Users Manual - English
Page 127
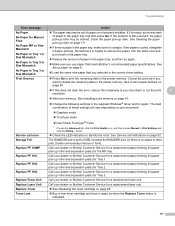
... in the paper tray and then press Go. Increase the RAMDISK size. Delete unnecessary macros or fonts. See Installing extra memory on page 95. „ Buy a new toner cartridge and have it before printing. Or there is curled, straighten it ready for a replacement fuser unit. ...try again. „ Make sure you use paper that you want to print the remaining data in the printer memory. Replace Laser Unit Replace Toner Toner Low Call your dealer or Brother Customer Service for a replacement paper feeding kit (paper pick up roller may be stained. If the problem is...
... in the paper tray and then press Go. Increase the RAMDISK size. Delete unnecessary macros or fonts. See Installing extra memory on page 95. „ Buy a new toner cartridge and have it before printing. Or there is curled, straighten it ready for a replacement fuser unit. ...try again. „ Make sure you use paper that you want to print the remaining data in the printer memory. Replace Laser Unit Replace Toner Toner Low Call your dealer or Brother Customer Service for a replacement paper feeding kit (paper pick up roller may be stained. If the problem is...
Users Manual - English
Page 131
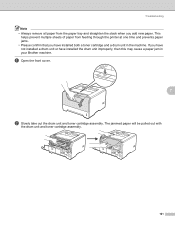
...when you add new paper. Troubleshooting Note • Always remove all paper from feeding through the printer at one time and prevents paper jams. • Please confirm that you have installed the drum unit improperly, then this may cause a paper jam in the machine. The jammed ...paper will be pulled out with the drum unit and toner cartridge assembly. 121 a Open the front cover. 7 b Slowly take out the drum unit and toner cartridge assembly. If you have not installed a drum unit or have installed both a toner cartridge and a drum unit in your Brother machine.
...when you add new paper. Troubleshooting Note • Always remove all paper from feeding through the printer at one time and prevents paper jams. • Please confirm that you have installed the drum unit improperly, then this may cause a paper jam in the machine. The jammed ...paper will be pulled out with the drum unit and toner cartridge assembly. 121 a Open the front cover. 7 b Slowly take out the drum unit and toner cartridge assembly. If you have not installed a drum unit or have installed both a toner cartridge and a drum unit in your Brother machine.

Users Manual - English
Page 151
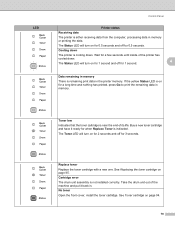
... from http://solutions.brother.com/. A 3 Depending on Linux distributions, the driver may not be available. 4 The Driver Deployment Wizard automates the installation of printers in a peer-to-peer network (Windows® only). Control panel 0 Model LED Button HL-5340D HL-5350DN 5 LEDs: Back Cover, Toner, Drum, Paper and Status 2 buttons: Job Cancel and Go HL-5370DW Paper handling...
... from http://solutions.brother.com/. A 3 Depending on Linux distributions, the driver may not be available. 4 The Driver Deployment Wizard automates the installation of printers in a peer-to-peer network (Windows® only). Control panel 0 Model LED Button HL-5340D HL-5350DN 5 LEDs: Back Cover, Toner, Drum, Paper and Status 2 buttons: Job Cancel and Go HL-5370DW Paper handling...

Network Users Manual - English
Page 13
... Mail support required). The BRPrint Auditor utility also supports E-mail notification for Brother products on your network printer securely on page 145. 3 Unlike BRAdmin Professional 3, which then communicates with... or USB interface. By installing the Web BRAdmin server utility on your LAN and WAN. For more information and downloading, visit us at http://solutions.brother.com/. 1 Internet Information ... Brother network management tools to locally connected machines. This utility 1 can E-mail the usage and status information directly to check items such as page counts, toner...
... Mail support required). The BRPrint Auditor utility also supports E-mail notification for Brother products on your network printer securely on page 145. 3 Unlike BRAdmin Professional 3, which then communicates with... or USB interface. By installing the Web BRAdmin server utility on your LAN and WAN. For more information and downloading, visit us at http://solutions.brother.com/. 1 Internet Information ... Brother network management tools to locally connected machines. This utility 1 can E-mail the usage and status information directly to check items such as page counts, toner...
Network Users Manual - English
Page 54
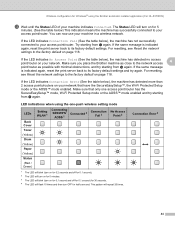
...the same message is indicated again, reset the print server back to its factory default settings. LED indications when using the Brother automatic installer application (For HL-5370DW) m Wait until the Status LED of your machine in a wireless network. If the LED indicates No Access Point (...the table below), the machine has detected more than 2 access points/routers on your network that only one -push wireless setting mode LEDs Back Cover Toner (Yellow) Drum (Yellow) Paper (Yellow) Status (Red / Green) Setting WLAN 1 Connecting SES/WPS/ Connected 2 AOSS 1 Connection Fail 3 No...
...the same message is indicated again, reset the print server back to its factory default settings. LED indications when using the Brother automatic installer application (For HL-5370DW) m Wait until the Status LED of your machine in a wireless network. If the LED indicates No Access Point (...the table below), the machine has detected more than 2 access points/routers on your network that only one -push wireless setting mode LEDs Back Cover Toner (Yellow) Drum (Yellow) Paper (Yellow) Status (Red / Green) Setting WLAN 1 Connecting SES/WPS/ Connected 2 AOSS 1 Connection Fail 3 No...

Network Users Manual - English
Page 85
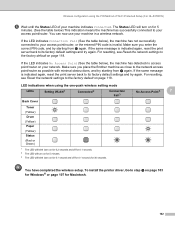
... Connection Fail (See the table below), the machine has not successfully connected to your network that only one -push wireless setting mode LEDs Back Cover Toner (Yellow) Drum (Yellow) Paper (Yellow) Status (Red / Green) Setting WLAN 1 Connecting SES/WPS/ Connected 2 AOSS 1 Connection Fail 3 No ... For resetting, 5 see Reset the network settings to its factory default settings and try again. LED indications when using the Brother installer application (For HL-5370DW) m Wait until the Status LED of your access point/router. This pattern will flash 10 times and then turn on your...
... Connection Fail (See the table below), the machine has not successfully connected to your network that only one -push wireless setting mode LEDs Back Cover Toner (Yellow) Drum (Yellow) Paper (Yellow) Status (Red / Green) Setting WLAN 1 Connecting SES/WPS/ Connected 2 AOSS 1 Connection Fail 3 No ... For resetting, 5 see Reset the network settings to its factory default settings and try again. LED indications when using the Brother installer application (For HL-5370DW) m Wait until the Status LED of your access point/router. This pattern will flash 10 times and then turn on your...

Network Users Manual - English
Page 102
...push wireless setting mode (For HL-5370DW) f Wait until the Status LED of your access point/router. To install the printer driver, Go to its factory... default settings and try again. For resetting, see Reset the network settings to the network access point/router as possible with minimal obstructions, and try starting from c again. Make sure you place the Brother...access point/router on your network that only one -push wireless setting mode LEDs Back Cover Toner (Yellow) Drum (Yellow) Paper (Yellow) Status (Red / Green) Setting WLAN 1 ...
...push wireless setting mode (For HL-5370DW) f Wait until the Status LED of your access point/router. To install the printer driver, Go to its factory... default settings and try again. For resetting, see Reset the network settings to the network access point/router as possible with minimal obstructions, and try starting from c again. Make sure you place the Brother...access point/router on your network that only one -push wireless setting mode LEDs Back Cover Toner (Yellow) Drum (Yellow) Paper (Yellow) Status (Red / Green) Setting WLAN 1 ...
Network Users Manual - English
Page 112
...place the Brother machine as close to its factory default settings and try again. For resetting, see Reset the network settings to your access point/router. To install the printer driver, ...page 118. LED indications when using the PIN Method of Wi-Fi Protected Setup (For HL-5370DW) f Wait until the Status LED of your network. Wireless configuration using the one-push... wireless setting mode LEDs Setting WLAN 1 Connected 2 Connection Fail 3 Back Cover Toner (Yellow) Drum (Yellow) Paper (Yellow) Status (Red or Green) 1 The LED will blink ...
...place the Brother machine as close to its factory default settings and try again. For resetting, see Reset the network settings to your access point/router. To install the printer driver, ...page 118. LED indications when using the PIN Method of Wi-Fi Protected Setup (For HL-5370DW) f Wait until the Status LED of your network. Wireless configuration using the one-push... wireless setting mode LEDs Setting WLAN 1 Connected 2 Connection Fail 3 Back Cover Toner (Yellow) Drum (Yellow) Paper (Yellow) Status (Red or Green) 1 The LED will blink ...
Quick Setup Guide - English
Page 1
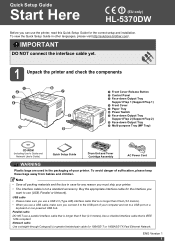
... (including User's Guide and Network User's Guide) Quick Setup Guide Drum Unit and Toner Cartridge Assembly AC Power Cord WARNING Plastic bags are used in other languages, please visit http://solutions.brother.com/. Parallel cable DO NOT use a parallel interface cable that is longer than 6... that is not a standard accessory. Buy the appropriate interface cable for the correct setup and installation. ENG Version 1 1 Quick Setup Guide Start Here (EU only) HL-5370DW Before you can use the printer, read this Quick Setup Guide for the interface you want to a USB port on a keyboard...
... (including User's Guide and Network User's Guide) Quick Setup Guide Drum Unit and Toner Cartridge Assembly AC Power Cord WARNING Plastic bags are used in other languages, please visit http://solutions.brother.com/. Parallel cable DO NOT use a parallel interface cable that is longer than 6... that is not a standard accessory. Buy the appropriate interface cable for the correct setup and installation. ENG Version 1 1 Quick Setup Guide Start Here (EU only) HL-5370DW Before you can use the printer, read this Quick Setup Guide for the interface you want to a USB port on a keyboard...
Quick Setup Guide - English
Page 3
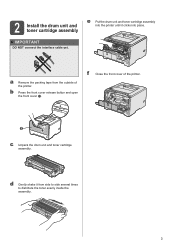
IMPORTANT DO NOT connect the interface cable yet. d Gently shake it clicks into the printer until it from the outside of the printer. 11 c Unpack the drum unit and toner cartridge assembly. b Press the front cover release button and open the front cover a. a Remove the packing tape from side to side several times to distribute the toner evenly inside the assembly. 3 2 Install the drum unit and toner cartridge assembly e Put the drum unit and toner cartridge assembly into place. f Close the front cover of the printer.
IMPORTANT DO NOT connect the interface cable yet. d Gently shake it clicks into the printer until it from the outside of the printer. 11 c Unpack the drum unit and toner cartridge assembly. b Press the front cover release button and open the front cover a. a Remove the packing tape from side to side several times to distribute the toner evenly inside the assembly. 3 2 Install the drum unit and toner cartridge assembly e Put the drum unit and toner cartridge assembly into place. f Close the front cover of the printer.
Quick Setup Guide - English
Page 54
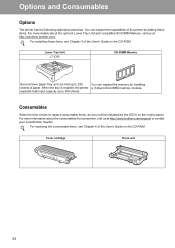
When the tray is installed, the printer a (144-pin SO-DIMM) memory module. For installing these items. For more information about the optional Lower Tray Unit and compatible SO-DIMM Memory, visit us at http://solutions.brother.com/. For replacing the consumable items, see Chapter 5 of...of the User's Guide on the CD-ROM. Toner cartridge Drum unit 54 For more details about the consumables for your printer, visit us at http://www.brother.com/original/ or contact your local Brother reseller. Options and Consumables Options The printer has the following optional accessories.
When the tray is installed, the printer a (144-pin SO-DIMM) memory module. For installing these items. For more information about the optional Lower Tray Unit and compatible SO-DIMM Memory, visit us at http://solutions.brother.com/. For replacing the consumable items, see Chapter 5 of...of the User's Guide on the CD-ROM. Toner cartridge Drum unit 54 For more details about the consumables for your printer, visit us at http://www.brother.com/original/ or contact your local Brother reseller. Options and Consumables Options The printer has the following optional accessories.


