Users Manual - English
Page 9
4 Control Panel 76 LEDs (Light Emitting Diodes)...76 Service call indications ...82 Control panel buttons...84 Print a test page ...85 Print the Printer Settings page...86 Print Fonts ...87 Default settings...88 5 Options 89 Lower tray (LT-5300) ...89 SO-DIMM (memory module)...90 ... 116 Error message printout ...118 Paper handling ...119 Paper jams and how to clear them ...120 Jam MP tray / Tray1 / Tray2 / Tray3 / Inside 120 Jam Rear / Duplex...125 Improving the print quality...129 Solving print problems ...136 Network problems (For HL-5350DN and HL-5370DW 137 Other problems ...137 For ...
4 Control Panel 76 LEDs (Light Emitting Diodes)...76 Service call indications ...82 Control panel buttons...84 Print a test page ...85 Print the Printer Settings page...86 Print Fonts ...87 Default settings...88 5 Options 89 Lower tray (LT-5300) ...89 SO-DIMM (memory module)...90 ... 116 Error message printout ...118 Paper handling ...119 Paper jams and how to clear them ...120 Jam MP tray / Tray1 / Tray2 / Tray3 / Inside 120 Jam Rear / Duplex...125 Improving the print quality...129 Solving print problems ...136 Network problems (For HL-5350DN and HL-5370DW 137 Other problems ...137 For ...
Users Manual - English
Page 52
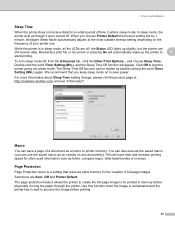
...save power. While the printer is complicated and the printer has to wait to the...sleep mode, the printer acts as an overlay on the frequency of your printer use. Receiving ...paper through the printer. Click Off to be hidden by double-clicking the word Timer Setting (Min.) again. Selections are off, the Status LED lights up the printer to a setting that you choose Printer... Default the timeout setting will automatically wake up slightly, but the printer... the printer to create the full-page image to stop the printer going ...
...save power. While the printer is complicated and the printer has to wait to the...sleep mode, the printer acts as an overlay on the frequency of your printer use. Receiving ...paper through the printer. Click Off to be hidden by double-clicking the word Timer Setting (Min.) again. Selections are off, the Status LED lights up the printer to a setting that you choose Printer... Default the timeout setting will automatically wake up slightly, but the printer... the printer to create the full-page image to stop the printer going ...
Users Manual - English
Page 63
... setting. When you change , please visit the product page at http://solutions.brother.com/ and see "Information". „ Halftone Screen Lock Stops other applications from modifying the Halftone settings. In sleep mode, the printer acts as though it enters sleep mode. We recommend that you choose... to choose this setting, the toner fixing on paper may be 1 minute. Driver and Software „ Sleep Time When the printer does not receive data for a certain period of time, it were turned off , the Status LED lights up the printer to start printing. 3 For more information about...
... setting. When you change , please visit the product page at http://solutions.brother.com/ and see "Information". „ Halftone Screen Lock Stops other applications from modifying the Halftone settings. In sleep mode, the printer acts as though it enters sleep mode. We recommend that you choose... to choose this setting, the toner fixing on paper may be 1 minute. Driver and Software „ Sleep Time When the printer does not receive data for a certain period of time, it were turned off , the Status LED lights up the printer to start printing. 3 For more information about...
Users Manual - English
Page 70
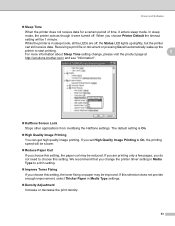
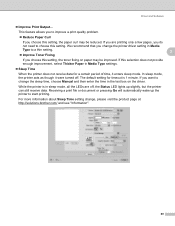
... pressing Go will automatically wake up slightly, but the printer can still receive data. This feature allows you to improve a print quality problem. „ Reduce Paper Curl If you choose this setting. If this setting, the paper curl may be reduced. For more information about Sleep...improvement, select Thicker Paper in the text box on paper may be improved. If you are off . The default setting for a certain period of time, it were turned off , the Status LED lights up the printer to change , please visit the product page at http://solutions.brother.com/ and ...
... pressing Go will automatically wake up slightly, but the printer can still receive data. This feature allows you to improve a print quality problem. „ Reduce Paper Curl If you choose this setting. If this setting, the paper curl may be reduced. For more information about Sleep...improvement, select Thicker Paper in the text box on paper may be improved. If you are off . The default setting for a certain period of time, it were turned off , the Status LED lights up the printer to change , please visit the product page at http://solutions.brother.com/ and ...
Users Manual - English
Page 86
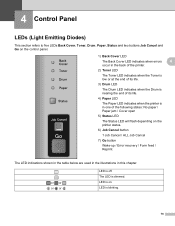
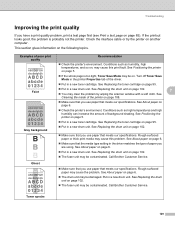
... 4 Control Panel 4 LEDs (Light Emitting Diodes) 4 This section refers to five LEDs Back Cover, Toner, Drum, Paper, Status and two buttons Job Cancel and Go on the control panel. 1) Back Cover LED The Back Cover LED indicates when errors 4 occur in the back of the printer. 2) Toner LED The Toner ...life. 3) Drum LED The Drum LED indicates when the Drum is nearing the end of its life. 4) Paper LED The Paper LED indicates when the printer is in one of the following states: No paper / Paper jam / Cover open 5) Status LED The Status LED will flash depending on . The LED is blinking....
... 4 Control Panel 4 LEDs (Light Emitting Diodes) 4 This section refers to five LEDs Back Cover, Toner, Drum, Paper, Status and two buttons Job Cancel and Go on the control panel. 1) Back Cover LED The Back Cover LED indicates when errors 4 occur in the back of the printer. 2) Toner LED The Toner ...life. 3) Drum LED The Drum LED indicates when the Drum is nearing the end of its life. 4) Paper LED The Paper LED indicates when the printer is in one of the following states: No paper / Paper jam / Cover open 5) Status LED The Status LED will flash depending on . The LED is blinking....
Users Manual - English
Page 92
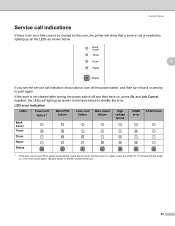
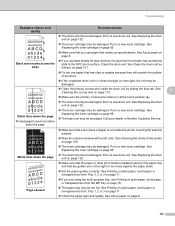
... is needed by the user, the printer will light up all the LEDs as shown in the table below . 4 If you see the service call your dealer or Brother Customer Service. 82 If the error occurs again, call indication shown above, turn off the printer power switch, wait a few seconds,... and then turn it on again. LED error indication 4 LEDs Back Cover Toner Fuser unit failure 1 Main PCB failure Laser unit failure Main motor failure High voltage failure DIMM error FAN Failure Drum Paper Status 1 If this error ...
... is needed by the user, the printer will light up all the LEDs as shown in the table below . 4 If you see the service call your dealer or Brother Customer Service. 82 If the error occurs again, call indication shown above, turn off the printer power switch, wait a few seconds,... and then turn it on again. LED error indication 4 LEDs Back Cover Toner Fuser unit failure 1 Main PCB failure Laser unit failure Main motor failure High voltage failure DIMM error FAN Failure Drum Paper Status 1 If this error ...

Users Manual - English
Page 94
...errors. on for about 4 seconds. icon and click Use Reprint and then check the Use Reprint check box. If you want to wake the printer up and then release it. Control Panel Control panel buttons 4 The control panel buttons have the following functions: „ Cancel printing Cancel only ... If you press Job Cancel while printing, the printer will immediately stop printing and will be printed. If you do not press Go within 2 seconds, a single copy will then eject the paper. Cancel all the received jobs: 4 To delete all the LEDs light up and go to the Ready state. „...
...errors. on for about 4 seconds. icon and click Use Reprint and then check the Use Reprint check box. If you want to wake the printer up and then release it. Control Panel Control panel buttons 4 The control panel buttons have the following functions: „ Cancel printing Cancel only ... If you press Job Cancel while printing, the printer will immediately stop printing and will be printed. If you do not press Go within 2 seconds, a single copy will then eject the paper. Cancel all the received jobs: 4 To delete all the LEDs light up and go to the Ready state. „...
Users Manual - English
Page 95
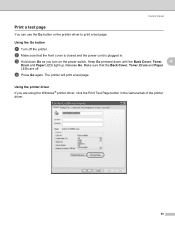
... sure that the Back Cover, Toner, Drum and Paper LEDs are using the Windows® printer driver, click the Print Test Page button in . c Hold down until the Back Cover, Toner, 4 Drum and Paper LEDs light up. Release Go. Using the printer driver 4 If you turn on the power switch.... The printer will print a test page. Control Panel Print a test page 4 You can use the Go button or the printer driver to print a test page. Using ...
... sure that the Back Cover, Toner, Drum and Paper LEDs are using the Windows® printer driver, click the Print Test Page button in . c Hold down until the Back Cover, Toner, 4 Drum and Paper LEDs light up. Release Go. Using the printer driver 4 If you turn on the power switch.... The printer will print a test page. Control Panel Print a test page 4 You can use the Go button or the printer driver to print a test page. Using ...
Users Manual - English
Page 97
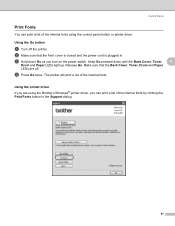
... Panel Print Fonts 4 You can print a list of the internal fonts using the control panel button or printer driver. Using the Go button 4 a Turn off . c Hold down until the Back Cover, Toner, 4 Drum and Paper LEDs light up. d Press Go twice. Make sure that the front cover...printer. The printer will print a list of the internal fonts. Keep Go pressed down Go as you can print a list of the internal fonts by clicking the Print Fonts button in . Release Go. b Make sure that the Back Cover, Toner, Drum and Paper LEDs are using the Brother's Windows® printer...
... Panel Print Fonts 4 You can print a list of the internal fonts using the control panel button or printer driver. Using the Go button 4 a Turn off . c Hold down until the Back Cover, Toner, 4 Drum and Paper LEDs light up. d Press Go twice. Make sure that the front cover...printer. The printer will print a list of the internal fonts. Keep Go pressed down Go as you can print a list of the internal fonts by clicking the Print Fonts button in . Release Go. b Make sure that the Back Cover, Toner, Drum and Paper LEDs are using the Brother's Windows® printer...
Users Manual - English
Page 111
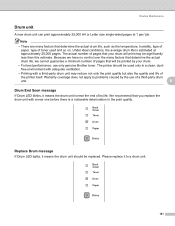
...life, we cannot guarantee a minimum number of its life. The printer should be printed by the use only genuine Brother toner. Warranty coverage does not apply to problems caused by your... drum will be replaced. Please replace it means the drum unit is estimated at 1 per/ job. Replace Drum message 6 If Drum LED lights... determine the actual drum life, such as the temperature, humidity, type of paper, type of the printer itself. Routine Maintenance Drum unit 6 A new drum unit can print approximately ...
...life, we cannot guarantee a minimum number of its life. The printer should be printed by the use only genuine Brother toner. Warranty coverage does not apply to problems caused by your... drum will be replaced. Please replace it means the drum unit is estimated at 1 per/ job. Replace Drum message 6 If Drum LED lights... determine the actual drum life, such as the temperature, humidity, type of paper, type of the printer itself. Routine Maintenance Drum unit 6 A new drum unit can print approximately ...
Users Manual - English
Page 125
...are fully closed. „ Paper is inserted properly in the Status Monitor on page 116. „ Paper handling See Paper handling on page 119 and Paper jams and how to the correct printer port. 7 7 7 Printer does not print: 7 If you need additional help, the Brother Solutions Center offers the latest ...to the page suggested below. „ Printer LED is blinking See LEDs (Light Emitting Diodes) on page 76. „ Status Monitor Error Message appears See Error messages in the paper tray. „ The interface cable is securely connected to the printer and the computer. „ The ...
...are fully closed. „ Paper is inserted properly in the Status Monitor on page 116. „ Paper handling See Paper handling on page 119 and Paper jams and how to the correct printer port. 7 7 7 Printer does not print: 7 If you need additional help, the Brother Solutions Center offers the latest ...to the page suggested below. „ Printer LED is blinking See LEDs (Light Emitting Diodes) on page 76. „ Status Monitor Error Message appears See Error messages in the paper tray. „ The interface cable is securely connected to the printer and the computer. „ The ...
Users Manual - English
Page 134
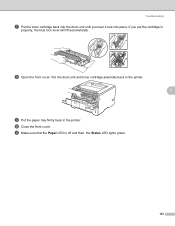
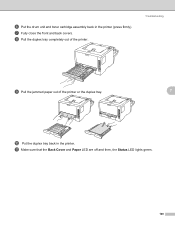
h Open the front cover. j Close the front cover. k Make sure that the Paper LED is off and then, the Status LED lights green. 124 Troubleshooting g Put the toner cartridge back into place. If you hear it lock into the drum unit until you put the cartridge in the printer. Put the drum unit and toner cartridge assembly back in the printer. 7 i Put the paper tray firmly back in properly, the blue lock lever will lift automatically.
h Open the front cover. j Close the front cover. k Make sure that the Paper LED is off and then, the Status LED lights green. 124 Troubleshooting g Put the toner cartridge back into place. If you hear it lock into the drum unit until you put the cartridge in the printer. Put the drum unit and toner cartridge assembly back in the printer. 7 i Put the paper tray firmly back in properly, the blue lock lever will lift automatically.
Users Manual - English
Page 138
f Put the drum unit and toner cartridge assembly back in the printer. h Pull the duplex tray completely out of the printer or the duplex tray. 7 j Put the duplex tray back in the printer (press firmly). k Make sure that the Back Cover and Paper LED are off and then, the Status LED lights green. 128 Troubleshooting i Pull the jammed paper out of the printer. g Fully close the front and back covers.
f Put the drum unit and toner cartridge assembly back in the printer. h Pull the duplex tray completely out of the printer or the duplex tray. 7 j Put the duplex tray back in the printer (press firmly). k Make sure that the Back Cover and Paper LED are off and then, the Status LED lights green. 128 Troubleshooting i Pull the jammed paper out of the printer. g Fully close the front and back covers.
Users Manual - English
Page 139
...Replacing the drum unit on page 85). Put in a new toner cartridge. Turn off Toner Save Mode in the printer Properties tab of paper you use paper that meets our specifications. See About paper on page 5. See Replacing the toner cartridge on page 6. „ Put in a new drum unit. See ...thick print media may be damaged. Call Brother Customer Service. Rough-surfaced paper may be on page 6. „ Make sure that the media type setting in a new drum unit. Call Brother Customer Service. If the printout looks good, the problem is too light, Toner Save Mode may cause this problem...
...Replacing the drum unit on page 85). Put in a new toner cartridge. Turn off Toner Save Mode in the printer Properties tab of paper you use paper that meets our specifications. See About paper on page 5. See Replacing the toner cartridge on page 6. „ Put in a new drum unit. See ...thick print media may be damaged. Call Brother Customer Service. Rough-surfaced paper may be on page 6. „ Make sure that the media type setting in a new drum unit. Call Brother Customer Service. If the printout looks good, the problem is too light, Toner Save Mode may cause this problem...
Users Manual - English
Page 142
...drum. „ If the unpacked drum unit is in direct sunlight or room light, the unit may be damaged. „ Clean the primary corona wire inside ... toner cartridge may be smudged. Call your dealer or Brother Customer Service. „ Make sure that a torn piece of the printer on page 131. „ Do not use paper that meets our specifications. White lines down the page..... See Replacing the drum unit on page 16. „ The paper tray may be damaged. Put in a new drum unit. Page skewed „ If you use label sheets for laser printers, the glue from Tray 1, 2 or 3 on page 95....
...drum. „ If the unpacked drum unit is in direct sunlight or room light, the unit may be damaged. „ Clean the primary corona wire inside ... toner cartridge may be smudged. Call your dealer or Brother Customer Service. „ Make sure that a torn piece of the printer on page 131. „ Do not use paper that meets our specifications. White lines down the page..... See Replacing the drum unit on page 16. „ The paper tray may be damaged. Put in a new drum unit. Page skewed „ If you use label sheets for laser printers, the glue from Tray 1, 2 or 3 on page 95....
Users Manual - English
Page 171
... tab 44 Automatic duplex printing 29 Automatic Emulation Selection 74 Automatic Interface Selection 74 B Bar code control 150 Booklet printing 31 BRAdmin Light 72 BRAdmin Professional 3 72 Brother Numbers (USA/Canada 159 BRPrint Auditor 73 BR-Script 3 mode 73 BR-Script3 48, 64, 138 Buffer error 81 C Cancel... 74 Error Messages 116 Error messages 118 F Font full 81 Fonts 87, 140 G Go button 84 H HP LaserJet mode 73 I Incorrect paper size for auto DX 80 Interface 140 L LEDs 76 Linux 32 Lower tray 89 M Macintosh 54, 137 Manual duplex printing 25 Media specifications ...
... tab 44 Automatic duplex printing 29 Automatic Emulation Selection 74 Automatic Interface Selection 74 B Bar code control 150 Booklet printing 31 BRAdmin Light 72 BRAdmin Professional 3 72 Brother Numbers (USA/Canada 159 BRPrint Auditor 73 BR-Script 3 mode 73 BR-Script3 48, 64, 138 Buffer error 81 C Cancel... 74 Error Messages 116 Error messages 118 F Font full 81 Fonts 87, 140 G Go button 84 H HP LaserJet mode 73 I Incorrect paper size for auto DX 80 Interface 140 L LEDs 76 Linux 32 Lower tray 89 M Macintosh 54, 137 Manual duplex printing 25 Media specifications ...
Network Users Manual - English
Page 120
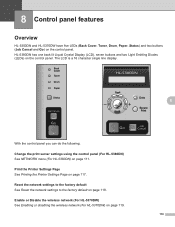
...settings to the factory default on page 117. Print the Printer Settings Page See Printing the Printer Settings Page on page 118. Enable or Disable the wireless network (For HL-5370DW) See Enabling or disabling the wireless network (For HL-5370DW) on page 111. The LCD is a 16 character ...8 Control panel features 8 Overview 8 HL-5350DN and HL-5370DW have five LEDs (Back Cover, Toner, Drum, Paper, Status) and two buttons (Job Cancel and Go) on the control panel. HL-5380DN has one back lit Liquid Crystal Display (LCD), seven buttons and two Light Emitting Diodes (LEDs) on the control...
...settings to the factory default on page 117. Print the Printer Settings Page See Printing the Printer Settings Page on page 118. Enable or Disable the wireless network (For HL-5370DW) See Enabling or disabling the wireless network (For HL-5370DW) on page 111. The LCD is a 16 character ...8 Control panel features 8 Overview 8 HL-5350DN and HL-5370DW have five LEDs (Back Cover, Toner, Drum, Paper, Status) and two buttons (Job Cancel and Go) on the control panel. HL-5380DN has one back lit Liquid Crystal Display (LCD), seven buttons and two Light Emitting Diodes (LEDs) on the control...


