
Users Manual - English
Page 4
...the fuser. Carefully clean the toner dust with volatile liquids such as thinner or benzine will damage the outside of it according to clean up scattered toner. iii DO NOT use flammable substances near the printer. Doing this might cause the toner dust to ignite inside the ...vacuum cleaner, potentially starting a fire. CAUTION Cleaning the outside surface of the printer. • DO NOT use cleaning materials...
...the fuser. Carefully clean the toner dust with volatile liquids such as thinner or benzine will damage the outside of it according to clean up scattered toner. iii DO NOT use flammable substances near the printer. Doing this might cause the toner dust to ignite inside the ...vacuum cleaner, potentially starting a fire. CAUTION Cleaning the outside surface of the printer. • DO NOT use cleaning materials...
Users Manual - English
Page 7
...50 Back light ...50 LCD messages ...51 Reprinting documents...52 Using the control panel LCD menu...55 Menu table...56 Default Settings ...68 Printer default setting...68 Network default setting ...68 5 Options Lower tray unit (LT-5300) ...69 DIMM ...70 DIMM types ...70 Installing... 6 Routine Maintenance Replacing the consumable items...73 Consumables...74 Toner cartridge ...74 Drum unit ...80 Replacing periodic maintenance parts...84 Cleaning ...85 Cleaning the outside of the printer...85 Cleaning the inside of the printer...86 Cleaning the corona wire...89 7 Troubleshooting Identifying your ...
...50 Back light ...50 LCD messages ...51 Reprinting documents...52 Using the control panel LCD menu...55 Menu table...56 Default Settings ...68 Printer default setting...68 Network default setting ...68 5 Options Lower tray unit (LT-5300) ...69 DIMM ...70 DIMM types ...70 Installing... 6 Routine Maintenance Replacing the consumable items...73 Consumables...74 Toner cartridge ...74 Drum unit ...80 Replacing periodic maintenance parts...84 Cleaning ...85 Cleaning the outside of the printer...85 Cleaning the inside of the printer...86 Cleaning the corona wire...89 7 Troubleshooting Identifying your ...
Users Manual - English
Page 9
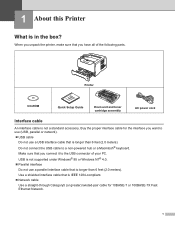
...® 95 or Windows NT® 4.0. „ Parallel interface Do not use a USB interface cable that is longer than 6 feet (2.0 meters). 1 About this Printer What is not a standard accessory. Do not connect the USB cable to the USB connector of the following parts. When you connect it to a non... you want to use (USB, parallel or network). „ USB cable Do not use a parallel interface cable that is longer than 6 feet (2.0 meters). Printer CD-ROM Quick Setup Guide Drum unit and toner cartridge assembly AC power cord Interface cable An interface cable is in the box?
...® 95 or Windows NT® 4.0. „ Parallel interface Do not use a USB interface cable that is longer than 6 feet (2.0 meters). 1 About this Printer What is not a standard accessory. Do not connect the USB cable to the USB connector of the following parts. When you connect it to a non... you want to use (USB, parallel or network). „ USB cable Do not use a parallel interface cable that is longer than 6 feet (2.0 meters). Printer CD-ROM Quick Setup Guide Drum unit and toner cartridge assembly AC power cord Interface cable An interface cable is in the box?
Users Manual - English
Page 35
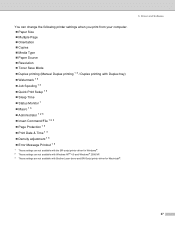
Driver and Software 27 You can change the following printer settings when you print from your computer. „ Paper Size „ Multiple Page „ Orientation „ Copies „ Media Type „ Paper Source „ Resolution „ Toner Save Mode „ Duplex printing (Manual Duplex printing ...Date & Time 1 3 „ Density adjustment 1 3 „ Error Message Printout 1 3 1 These settings are not available with the BR-script printer driver for Windows®. 2 These settings are not available with Windows NT® 4.0 and Windows® 2000/XP. 3 These settings are not available with...
Driver and Software 27 You can change the following printer settings when you print from your computer. „ Paper Size „ Multiple Page „ Orientation „ Copies „ Media Type „ Paper Source „ Resolution „ Toner Save Mode „ Duplex printing (Manual Duplex printing ...Date & Time 1 3 „ Density adjustment 1 3 „ Error Message Printout 1 3 1 These settings are not available with the BR-script printer driver for Windows®. 2 These settings are not available with Windows NT® 4.0 and Windows® 2000/XP. 3 These settings are not available with...
Users Manual - English
Page 38
... Mode You can set brightness, contrast and other settings. Note • We do not recommend Toner Save for printing Photo or Gray Scale images. • Toner Save Mode is not available for the manual duplex settings will appear. Duplex Printing „ Use Duplex Unit If you can change the print image .... „ Booklet Printing When you have created. 3. There are six types of duplex binding directions available for your documents as a watermark, you like on the Toner Save Mode, which cuts the print density.
... Mode You can set brightness, contrast and other settings. Note • We do not recommend Toner Save for printing Photo or Gray Scale images. • Toner Save Mode is not available for the manual duplex settings will appear. Duplex Printing „ Use Duplex Unit If you can change the print image .... „ Booklet Printing When you have created. 3. There are six types of duplex binding directions available for your documents as a watermark, you like on the Toner Save Mode, which cuts the print density.
Users Manual - English
Page 40
...memory. Note If you can turn the status monitor on any errors that you want to turn the quick print setup function on your printer use the saved macro as forms, company logos, letterhead formats or invoices. 32 Click Off to start printing. A small selection window... adjusts to the settings of the following functions: • Multiple Page • Duplex Printing • Toner Save Mode • Paper Source • Media Type „ Sleep Time When the printer does not receive data for a certain period of a document as though it were turned off. When ...
...memory. Note If you can turn the status monitor on any errors that you want to turn the quick print setup function on your printer use the saved macro as forms, company logos, letterhead formats or invoices. 32 Click Off to start printing. A small selection window... adjusts to the settings of the following functions: • Multiple Page • Duplex Printing • Toner Save Mode • Paper Source • Media Type „ Sleep Time When the printer does not receive data for a certain period of a document as though it were turned off. When ...

Users Manual - English
Page 46
Driver and Software 1 2 3 a Choose the Paper Size and Copy Count (1). c You can change settings by choosing the setting in the Printer Features list (3): „ Print Quality „ Media Type „ Job Spooling „ Passwprd „ Job Name „ Toner Save You can save running costs by turning on the Toner Save, which reduces the print density. „ Sleep Time See Device Options on page 31. „ Halftone Screen Lock „ BR-Script Level 38 b Set the Scaling and TrueType Font settings (2). Advanced options 3.
Driver and Software 1 2 3 a Choose the Paper Size and Copy Count (1). c You can change settings by choosing the setting in the Printer Features list (3): „ Print Quality „ Media Type „ Job Spooling „ Passwprd „ Job Name „ Toner Save You can save running costs by turning on the Toner Save, which reduces the print density. „ Sleep Time See Device Options on page 31. „ Halftone Screen Lock „ BR-Script Level 38 b Set the Scaling and TrueType Font settings (2). Advanced options 3.

Users Manual - English
Page 48
... Paper • Bond Paper • Transparencies • Envelopes • Env.Thick • Env.Thin • Recycled Paper „ Toner Save Mode You can change settings by turning on Toner save running costs by choosing the setting in the Print Settings list: Basic tab 3. Driver and Software „ Resolution You can... the print speed will be slower. „ Media Type You can save , which reduces the print density. Note • We do not recommend Toner Save for printing Photo or Gray Scale images. • Toner Save Mode is not available for 1200 dpi or HQ 1200 resolution. 40
... Paper • Bond Paper • Transparencies • Envelopes • Env.Thick • Env.Thin • Recycled Paper „ Toner Save Mode You can change settings by turning on Toner save running costs by choosing the setting in the Print Settings list: Basic tab 3. Driver and Software „ Resolution You can... the print speed will be slower. „ Media Type You can save , which reduces the print density. Note • We do not recommend Toner Save for printing Photo or Gray Scale images. • Toner Save Mode is not available for 1200 dpi or HQ 1200 resolution. 40

Users Manual - English
Page 65
...BIND)/ON(SHO RT BIND) Descriptions Chooses the tray that contain paper of paper you want to feed paper manually. QUALITY Submenu RESOLUTION TONER SAVE DENSITY Options 300/600*/HQ1200/1200 OFF*/ON -6/-5/-4/-3/-2/-1/0*/1/2/3/4/5 /6 Descriptions Chooses a print resolution 300, 600 or 1200 dots per inch or... in Bold with an asterisk. SETUP Submenu LANGUAGE Menu Selections Options ENGLISH*/FRANÇAIS... Chooses whether you put in the printer driver will be ignored. Chooses the size of paper you want to automatically print on both sides of paper you choose the...
...BIND)/ON(SHO RT BIND) Descriptions Chooses the tray that contain paper of paper you want to feed paper manually. QUALITY Submenu RESOLUTION TONER SAVE DENSITY Options 300/600*/HQ1200/1200 OFF*/ON -6/-5/-4/-3/-2/-1/0*/1/2/3/4/5 /6 Descriptions Chooses a print resolution 300, 600 or 1200 dots per inch or... in Bold with an asterisk. SETUP Submenu LANGUAGE Menu Selections Options ENGLISH*/FRANÇAIS... Chooses whether you put in the printer driver will be ignored. Chooses the size of paper you want to automatically print on both sides of paper you choose the...

Users Manual - English
Page 81
... intervals.) See TONER LOW Message on page 80. DRUM NEAR END See DRUM NEAR END message on page 74. When the time comes to replace consumable items, the following : • If your clothes are also included in the illustration. When you have just used the printer, some internal parts of the printer will need...
... intervals.) See TONER LOW Message on page 80. DRUM NEAR END See DRUM NEAR END message on page 74. When the time comes to replace consumable items, the following : • If your clothes are also included in the illustration. When you have just used the printer, some internal parts of the printer will need...

Users Manual - English
Page 82
... shows TONER LOW, the printer has nearly run out of toner. TONER LOW Message (Appears at 5% coverage. TONER LIFE END message TONER LIFE END If the LCD shows TONER LIFE END, the printer has run out of toner or the toner is printed on page 74. Toner cartridge A new toner cartridge can only be cleared by putting a new toner cartridge into the printer. Consumables Toner...
... shows TONER LOW, the printer has nearly run out of toner. TONER LOW Message (Appears at 5% coverage. TONER LIFE END message TONER LIFE END If the LCD shows TONER LIFE END, the printer has run out of toner or the toner is printed on page 74. Toner cartridge A new toner cartridge can only be cleared by putting a new toner cartridge into the printer. Consumables Toner...

Users Manual - English
Page 83
... static electricity, DO NOT touch the electrodes shown in case you replace the toner cartridge. 6. When you want to the printer from or Brother Customer Service. • We recommend that you use only genuine Brother toner cartridges. Routine Maintenance Replacing the toner cartridge Note • To ensure high quality printing, we recommend that you put the...
... static electricity, DO NOT touch the electrodes shown in case you replace the toner cartridge. 6. When you want to the printer from or Brother Customer Service. • We recommend that you use only genuine Brother toner cartridges. Routine Maintenance Replacing the toner cartridge Note • To ensure high quality printing, we recommend that you put the...

Users Manual - English
Page 84
... cartridge level with cold water at once. It could explode, resulting in the illustrations. Handle the toner cartridge carefully. If toner scatters on your local waste disposal office. d Unpack the new toner cartridge. To avoid print quality problems, DO NOT touch the shaded parts shown in injuries. 6.... Routine Maintenance c Push down the blue lock lever and take the toner cartridge out of the cartridge. • Discard the used toner cartridge according to local regulations, keeping it from domestic waste. Note • Be sure to spread the...
... cartridge level with cold water at once. It could explode, resulting in the illustrations. Handle the toner cartridge carefully. If toner scatters on your local waste disposal office. d Unpack the new toner cartridge. To avoid print quality problems, DO NOT touch the shaded parts shown in injuries. 6.... Routine Maintenance c Push down the blue lock lever and take the toner cartridge out of the cartridge. • Discard the used toner cartridge according to local regulations, keeping it from domestic waste. Note • Be sure to spread the...

Users Manual - English
Page 85
... machine and/or may be shortened. If toner cartridges are designed to work with toner of a particular specification and will be damaged. Put the toner cartridge in the printer. Brother does not therefore recommend the use of cartridges other countries Brother machines are left unpacked for a long time the toner life will work to any degradation to...
... machine and/or may be shortened. If toner cartridges are designed to work with toner of a particular specification and will be damaged. Put the toner cartridge in the printer. Brother does not therefore recommend the use of cartridges other countries Brother machines are left unpacked for a long time the toner life will work to any degradation to...

Users Manual - English
Page 86
.... g Clean the primary corona wire inside the drum unit by gently sliding the blue tab from the drum unit. If you put it in the toner cartridge properly or it lock into place. If you hear it may have a vertical stripe. 78 e Pull off the protective cover. 6. Routine Maintenance f Put... the new toner cartridge firmly into the drum unit until you do not, printed pages may separate from right to left and left to right several times. 1 CAUTION...
.... g Clean the primary corona wire inside the drum unit by gently sliding the blue tab from the drum unit. If you put it in the toner cartridge properly or it lock into place. If you hear it may have a vertical stripe. 78 e Pull off the protective cover. 6. Routine Maintenance f Put... the new toner cartridge firmly into the drum unit until you do not, printed pages may separate from right to left and left to right several times. 1 CAUTION...

Users Manual - English
Page 87
Close the front cover. 79 6. Routine Maintenance h Put the drum unit and toner cartridge assembly back in the printer.
Close the front cover. 79 6. Routine Maintenance h Put the drum unit and toner cartridge assembly back in the printer.
Users Manual - English
Page 88
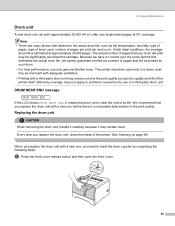
...ideal conditions, the average drum life is near the end of the printer itself. The printer should be significantly less than this estimate. Warranty coverage does not apply to reset the drum counter by the use only genuine Brother toner. When you replace the drum unit with a new one before there ... For best performance, use of pages that you replace the drum unit with a third-party drum unit may be used , number of the printer. Replacing the drum unit CAUTION While removing the drum unit, handle it carefully because it means the drum unit is estimated at 5% coverage. Every...
...ideal conditions, the average drum life is near the end of the printer itself. The printer should be significantly less than this estimate. Warranty coverage does not apply to reset the drum counter by the use only genuine Brother toner. When you replace the drum unit with a new one before there ... For best performance, use of pages that you replace the drum unit with a third-party drum unit may be used , number of the printer. Replacing the drum unit CAUTION While removing the drum unit, handle it carefully because it means the drum unit is estimated at 5% coverage. Every...

Users Manual - English
Page 89
Routine Maintenance b Hold down Go until the message DRUM CLEAR is displayed on a piece of disposable paper or cloth in the illustration. 81 CAUTION We recommend that you put the drum unit and toner cartridge assembly on the LCD, then release Go. >>>> Improper Setup Do not reset the drum counter when you accidentally spill or scatter toner. To prevent damage to the printer from static electricity, DO NOT touch the electrodes shown in case you replace only the toner cartridge. 6. c Take out the drum unit and toner cartridge assembly.
Routine Maintenance b Hold down Go until the message DRUM CLEAR is displayed on a piece of disposable paper or cloth in the illustration. 81 CAUTION We recommend that you put the drum unit and toner cartridge assembly on the LCD, then release Go. >>>> Improper Setup Do not reset the drum counter when you accidentally spill or scatter toner. To prevent damage to the printer from static electricity, DO NOT touch the electrodes shown in case you replace only the toner cartridge. 6. c Take out the drum unit and toner cartridge assembly.

Users Manual - English
Page 90
Routine Maintenance d Push down the blue lock lever and take the toner cartridge out of the unit. • Discard the used drum unit according to unpack a...e Unpack the new drum unit. Exposure to seal up the drum unit tightly in a bag so that toner powder does not spill out of the drum unit. To avoid print quality problems, DO NOT touch the shaded parts ...shown in the printer. If you put it in the illustrations. If toner scatters on your local waste disposal office. CAUTION Wait to local regulations, keeping it off ...
Routine Maintenance d Push down the blue lock lever and take the toner cartridge out of the unit. • Discard the used drum unit according to unpack a...e Unpack the new drum unit. Exposure to seal up the drum unit tightly in a bag so that toner powder does not spill out of the drum unit. To avoid print quality problems, DO NOT touch the shaded parts ...shown in the printer. If you put it in the illustrations. If toner scatters on your local waste disposal office. CAUTION Wait to local regulations, keeping it off ...

Users Manual - English
Page 91
If you put the cartridge in properly, the blue lock lever will lift automatically. g Put the drum unit and toner cartridge assembly back in the toner cartridge properly, or it lock into place. CAUTION Make sure that you put in the printer. h Close the front cover. 83 6. Routine Maintenance f Put the toner cartridge firmly into the new drum unit until you hear it may separate from the drum unit.
If you put the cartridge in properly, the blue lock lever will lift automatically. g Put the drum unit and toner cartridge assembly back in the toner cartridge properly, or it lock into place. CAUTION Make sure that you put in the printer. h Close the front cover. 83 6. Routine Maintenance f Put the toner cartridge firmly into the new drum unit until you hear it may separate from the drum unit.


