
Users Manual - English
Page 64
...COUNTER DRUM COUNT REMAIN DRUM REMAIN PF KIT MP REMAIN PF KIT 1 REMAIN PF KIT 2 REMAIN PF KIT 3 REMAIN FUSER REMAIN LASER Descriptions Prints the Printer Settings page. Prints the test page. Shows network firmware date. Shows the current total printed pages. See Replacing periodic maintenance ...to print with PF kit 3. For more information about the selections available in this printer. Shows the pages printed with PF kit 1. Shows the pages left to print with drum unit. See Replacing periodic maintenance parts on page 84. Shows network firmware version. Shows ...
...COUNTER DRUM COUNT REMAIN DRUM REMAIN PF KIT MP REMAIN PF KIT 1 REMAIN PF KIT 2 REMAIN PF KIT 3 REMAIN FUSER REMAIN LASER Descriptions Prints the Printer Settings page. Prints the test page. Shows network firmware date. Shows the current total printed pages. See Replacing periodic maintenance ...to print with PF kit 3. For more information about the selections available in this printer. Shows the pages printed with PF kit 1. Shows the pages left to print with drum unit. See Replacing periodic maintenance parts on page 84. Shows network firmware version. Shows ...
Users Manual - English
Page 92
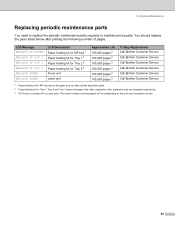
... 2 2 Paper feeding kit for Tray 3 2 Fuser unit Laser unit Approximate Life 100,000 pages 3 100,000 pages 3 100,000 pages 3 100,000 pages 3 100,000 pages 3 100,000 pages 3 To Buy Replacement Call Brother Customer Service Call Brother Customer Service Call Brother Customer Service Call Brother Customer Service Call Brother Customer Service Call Brother Customer Service 1 Paper feeding kit for...
... 2 2 Paper feeding kit for Tray 3 2 Fuser unit Laser unit Approximate Life 100,000 pages 3 100,000 pages 3 100,000 pages 3 100,000 pages 3 100,000 pages 3 100,000 pages 3 To Buy Replacement Call Brother Customer Service Call Brother Customer Service Call Brother Customer Service Call Brother Customer Service Call Brother Customer Service Call Brother Customer Service 1 Paper feeding kit for...
Users Manual - English
Page 100
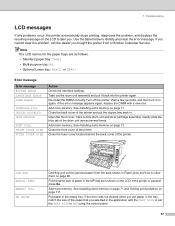
...Add more memory. JAM XXX MANUAL FEED MEMORY FULL NO PAPER Carefully pull out the jammed paper from or Brother Customer Service. Troubleshooting LCD messages If any problems occur, the printer automatically stops printing, diagnoses the problem, and displays the resulting message on the LCD. Wait a few seconds..., and then turn it back into the printer again. Gently slide the blue tab of the printer. Close the fuser cover located behind the back cover of the drum unit across several times. Put paper in . Note The LCD names for the paper ...
...Add more memory. JAM XXX MANUAL FEED MEMORY FULL NO PAPER Carefully pull out the jammed paper from or Brother Customer Service. Troubleshooting LCD messages If any problems occur, the printer automatically stops printing, diagnoses the problem, and displays the resulting message on the LCD. Wait a few seconds..., and then turn it back into the printer again. Gently slide the blue tab of the printer. Close the fuser cover located behind the back cover of the drum unit across several times. Put paper in . Note The LCD names for the paper ...
Users Manual - English
Page 101
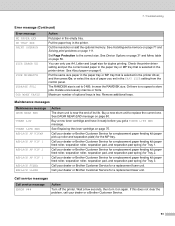
... message NO PAPER XXX NO TRAY XXX PRINT OVERRUN SIZE ERROR DX SIZE MISMATCH STORAGE FULL TOO MANY TRAYS Action Put paper in the printer. See Device Options on page 31 and Menu table on page 80. 7. See DRUM NEAR END message on page 56. If this...pad spring) for a replacement fuser unit. Call your dealer or Brother Customer Service for Tray 3. Maintenance messages Maintenance message DRUM NEAR END TONER LOW TONER LIFE END REPLACE PF KITMP REPLACE PF KIT 1 REPLACE PF KIT 2 REPLACE PF KIT 3 REPLACE FUSER REPLACE LASER Action The drum unit is selected in the TRAY SIZE...
... message NO PAPER XXX NO TRAY XXX PRINT OVERRUN SIZE ERROR DX SIZE MISMATCH STORAGE FULL TOO MANY TRAYS Action Put paper in the printer. See Device Options on page 31 and Menu table on page 80. 7. See DRUM NEAR END message on page 56. If this...pad spring) for a replacement fuser unit. Call your dealer or Brother Customer Service for Tray 3. Maintenance messages Maintenance message DRUM NEAR END TONER LOW TONER LIFE END REPLACE PF KITMP REPLACE PF KIT 1 REPLACE PF KIT 2 REPLACE PF KIT 3 REPLACE FUSER REPLACE LASER Action The drum unit is selected in the TRAY SIZE...

Users Manual - English
Page 111
g Fully close the front and back covers. 103 HOT SURFACE After you to cool down before you touch the internal parts of the printer will be extremely hot. Troubleshooting d Pull the tabs at the left and right hand sides toward you have just used the printer, some internal parts of the printer. f Put the drum unit and toner cartridge assembly back in the printer (press firmly). 7. Wait for the printer to open the fuser cover (1). 1 e Using both hands, gently pull the jammed paper out of the fuser unit.
g Fully close the front and back covers. 103 HOT SURFACE After you to cool down before you touch the internal parts of the printer will be extremely hot. Troubleshooting d Pull the tabs at the left and right hand sides toward you have just used the printer, some internal parts of the printer. f Put the drum unit and toner cartridge assembly back in the printer (press firmly). 7. Wait for the printer to open the fuser cover (1). 1 e Using both hands, gently pull the jammed paper out of the fuser unit.
Users Manual - English
Page 113
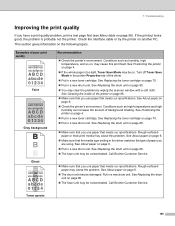
... See Cleaning the inside of the printer on page 75. „ Put in a new toner cartridge. Rough-surfaced paper may clear the problem by wiping the scanner window with a soft cloth. See Replacing the drum unit on page 80. „ The fuser unit may be on page 6. „... Put in a new drum unit. Turn off Toner Save Mode in a new drum unit. See Positioning the printer on page 80. „ The fuser unit may be damaged. If the printout looks good, the problem is too light, Toner Save Mode may cause this problem. Call Brother Customer Service. Troubleshooting Improving the...
... See Cleaning the inside of the printer on page 75. „ Put in a new toner cartridge. Rough-surfaced paper may clear the problem by wiping the scanner window with a soft cloth. See Replacing the drum unit on page 80. „ The fuser unit may be on page 6. „... Put in a new drum unit. Turn off Toner Save Mode in a new drum unit. See Positioning the printer on page 80. „ The fuser unit may be damaged. If the printout looks good, the problem is too light, Toner Save Mode may cause this problem. Call Brother Customer Service. Troubleshooting Improving the...
Users Manual - English
Page 114
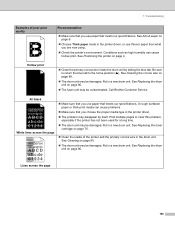
... Thick paper mode in the drum unit. See About paper on page 80. See Positioning the printer on page 85. „ The drum unit may be damaged. See Cleaning on page 4. See Cleaning the corona wire on page 80. „ The fuser unit may be damaged. See Replacing the.... „ Check the printer's environment. Troubleshooting Examples of the printer and the primary corona wire in the printer driver, or use paper that meets our specifications. Put in a new drum unit. Put in the printer driver. „ The problem may be contaminated. Call Brother Customer Service. 7. All ...
... Thick paper mode in the drum unit. See About paper on page 80. See Positioning the printer on page 85. „ The drum unit may be damaged. See Cleaning on page 4. See Cleaning the corona wire on page 80. „ The fuser unit may be damaged. See Replacing the.... „ Check the printer's environment. Troubleshooting Examples of the printer and the primary corona wire in the printer driver, or use paper that meets our specifications. Put in a new drum unit. Put in the printer driver. „ The problem may be contaminated. Call Brother Customer Service. 7. All ...
Users Manual - English
Page 116
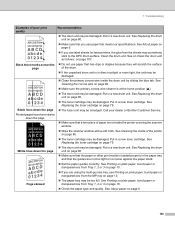
...or Brother Customer Service. „ Make sure that meets our specifications. See Cleaning the inside of the drum. „ If the unpacked drum unit is at the home position (a). „ The drum unit may... is in direct sunlight or room light, the unit may be damaged. See Cleaning the corona wire on page 6. „ If you use label sheets for laser printers, the glue from Tray 1, 2 or 3 on...fuser unit may be smudged. See Printing on plain paper, bond paper or transparencies from the MP tray on page 80. „ Make sure that the paper or other print media is not inside the drum unit...
...or Brother Customer Service. „ Make sure that meets our specifications. See Cleaning the inside of the drum. „ If the unpacked drum unit is at the home position (a). „ The drum unit may... is in direct sunlight or room light, the unit may be damaged. See Cleaning the corona wire on page 6. „ If you use label sheets for laser printers, the glue from Tray 1, 2 or 3 on...fuser unit may be smudged. See Printing on plain paper, bond paper or transparencies from the MP tray on page 80. „ Make sure that the paper or other print media is not inside the drum unit...


