Users Manual - English
Page 103
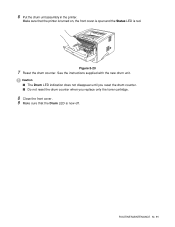
ROUTINE MAINTENANCE 5 - 11 Make sure that the Drum LED is red. Caution ■ The Drum LED indication does not disappear until you reset the drum counter. ■ Do not reset the drum counter when you replace only the toner cartridge. 8 Close the front cover. 9 Make sure that the printer is turned on, the front cover is open and the Status LED is now off. Figure 5-20 7 Reset the drum counter. See the instructions supplied with the new drum unit. 6 Put the drum unit assembly in the printer.
ROUTINE MAINTENANCE 5 - 11 Make sure that the Drum LED is red. Caution ■ The Drum LED indication does not disappear until you reset the drum counter. ■ Do not reset the drum counter when you replace only the toner cartridge. 8 Close the front cover. 9 Make sure that the printer is turned on, the front cover is open and the Status LED is now off. Figure 5-20 7 Reset the drum counter. See the instructions supplied with the new drum unit. 6 Put the drum unit assembly in the printer.

Service Manual
Page 69
...the APIPA protocol, follow these steps; (1) Turn off . When the Status LED comes on APIPA, see the Network User's Guide or visit http://solutions.brother.com 2-36 Active LED is connected to a 10 Base T Ethernet. This Link/Speed LED will be green if the print server is connected to a... its default settings (resetting all the LEDs except for Toner LED go off , then the print server is receiving or transmitting data. 6.2 Network Factory default setting (For HL-5170DN) If you turn on . When the Drum, Paper and Status LEDs go off the printer. (2) Make sure that the front cover ...
...the APIPA protocol, follow these steps; (1) Turn off . When the Status LED comes on APIPA, see the Network User's Guide or visit http://solutions.brother.com 2-36 Active LED is connected to a 10 Base T Ethernet. This Link/Speed LED will be green if the print server is connected to a... its default settings (resetting all the LEDs except for Toner LED go off , then the print server is receiving or transmitting data. 6.2 Network Factory default setting (For HL-5170DN) If you turn on . When the Drum, Paper and Status LEDs go off the printer. (2) Make sure that the front cover ...

Service Manual
Page 174
...office. • Be sure to seal up the drum unit tightly so that toner powder does not spill out of the drum unit assembly. (Fig.5-4) HL-5130/5140/5150D/5170DN SERVICE MANUAL (4) Unpack the new drum unit. (5) Put the toner cartridge in the new drum unit until you need to install it into place... correctly, the blue lock lever is lifted automatically. (Fig.5-5) Make sure you fit the toner cartridge properly, or it separate from the drum unit when you reset the drum counter. • It is subjected to excessive direct sunlight or room light, the unit may separate from domestic waste.
...office. • Be sure to seal up the drum unit tightly so that toner powder does not spill out of the drum unit assembly. (Fig.5-4) HL-5130/5140/5150D/5170DN SERVICE MANUAL (4) Unpack the new drum unit. (5) Put the toner cartridge in the new drum unit until you need to install it into place... correctly, the blue lock lever is lifted automatically. (Fig.5-5) Make sure you fit the toner cartridge properly, or it separate from the drum unit when you reset the drum counter. • It is subjected to excessive direct sunlight or room light, the unit may separate from domestic waste.

Service Manual
Page 192
...paper on the LEDs is displayed.) Clean the corona wire. (Refer to Section 3 of Chapter 5.) Clean the electrodes of the main body and drum unit. (Refer to reset the printer with a new one. Install the tray 1. (Only when the LT is installed.) If the tray 1 is not set correctly ...empty Cover open (Front cover) Cover open (Jam clear cover) Paper jam No paper (HL-5130) No paper (HL5140/5150D/5170 DN) No tray 1 Manual feed Memory full Print overrun Clean drum unit Toner (Yellow light) LED Drum (Yellow light) Paper (Yellow blink) Status (Red light)) Remedy Replace the toner cartridge with...
...paper on the LEDs is displayed.) Clean the corona wire. (Refer to Section 3 of Chapter 5.) Clean the electrodes of the main body and drum unit. (Refer to reset the printer with a new one. Install the tray 1. (Only when the LT is installed.) If the tray 1 is not set correctly ...empty Cover open (Front cover) Cover open (Jam clear cover) Paper jam No paper (HL-5130) No paper (HL5140/5150D/5170 DN) No tray 1 Manual feed Memory full Print overrun Clean drum unit Toner (Yellow light) LED Drum (Yellow light) Paper (Yellow blink) Status (Red light)) Remedy Replace the toner cartridge with...

Service Manual
Page 244
...1. The printer prints a list of mode Test Sample Page Drum Paper Print Fonts (HL-5140/5150D/5170DN only) Factory Reset Status Network factory reset (yellow) (APIPA: ON) Status Network factory reset (green) (APIPA: OFF) Function The printer prints a ...test sample page. Release and then press the Go button to the ready status after sending a print job, follow the steps from your PC. LED Toner Type of the internal...
...1. The printer prints a list of mode Test Sample Page Drum Paper Print Fonts (HL-5140/5150D/5170DN only) Factory Reset Status Network factory reset (yellow) (APIPA: ON) Status Network factory reset (green) (APIPA: OFF) Function The printer prints a ...test sample page. Release and then press the Go button to the ready status after sending a print job, follow the steps from your PC. LED Toner Type of the internal...

Service Manual
Page 257
...is switched from the number of Drum LED ON Development switching timing Fixing temperature Smaller size mode Descriptions 18,000 pages (Counted from the drum unit life.) The developing bias is replaced following settings, the developing bias reset function operates. 1. Close the front... cover. 7-14 Items Timing of the drum rotation in noncontinuous printing) • Transparencies: 170°C...
...is switched from the number of Drum LED ON Development switching timing Fixing temperature Smaller size mode Descriptions 18,000 pages (Counted from the drum unit life.) The developing bias is replaced following settings, the developing bias reset function operates. 1. Close the front... cover. 7-14 Items Timing of the drum rotation in noncontinuous printing) • Transparencies: 170°C...


