
Users Manual - English
Page 7
VI Frequently asked questions (FAQs) The Brother Solutions Center is our one-stop resource for the Brother driver updates. http://solutions.brother.com You can download the latest software and utilities, read FAQs and troubleshooting tips, and go to the 'Solutions' section to learn how to get the most from your Printer needs. You can check here for all your Brother product.
VI Frequently asked questions (FAQs) The Brother Solutions Center is our one-stop resource for the Brother driver updates. http://solutions.brother.com You can download the latest software and utilities, read FAQs and troubleshooting tips, and go to the 'Solutions' section to learn how to get the most from your Printer needs. You can check here for all your Brother product.
Users Manual - English
Page 17
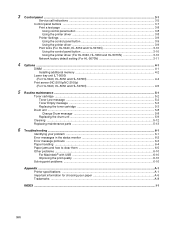
... unit (LT-5000) (For HL-5040, HL-5050 and HL-5070N 4-4 Print server (NC-2010p/NC-2100p) (For HL-5040, HL-5050 and HL-5070N 4-5 5 Routine maintenance ...5-1 Toner cartridge ...5-2 Toner Low message ...5-2 Toner Empty message ...5-3 Replacing the toner cartridge 5-3 Drum unit ...5-8 Change Drum message ...5-8 Replacing the drum unit ...5-9 Cleaning ...5-12 Replacing maintenance parts ...5-13 6 Troubleshooting ...6-1 Identifying your problem ...6-1 Error...
... unit (LT-5000) (For HL-5040, HL-5050 and HL-5070N 4-4 Print server (NC-2010p/NC-2100p) (For HL-5040, HL-5050 and HL-5070N 4-5 5 Routine maintenance ...5-1 Toner cartridge ...5-2 Toner Low message ...5-2 Toner Empty message ...5-3 Replacing the toner cartridge 5-3 Drum unit ...5-8 Change Drum message ...5-8 Replacing the drum unit ...5-9 Cleaning ...5-12 Replacing maintenance parts ...5-13 6 Troubleshooting ...6-1 Identifying your problem ...6-1 Error...
Users Manual - English
Page 112
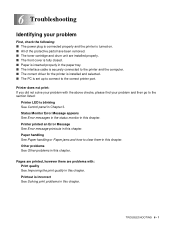
Other problems See Other problems in this chapter. 6 Troubleshooting Identifying your problem First, check the following: ■ The power plug is connected properly and the printer is turned on. ■ All of the protective ... print: If you did not solve your problem and then go to the section listed: Printer LED is blinking See Control panel in this chapter. TROUBLESHOOTING 6 - 1
Other problems See Other problems in this chapter. 6 Troubleshooting Identifying your problem First, check the following: ■ The power plug is connected properly and the printer is turned on. ■ All of the protective ... print: If you did not solve your problem and then go to the section listed: Printer LED is blinking See Control panel in this chapter. TROUBLESHOOTING 6 - 1
Users Manual - English
Page 113
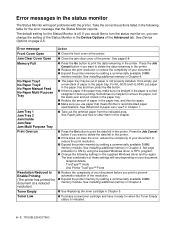
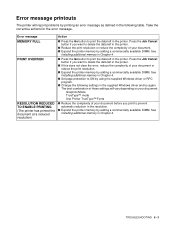
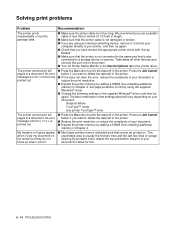
...Press the Go button to ON by adding a commercially available DIMM memory module. For HL-5030 and HL-5040, put it is off. Set page protection to print the data remaining in Chapter... 5. ■ Purchase a new toner cartridge and have it is indicated. 6 - 2 TROUBLESHOOTING If you would like to clear them in this does not clear the error, reduce the complexity...paper that the Status Monitor reports. The default setting for the error message that meets Brother's recommended paper specifications. See Installing additional memory in the supplied Windows driver and try...
...Press the Go button to ON by adding a commercially available DIMM memory module. For HL-5030 and HL-5040, put it is off. Set page protection to print the data remaining in Chapter... 5. ■ Purchase a new toner cartridge and have it is indicated. 6 - 2 TROUBLESHOOTING If you would like to clear them in this does not clear the error, reduce the complexity...paper that the Status Monitor reports. The default setting for the error message that meets Brother's recommended paper specifications. See Installing additional memory in the supplied Windows driver and try...
Users Manual - English
Page 114
... not clear the error, reduce the complexity of your document or reduce the print resolution. ■ Expand the printer memory by adding a commercially available DIMM. TROUBLESHOOTING 6 - 3 Press the Job Cancel button if you want to delete the data left in the printer. ■ Reduce the print resolution or reduce the complexity...
... not clear the error, reduce the complexity of your document or reduce the print resolution. ■ Expand the printer memory by adding a commercially available DIMM. TROUBLESHOOTING 6 - 3 Press the Job Cancel button if you want to delete the data left in the printer. ■ Reduce the print resolution or reduce the complexity...
Users Manual - English
Page 115
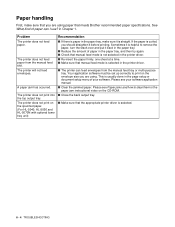
... the top output tray. The printer does not print on the specified paper. (For HL-5040, HL-5050 and HL-5070N with optional lower tray unit) Recommendation ■ If there is paper in the ... the back output tray. ■ Make sure that manual feed mode is selected. 6 - 4 TROUBLESHOOTING Paper handling First, make sure it is helpful to remove the paper, turn the stack over and ...them or the paper jam instructional video on the envelope size you are using paper that meets Brother recommended paper specifications. in the printer driver. ■ The printer can I use? If...
... the top output tray. The printer does not print on the specified paper. (For HL-5040, HL-5050 and HL-5070N with optional lower tray unit) Recommendation ■ If there is paper in the ... the back output tray. ■ Make sure that manual feed mode is selected. 6 - 4 TROUBLESHOOTING Paper handling First, make sure it is helpful to remove the paper, turn the stack over and ...them or the paper jam instructional video on the envelope size you are using paper that meets Brother recommended paper specifications. in the printer driver. ■ The printer can I use? If...
Users Manual - English
Page 116
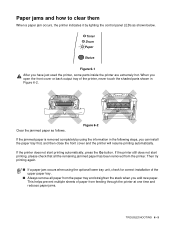
... stack when you open the front cover or back output tray of paper from feeding through the printer at one time and reduces paper jams. TROUBLESHOOTING 6 - 5 When you add new paper. This helps prevent multiple sheets of the printer, never touch the shaded parts shown in the following steps, you have...
... stack when you open the front cover or back output tray of paper from feeding through the printer at one time and reduces paper jams. TROUBLESHOOTING 6 - 5 When you add new paper. This helps prevent multiple sheets of the printer, never touch the shaded parts shown in the following steps, you have...
Users Manual - English
Page 117
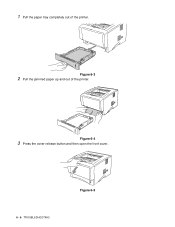
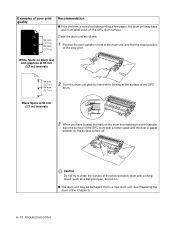
1 Pull the paper tray completely out of the printer. Figure 6-4 3 Press the cover release button and then open the front cover. 6 - 6 TROUBLESHOOTING Figure 6-5 Figure 6-3 2 Pull the jammed paper up and out of the printer.
1 Pull the paper tray completely out of the printer. Figure 6-4 3 Press the cover release button and then open the front cover. 6 - 6 TROUBLESHOOTING Figure 6-5 Figure 6-3 2 Pull the jammed paper up and out of the printer.
Users Manual - English
Page 118
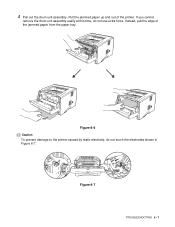
Figure 6-6 Caution To prevent damage to the printer caused by static electricity, do not use extra force. Instead, pull the edge of the printer. 4 Pull out the drum unit assembly. If you cannot remove the drum unit assembly easily at this time, do not touch the electrodes shown in Figure 6-7. Figure 6-7 TROUBLESHOOTING 6 - 7 Pull the jammed paper up and out of the jammed paper from the paper tray.
Figure 6-6 Caution To prevent damage to the printer caused by static electricity, do not use extra force. Instead, pull the edge of the printer. 4 Pull out the drum unit assembly. If you cannot remove the drum unit assembly easily at this time, do not touch the electrodes shown in Figure 6-7. Figure 6-7 TROUBLESHOOTING 6 - 7 Pull the jammed paper up and out of the jammed paper from the paper tray.
Users Manual - English
Page 119
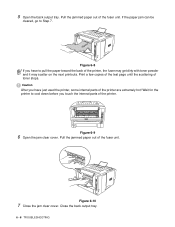
... the jam clear cover. Figure 6-10 7 Close the jam clear cover. Close the back output tray. 6 - 8 TROUBLESHOOTING Pull the jammed paper out of toner stops. Caution After you have just used the printer, some internal parts of the printer, the fuser may get dirty with toner powder and it may scatter on... paper out of the printer. 5 Open the back output tray. If the paper jam can be cleared, go to cool down before you touch the internal parts of the fuser unit.
... the jam clear cover. Figure 6-10 7 Close the jam clear cover. Close the back output tray. 6 - 8 TROUBLESHOOTING Pull the jammed paper out of toner stops. Caution After you have just used the printer, some internal parts of the printer, the fuser may get dirty with toner powder and it may scatter on... paper out of the printer. 5 Open the back output tray. If the paper jam can be cleared, go to cool down before you touch the internal parts of the fuser unit.
Users Manual - English
Page 120
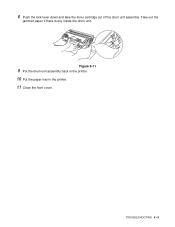
8 Push the lock lever down and take the toner cartridge out of the drum unit assembly. TROUBLESHOOTING 6 - 9 Figure 6-11 9 Put the drum unit assembly back in the printer. 10 Put the paper tray in the printer. 11 Close the front cover. Take out the jammed paper if there is any inside the drum unit.
8 Push the lock lever down and take the toner cartridge out of the drum unit assembly. TROUBLESHOOTING 6 - 9 Figure 6-11 9 Put the drum unit assembly back in the printer. 10 Put the paper tray in the printer. 11 Close the front cover. Take out the jammed paper if there is any inside the drum unit.
Users Manual - English
Page 121
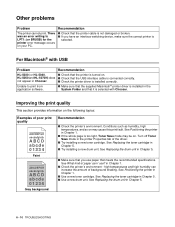
... on your PC. in Chapter 5. 6 - 10 TROUBLESHOOTING See Replacing the drum unit in Chapter 1. ■ Check the printer's environment - For Macintosh® with Chooser. See Replacing the drum unit in the System Folder and that it is selected with USB Problem Recommendation HL-5030 (or HL-5040, ■ Check that the printer cable is...
... on your PC. in Chapter 5. 6 - 10 TROUBLESHOOTING See Replacing the drum unit in Chapter 1. ■ Check the printer's environment - For Macintosh® with Chooser. See Replacing the drum unit in the System Folder and that it is selected with USB Problem Recommendation HL-5030 (or HL-5040, ■ Check that the printer cable is...
Users Manual - English
Page 122
.... in Chapter 1. See Positioning the printer in Chapter 1. ■ The drum unit may be damaged. Hollow print ■ You may cause the problem. All black TROUBLESHOOTING 6 - 11 See What kind of paper can I use? See Replacing the drum unit in Chapter 1. ■ Make sure that meets our specifications. Make sure you...
.... in Chapter 1. See Positioning the printer in Chapter 1. ■ The drum unit may be damaged. Hollow print ■ You may cause the problem. All black TROUBLESHOOTING 6 - 11 See What kind of paper can I use? See Replacing the drum unit in Chapter 1. ■ Make sure that meets our specifications. Make sure you...
Users Manual - English
Page 123
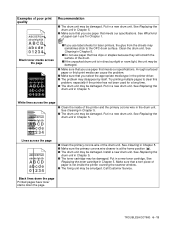
... by hand while looking at 94 mm (3.7 in.) intervals 3 When you have glue from label stock on the OPC drum surface. Put in Chapter 5. 6 - 12 TROUBLESHOOTING White Spots on the surface comes off.
... by hand while looking at 94 mm (3.7 in.) intervals 3 When you have glue from label stock on the OPC drum surface. Put in Chapter 5. 6 - 12 TROUBLESHOOTING White Spots on the surface comes off.
Users Manual - English
Page 124
... Chapter 5. ■ Make sure that you use paper that meets our specifications. Black lines down the page Printed pages have toner stains down the page. TROUBLESHOOTING 6 - 13
... Chapter 5. ■ Make sure that you use paper that meets our specifications. Black lines down the page Printed pages have toner stains down the page. TROUBLESHOOTING 6 - 13

Users Manual - English
Page 125
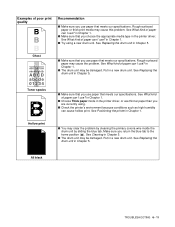
... output path. See What kind of paper can I use ? in Chapter 5. ■ The toner cartridge may have been in the input tray. 6 - 14 TROUBLESHOOTING See What kind of paper can I use ? in Chapter 1. ■ If you are not too tight or too loose against the paper stack. ■ Set...; Check the paper type and quality. See Printing on plain paper from the manual feed tray (For HL-5030 and HL-5040) in Chapter 1 or Printing on plain paper from the MP tray (For HL-5050 and HL-5070N) in Chapter 1. ■ Check the paper type and quality. Curl or wave B DEFGH abc efghijk ...
... output path. See What kind of paper can I use ? in Chapter 5. ■ The toner cartridge may have been in the input tray. 6 - 14 TROUBLESHOOTING See What kind of paper can I use ? in Chapter 1. ■ If you are not too tight or too loose against the paper stack. ■ Set...; Check the paper type and quality. See Printing on plain paper from the manual feed tray (For HL-5030 and HL-5040) in Chapter 1 or Printing on plain paper from the MP tray (For HL-5050 and HL-5070N) in Chapter 1. ■ Check the paper type and quality. Curl or wave B DEFGH abc efghijk ...
Users Manual - English
Page 126
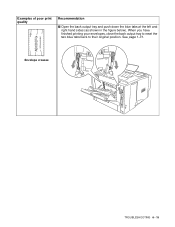
When you have finished printing your envelopes, close the back output tray to reset the two blue tabs back to their original position. ABCDEFG EFGHIJKLMN Envelope creases TROUBLESHOOTING 6 - 15 Examples of poor print quality Recommendation ■ Open the back output tray and push down the blue tabs at the left and right hand sides (as shown in the figure below). See page 1-31.
When you have finished printing your envelopes, close the back output tray to reset the two blue tabs back to their original position. ABCDEFG EFGHIJKLMN Envelope creases TROUBLESHOOTING 6 - 15 Examples of poor print quality Recommendation ■ Open the back output tray and push down the blue tabs at the left and right hand sides (as shown in the figure below). See page 1-31.
Users Manual - English
Page 127
... the Job Cancel button if you are using the supplied Windows® driver. ■ Change the following settings in the printer. ■ If this . 6 - 16 TROUBLESHOOTING See Installing additional memory in Chapter 4. ■ Most laser printers have chosen the appropriate printer driver with 'Set as Default'. ■ Make sure that the...
... the Job Cancel button if you are using the supplied Windows® driver. ■ Change the following settings in the printer. ■ If this . 6 - 16 TROUBLESHOOTING See Installing additional memory in Chapter 4. ■ Most laser printers have chosen the appropriate printer driver with 'Set as Default'. ■ Make sure that the...

Quick Setup Guide - English
Page 3
... Only) ..... 14 Connecting the Printer to Your PC and Installing the Driver For USB Interface Cable Users 16 ■ For Mac® OS 8.6 to 9.2 Users (HL-5030/5040 Users 16 Installing the Driver & Connecting the Printer to your Macintosh ■ For Mac® OS 8.6 to your Macintosh & Installing the Driver ■ Other... Printer to Your PC 2. Installing the Driver and Connecting the Printer to your Macintosh & Installing the Driver 2. Table of the Printer 22 Options ...23 ■ Troubleshooting User's Guide Chapter 6 1
... Only) ..... 14 Connecting the Printer to Your PC and Installing the Driver For USB Interface Cable Users 16 ■ For Mac® OS 8.6 to 9.2 Users (HL-5030/5040 Users 16 Installing the Driver & Connecting the Printer to your Macintosh ■ For Mac® OS 8.6 to your Macintosh & Installing the Driver ■ Other... Printer to Your PC 2. Installing the Driver and Connecting the Printer to your Macintosh & Installing the Driver 2. Table of the Printer 22 Options ...23 ■ Troubleshooting User's Guide Chapter 6 1

Quick Setup Guide - English
Page 8
Download the latest drivers and utilities for your printers, read by Screen Reader 'text-to learn about using your Brother printer. 5 Brother Solutions Center The Brother Solutions Center (http://solutions.brother.com) is a one-stop resource for printer maintenance. 7 On-Line Registration Register your printer needs. For visually...included) 4 Learn More Watch instructional movies to -speech' software. Supplied CD-ROM You can be read the FAQs and troubleshooting tips, or learn more about printer solutions. 6 Maintenance Tutorial Instructional movie for all your product on-line.
Download the latest drivers and utilities for your printers, read by Screen Reader 'text-to learn about using your Brother printer. 5 Brother Solutions Center The Brother Solutions Center (http://solutions.brother.com) is a one-stop resource for printer maintenance. 7 On-Line Registration Register your printer needs. For visually...included) 4 Learn More Watch instructional movies to -speech' software. Supplied CD-ROM You can be read the FAQs and troubleshooting tips, or learn more about printer solutions. 6 Maintenance Tutorial Instructional movie for all your product on-line.


