Users Manual - English
Page 44
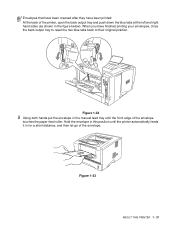
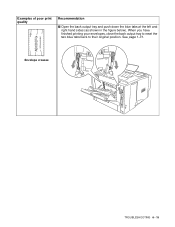
... sides (as shown in the figure below). Envelopes that have been creased after they have finished printing your envelopes, close the back output tray to reset the two blue tabs back to their original position.
... sides (as shown in the figure below). Envelopes that have been creased after they have finished printing your envelopes, close the back output tray to reset the two blue tabs back to their original position.

Users Manual - English
Page 48
Envelopes that have been creased after they have finished printing your envelopes, close the back output tray to reset the two blue tabs back to their original position. Figure 1-38 Make sure that they are neatly stacked and in the proper position in a skewed ...
Envelopes that have been creased after they have finished printing your envelopes, close the back output tray to reset the two blue tabs back to their original position. Figure 1-38 Make sure that they are neatly stacked and in the proper position in a skewed ...

Users Manual - English
Page 63
...). For Thicker paper that has curled once the first side has been printed on, and you have finished printing, close the back output tray to reset the two blue tabs back to their original position. Guidelines for the second time from manual feed tray or MP tray to allow the other...
...). For Thicker paper that has curled once the first side has been printed on, and you have finished printing, close the back output tray to reset the two blue tabs back to their original position. Guidelines for the second time from manual feed tray or MP tray to allow the other...
Users Manual - English
Page 93
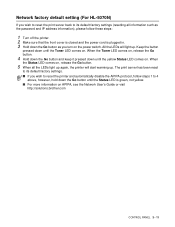
...warming up . Keep the button pressed down the Go button until the yellow Status LED comes on . Network factory default setting (For HL-5070N) If you wish to reset the print server back to its default factory settings. ■ If you turn on APIPA, see the Network User's Guide or ...visit http://solutions.brother.com CONTROL PANEL 3 - 11 When the Status LED comes on, release the Go button. 5 When all information such as you wish to reset the printer and automatically disable the APIPA protocol, follow these steps: 1 Turn off...
...warming up . Keep the button pressed down the Go button until the yellow Status LED comes on . Network factory default setting (For HL-5070N) If you wish to reset the print server back to its default factory settings. ■ If you turn on APIPA, see the Network User's Guide or ...visit http://solutions.brother.com CONTROL PANEL 3 - 11 When the Status LED comes on, release the Go button. 5 When all information such as you wish to reset the printer and automatically disable the APIPA protocol, follow these steps: 1 Turn off...
Users Manual - English
Page 109
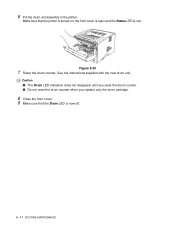
Figure 5-20 7 Reset the drum counter. See the instructions supplied with the new drum unit. Caution ■ The Drum LED indication does not disappear until you reset the drum counter. ■ Do not reset the drum counter when you replace only the toner cartridge. 8 Close the front cover. 9 Make sure that the printer is turned on, the front cover is open and the Status LED is now off. 5 - 11 ROUTINE MAINTENANCE Make sure that the Drum LED is red. 6 Put the drum unit assembly in the printer.
Figure 5-20 7 Reset the drum counter. See the instructions supplied with the new drum unit. Caution ■ The Drum LED indication does not disappear until you reset the drum counter. ■ Do not reset the drum counter when you replace only the toner cartridge. 8 Close the front cover. 9 Make sure that the printer is turned on, the front cover is open and the Status LED is now off. 5 - 11 ROUTINE MAINTENANCE Make sure that the Drum LED is red. 6 Put the drum unit assembly in the printer.
Users Manual - English
Page 126
ABCDEFG EFGHIJKLMN Envelope creases TROUBLESHOOTING 6 - 15 When you have finished printing your envelopes, close the back output tray to reset the two blue tabs back to their original position. See page 1-31. Examples of poor print quality Recommendation ■ Open the back output tray and push down the blue tabs at the left and right hand sides (as shown in the figure below).
ABCDEFG EFGHIJKLMN Envelope creases TROUBLESHOOTING 6 - 15 When you have finished printing your envelopes, close the back output tray to reset the two blue tabs back to their original position. See page 1-31. Examples of poor print quality Recommendation ■ Open the back output tray and push down the blue tabs at the left and right hand sides (as shown in the figure below).


