Users Manual - English
Page 12
...standard electrical wiring. There is a danger of an emergency, you must disconnect the power cord from the power outlet to -phase voltage 230V. Caution for an IT power system with this printer near a power outlet that is incorrectly replaced. Geräuschemission / Acoustic noise emission (for ...only) Lpa < 70 dB (A) DIN 45635-19-01-KL2 XI Incorrectly wired extension cords may cause personal injury and equipment damage. Extension cords used batteries according to local regulations. IT power system (For Norway only) This product is also designed for LAN connection Connect this ...
...standard electrical wiring. There is a danger of an emergency, you must disconnect the power cord from the power outlet to -phase voltage 230V. Caution for an IT power system with this printer near a power outlet that is incorrectly replaced. Geräuschemission / Acoustic noise emission (for ...only) Lpa < 70 dB (A) DIN 45635-19-01-KL2 XI Incorrectly wired extension cords may cause personal injury and equipment damage. Extension cords used batteries according to local regulations. IT power system (For Norway only) This product is also designed for LAN connection Connect this ...
Users Manual - English
Page 18
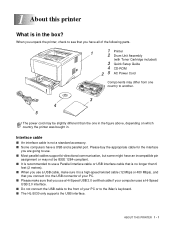
... parts. 1 1 Printer 2 Drum Unit Assembly (with Toner Cartridge included) 3 Quick Setup Guide 4 CD-ROM 2 5 AC Power Cord Components may differ from one country to another. 3 4 5 The power cord may not be slightly different than the one in the figure above, depending on which country the printer was bought in...but some might have an incompatible pin assignment or may be IEEE 1284-compliant. ■ It is recommended to the iMac's keyboard. ■ The HL-5030 only supports the USB interface. ABOUT THIS PRINTER 1 - 1 When you unpack the printer, check to see that you use a USB cable,...
... parts. 1 1 Printer 2 Drum Unit Assembly (with Toner Cartridge included) 3 Quick Setup Guide 4 CD-ROM 2 5 AC Power Cord Components may differ from one country to another. 3 4 5 The power cord may not be slightly different than the one in the figure above, depending on which country the printer was bought in...but some might have an incompatible pin assignment or may be IEEE 1284-compliant. ■ It is recommended to the iMac's keyboard. ■ The HL-5030 only supports the USB interface. ABOUT THIS PRINTER 1 - 1 When you unpack the printer, check to see that you use a USB cable,...

Users Manual - English
Page 21
...of the printer is not stable. Power source: USA and Canada: AC 110 to 120 V, 50/60 Hz Europe and Australia: AC 220 to 240 V, 50/60 Hz The power cord, including extensions, should be easily ...unplugged. ■ Only use the printer. Do not share the same power circuit with these appliances, we recommend that , if...9632; To avoid ozone building up, put the printer in direct sunlight. Use a voltage regulator if the power source is blocked. If you have to put it near a window, use a blind or a heavy curtain...
...of the printer is not stable. Power source: USA and Canada: AC 110 to 120 V, 50/60 Hz Europe and Australia: AC 220 to 240 V, 50/60 Hz The power cord, including extensions, should be easily ...unplugged. ■ Only use the printer. Do not share the same power circuit with these appliances, we recommend that , if...9632; To avoid ozone building up, put the printer in direct sunlight. Use a voltage regulator if the power source is blocked. If you have to put it near a window, use a blind or a heavy curtain...
Users Manual - English
Page 90
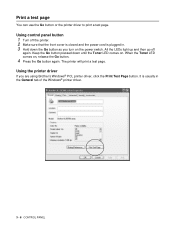
... Windows® printer driver. 3 - 8 CONTROL PANEL The printer will print a test page. Keep the Go button pressed down the Go button as you are using Brother's Windows® PCL printer driver, click the Print Test Page button. When the Toner LED comes on . Using the printer driver If you turn on... button 1 Turn off again. All the LEDs light up and then go off the printer. 2 Make sure that the front cover is closed and the power cord is usually in . 3 Hold down until the Toner LED comes on , release the Go button. 4 Press the Go button again. Print a test page You can...
... Windows® printer driver. 3 - 8 CONTROL PANEL The printer will print a test page. Keep the Go button pressed down the Go button as you are using Brother's Windows® PCL printer driver, click the Print Test Page button. When the Toner LED comes on . Using the printer driver If you turn on... button 1 Turn off again. All the LEDs light up and then go off the printer. 2 Make sure that the front cover is closed and the power cord is usually in . 3 Hold down until the Toner LED comes on , release the Go button. 4 Press the Go button again. Print a test page You can...
Users Manual - English
Page 91
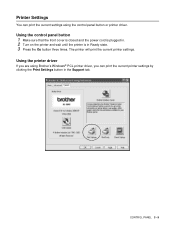
CONTROL PANEL 3 - 9 Using the control panel button 1 Make sure that the front cover is closed and the power cord is plugged in. 2 Turn on the printer and wait until the printer is in the Support tab. Using the printer driver If you are using Brother's Windows® PCL printer driver, you can print the current settings using the control panel button or printer driver. Printer Settings You can print the current printer settings by clicking the Print Settings button in Ready state. 3 Press the Go button three times. The printer will print the current printer settings.
CONTROL PANEL 3 - 9 Using the control panel button 1 Make sure that the front cover is closed and the power cord is plugged in. 2 Turn on the printer and wait until the printer is in the Support tab. Using the printer driver If you are using Brother's Windows® PCL printer driver, you can print the current settings using the control panel button or printer driver. Printer Settings You can print the current printer settings by clicking the Print Settings button in Ready state. 3 Press the Go button three times. The printer will print the current printer settings.

Users Manual - English
Page 92
... is closed and the power cord is plugged in the Support tab. 3 - 10 CONTROL PANEL Keep the Go button pressed down the Go button as you can print a list of the internal fonts. The printer will print a list of the internal fonts using Brother's Windows® PCL ...printer driver, you turn on . Using the control panel button 1 Turn off again. When the Toner LED comes on, release the Go button. 4 Press and hold the Go button again until the Toner LED comes on the power switch. Using the printer driver (For HL-5040, HL-5050 and HL...
... is closed and the power cord is plugged in the Support tab. 3 - 10 CONTROL PANEL Keep the Go button pressed down the Go button as you can print a list of the internal fonts. The printer will print a list of the internal fonts using Brother's Windows® PCL ...printer driver, you turn on . Using the control panel button 1 Turn off again. When the Toner LED comes on, release the Go button. 4 Press and hold the Go button again until the Toner LED comes on the power switch. Using the printer driver (For HL-5040, HL-5050 and HL...
Users Manual - English
Page 93
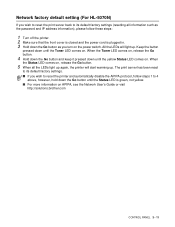
...(For HL-5070N) If you wish to reset the print server back to its default factory settings. ■ If you wish to reset the printer and automatically disable the APIPA protocol, follow these steps: 1 Turn off the printer. 2 Make sure that the front cover is closed and the power cord is green..., not yellow. ■ For more information on APIPA, see the Network User's Guide or visit http://solutions.brother.com CONTROL PANEL 3 - 11 Keep the button pressed down until the Toner LED comes on.
...(For HL-5070N) If you wish to reset the print server back to its default factory settings. ■ If you wish to reset the printer and automatically disable the APIPA protocol, follow these steps: 1 Turn off the printer. 2 Make sure that the front cover is closed and the power cord is green..., not yellow. ■ For more information on APIPA, see the Network User's Guide or visit http://solutions.brother.com CONTROL PANEL 3 - 11 Keep the button pressed down until the Toner LED comes on.
Quick Setup Guide - English
Page 2
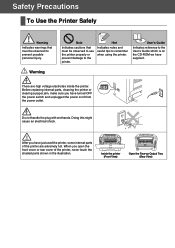
...internal parts of the printer, never touch the shaded parts shown in the illustration. Warning Note Indicates cautions that must be observed to prevent possible personal injury. User's Guide Indicates reference to the User's Guide which is on the CD-ROM we have turned OFF the power switch and unplugged the power cord... from the power outlet. When you have supplied. Safety Precautions To Use the Printer Safely Warning Indicates warnings that must ...
...internal parts of the printer, never touch the shaded parts shown in the illustration. Warning Note Indicates cautions that must be observed to prevent possible personal injury. User's Guide Indicates reference to the User's Guide which is on the CD-ROM we have turned OFF the power switch and unplugged the power cord... from the power outlet. When you have supplied. Safety Precautions To Use the Printer Safely Warning Indicates warnings that must ...
Quick Setup Guide - English
Page 5
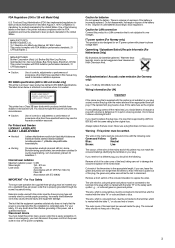
...power cord from the mains lead and fit an appropriate three-pin plug. IT power system (For Norway only) This product is not suitable for an IT power system with this product to a LAN connection that is supplied with phase-to over voltages. Always replace the fuse cover. MANUFACTURED: Brother... kan användaren utsättas för osynlig laserstrålning, som överskrider gränsen för laserklass 1. Internal laser radiation Maximum radiation power: 5 mW Wave length: 760 - 810 nm Laser class: Class IIIb (Accordance with 21 CFR Part 1040.10) Class 3B (...
...power cord from the mains lead and fit an appropriate three-pin plug. IT power system (For Norway only) This product is not suitable for an IT power system with this product to a LAN connection that is supplied with phase-to over voltages. Always replace the fuse cover. MANUFACTURED: Brother... kan användaren utsättas för osynlig laserstrålning, som överskrider gränsen för laserklass 1. Internal laser radiation Maximum radiation power: 5 mW Wave length: 760 - 810 nm Laser class: Class IIIb (Accordance with 21 CFR Part 1040.10) Class 3B (...
Quick Setup Guide - English
Page 6
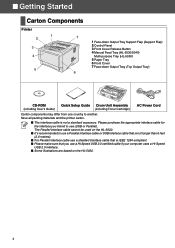
...Release Button 4 Manual Feed Tray (HL-5030/5040) Multi-purpose Tray (HL-5050) 5 Paper Tray 6 Front Cover 7 Face-down Output Tray (Top Output Tray) CD-ROM (including User's Guide) Quick Setup Guide Drum Unit Assembly (including Toner Cartridge) AC Power Cord Carton components may differ from one country... to use a shielded interface cable that you intend to another. The Parallel interface cable cannot be used on the HL-5050. 4
...Release Button 4 Manual Feed Tray (HL-5030/5040) Multi-purpose Tray (HL-5050) 5 Paper Tray 6 Front Cover 7 Face-down Output Tray (Top Output Tray) CD-ROM (including User's Guide) Quick Setup Guide Drum Unit Assembly (including Toner Cartridge) AC Power Cord Carton components may differ from one country... to use a shielded interface cable that you intend to another. The Parallel interface cable cannot be used on the HL-5050. 4

Quick Setup Guide - English
Page 12
...Your Printer 4 Print a Test Page Do NOT connect the interface cable. Turn the power switch on. 4 Press the Go button. The printer prints a test page. Go to the next page to the printer. 2 Plug the AC power cord into an AC outlet. Extend the Support flap. 1 Make sure that the test... page has printed correctly. Connecting the interface cable is off. Check that the printer power switch is done when installing the driver. 3 After the printer has...
...Your Printer 4 Print a Test Page Do NOT connect the interface cable. Turn the power switch on. 4 Press the Go button. The printer prints a test page. Go to the next page to the printer. 2 Plug the AC power cord into an AC outlet. Extend the Support flap. 1 Make sure that the test... page has printed correctly. Connecting the interface cable is off. Check that the printer power switch is done when installing the driver. 3 After the printer has...

Quick Setup Guide - English
Page 24
... be adequately insured with the carrier. Failure to the Printer and may VOID THE WARRANTY. 1 Turn off the printer power switch, and then unplug the AC power cord. 3 Re-pack the printer. 2 Remove the drum unit assembly. The Printer should also be removed from the Printer... and placed in the plastic bag and seal the bag completely. Adobe PostScript® and PostScript3TM are registered Compilation and Publication Under the supervision of Brother ...
... be adequately insured with the carrier. Failure to the Printer and may VOID THE WARRANTY. 1 Turn off the printer power switch, and then unplug the AC power cord. 3 Re-pack the printer. 2 Remove the drum unit assembly. The Printer should also be removed from the Printer... and placed in the plastic bag and seal the bag completely. Adobe PostScript® and PostScript3TM are registered Compilation and Publication Under the supervision of Brother ...

