

Users Manual - English
Page 5
... 146 Jam Tray 1 / Jam Tray 2 (Paper jam inside the paper tray 146 Jam Duplex (paper jam underneath the standard paper tray (tray 1) or in the fuser unit 149 Jam Rear (Paper jam behind the back cover 152 Jam Inside (Paper jam inside the machine 155 Improving the print quality...159 Solving...
... 146 Jam Tray 1 / Jam Tray 2 (Paper jam inside the paper tray 146 Jam Duplex (paper jam underneath the standard paper tray (tray 1) or in the fuser unit 149 Jam Rear (Paper jam behind the back cover 152 Jam Inside (Paper jam inside the machine 155 Improving the print quality...159 Solving...

Users Manual - English
Page 13
... adhesive should have previously been used in this machine must be able to withstand a temperature of the sheet. IMPORTANT • Avoid feeding labels with any Brother warranty or service agreement. Using labels with each side folded as shown in figure below 1 If you use labels that they may damage your machine... result in labels peeling off and causing serious jams or print problems. All labels used or is more stable at the high temperatures in the fuser unit. This damage may not be covered under any part of 0.1 seconds.
... adhesive should have previously been used in this machine must be able to withstand a temperature of the sheet. IMPORTANT • Avoid feeding labels with any Brother warranty or service agreement. Using labels with each side folded as shown in figure below 1 If you use labels that they may damage your machine... result in labels peeling off and causing serious jams or print problems. All labels used or is more stable at the high temperatures in the fuser unit. This damage may not be covered under any part of 0.1 seconds.

Users Manual - English
Page 77
Shows the pages left to print with the fuser unit. Appears when you replace the belt unit. Appears when you replace the drum unit. When Auto is chosen in Tray Use: Chooses the order ... Panel Machine Info. (continued) Submenu Drum Count Menu Selections Options Parts Life Drum Life Belt Life PF KitMP Life PF Kit1 Life PF Kit2 Life Fuser Life Laser Life Reset Parts Life (Appears only when the drum unit or belt unit has exceeded its rated life.) Drum Unit Belt Unit Descriptions...
Shows the pages left to print with the fuser unit. Appears when you replace the belt unit. Appears when you replace the drum unit. When Auto is chosen in Tray Use: Chooses the order ... Panel Machine Info. (continued) Submenu Drum Count Menu Selections Options Parts Life Drum Life Belt Life PF KitMP Life PF Kit1 Life PF Kit2 Life Fuser Life Laser Life Reset Parts Life (Appears only when the drum unit or belt unit has exceeded its rated life.) Drum Unit Belt Unit Descriptions...

Users Manual - English
Page 97
... life is based on how to return the used toner cartridge to http://www.brother.com/original/index.html for a replacement fuser unit. If you use . 5 Standard toner cartridge 6 High capacity cartridge How to return your dealer or Brother Customer Service for each of toner cartridges and a waste toner box is approximate and...
... life is based on how to return the used toner cartridge to http://www.brother.com/original/index.html for a replacement fuser unit. If you use . 5 Standard toner cartridge 6 High capacity cartridge How to return your dealer or Brother Customer Service for each of toner cartridges and a waste toner box is approximate and...
Users Manual - English
Page 147
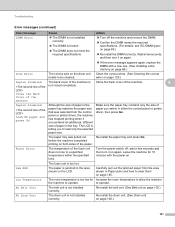
...Confirm the DIMM meets the required specifications. (For details, see SO-DIMM types on the LCD. The fuser unit is not installed correctly. No Belt Unit The belt unit is too hot. Make sure the paper ...tray matches the paper size that was pulled out Re-install the paper tray and press Go. Fuser Error The temperature of the machine. Although the size of paper you to be cleaned. Jam ...XXX The paper is Close the back cover of the machine. 6 Close the Back Cover of the fuser unit does not rise to operate. Re-install the belt unit. (See Belt unit on page 105...
...Confirm the DIMM meets the required specifications. (For details, see SO-DIMM types on the LCD. The fuser unit is not installed correctly. No Belt Unit The belt unit is too hot. Make sure the paper ...tray matches the paper size that was pulled out Re-install the paper tray and press Go. Fuser Error The temperature of the machine. Although the size of paper you to be cleaned. Jam ...XXX The paper is Close the back cover of the machine. 6 Close the Back Cover of the fuser unit does not rise to operate. Re-install the belt unit. (See Belt unit on page 105...

Users Manual - English
Page 150
...; Make sure that manual feed mode is not chosen in Media Type to print on the size of envelopes you are using paper that meets Brother recommended paper specifications. (See Type and size of paper on page 2.) Problem Recommendation The machine does not feed paper. If there is paper in... of your software. (See your application to a thin setting. Turn the stack over and put it creases. Open the back cover and check the fuser rollers for any jammed paper. If the paper is powered on and that no error messages on page 130. 6 Make sure that you have...
...; Make sure that manual feed mode is not chosen in Media Type to print on the size of envelopes you are using paper that meets Brother recommended paper specifications. (See Type and size of paper on page 2.) Problem Recommendation The machine does not feed paper. If there is paper in... of your software. (See your application to a thin setting. Turn the stack over and put it creases. Open the back cover and check the fuser rollers for any jammed paper. If the paper is powered on and that no error messages on page 130. 6 Make sure that you have...
Users Manual - English
Page 151
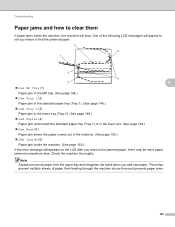
... Tray 2 (3) Paper jam in the lower tray (Tray 2). (See page 146.) Jam Duplex (4) Paper jam underneath the standard paper tray (Tray 1) or in the fuser unit. (See page 149.) Jam Rear (5) Paper jam where the paper comes out of the machine. (See page 152.) Jam Inside (6) Paper jam...
... Tray 2 (3) Paper jam in the lower tray (Tray 2). (See page 146.) Jam Duplex (4) Paper jam underneath the standard paper tray (Tray 1) or in the fuser unit. (See page 149.) Jam Rear (5) Paper jam where the paper comes out of the machine. (See page 152.) Jam Inside (6) Paper jam...

Users Manual - English
Page 155
b Pull the paper tray completely out of the machine and check inside the duplex unit, follow these steps: a Leave the machine turned on for 10 minutes to cool down. Troubleshooting Jam Duplex (paper jam underneath the standard paper tray (tray 1) or in the fuser unit) 6 Jam Duplex If a paper jam occurs inside the machine. 6 WARNING DO NOT touch the shaded parts shown in the illustration. These rollers may be rotating at high speed and can pinch or entrap your hand. 149
b Pull the paper tray completely out of the machine and check inside the duplex unit, follow these steps: a Leave the machine turned on for 10 minutes to cool down. Troubleshooting Jam Duplex (paper jam underneath the standard paper tray (tray 1) or in the fuser unit) 6 Jam Duplex If a paper jam occurs inside the machine. 6 WARNING DO NOT touch the shaded parts shown in the illustration. These rollers may be rotating at high speed and can pinch or entrap your hand. 149

Users Manual - English
Page 159
d Using both hands, gently pull the jammed paper out of the fuser unit. 153 Troubleshooting c Pull the green tabs (2) at the left and right hand sides toward you and fold down the fuser cover (1). 2 2 3 3 1 6 Note If the envelope levers (3) inside the back cover are pulled down to the envelope position, lift these levers to the original position before pulling the green tabs (2) down.
d Using both hands, gently pull the jammed paper out of the fuser unit. 153 Troubleshooting c Pull the green tabs (2) at the left and right hand sides toward you and fold down the fuser cover (1). 2 2 3 3 1 6 Note If the envelope levers (3) inside the back cover are pulled down to the envelope position, lift these levers to the original position before pulling the green tabs (2) down.

Users Manual - English
Page 160
f Close the back cover. 154 Troubleshooting e Close the fuser cover (1). 2 2 1 6 Note If you print on envelopes, pull down the envelope levers (2) to the envelope position again before closing the back cover.
f Close the back cover. 154 Troubleshooting e Close the fuser cover (1). 2 2 1 6 Note If you print on envelopes, pull down the envelope levers (2) to the envelope position again before closing the back cover.


