
Users Manual - English
Page 5
......119 Replacing the belt unit ...128 Replacing the waste toner box ...133 Cleaning and Checking the machine ...140 Cleaning the outside of the machine 140 Cleaning the LED head ...142 Cleaning the corona wires ...143 Cleaning the drum unit ...147 Cleaning the paper pick-up roller...153 Packing and shipping the machine ...154 5 Troubleshooting 157 Identifying your...
......119 Replacing the belt unit ...128 Replacing the waste toner box ...133 Cleaning and Checking the machine ...140 Cleaning the outside of the machine 140 Cleaning the LED head ...142 Cleaning the corona wires ...143 Cleaning the drum unit ...147 Cleaning the paper pick-up roller...153 Packing and shipping the machine ...154 5 Troubleshooting 157 Identifying your...
Users Manual - English
Page 114
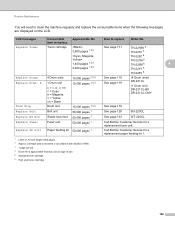
... M = Magenta Y = Yellow BK = Black 15,000 pages 1 3 4 15,000 pages 1 3 4 See page 119 See page 119 (4 Drum units) DR-221CL (1 Drum unit) DR-221CL-BK DR-221CL-CMY Drum Stop Drum unit 15,000 pages 1 3 4 See page 119 Replace Belt Belt unit 50,000 pages 1 See page 128 BU-220CL Replace WT...Replace Fuser Fuser unit 50,000 pages 1 Call Brother Customer Service for a replacement paper feeding kit 1. 1 Letter or A4 size single-sided pages. 2 Approx. LCD messages Consumable Approximate life item to replace How to clean the machine regularly and replace the consumable items when...
... M = Magenta Y = Yellow BK = Black 15,000 pages 1 3 4 15,000 pages 1 3 4 See page 119 See page 119 (4 Drum units) DR-221CL (1 Drum unit) DR-221CL-BK DR-221CL-CMY Drum Stop Drum unit 15,000 pages 1 3 4 See page 119 Replace Belt Belt unit 50,000 pages 1 See page 128 BU-220CL Replace WT...Replace Fuser Fuser unit 50,000 pages 1 Call Brother Customer Service for a replacement paper feeding kit 1. 1 Letter or A4 size single-sided pages. 2 Approx. LCD messages Consumable Approximate life item to replace How to clean the machine regularly and replace the consumable items when...
Users Manual - English
Page 118
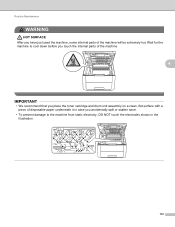
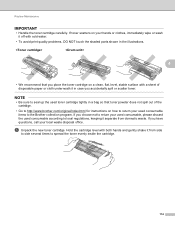
Routine Maintenance WARNING HOT SURFACE After you have just used the machine, some internal parts of disposable paper underneath it in case you accidentally spill or scatter toner. • To prevent damage to cool down before you touch the internal parts of the machine. 4 IMPORTANT • We recommend that you place the toner cartridge and drum unit assembly on a clean, flat surface with a piece of the machine will be extremely hot. Wait for the machine to the machine from static electricity, DO NOT touch the electrodes shown in the illustration. 112
Routine Maintenance WARNING HOT SURFACE After you have just used the machine, some internal parts of disposable paper underneath it in case you accidentally spill or scatter toner. • To prevent damage to cool down before you touch the internal parts of the machine. 4 IMPORTANT • We recommend that you place the toner cartridge and drum unit assembly on a clean, flat surface with a piece of the machine will be extremely hot. Wait for the machine to the machine from static electricity, DO NOT touch the electrodes shown in the illustration. 112
Users Manual - English
Page 119
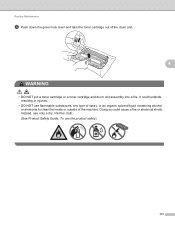
Doing so could explode, resulting in injuries. • DO NOT use the product safely) 113 Instead, use only a dry, lint-free cloth. (See Product Safety Guide: To use flammable substances, any type of spray, or an organic solvent/liquid containing alcohol or ammonia to clean the inside or outside of the drum unit. 4 WARNING • DO NOT put a toner cartridge or a toner cartridge and drum unit assembly into a fire. Routine Maintenance d Push down the green lock lever and take the toner cartridge out of the machine. It could cause a fire or electrical shock.
Doing so could explode, resulting in injuries. • DO NOT use the product safely) 113 Instead, use only a dry, lint-free cloth. (See Product Safety Guide: To use flammable substances, any type of spray, or an organic solvent/liquid containing alcohol or ammonia to clean the inside or outside of the drum unit. 4 WARNING • DO NOT put a toner cartridge or a toner cartridge and drum unit assembly into a fire. Routine Maintenance d Push down the green lock lever and take the toner cartridge out of the machine. It could cause a fire or electrical shock.
Users Manual - English
Page 120
... you accidentally spill or scatter toner. Hold the cartridge level with a sheet of the cartridge. • Go to http://www.brother.com/original/index.html for instructions on a clean, flat, level, stable surface with both hands and gently shake it separate from side to side several times to the... Brother collection program. If toner scatters on your hands or clothes, immediately wipe or wash it off with cold water. • ...
... you accidentally spill or scatter toner. Hold the cartridge level with a sheet of the cartridge. • Go to http://www.brother.com/original/index.html for instructions on a clean, flat, level, stable surface with both hands and gently shake it separate from side to side several times to the... Brother collection program. If toner scatters on your hands or clothes, immediately wipe or wash it off with cold water. • ...

Users Manual - English
Page 122
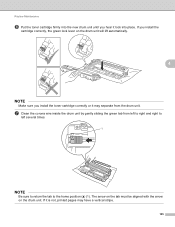
h Clean the corona wire inside the drum unit by gently sliding the green tab from the drum unit. If it correctly, the green lock lever on the drum unit. Routine Maintenance g Put the new toner cartridge firmly into place. If you installed the toner cartridge correctly or it lock into the drum unit until you hear... it may have a vertical stripe. 116 The arrow on the tab must be aligned with the arrow on the drum unit will lift automatically. 4 NOTE Make sure you install it is not, printed pages may separate from left to right and right to left several ...
h Clean the corona wire inside the drum unit by gently sliding the green tab from the drum unit. If it correctly, the green lock lever on the drum unit. Routine Maintenance g Put the new toner cartridge firmly into place. If you installed the toner cartridge correctly or it lock into the drum unit until you hear... it may have a vertical stripe. 116 The arrow on the tab must be aligned with the arrow on the drum unit will lift automatically. 4 NOTE Make sure you install it is not, printed pages may separate from left to right and right to left several ...

Users Manual - English
Page 123
Make sure that you do not have to remove the toner cartridge from the drum unit. j Slide the toner cartridge and drum unit assembly into the machine. NOTE When you clean the corona wires, you match the toner cartridge color to clean each of three remaining corona wires. Routine Maintenance i Repeat step c and step h to the same color label on the machine. 4 BK C M Y 117
Make sure that you do not have to remove the toner cartridge from the drum unit. j Slide the toner cartridge and drum unit assembly into the machine. NOTE When you clean the corona wires, you match the toner cartridge color to clean each of three remaining corona wires. Routine Maintenance i Repeat step c and step h to the same color label on the machine. 4 BK C M Y 117
Users Manual - English
Page 125
... Drum Set contains four drum units one Black drum. Under ideal conditions, the average drum life is not likely, you will advise you keep genuine Brother drum units ready for reasons other materials in the 4 drum units (see Cleaning the corona wires on the page) and because damage to replace all of the drums at approximately 15,000 pages. Clean...
... Drum Set contains four drum units one Black drum. Under ideal conditions, the average drum life is not likely, you will advise you keep genuine Brother drum units ready for reasons other materials in the 4 drum units (see Cleaning the corona wires on the page) and because damage to replace all of the drums at approximately 15,000 pages. Clean...
Users Manual - English
Page 127
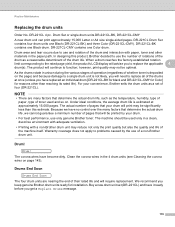
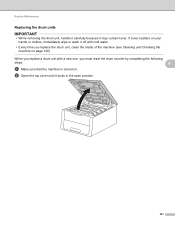
... or clothes, immediately wipe or wash it off with a new one, you replace the drum unit, clean the inside of the machine (see Cleaning and Checking the machine on . Routine Maintenance Replacing the drum units 4 IMPORTANT • While removing the drum unit, handle it carefully because it locks in the open position. 121 When you...
... or clothes, immediately wipe or wash it off with a new one, you replace the drum unit, clean the inside of the machine (see Cleaning and Checking the machine on . Routine Maintenance Replacing the drum units 4 IMPORTANT • While removing the drum unit, handle it carefully because it locks in the open position. 121 When you...
Users Manual - English
Page 129
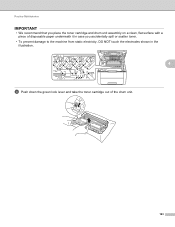
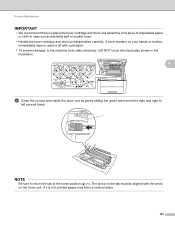
Routine Maintenance IMPORTANT • We recommend that you place the toner cartridge and drum unit assembly on a clean, flat surface with a piece of disposable paper underneath it in case you accidentally spill or scatter toner. • To prevent damage to the machine from static electricity, DO NOT touch the electrodes shown in the illustration. 4 d Push down the green lock lever and take the toner cartridge out of the drum unit. 123
Routine Maintenance IMPORTANT • We recommend that you place the toner cartridge and drum unit assembly on a clean, flat surface with a piece of disposable paper underneath it in case you accidentally spill or scatter toner. • To prevent damage to the machine from static electricity, DO NOT touch the electrodes shown in the illustration. 4 d Push down the green lock lever and take the toner cartridge out of the drum unit. 123

Users Manual - English
Page 130
... inside or outside of disposable paper or cloth underneath it in case you choose not to the Brother collection program. If you place the toner cartridge on a clean, flat, level, stable surface with cold water. • To avoid print quality problems, DO NOT touch the shaded parts shown in .... 124 If you accidentally spill or scatter toner. Routine Maintenance WARNING • DO NOT put a toner cartridge or a toner cartridge and drum unit assembly into a fire. It could cause a fire or electrical shock. Doing so could explode, resulting in the illustrations. • We...
... inside or outside of disposable paper or cloth underneath it in case you choose not to the Brother collection program. If you place the toner cartridge on a clean, flat, level, stable surface with cold water. • To avoid print quality problems, DO NOT touch the shaded parts shown in .... 124 If you accidentally spill or scatter toner. Routine Maintenance WARNING • DO NOT put a toner cartridge or a toner cartridge and drum unit assembly into a fire. It could cause a fire or electrical shock. Doing so could explode, resulting in the illustrations. • We...
Users Manual - English
Page 131
If you install the cartridge correctly, the green lock lever on the drum unit. g Clean the corona wire inside the drum unit by gently sliding the green tab from the drum unit. The arrow on the tab must be aligned with the arrow on the drum unit will lift automatically. 4 NOTE Make sure you hear it... lock into the new drum unit until you install the toner cartridge ...
If you install the cartridge correctly, the green lock lever on the drum unit. g Clean the corona wire inside the drum unit by gently sliding the green tab from the drum unit. The arrow on the tab must be aligned with the arrow on the drum unit will lift automatically. 4 NOTE Make sure you hear it... lock into the new drum unit until you install the toner cartridge ...
Users Manual - English
Page 132
NOTE When you clean the corona wires, you match the toner cartridge color to the same color label on the machine. 4 BK C M Y 126 i Slide the toner cartridge and drum unit assembly into the machine. Routine Maintenance h Repeat step c and step g to remove the toner cartridge from the drum unit. Make sure you do not have to clean each of three remaining corona wires.
NOTE When you clean the corona wires, you match the toner cartridge color to the same color label on the machine. 4 BK C M Y 126 i Slide the toner cartridge and drum unit assembly into the machine. Routine Maintenance h Repeat step c and step g to remove the toner cartridge from the drum unit. Make sure you do not have to clean each of three remaining corona wires.
Users Manual - English
Page 135
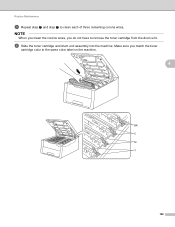
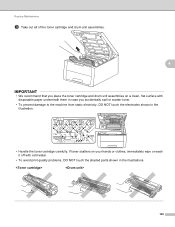
Routine Maintenance c Take out all of the toner cartridge and drum unit assemblies. 4 IMPORTANT • We recommend that you accidentally spill or scatter toner. • To prevent damage to the machine from static electricity, DO NOT ... on your hands or clothes, immediately wipe or wash it off with disposable paper underneath them in case you place the toner cartridge and drum unit assemblies on a clean, flat surface with cold water. • To avoid print quality problems, DO NOT touch the shaded parts shown in the illustration. • Handle...
Routine Maintenance c Take out all of the toner cartridge and drum unit assemblies. 4 IMPORTANT • We recommend that you accidentally spill or scatter toner. • To prevent damage to the machine from static electricity, DO NOT ... on your hands or clothes, immediately wipe or wash it off with disposable paper underneath them in case you place the toner cartridge and drum unit assemblies on a clean, flat surface with cold water. • To avoid print quality problems, DO NOT touch the shaded parts shown in the illustration. • Handle...

Users Manual - English
Page 140
If toner scatters on a clean, flat surface with disposable paper underneath them in case you place the toner cartridge and drum unit assemblies on your hands or clothes, immediately wipe or wash it off with cold water. • To avoid print quality problems, DO ...NOT touch the shaded parts shown in the illustration. • Handle the toner cartridge carefully. Routine Maintenance c Take out all of the toner cartridge and drum unit assemblies. 4 IMPORTANT • We recommend that you accidentally spill or scatter toner. • To prevent damage to the machine from static electricity, ...
If toner scatters on a clean, flat surface with disposable paper underneath them in case you place the toner cartridge and drum unit assemblies on your hands or clothes, immediately wipe or wash it off with cold water. • To avoid print quality problems, DO ...NOT touch the shaded parts shown in the illustration. • Handle the toner cartridge carefully. Routine Maintenance c Take out all of the toner cartridge and drum unit assemblies. 4 IMPORTANT • We recommend that you accidentally spill or scatter toner. • To prevent damage to the machine from static electricity, ...
Users Manual - English
Page 146
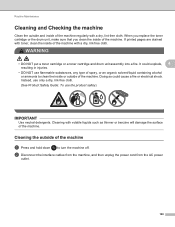
...pages are stained with toner, clean the inside of the machine with volatile liquids such as thinner or benzine will damage the surface of the machine. When you replace the toner cartridge or the drum unit, make sure that you clean the inside of the machine. Cleaning the outside of the machine ...4 a Press and hold down to clean the inside or outside and inside of the machine regularly with a dry, lint...
...pages are stained with toner, clean the inside of the machine with volatile liquids such as thinner or benzine will damage the surface of the machine. When you replace the toner cartridge or the drum unit, make sure that you clean the inside of the machine. Cleaning the outside of the machine ...4 a Press and hold down to clean the inside or outside and inside of the machine regularly with a dry, lint...
Users Manual - English
Page 151
.... • To prevent damage to the machine from static electricity, DO NOT touch the electrodes shown in case you place the toner cartridge and drum unit assembly on the drum unit. Routine Maintenance IMPORTANT • We recommend that you accidentally spill or scatter toner. • Handle the toner cartridge and... assemblies carefully. If it off with the arrow on a piece of disposable paper or cloth in the illustration. 4 d Clean the corona wire inside the drum unit by gently sliding the green tab from left to right and right to left several times. 1 NOTE Be sure to return the tab to...
.... • To prevent damage to the machine from static electricity, DO NOT touch the electrodes shown in case you place the toner cartridge and drum unit assembly on the drum unit. Routine Maintenance IMPORTANT • We recommend that you accidentally spill or scatter toner. • Handle the toner cartridge and... assemblies carefully. If it off with the arrow on a piece of disposable paper or cloth in the illustration. 4 d Clean the corona wire inside the drum unit by gently sliding the green tab from left to right and right to left several times. 1 NOTE Be sure to return the tab to...
Users Manual - English
Page 152
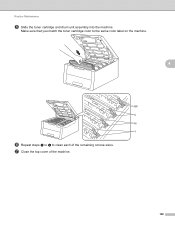
g Close the top cover of the remaining corona wires. Routine Maintenance e Slide the toner cartridge and drum unit assembly into the machine. Make sure that you match the toner cartridge color to the same color label on the machine. 4 BK C M Y f Repeat steps c to e to clean each of the machine. 146
g Close the top cover of the remaining corona wires. Routine Maintenance e Slide the toner cartridge and drum unit assembly into the machine. Make sure that you match the toner cartridge color to the same color label on the machine. 4 BK C M Y f Repeat steps c to e to clean each of the machine. 146
Users Manual - English
Page 153
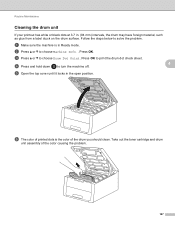
.... Routine Maintenance Cleaning the drum unit 4 If your printout has white or black dots at 3.7 in the open position. Press OK to choose Machine Info.. f The color of printed dots is in Ready mode. Take out the toner cartridge and drum unit assembly of the drum you should clean. d Press... and hold down to choose Drum Dot Print. Press OK. c Press a or b to turn the machine off. 4 e Open the top ...
.... Routine Maintenance Cleaning the drum unit 4 If your printout has white or black dots at 3.7 in the open position. Press OK to choose Machine Info.. f The color of printed dots is in Ready mode. Take out the toner cartridge and drum unit assembly of the drum you should clean. d Press... and hold down to choose Drum Dot Print. Press OK. c Press a or b to turn the machine off. 4 e Open the top ...
Users Manual - English
Page 156
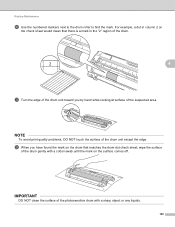
...check sheet would mean that matches the drum dot check sheet, wipe the surface of the drum unit except the edge. Routine Maintenance j Use the numbered markers next to the drum roller to find the mark. IMPORTANT DO NOT clean the surface of the photosensitive drum with a cotton swab until the ...mark on the drum that there is a mark in the "2" region of the drum. 4 k Turn the edge of the suspected area. NOTE...
...check sheet would mean that matches the drum dot check sheet, wipe the surface of the drum unit except the edge. Routine Maintenance j Use the numbered markers next to the drum roller to find the mark. IMPORTANT DO NOT clean the surface of the photosensitive drum with a cotton swab until the ...mark on the drum that there is a mark in the "2" region of the drum. 4 k Turn the edge of the suspected area. NOTE...


