Quick Setup Guide - English
Page 4
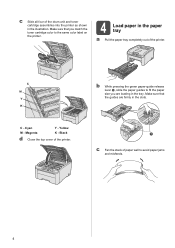
...to fit the paper size you match the toner cartridge color to avoid paper jams and misfeeds. 4 C - Cyan Y - Magenta K - Yellow M - Make sure that you are firmly in the tray. Black d Close the top cover of paper well to the same color label on the printer. 4 Load paper in the illustration. ...c Fan the stack of the printer. Make sure that the guides are loading in the slots. c Slide all four of the drum...
...to fit the paper size you match the toner cartridge color to avoid paper jams and misfeeds. 4 C - Cyan Y - Magenta K - Yellow M - Make sure that you are firmly in the tray. Black d Close the top cover of paper well to the same color label on the printer. 4 Load paper in the illustration. ...c Fan the stack of the printer. Make sure that the guides are loading in the slots. c Slide all four of the drum...
Users Manual - English
Page 39
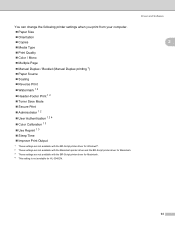
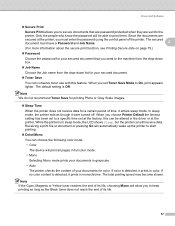
...61550; Scaling Reverse Print Watermark 1 2 Header-Footer Print 1 2 Toner Save Mode Secure Print Administrator 1 2 User Authentication 1 2 4 Color Calibration 1 3 Use Reprint 1 3 Sleep Time Improve Print Output 1 These ...printer driver for Windows®. 2 These settings are not available with the Macintosh printer driver and the BR-Script printer driver for Macintosh. 3 These settings are not available with the BR-Script printer driver for Macintosh. 4 This setting is not available for HL-3045CN...
...61550; Scaling Reverse Print Watermark 1 2 Header-Footer Print 1 2 Toner Save Mode Secure Print Administrator 1 2 User Authentication 1 2 4 Color Calibration 1 3 Use Reprint 1 3 Sleep Time Improve Print Output 1 These ...printer driver for Windows®. 2 These settings are not available with the Macintosh printer driver and the BR-Script printer driver for Macintosh. 3 These settings are not available with the BR-Script printer driver for Macintosh. 4 This setting is not available for HL-3045CN...
Users Manual - English
Page 42
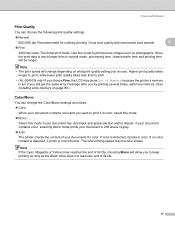
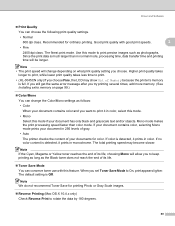
... in 256 levels of gray. Auto The printer checks the content of your document contains color and you want to print precise images such as the Black toner does not reach the end of its life, choosing Mono will allow you to print. • (HL-3045CN only) If you choose Fine, the LCD may... become slower. If color is detected, it prints in color, select this mode. Mono Select this mode to...
... in 256 levels of gray. Auto The printer checks the content of your document contains color and you want to print precise images such as the Black toner does not reach the end of its life, choosing Mono will allow you to print. • (HL-3045CN only) If you choose Fine, the LCD may... become slower. If color is detected, it prints in color, select this mode. Mono Select this mode to...
Users Manual - English
Page 57
...lighter. Note We do not recommend Toner Save for printing Photo or Gray Scale images. Sleep Time When the printer does not receive data for color. If color is in sleep mode, the LCD shows Sleep, but the printer can choose the following color mode: • Color The device will print all pages ... the drop-down list for your secured document. Toner Save You can be able to start printing. Color/Mono You can still receive data. If no color content is Off. In sleep mode, the printer acts as the Black toner does not reach the end of its life, choosing Mono...
...lighter. Note We do not recommend Toner Save for printing Photo or Gray Scale images. Sleep Time When the printer does not receive data for color. If color is in sleep mode, the LCD shows Sleep, but the printer can choose the following color mode: • Color The device will print all pages ... the drop-down list for your secured document. Toner Save You can be able to start printing. Color/Mono You can still receive data. If no color content is Off. In sleep mode, the printer acts as the Black toner does not reach the end of its life, choosing Mono...
Users Manual - English
Page 58
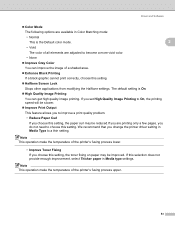
... upper. 53 Note This operation make the temperature of the printer's fusing process lower. • Improve Toner Fixing If you choose this setting, the toner fixing on paper may be reduced.If you are adjusted to become a more vivid color. • None Improve Gray Color You can get high quality image printing. If this...
... upper. 53 Note This operation make the temperature of the printer's fusing process lower. • Improve Toner Fixing If you choose this setting, the toner fixing on paper may be reduced.If you are adjusted to become a more vivid color. • None Improve Gray Color You can get high quality image printing. If this...
Users Manual - English
Page 65
... to print. • (HL-3045CN only) If you to print it in 256 levels of gray. • Auto The printer checks the content of Memory because the printer's memory is detected, it prints in monochrome. Since the print data is much larger than color mode. Note If the Cyan, Magenta or Yellow toner reaches the end...
... to print. • (HL-3045CN only) If you to print it in 256 levels of gray. • Auto The printer checks the content of Memory because the printer's memory is detected, it prints in monochrome. Since the print data is much larger than color mode. Note If the Cyan, Magenta or Yellow toner reaches the end...

Users Manual - English
Page 100
.... Calibration 3 The output density for how to choose Color Correction. to turn the status monitor on. Press OK. The color correction process consumes some amount of the toner. Press OK. See Color Calibration on the environment the machine is Normal. See ...Status Monitor on page 64 for each color may vary depending on page 43. ColorCalibration c Press OK. a Press + or - Select ab or OK h Color Correction b Press OK. b Press + or - If you print using the Macintosh printer...
.... Calibration 3 The output density for how to choose Color Correction. to turn the status monitor on. Press OK. The color correction process consumes some amount of the toner. Press OK. See Color Calibration on the environment the machine is Normal. See ...Status Monitor on page 64 for each color may vary depending on page 43. ColorCalibration c Press OK. a Press + or - Select ab or OK h Color Correction b Press OK. b Press + or - If you print using the Macintosh printer...

Users Manual - English
Page 106
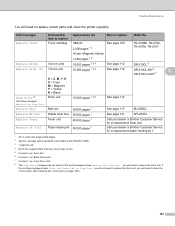
...K = Black Belt End Soon Belt unit 50,000 pages 1 See page 117 BU-200CL WT Box End Soon Waste toner box 50,000 pages 1 See page 121 WT-200CL 1 A4 or Letter size single-sided pages. 2 Approx. cartridge...the Ready state. These messages provide advanced warnings to replace the consumable items before the printer stops printing. To avoid any inconvenience, you may vary by type of their life... to buy spare consumable items before they reach the end of use. 5 Contains 4 pc. Color Drum Unit. 101 5 Routine Maintenance 5 Replacing the consumable items 5 The following messages appear on...
...K = Black Belt End Soon Belt unit 50,000 pages 1 See page 117 BU-200CL WT Box End Soon Waste toner box 50,000 pages 1 See page 121 WT-200CL 1 A4 or Letter size single-sided pages. 2 Approx. cartridge...the Ready state. These messages provide advanced warnings to replace the consumable items before the printer stops printing. To avoid any inconvenience, you may vary by type of their life... to buy spare consumable items before they reach the end of use. 5 Contains 4 pc. Color Drum Unit. 101 5 Routine Maintenance 5 Replacing the consumable items 5 The following messages appear on...
Users Manual - English
Page 107
...need to replace the drum unit, you will need to replace certain parts and clean the printer regularly. Routine Maintenance You will need to replace the drum unit. Replace Belt Drum unit Belt unit... feeding kit 50,000 pages 1 Call your dealer or Brother Customer Service for a replacement paper feeding kit 1. 1 A4 or Letter size single-sided pages. 2 Approx. Replace Toner Toner cartridge 2,200 pages 1 2 See page 103 TN-210BK... (See Cleaning the corona wires on Drum Unit. Color Drum Unit. 8 The Drum Error message has two cases: If the scroll message shows Replace the Drum ...
...need to replace the drum unit, you will need to replace certain parts and clean the printer regularly. Routine Maintenance You will need to replace the drum unit. Replace Belt Drum unit Belt unit... feeding kit 50,000 pages 1 Call your dealer or Brother Customer Service for a replacement paper feeding kit 1. 1 A4 or Letter size single-sided pages. 2 Approx. Replace Toner Toner cartridge 2,200 pages 1 2 See page 103 TN-210BK... (See Cleaning the corona wires on Drum Unit. Color Drum Unit. 8 The Drum Error message has two cases: If the scroll message shows Replace the Drum ...

Users Manual - English
Page 108
... LCD, you need to the brother collection program. A starter toner can print approximately 2,200 pages (black) or approximately 1,400 pages (yellow, magenta, cyan) 1. Toner Low message 5 Toner Low (X) If the LCD shows Toner Low, the printer has nearly run out of toner used will vary depending on the LCD indicates which color you choose not to return your...
... LCD, you need to the brother collection program. A starter toner can print approximately 2,200 pages (black) or approximately 1,400 pages (yellow, magenta, cyan) 1. Toner Low message 5 Toner Low (X) If the LCD shows Toner Low, the printer has nearly run out of toner used will vary depending on the LCD indicates which color you choose not to return your...
Users Manual - English
Page 109
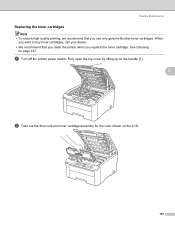
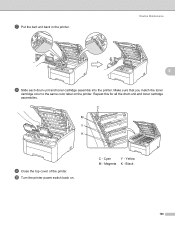
Routine Maintenance Replacing the toner cartridges 5 Note • To ensure high quality printing, we recommend that you clean the printer when you use only genuine Brother toner cartridges. a Turn off the printer power switch. Fully open the top cover by lifting up on the handle (1). 1 5 b Take out the drum unit and toner cartridge assembly for the color shown on page 127. See Cleaning on the LCD. 104 When you want to buy toner cartridges, call your dealer. • We recommend that you replace the toner cartridge.
Routine Maintenance Replacing the toner cartridges 5 Note • To ensure high quality printing, we recommend that you clean the printer when you use only genuine Brother toner cartridges. a Turn off the printer power switch. Fully open the top cover by lifting up on the handle (1). 1 5 b Take out the drum unit and toner cartridge assembly for the color shown on page 127. See Cleaning on the LCD. 104 When you want to buy toner cartridges, call your dealer. • We recommend that you replace the toner cartridge.
Users Manual - English
Page 115
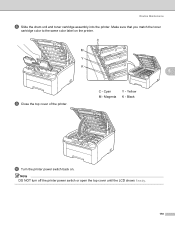
Yellow K - Make sure that you match the toner cartridge color to the same color label on . Magenta Y - Note DO NOT turn off the printer power switch or open the top cover until the LCD shows Ready. 110 C - Routine Maintenance h Slide the drum unit and toner cartridge assembly into the printer. Cyan M - C M Y K 5 i Close the top cover of the printer. Black j Turn the printer power switch back on the printer.
Yellow K - Make sure that you match the toner cartridge color to the same color label on . Magenta Y - Note DO NOT turn off the printer power switch or open the top cover until the LCD shows Ready. 110 C - Routine Maintenance h Slide the drum unit and toner cartridge assembly into the printer. Cyan M - C M Y K 5 i Close the top cover of the printer. Black j Turn the printer power switch back on the printer.

Users Manual - English
Page 116
...drum. • For best performance, use and rotation of the drum and interaction with paper, toner and other than this product, Brother decided to replace the applicable drum(s). DR-210CL-CMY contains 1 Color drum. Routine Maintenance Drum units 5 Order No. When a drum reaches the factory-established rotation... page yield, the product LCD display will advise you get a Replace Drums message. The printer should be optimal. DR-210CL Drum Set contains 4 drum units 1 Black (DR-210CL-BK) and 3 Color (DR-210CL-CMY). The product will need to a single drum unit is near the...
...drum. • For best performance, use and rotation of the drum and interaction with paper, toner and other than this product, Brother decided to replace the applicable drum(s). DR-210CL-CMY contains 1 Color drum. Routine Maintenance Drum units 5 Order No. When a drum reaches the factory-established rotation... page yield, the product LCD display will advise you get a Replace Drums message. The printer should be optimal. DR-210CL Drum Set contains 4 drum units 1 Black (DR-210CL-BK) and 3 Color (DR-210CL-CMY). The product will need to a single drum unit is near the...
Users Manual - English
Page 117
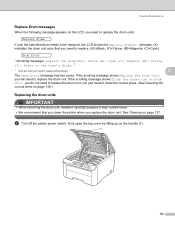
.... See Cleaning on page 130.) Replacing the drum units 5 IMPORTANT • While removing the drum unit, handle it carefully because it may contain toner. • We recommend that you need to replace. ((K)=Black, (Y)=Yellow, (M)=Magenta, (C)=Cyan). Fully open the top cover by lifting up on...Slide the Green tab on the handle (1). 1 112 a Turn off the printer power switch. you will be replaced, the LCD shows the Replace Drum(X) message. (X) indicates the drum unit color that you clean the printer when you replace the drum unit. Routine Maintenance Replace Drum messages 5 When ...
.... See Cleaning on page 130.) Replacing the drum units 5 IMPORTANT • While removing the drum unit, handle it carefully because it may contain toner. • We recommend that you need to replace. ((K)=Black, (Y)=Yellow, (M)=Magenta, (C)=Cyan). Fully open the top cover by lifting up on...Slide the Green tab on the handle (1). 1 112 a Turn off the printer power switch. you will be replaced, the LCD shows the Replace Drum(X) message. (X) indicates the drum unit color that you clean the printer when you replace the drum unit. Routine Maintenance Replace Drum messages 5 When ...
Users Manual - English
Page 118
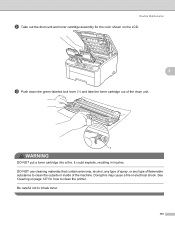
... may cause a fire or electrical shock. See Cleaning on page 127 for the color shown on the LCD. 5 c Push down the green-labeled lock lever (1) and take the toner cartridge out of the machine. Be careful not to inhale toner. 113 DO NOT use cleaning materials that contain ammonia, alcohol, any type of... spray, or any type of flammable substance to clean the outside or inside of the drum unit. 1 WARNING DO NOT put a toner cartridge into a fire. It could explode, resulting in injuries. Routine Maintenance b Take out the drum unit and...
... may cause a fire or electrical shock. See Cleaning on page 127 for the color shown on the LCD. 5 c Push down the green-labeled lock lever (1) and take the toner cartridge out of the machine. Be careful not to inhale toner. 113 DO NOT use cleaning materials that contain ammonia, alcohol, any type of... spray, or any type of flammable substance to clean the outside or inside of the drum unit. 1 WARNING DO NOT put a toner cartridge into a fire. It could explode, resulting in injuries. Routine Maintenance b Take out the drum unit and...

Users Manual - English
Page 121
... replace a drum unit with a new one, you match the toner cartridge color to choose Reset Parts Life. to the same color label on . Routine Maintenance f Slide the drum unit and toner cartridge assembly into the printer. Make sure that you replaced. C M Y K 5 g Close the top cover of the printer. Magenta Y - b Press + or - to choose Machine Info.. e Press...
... replace a drum unit with a new one, you match the toner cartridge color to choose Reset Parts Life. to the same color label on . Routine Maintenance f Slide the drum unit and toner cartridge assembly into the printer. Make sure that you replaced. C M Y K 5 g Close the top cover of the printer. Magenta Y - b Press + or - to choose Machine Info.. e Press...

Users Manual - English
Page 125
... assemblies. Black When you replace the belt unit with a new one, you match the toner cartridge color to reset the belt unit counter by completing the following steps: a Turn the printer power switch back on the printer. to the next menu level, and then press + or - c Press OK to proceed to choose Machine ...OK, and then press + to choose Reset Parts Life. Magenta K - b Press + or - Cyan Y - C - to choose Belt Unit. Make sure that you need to the same color label on . C M Y K 5 f Close the top cover of the printer. Yellow M - e Press OK two times. 120
... assemblies. Black When you replace the belt unit with a new one, you match the toner cartridge color to reset the belt unit counter by completing the following steps: a Turn the printer power switch back on the printer. to the next menu level, and then press + or - c Press OK to proceed to choose Machine ...OK, and then press + to choose Reset Parts Life. Magenta K - b Press + or - Cyan Y - C - to choose Belt Unit. Make sure that you need to the same color label on . C M Y K 5 f Close the top cover of the printer. Yellow M - e Press OK two times. 120
Users Manual - English
Page 131
Routine Maintenance 5 h Slide each drum unit and toner cartridge assembly into the printer. C M Y K i Close the top cover of the printer. Cyan Y - Repeat this for all the drum unit and toner cartridge assemblies. j Turn the printer power switch back on the printer. Yellow M - Black 126 g Put the belt unit back in the printer. C - Make sure that you match the toner cartridge color to the same color label on . Magenta K -
Routine Maintenance 5 h Slide each drum unit and toner cartridge assembly into the printer. C M Y K i Close the top cover of the printer. Cyan Y - Repeat this for all the drum unit and toner cartridge assemblies. j Turn the printer power switch back on the printer. Yellow M - Black 126 g Put the belt unit back in the printer. C - Make sure that you match the toner cartridge color to the same color label on . Magenta K -

Users Manual - English
Page 137
... Be sure to return the tab to the same color label on . 132 g Turn the printer power switch back on the printer. Black e Repeat steps b to d to clean each of the printer. f Close the top cover of the remaining corona wires. If you match the toner cartridge color to the home position (a) (1). Make sure that you...
... Be sure to return the tab to the same color label on . 132 g Turn the printer power switch back on the printer. Black e Repeat steps b to d to clean each of the printer. f Close the top cover of the remaining corona wires. If you match the toner cartridge color to the home position (a) (1). Make sure that you...
Users Manual - English
Page 140
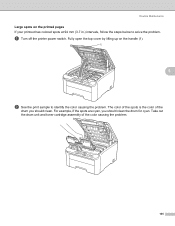
The color of the spots is the color of the color causing the problem. 135 a Turn off the printer power switch. For example, if the spots are cyan, you should clean the drum for cyan. Routine Maintenance Large spots on the handle (1). 1 5 b See the print sample to solve the problem. Fully open the top cover by lifting up on the printed pages 5 If your printout has colored spots at 94 mm (3.7 in.) intervals, follow the steps below to identify the color causing the problem. Take out the drum unit and toner cartridge assembly of the drum you should clean.
The color of the spots is the color of the color causing the problem. 135 a Turn off the printer power switch. For example, if the spots are cyan, you should clean the drum for cyan. Routine Maintenance Large spots on the handle (1). 1 5 b See the print sample to solve the problem. Fully open the top cover by lifting up on the printed pages 5 If your printout has colored spots at 94 mm (3.7 in.) intervals, follow the steps below to identify the color causing the problem. Take out the drum unit and toner cartridge assembly of the drum you should clean.


