
Network Users Manual - English
Page 14
...may cause undersired operation. These limits are designed to Part 15 of the FCC Rules. Important Changes or modifications not expressly approved by one or more of Conformity (For U.S.A. xiv only) Responsible Party: Brother International Corporation 100 Somerset Corporate Boulvard Bridgewater, NJ 09907-0911... interference to radio or television reception, which the receiver is no guarantee that the products Product Name: Model Number: Brother Network Card (BR-net) NC-4100h complies with the instructions, may cause harmful interference to operate the equipment. Connect...
...may cause undersired operation. These limits are designed to Part 15 of the FCC Rules. Important Changes or modifications not expressly approved by one or more of Conformity (For U.S.A. xiv only) Responsible Party: Brother International Corporation 100 Somerset Corporate Boulvard Bridgewater, NJ 09907-0911... interference to radio or television reception, which the receiver is no guarantee that the products Product Name: Model Number: Brother Network Card (BR-net) NC-4100h complies with the instructions, may cause harmful interference to operate the equipment. Connect...

Network Users Manual - English
Page 54
... IIS is installed and running on the server and that is part of the Windows 2000 operating systems. Skip to the "Windows 2000 IPP Printing" section of this document. The default IP address of Brother print servers is using version 4 or later of this BIP ...PRINTING INSTALLATION CHAPTER FIVE 5 How to Configure Internet Printing for Windows 95/98/Me NT 4.0/Windows 2000 Internet Printing Installation Overview Brother's Brother Internet Print (BIP ) software, for Brother print servers is "access". 4. For example, a user on your DHCP server allocate an IP address to a printer in...
... IIS is installed and running on the server and that is part of the Windows 2000 operating systems. Skip to the "Windows 2000 IPP Printing" section of this document. The default IP address of Brother print servers is using version 4 or later of this BIP ...PRINTING INSTALLATION CHAPTER FIVE 5 How to Configure Internet Printing for Windows 95/98/Me NT 4.0/Windows 2000 Internet Printing Installation Overview Brother's Brother Internet Print (BIP ) software, for Brother print servers is "access". 4. For example, a user on your DHCP server allocate an IP address to a printer in...

Network Users Manual - English
Page 56
... mail account (Mailbox name) and password for example, if you may need to it. CHAPTER 5 BIP INTERNET PRINTING INSTALLATION Brother Internet Print Configuring the Brother Print Server The print server can be emailprinter). 2. Print Server Configuration Checklist Before configuring the print server to receive BIP jobs...with BRAdmin configuration utility, by using a web browser, or by using the TELNET command. for the Brother print server (generally, the mail account name will be the first part of the Email address; Configure the POP3 server on the E-mail server at the remote site (the...
... mail account (Mailbox name) and password for example, if you may need to it. CHAPTER 5 BIP INTERNET PRINTING INSTALLATION Brother Internet Print Configuring the Brother Print Server The print server can be emailprinter). 2. Print Server Configuration Checklist Before configuring the print server to receive BIP jobs...with BRAdmin configuration utility, by using a web browser, or by using the TELNET command. for the Brother print server (generally, the mail account name will be the first part of the Email address; Configure the POP3 server on the E-mail server at the remote site (the...

Network Users Manual - English
Page 58
...may change this address). 9. Press the OK button and save the changes. CHAPTER 5 BIP INTERNET PRINTING INSTALLATION 3. Enter the mailbox name for the remote Brother print server. Enter the IP address of the E-mail address (for the mailbox, if any. 7. The print server is emailprinter@xyz, then the mailbox ...name would be the first part of the POP3 server (consult your network administrator if you do not know this will be emailprinter). 6. Click on the Internet tab. 4.
...may change this address). 9. Press the OK button and save the changes. CHAPTER 5 BIP INTERNET PRINTING INSTALLATION 3. Enter the mailbox name for the remote Brother print server. Enter the IP address of the E-mail address (for the mailbox, if any. 7. The print server is emailprinter@xyz, then the mailbox ...name would be the first part of the POP3 server (consult your network administrator if you do not know this will be emailprinter). 6. Click on the Internet tab. 4.

Network Users Manual - English
Page 60
... access the print server using these utilities, you will be accessed via TELNET. Usually the mailbox name is the same as the first part of your POP3 server (consult with this mailbox. If you wish to the console, enter the command: SET POP3 ADDRESS ipaddress where ipaddress... completed configuring the print server. 5-7 The default password is set by default to configure the print server. CHAPTER 5 BIP INTERNET PRINTING INSTALLATION Brother Internet Print Using TELNET to Configure the Print Server Skip this section if you used BRAdmin or a Web Browser to exit the console and save...
... access the print server using these utilities, you will be accessed via TELNET. Usually the mailbox name is the same as the first part of your POP3 server (consult with this mailbox. If you wish to the console, enter the command: SET POP3 ADDRESS ipaddress where ipaddress... completed configuring the print server. 5-7 The default password is set by default to configure the print server. CHAPTER 5 BIP INTERNET PRINTING INSTALLATION Brother Internet Print Using TELNET to Configure the Print Server Skip this section if you used BRAdmin or a Web Browser to exit the console and save...
Users Manual - English
Page 11
... the instructions, may cause undesired operation. This equipment has been tested and found to Part 15 of the FCC Rules. These limits are designed to operate the equipment. Important ... authority to provide reasonable protection against harmful interference a residential installation. Only) Responsible Party: Brother International Corporation 100 Somerset Corporate Boulevard Bridgewater, NJ 08807-0911, USA TEL: (908) 704-...Model Number: Product Options: Brother Laser Printer HL-2600CN HL-2600CN ALL complies with the limits for a Class B digital device. However, there is connected...
... the instructions, may cause undesired operation. This equipment has been tested and found to Part 15 of the FCC Rules. These limits are designed to operate the equipment. Important ... authority to provide reasonable protection against harmful interference a residential installation. Only) Responsible Party: Brother International Corporation 100 Somerset Corporate Boulevard Bridgewater, NJ 08807-0911, USA TEL: (908) 704-...Model Number: Product Options: Brother Laser Printer HL-2600CN HL-2600CN ALL complies with the limits for a Class B digital device. However, there is connected...
Users Manual - English
Page 20
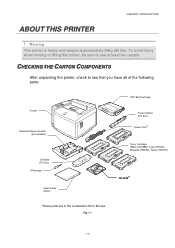
... 39kg (86 lbs). To avoid injury when moving or lifting this printer, be sure to see that you have all of the following parts: Printer Standard Paper Cassette (pre-installed) Oil Bottle (FO-2CL) Oil Syringe Quick Setup Guide* OPC Belt Cartridge Fuser Cleaner (CR-...3CL) * Power Cord Toner Cartridge (Black (TN03BK), Cyan (TN03C), Magenta (TN03M), Yellow (TN03Y)) CD-ROM* *These parts are in the Localization Kit in Europe. CHHEECCKKIINNGGTTHHEE CAARRTTOONN COOMMPPOONNEENNTTSS After unpacking the printer, check to use at least two people. CHAPTER 1 INTRODUCTION ABOUT THIS...
... 39kg (86 lbs). To avoid injury when moving or lifting this printer, be sure to see that you have all of the following parts: Printer Standard Paper Cassette (pre-installed) Oil Bottle (FO-2CL) Oil Syringe Quick Setup Guide* OPC Belt Cartridge Fuser Cleaner (CR-...3CL) * Power Cord Toner Cartridge (Black (TN03BK), Cyan (TN03C), Magenta (TN03M), Yellow (TN03Y)) CD-ROM* *These parts are in the Localization Kit in Europe. CHHEECCKKIINNGGTTHHEE CAARRTTOONN COOMMPPOONNEENNTTSS After unpacking the printer, check to use at least two people. CHAPTER 1 INTRODUCTION ABOUT THIS...
Users Manual - English
Page 21
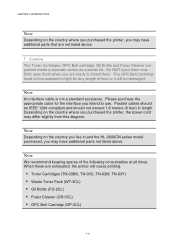
... are exhausted, the printer will be IEEE 1284 compliant and should not exceed 1.8 meters (6 feet) in and the HL-2600CN series model purchased, you may have additional parts that are packed inside a separate carton as a starter kit. Note Depending on the country you live in length. ... at all times. Only open them . CHAPTER 1 INTRODUCTION Note Depending on the country where you purchased the printer, you may have additional parts not listed above . ! Note An interface cable is not a standard accessory. Caution The Toner Cartridges, OPC Belt cartridge, Oil Bottle and...
... are exhausted, the printer will be IEEE 1284 compliant and should not exceed 1.8 meters (6 feet) in and the HL-2600CN series model purchased, you may have additional parts that are packed inside a separate carton as a starter kit. Note Depending on the country you live in length. ... at all times. Only open them . CHAPTER 1 INTRODUCTION Note Depending on the country where you purchased the printer, you may have additional parts not listed above . ! Note An interface cable is not a standard accessory. Caution The Toner Cartridges, OPC Belt cartridge, Oil Bottle and...

Users Manual - English
Page 64
CHAPTER 3 BEFORE WORKING WITH THE PRINTER Printable Area The Printable Area depends on the settings in this printer. The figure below shows the physical printable area and non-guaranteed print area for the various types of paper that does not meet the specifications listed in your application. Cut Sheets Envelopes Unprintable Area Non guaranteed Print Area Fig. 3-1 Note If you use paper that can be used with this User's Guide, the life of the various consumables and parts may be reduced. 3-9
CHAPTER 3 BEFORE WORKING WITH THE PRINTER Printable Area The Printable Area depends on the settings in this printer. The figure below shows the physical printable area and non-guaranteed print area for the various types of paper that does not meet the specifications listed in your application. Cut Sheets Envelopes Unprintable Area Non guaranteed Print Area Fig. 3-1 Note If you use paper that can be used with this User's Guide, the life of the various consumables and parts may be reduced. 3-9

Users Manual - English
Page 65
CHAPTER 3 BEFORE WORKING WITH THE PRINTER Envelopes Avoid using envelopes with the following characteristics: • Glossy or shiny surfaces • Protective cover on the envelopes' adhesive parts • Sealing flaps that have not been folded at purchase • Sealing flaps as shown below • Three or more layers of paper in the marked area • Each side folded as shown below Fig. 3-2 3-10
CHAPTER 3 BEFORE WORKING WITH THE PRINTER Envelopes Avoid using envelopes with the following characteristics: • Glossy or shiny surfaces • Protective cover on the envelopes' adhesive parts • Sealing flaps that have not been folded at purchase • Sealing flaps as shown below • Three or more layers of paper in the marked area • Each side folded as shown below Fig. 3-2 3-10
Users Manual - English
Page 102
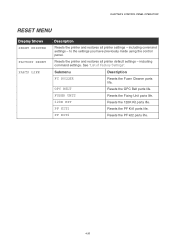
...including command settings. FUSER UNIT Resets the Fixing Unit parts life. 120K KIT Resets the 120K Kit parts life. PF KIT2 Resets the PF kit2 parts life. 4-33 OPC BELT Resets the OPC Belt parts life. PF KIT1 Resets the PF Kit1 parts life. Submenu Description FC ROLLER Resets the Fuser ...Cleaner parts life. See "List of Factory Settings". to ...
...including command settings. FUSER UNIT Resets the Fixing Unit parts life. 120K KIT Resets the 120K Kit parts life. PF KIT2 Resets the PF kit2 parts life. 4-33 OPC BELT Resets the OPC Belt parts life. PF KIT1 Resets the PF Kit1 parts life. Submenu Description FC ROLLER Resets the Fuser ...Cleaner parts life. See "List of Factory Settings". to ...

Users Manual - English
Page 104
... appears at the end of the number is blinking. TCP/IP IP ADDRESS= Press Set. IP ADDRESS= 192.0.0.192 * The last digit in the first part of the display. 4-35 TCP/IP TCP/IP ENABLE Press +.
... appears at the end of the number is blinking. TCP/IP IP ADDRESS= Press Set. IP ADDRESS= 192.0.0.192 * The last digit in the first part of the display. 4-35 TCP/IP TCP/IP ENABLE Press +.

Users Manual - English
Page 116
..., the " indicator will be reduced. • The Projected Life for each of the items listed is not a direct equivalent for the specified paper, consumable and part life may be blinking ") K CM Y If the Cyan and Magenta toner cartridges are not sure of them, consult your local dealer/retailer or Service provider...
..., the " indicator will be reduced. • The Projected Life for each of the items listed is not a direct equivalent for the specified paper, consumable and part life may be blinking ") K CM Y If the Cyan and Magenta toner cartridges are not sure of them, consult your local dealer/retailer or Service provider...

Users Manual - English
Page 122
CHAPTER 5 MAINTENANCE ! If you touch the HOT parts (shaded area shown below), you spill some oil, consult your warranty. It might cause the oil to leak. 5-10 If you might get injured. ! Caution • Be careful not to wait until the Fusing Unit has cooled sufficiently before you replace the Oil Bottle. Be sure to spill oil inside the printer. It might cause considerable damage and void your dealer or Brother authorized service representative. • Do not loose the Oil Bottle cap. Warning The Fusing Unit and the parts around it are HOT!
CHAPTER 5 MAINTENANCE ! If you touch the HOT parts (shaded area shown below), you spill some oil, consult your warranty. It might cause the oil to leak. 5-10 If you might get injured. ! Caution • Be careful not to wait until the Fusing Unit has cooled sufficiently before you replace the Oil Bottle. Be sure to spill oil inside the printer. It might cause considerable damage and void your dealer or Brother authorized service representative. • Do not loose the Oil Bottle cap. Warning The Fusing Unit and the parts around it are HOT!

Users Manual - English
Page 126
Press the Power button to wait until it are HOT! Release the Oil Bottle Lock Levers on both sides as shown: Fig. 5-8 5-14 Be sure to turn the printer off, and then wait until the Fusing Unit has cooled sufficiently before replacing the Fuser Cleaner. Open the Top Cover. 3. If you touch the HOT parts, you might get injured. 1. CHAPTER 5 MAINTENANCE Replacing the Fuser Cleaner ! Warning The Fusing unit and the parts around it has cooled down sufficiently. 2.
Press the Power button to wait until it are HOT! Release the Oil Bottle Lock Levers on both sides as shown: Fig. 5-8 5-14 Be sure to turn the printer off, and then wait until the Fusing Unit has cooled sufficiently before replacing the Fuser Cleaner. Open the Top Cover. 3. If you touch the HOT parts, you might get injured. 1. CHAPTER 5 MAINTENANCE Replacing the Fuser Cleaner ! Warning The Fusing unit and the parts around it has cooled down sufficiently. 2.

Users Manual - English
Page 127
... the new Fuser Cleaner into the guide with the Oil Bottle Lock Levers. 7. Press the Power button to take the printer Off Line. 10. until "PARTS LIFE" appears. 12. Lock the Fuser Cleaner with the roller side facing you. Press + or - Press Set to proceed to the next menu level, and...
... the new Fuser Cleaner into the guide with the Oil Bottle Lock Levers. 7. Press the Power button to take the printer Off Line. 10. until "PARTS LIFE" appears. 12. Lock the Fuser Cleaner with the roller side facing you. Press + or - Press Set to proceed to the next menu level, and...
Users Manual - English
Page 132
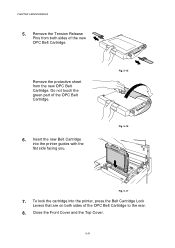
Remove the Tension Release Pins from the new OPC Belt Cartridge. Remove the protective sheet from both sides of the OPC Belt Cartridge to the rear. 8. Do not touch the green part of the new OPC Belt Cartridge. Fig. 5-15 Fig. 5-16 Fig. 5-17 7. To lock the cartridge into the printer guides with the flat side facing you. Insert the new Belt Cartridge into the printer, press the Belt Cartridge Lock Levers that are on both sides of the OPC Belt Cartridge. 6. Close the Front Cover and the Top Cover. 5-20 CHAPTER 5 MAINTENANCE 5.
Remove the Tension Release Pins from the new OPC Belt Cartridge. Remove the protective sheet from both sides of the OPC Belt Cartridge to the rear. 8. Do not touch the green part of the new OPC Belt Cartridge. Fig. 5-15 Fig. 5-16 Fig. 5-17 7. To lock the cartridge into the printer guides with the flat side facing you. Insert the new Belt Cartridge into the printer, press the Belt Cartridge Lock Levers that are on both sides of the OPC Belt Cartridge. 6. Close the Front Cover and the Top Cover. 5-20 CHAPTER 5 MAINTENANCE 5.

Users Manual - English
Page 133
Press + or - until "PARTS LIFE" appears. 13. Press Set, and then press Go. Press any of the Menu buttons (+, - , Set or Back) to turn the printer On. 10. until "RESET MENU" appears. 12. The printer is now in the READY state. 5-21 Press Set, and then press + until "OPC BELT" appears. 14. CHAPTER 5 MAINTENANCE 9. Press the Power button to take the printer Off Line. 11. Press Set to proceed to the next menu level, and then press + or -
Press + or - until "PARTS LIFE" appears. 13. Press Set, and then press Go. Press any of the Menu buttons (+, - , Set or Back) to turn the printer On. 10. until "RESET MENU" appears. 12. The printer is now in the READY state. 5-21 Press Set, and then press + until "OPC BELT" appears. 14. CHAPTER 5 MAINTENANCE 9. Press the Power button to take the printer Off Line. 11. Press Set to proceed to the next menu level, and then press + or -

Users Manual - English
Page 135
Warning The Fusing Unit and the parts around it are HOT! If you touch the HOT parts, you must replace the Fusing Unit: REPLACE FUSER !" Be sure to wait until the Fusing Unit has cooled down sufficiently before you print to allow the fusing oil to circulate. 5-23 Warning After replacing the Fusing Unit, wait for approximately 30 minutes before replacing the Fusing Unit. READY ! CHAPTER 5 MAINTENANCE FUUSSIINNGG UNNIITT Fusing Unit When the following message appears on the LCD panel, you might get injured. !
Warning The Fusing Unit and the parts around it are HOT! If you touch the HOT parts, you must replace the Fusing Unit: REPLACE FUSER !" Be sure to wait until the Fusing Unit has cooled down sufficiently before you print to allow the fusing oil to circulate. 5-23 Warning After replacing the Fusing Unit, wait for approximately 30 minutes before replacing the Fusing Unit. READY ! CHAPTER 5 MAINTENANCE FUUSSIINNGG UNNIITT Fusing Unit When the following message appears on the LCD panel, you might get injured. !

Users Manual - English
Page 138
..., make sure the Fusing Unit connector is poor, we recommend that you replace the Fuser Cleaner at the same time as the Fusing Unit. until "PARTS LIFE" appears. 15. until "RESET MENU" appears. 14. Press any of the Fuser Cleaner is free to turn on the Fusing Unit; Press + or - Press...
..., make sure the Fusing Unit connector is poor, we recommend that you replace the Fuser Cleaner at the same time as the Fusing Unit. until "PARTS LIFE" appears. 15. until "RESET MENU" appears. 14. Press any of the Fuser Cleaner is free to turn on the Fusing Unit; Press + or - Press...


