
Network Users Manual - English
Page 8
CHAPTER 6 TROUBLESHOOTING LCD messages 6-1 Error messages 6-1 Maintenance messages 6-3 Service call messages 6-4 Troubleshooting paper handling 6-5 Paper jams and how to clear them 6-6 JAM TRAY1 6-8 JAM TRAY2 6-10 JAM MP TRAY 6-11 JAM INSIDE 6-12 JAM REAR 6-14 JAM DUPLEX 6-18 PAPER JAM 6-21 Improving the print quality 6-25 How to print correctly 6-31 Other problems 6-33 For DOS users 6-33 BR-Script 3 language 6-34
CHAPTER 6 TROUBLESHOOTING LCD messages 6-1 Error messages 6-1 Maintenance messages 6-3 Service call messages 6-4 Troubleshooting paper handling 6-5 Paper jams and how to clear them 6-6 JAM TRAY1 6-8 JAM TRAY2 6-10 JAM MP TRAY 6-11 JAM INSIDE 6-12 JAM REAR 6-14 JAM DUPLEX 6-18 PAPER JAM 6-21 Improving the print quality 6-25 How to print correctly 6-31 Other problems 6-33 For DOS users 6-33 BR-Script 3 language 6-34

Network Users Manual - English
Page 172
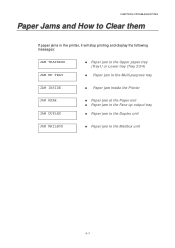
Paper jams and how to clear them If paper jams in the printer, it will stop printing and display the following illustrations show the location of the jammed paper. JAM TRAY1 JAM INSIDE JAM TRAY2 JAM REAR JAM MP TRAY JAM DUPLEX PAPER JAM If you see the "PAPER JAM" error message there are several possible places that the paper could have jammed. See the "PAPER JAM" section in the following messages. The shaded areas in this chapter for more information. 6-6
Paper jams and how to clear them If paper jams in the printer, it will stop printing and display the following illustrations show the location of the jammed paper. JAM TRAY1 JAM INSIDE JAM TRAY2 JAM REAR JAM MP TRAY JAM DUPLEX PAPER JAM If you see the "PAPER JAM" error message there are several possible places that the paper could have jammed. See the "PAPER JAM" section in the following messages. The shaded areas in this chapter for more information. 6-6

Network Users Manual - English
Page 180
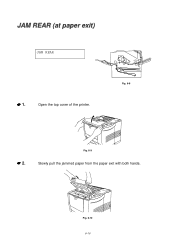
JAM REAR JAM REAR Follow the instructions below to clear a paper jam: ☛ 1. Fig. 6-10 Pull the Drum unit assembly out of the printer. Fig. 6-11 6-14 Press the Cover release button, and then open the Front cover. ☛ 2.
JAM REAR JAM REAR Follow the instructions below to clear a paper jam: ☛ 1. Fig. 6-10 Pull the Drum unit assembly out of the printer. Fig. 6-11 6-14 Press the Cover release button, and then open the Front cover. ☛ 2.
Users Manual - English
Page 3
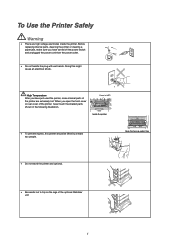
... the legs of the printer, never touch the shaded parts shown in the following illustration. Before replacing internal parts, cleaning the printer or clearing a paper jam, make sure you have just used the printer, some internal parts of the printer are high voltage electrodes inside the printer. High Temperature After you open the...
... the legs of the printer, never touch the shaded parts shown in the following illustration. Before replacing internal parts, cleaning the printer or clearing a paper jam, make sure you have just used the printer, some internal parts of the printer are high voltage electrodes inside the printer. High Temperature After you open the...
Users Manual - English
Page 166
Install the toner cartridge. Remove the jammed paper from the output tray. Close the rear cover of the printer. See "Paper jams and how to clear them." See "Replacing the Toner cartridge" in the paper tray or multi-purpose tray, and then press the Go switch. Load ... Duplex printing Optional Mailbox unit MX Error messages EErrrroorr MMeessssaaggee TONER EMPTY NO TONER NO PAPER XXX NO TRAY XXX COVER OPEN FACE UP OPEN JAM XXX STACKER FULL SIZE MISMATCH TOO MANY TRAYS AAccttiioonn Replace the toner cartridge with a new one. Close the duplex cover. Close the top cover of...
Install the toner cartridge. Remove the jammed paper from the output tray. Close the rear cover of the printer. See "Paper jams and how to clear them." See "Replacing the Toner cartridge" in the paper tray or multi-purpose tray, and then press the Go switch. Load ... Duplex printing Optional Mailbox unit MX Error messages EErrrroorr MMeessssaaggee TONER EMPTY NO TONER NO PAPER XXX NO TRAY XXX COVER OPEN FACE UP OPEN JAM XXX STACKER FULL SIZE MISMATCH TOO MANY TRAYS AAccttiioonn Replace the toner cartridge with a new one. Close the duplex cover. Close the top cover of...
Users Manual - English
Page 172
CHAPTER 6 TROUBLESHOOTING Paper Jams and How to Clear them If paper jams in the printer, it will stop printing and display the following messages: JAM TRAYXXXX JAM MP TRAY ♦ Paper jam in the Upper paper tray (Tray1) or Lower tray (Tray 2/3/4) ♦ Paper jam in the Multi-purpose tray JAM INSIDE ♦ Paper jam inside the Printer JAM REAR JAM DUPLEX ♦ Paper jam at the Paper exit ♦ Paper jam in the Face up output tray ♦ Paper jam in the Duplex unit JAM MAILBOX ♦ Paper jam in the Mailbox unit 6-7
CHAPTER 6 TROUBLESHOOTING Paper Jams and How to Clear them If paper jams in the printer, it will stop printing and display the following messages: JAM TRAYXXXX JAM MP TRAY ♦ Paper jam in the Upper paper tray (Tray1) or Lower tray (Tray 2/3/4) ♦ Paper jam in the Multi-purpose tray JAM INSIDE ♦ Paper jam inside the Printer JAM REAR JAM DUPLEX ♦ Paper jam at the Paper exit ♦ Paper jam in the Face up output tray ♦ Paper jam in the Duplex unit JAM MAILBOX ♦ Paper jam in the Mailbox unit 6-7
Users Manual - English
Page 181
Fig. 6-10 6-16 Open the top cover of the printer. Fig. 6-8 ☛ 2. Fig. 6-9 Slowly pull the jammed paper from the paper exit with both hands. JAM REAR (at paper exit) JAM REAR ☛ 1.
Fig. 6-10 6-16 Open the top cover of the printer. Fig. 6-8 ☛ 2. Fig. 6-9 Slowly pull the jammed paper from the paper exit with both hands. JAM REAR (at paper exit) JAM REAR ☛ 1.

Users Manual - English
Page 183
Open the top cover of the printer. ✒ Note If a duplex unit is installed on the printer, remove it from the printer. JAM REAR (at Face up output tray) JAM REAR Fig. 6-12 When a paper jam occurs behind the face up output tray. Open the face up output tray before the paper exits, remove the jammed paper as follows: ☛ 1. Fig. 6-13 6-18 After removing the jammed paper, re-install the duplex unit onto the printer. ☛ 2.
Open the top cover of the printer. ✒ Note If a duplex unit is installed on the printer, remove it from the printer. JAM REAR (at Face up output tray) JAM REAR Fig. 6-12 When a paper jam occurs behind the face up output tray. Open the face up output tray before the paper exits, remove the jammed paper as follows: ☛ 1. Fig. 6-13 6-18 After removing the jammed paper, re-install the duplex unit onto the printer. ☛ 2.

Users Manual - English
Page 189
JAM MAILBOX (inside the Mailbox unit) JAM MAILBOX Fig. 6-23 If a paper jam occurs in the mailbox unit, follow these steps: ☛ 1. Open the rear cover of the mailbox unit. Fig. 6-24 6-24
JAM MAILBOX (inside the Mailbox unit) JAM MAILBOX Fig. 6-23 If a paper jam occurs in the mailbox unit, follow these steps: ☛ 1. Open the rear cover of the mailbox unit. Fig. 6-24 6-24
Users Manual - English
Page 190
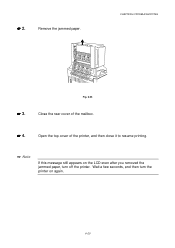
Close the rear cover of the printer, and then close it to resume printing. ✒ Note If this message still appears on again. 6-25 CHAPTER 6 TROUBLESHOOTING Fig. 6-25 ☛ 3. Remove the jammed paper. ☛ 2. Open the top cover of the mailbox. ☛ 4. Wait a few seconds, and then turn the printer on the LCD even after you removed the jammed paper, turn off the printer.
Close the rear cover of the printer, and then close it to resume printing. ✒ Note If this message still appears on again. 6-25 CHAPTER 6 TROUBLESHOOTING Fig. 6-25 ☛ 3. Remove the jammed paper. ☛ 2. Open the top cover of the mailbox. ☛ 4. Wait a few seconds, and then turn the printer on the LCD even after you removed the jammed paper, turn off the printer.

Users Manual - English
Page 244
... Drive HDD HP LaserJet mode HP-GL mode HQ1200 I IBM Proprinter XL mode information mode interface interface mode IP address IR-1000 Ir-DA J jam duplex jam inside jam mailbox jam rear jam tray Job Cancel switch 1-7 1-18 1-8, 1-38 1-38 2-24 4-21, A-9 1-7 3-2, 3-3 4-16 4-16, 6-33 3-40 3-41 2-4 ... message manual feed media type multi-purpose tray N Network network board slot Network interface connector network mode O Option P panel setting paper paper jam paper mode paper size paper spec parallel interface connector PCL6 power supply power switch INDEX-2 INDEX 1-33 3-18, 6-1 3-20 3-17 4-3 ...
... Drive HDD HP LaserJet mode HP-GL mode HQ1200 I IBM Proprinter XL mode information mode interface interface mode IP address IR-1000 Ir-DA J jam duplex jam inside jam mailbox jam rear jam tray Job Cancel switch 1-7 1-18 1-8, 1-38 1-38 2-24 4-21, A-9 1-7 3-2, 3-3 4-16 4-16, 6-33 3-40 3-41 2-4 ... message manual feed media type multi-purpose tray N Network network board slot Network interface connector network mode O Option P panel setting paper paper jam paper mode paper size paper spec parallel interface connector PCL6 power supply power switch INDEX-2 INDEX 1-33 3-18, 6-1 3-20 3-17 4-3 ...

Service Manual
Page 91
It also detects if there is paper in the fixing unit. Paper eject unit Face up open senor & Fuser exit sensor 0 Fig. 3-13 3-16 N Tray paper empty sensor Fig. 3-12 2.3.4 Face up open sensor / Fuser exit sensor Detects opening and closing of the rear cover. CHAPTER 3 THEORY OF OPERATION 2.3.3 Tray paper empty sensor Detects if there is jammed paper in the paper cassette.
It also detects if there is paper in the fixing unit. Paper eject unit Face up open senor & Fuser exit sensor 0 Fig. 3-13 3-16 N Tray paper empty sensor Fig. 3-12 2.3.4 Face up open sensor / Fuser exit sensor Detects opening and closing of the rear cover. CHAPTER 3 THEORY OF OPERATION 2.3.3 Tray paper empty sensor Detects if there is jammed paper in the paper cassette.
Service Manual
Page 170
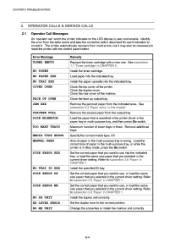
... SIZE ERROR MK NO DX UNIT EX LEVER ERROR NO MX UNIT Remedy Replace the toner cartridge with the control panel button. See subsection 3.2 `Paper Jams' in CHAPTER 5. Maximum number of the printer. Remove additional trays. Set the correct paper that is wrong. Refer to subsection 3.6 `Paper' in ... selected in CHAPTER 1. Close the top cover of lower trays in the multi-purpose tray, or while the printer is user recoverable. Close the rear cover of paper in three. Remove the excess paper from the indicated area. Load the paper that you want to reset the printer with a...
... SIZE ERROR MK NO DX UNIT EX LEVER ERROR NO MX UNIT Remedy Replace the toner cartridge with the control panel button. See subsection 3.2 `Paper Jams' in CHAPTER 5. Maximum number of the printer. Remove additional trays. Set the correct paper that is wrong. Refer to subsection 3.6 `Paper' in ... selected in CHAPTER 1. Close the top cover of lower trays in the multi-purpose tray, or while the printer is user recoverable. Close the rear cover of paper in three. Remove the excess paper from the indicated area. Load the paper that you want to reset the printer with a...

Service Manual
Page 178
... the upper paper tray (Trayl) or lower tray (Tray 2/3/4) Paper jam in the multi-purpose tray JAM INSIDE JAM REAR JAM DUPLEX Paper jam inside the printer Paper jam at once when printing on the LCD display. A6 A4 100 g/m2 (27 Ibs) Letter 105 g/m2 (28 Ibs) Legal 105 ... shown in the default setting position. o OFF4 ►ONI The switches in this chapter. Refer to remove the jammed paper. CHAPTER 6 TROUBLESHOOTING 3.2 Paper Jams • If paper jams in the printer, it is recommended to change the adjustment levers in the paper cassette using a coin by pushing ...
... the upper paper tray (Trayl) or lower tray (Tray 2/3/4) Paper jam in the multi-purpose tray JAM INSIDE JAM REAR JAM DUPLEX Paper jam inside the printer Paper jam at once when printing on the LCD display. A6 A4 100 g/m2 (27 Ibs) Letter 105 g/m2 (28 Ibs) Legal 105 ... shown in the default setting position. o OFF4 ►ONI The switches in this chapter. Refer to remove the jammed paper. CHAPTER 6 TROUBLESHOOTING 3.2 Paper Jams • If paper jams in the printer, it is recommended to change the adjustment levers in the paper cassette using a coin by pushing ...

Service Manual
Page 182
... of the printer. JAM REAR (at paper exit) (1) Open the top cover of the printer. O Fig. 6-8 6-16 O Fig. 6-7 (2) Slowly pull the jammed paper from inside the printer with both hands. NOTE: If a paper jam occurs when using A6 size paper, remove the jammed paper, turn over the... stack of the printer. CHAPTER 6 TROUBLESHOOTING (4) Slowly pull out the jammed paper from the paper exit with both hands...
... of the printer. JAM REAR (at paper exit) (1) Open the top cover of the printer. O Fig. 6-8 6-16 O Fig. 6-7 (2) Slowly pull the jammed paper from inside the printer with both hands. NOTE: If a paper jam occurs when using A6 size paper, remove the jammed paper, turn over the... stack of the printer. CHAPTER 6 TROUBLESHOOTING (4) Slowly pull out the jammed paper from the paper exit with both hands...

Service Manual
Page 183
After removing the printed jammed paper, re-install the duplex unit on the printer, remove it from the printer. Fig. 6-11 6-17 HL-2460 SERVICE MANUAL JAM REAR (at face up output tray. (5) Close the top cover of the printer. 1 Fig. 6-10 JAM DUPLEX (1) Open the top cover of the printer. NOTE: If a duplex unit is installed on to the printer. (2) Open the face up output tray. 1 Fig. 6-9 (3) Slowly remove the jammed paper with both hands. (4) Close the face up output tray) (1) Open the top cover of the printer.
After removing the printed jammed paper, re-install the duplex unit on the printer, remove it from the printer. Fig. 6-11 6-17 HL-2460 SERVICE MANUAL JAM REAR (at face up output tray. (5) Close the top cover of the printer. 1 Fig. 6-10 JAM DUPLEX (1) Open the top cover of the printer. NOTE: If a duplex unit is installed on to the printer. (2) Open the face up output tray. 1 Fig. 6-9 (3) Slowly remove the jammed paper with both hands. (4) Close the face up output tray) (1) Open the top cover of the printer.

Service Manual
Page 185
JAM MAILBOX (1) Open the rear cover of the printer. (5) Remove the jammed paper from inside the duplex unit. .;. HL-2460 SERVICE MANUAL Fig. 6-15 (6) Re-install the duplex unit into the printer. (7) Close the duplex unit cover gently. (8) Close the top cover of the... mailbox unit. Wait a few seconds, and then turn off the printer. TrrrinTrill „ Ra 11 471T1-411 (2) Remove the jammed paper. 1111111111)1111...
JAM MAILBOX (1) Open the rear cover of the printer. (5) Remove the jammed paper from inside the duplex unit. .;. HL-2460 SERVICE MANUAL Fig. 6-15 (6) Re-install the duplex unit into the printer. (7) Close the duplex unit cover gently. (8) Close the top cover of the... mailbox unit. Wait a few seconds, and then turn off the printer. TrrrinTrill „ Ra 11 471T1-411 (2) Remove the jammed paper. 1111111111)1111...

Service Manual
Page 186
... broken. Check actuator motion and replace it with a new one if it is not working properly and has not turned off . Message JAM TRAYXXXX JAM MP TRAY JAM INSIDE JAM REAR JAM DUPLEX JAM MAILBOX Cause Remedy The paper feed roller ASSY 45 and the separation pad ASSY MP may be worn out. The regist front actuator...
... broken. Check actuator motion and replace it with a new one if it is not working properly and has not turned off . Message JAM TRAYXXXX JAM MP TRAY JAM INSIDE JAM REAR JAM DUPLEX JAM MAILBOX Cause Remedy The paper feed roller ASSY 45 and the separation pad ASSY MP may be worn out. The regist front actuator...


