Users Manual - English
Page 49
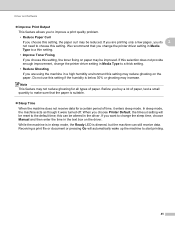
... quantity to make sure that you change the printer driver setting in Media Type to a thin setting. • Improve Toner Fixing If you choose this setting, the toner fixing on paper may be reset to choose this setting may increase. If this selection does not provide enough improvement, change the sleep time, choose...
... quantity to make sure that you change the printer driver setting in Media Type to a thin setting. • Improve Toner Fixing If you choose this setting, the toner fixing on paper may be reset to choose this setting may increase. If this selection does not provide enough improvement, change the sleep time, choose...
Users Manual - English
Page 75
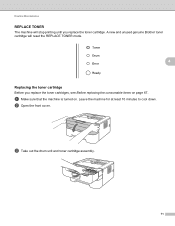
a Make sure that the machine is turned on page 67. Leave the machine for at least 10 minutes to cool down. b Open the front cover. c Take out the drum unit and toner cartridge assembly. 71 A new and unused genuine Brother toner cartridge will stop printing until you replace the toner cartridges, see Before replacing the consumable items on . Routine Maintenance REPLACE TONER 4 The machine will reset the REPLACE TONER mode. 4 Replacing the toner cartridge 4 Before you replace the toner cartridge.
a Make sure that the machine is turned on page 67. Leave the machine for at least 10 minutes to cool down. b Open the front cover. c Take out the drum unit and toner cartridge assembly. 71 A new and unused genuine Brother toner cartridge will stop printing until you replace the toner cartridges, see Before replacing the consumable items on . Routine Maintenance REPLACE TONER 4 The machine will reset the REPLACE TONER mode. 4 Replacing the toner cartridge 4 Before you replace the toner cartridge.

Users Manual - English
Page 82
Routine Maintenance Replacing the drum unit 4 Before you need to cool down. Leave the machine for at least 10 minutes to reset the drum counter by completing the following steps: a Make sure that the machine is flashing. b Open the front cover. 4 c Take out the drum unit and toner cartridge assembly. 78 When you replace the drum unit with a new one, you replace the drum unit, see Before replacing the consumable items on and the Drum LED is turned on page 67.
Routine Maintenance Replacing the drum unit 4 Before you need to cool down. Leave the machine for at least 10 minutes to reset the drum counter by completing the following steps: a Make sure that the machine is flashing. b Open the front cover. 4 c Take out the drum unit and toner cartridge assembly. 78 When you replace the drum unit with a new one, you replace the drum unit, see Before replacing the consumable items on and the Drum LED is turned on page 67.
Users Manual - English
Page 85
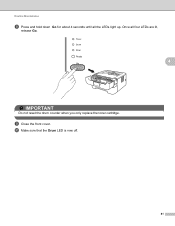
Once all the LEDs light up. i Close the front cover. j Make sure that the Drum LED is now off. 81 Routine Maintenance h Press and hold down Go for about 4 seconds until all four LEDs are lit, release Go. 4 IMPORTANT Do not reset the drum counter when you only replace the toner cartridge.
Once all the LEDs light up. i Close the front cover. j Make sure that the Drum LED is now off. 81 Routine Maintenance h Press and hold down Go for about 4 seconds until all four LEDs are lit, release Go. 4 IMPORTANT Do not reset the drum counter when you only replace the toner cartridge.

Network Users Manual - English
Page 21
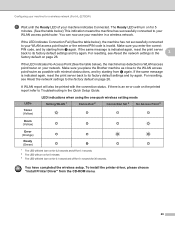
...sure you place the Brother machine as close to its factory default settings and try starting from the CD-ROM menu. 17 If there is indicated again, reset the print server back... on for 5 minutes. 3 The LED will blink (turn on your network that only one -push wireless setting mode LEDs Toner (Yellow) Drum (Yellow) Error (Orange) Ready (Green) Setting WLAN 1 Connecting Connected 2 Connection No Access Connection Error 4...half a second. Configuring your machine for a wireless network (For HL-2270DW) f Wait until the Ready LED of your machine in the Quick Setup Guide. The Ready LED ...
...sure you place the Brother machine as close to its factory default settings and try starting from the CD-ROM menu. 17 If there is indicated again, reset the print server back... on for 5 minutes. 3 The LED will blink (turn on your network that only one -push wireless setting mode LEDs Toner (Yellow) Drum (Yellow) Error (Orange) Ready (Green) Setting WLAN 1 Connecting Connected 2 Connection No Access Connection Error 4...half a second. Configuring your machine for a wireless network (For HL-2270DW) f Wait until the Ready LED of your machine in the Quick Setup Guide. The Ready LED ...
Network Users Manual - English
Page 24
... to your WLAN access point/router. Make sure you place the Brother machine as close to Troubleshooting in a wireless network. If the same...again. The Ready LED will turn on for a wireless network (For HL-2270DW) f Wait until the Ready LED of your network. If the LED...the WLAN access point/router as possible with the connection status. LEDs Toner (Yellow) LED indications when using the one-push wireless setting mode ...for 0.2 seconds and off for 0.1 second) for 30 seconds. For resetting, see Reset the network settings to its factory default settings and try starting from c...
... to your WLAN access point/router. Make sure you place the Brother machine as close to Troubleshooting in a wireless network. If the same...again. The Ready LED will turn on for a wireless network (For HL-2270DW) f Wait until the Ready LED of your network. If the LED...the WLAN access point/router as possible with the connection status. LEDs Toner (Yellow) LED indications when using the one-push wireless setting mode ...for 0.2 seconds and off for 0.1 second) for 30 seconds. For resetting, see Reset the network settings to its factory default settings and try starting from c...


