Users Manual - English
Page 3
... envelopes ...15 Duplex printing...20 Guidelines for printing on both sides of the paper 20 Automatic duplex printing (HL-2240D / HL-2242D / HL-2250DN / HL-2270DW only 21 Manual duplex printing ...22 2 Driver and Software 23 Printer driver ...23 Features in the printer driver...a test page ...61 Print a Printer Settings page...62 Print Fonts (HL-2250DN / HL-2270DW only 63 Print a WLAN report (HL-2270DW only 64 Default settings...64 4 Routine Maintenance 66 Replacing consumable items...66 Consumables...66 Before replacing the consumable items 67 Toner cartridge ...70 Drum unit ...76 ii
... envelopes ...15 Duplex printing...20 Guidelines for printing on both sides of the paper 20 Automatic duplex printing (HL-2240D / HL-2242D / HL-2250DN / HL-2270DW only 21 Manual duplex printing ...22 2 Driver and Software 23 Printer driver ...23 Features in the printer driver...a test page ...61 Print a Printer Settings page...62 Print Fonts (HL-2250DN / HL-2270DW only 63 Print a WLAN report (HL-2270DW only 64 Default settings...64 4 Routine Maintenance 66 Replacing consumable items...66 Consumables...66 Before replacing the consumable items 67 Toner cartridge ...70 Drum unit ...76 ii

Users Manual - English
Page 57
..., Ready and Go button on the control panel. 1 Toner LED 3 1 The Toner LED indicates that the Toner is low. 2 Drum LED 2 The Drum LED indicates that the Drum will need to be replaced soon. 3 3 Error LED The Error LED indicates when the machine is in one of the following states: 4 No paper / Paper jam...
..., Ready and Go button on the control panel. 1 Toner LED 3 1 The Toner LED indicates that the Toner is low. 2 Drum LED 2 The Drum LED indicates that the Drum will need to be replaced soon. 3 3 Error LED The Error LED indicates when the machine is in one of the following states: 4 No paper / Paper jam...

Users Manual - English
Page 59
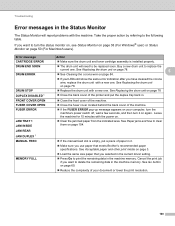
.... See Toner cartridge on page 71. See Replacing the toner cartridge on page 71 55 Take the drum unit out of the machine and put it ready for 3 seconds. 3 REPLACE TONER (Stop mode) Replace the toner cartridge with a new one . REPLACE TONER (Continue mode) The machine continues printing ... cartridge and have it back in. The Toner LED will need to be replaced soon. NO TONER Open the front cover, install the toner cartridge. CARTRIDGE ERROR The drum unit assembly is indicated. TONER ENDED Replace the toner cartridge with a new one . Control Panel LEDs Machine Status TONER...
.... See Toner cartridge on page 71. See Replacing the toner cartridge on page 71 55 Take the drum unit out of the machine and put it ready for 3 seconds. 3 REPLACE TONER (Stop mode) Replace the toner cartridge with a new one . REPLACE TONER (Continue mode) The machine continues printing ... cartridge and have it back in. The Toner LED will need to be replaced soon. NO TONER Open the front cover, install the toner cartridge. CARTRIDGE ERROR The drum unit assembly is indicated. TONER ENDED Replace the toner cartridge with a new one . Control Panel LEDs Machine Status TONER...
Users Manual - English
Page 60
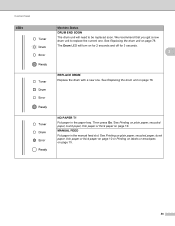
... paper, bond paper, thin paper or thick paper on page 10 or Printing on labels or envelopes on page 78. Control Panel LEDs Machine Status DRUM END SOON The drum unit will turn on for 2 seconds and off for 3 seconds. 3 REPLACE DRUM Replace the drum with a new one . See Replacing the drum unit on page 15. 56
... paper, bond paper, thin paper or thick paper on page 10 or Printing on labels or envelopes on page 78. Control Panel LEDs Machine Status DRUM END SOON The drum unit will turn on for 2 seconds and off for 3 seconds. 3 REPLACE DRUM Replace the drum with a new one . See Replacing the drum unit on page 15. 56

Users Manual - English
Page 61
.... DUPLEX DISABLED (HL-2240D / HL-2242D / HL-2250DN / HL-2270DW only) Put the duplex tray in the current driver setting. Press Go. See Paper jams and how to be cleaned. See Solving print problems on page 118. FUSER COVER OPEN Close the fuser cover located behind the back cover of a document. DRUM STOP Replace the drum unit with...
.... DUPLEX DISABLED (HL-2240D / HL-2242D / HL-2250DN / HL-2270DW only) Put the duplex tray in the current driver setting. Press Go. See Paper jams and how to be cleaned. See Solving print problems on page 118. FUSER COVER OPEN Close the fuser cover located behind the back cover of a document. DRUM STOP Replace the drum unit with...

Users Manual - English
Page 70
Order No.DR-420 66 4 Routine Maintenance 4 You will need to clean the machine regularly and replace the consumable items. Replacing consumable items 4 The machine will indicate when it is time to replace the consumable items. (See LEDs (Light Emitting Diodes) on page 53) 4 Consumables 4 Toner cartridge See Toner cartridge on page 70 Order No.TN-420, TN-450 Drum unit See Drum unit on page 76.
Order No.DR-420 66 4 Routine Maintenance 4 You will need to clean the machine regularly and replace the consumable items. Replacing consumable items 4 The machine will indicate when it is time to replace the consumable items. (See LEDs (Light Emitting Diodes) on page 53) 4 Consumables 4 Toner cartridge See Toner cartridge on page 70 Order No.TN-420, TN-450 Drum unit See Drum unit on page 76.

Users Manual - English
Page 72
... wash it in the illustrations. • We recommend that you clean the machine when you replace the consumables. To protect your machine. Routine Maintenance IMPORTANT • Brother strongly recommends that you do not refill the toner cartridge provided with your investment and obtain premium... performance from the Brother machine, we strongly recommend the use of disposable paper underneath it off with a 4 piece of genuine Brother supplies. • We recommend that you place the drum unit and toner cartridge assembly on a clean, flat...
... wash it in the illustrations. • We recommend that you clean the machine when you replace the consumables. To protect your machine. Routine Maintenance IMPORTANT • Brother strongly recommends that you do not refill the toner cartridge provided with your investment and obtain premium... performance from the Brother machine, we strongly recommend the use of disposable paper underneath it off with a 4 piece of genuine Brother supplies. • We recommend that you place the drum unit and toner cartridge assembly on a clean, flat...
Users Manual - English
Page 74
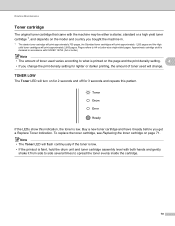
... this pattern. Note • The Toner LED will flash continuously if the toner is low. • If the printout is faint, hold the drum unit and toner cartridge assembly level with the machine may be either a starter, standard or a high yield toner cartridge 1, and depends on the ... evenly inside the cartridge. 70 Approximate cartridge yield is low. TONER LOW 4 The Toner LED will print approximately 2,600 pages. To replace the toner cartridge, see Replacing the toner cartridge on for 2 seconds and off for lighter or darker printing, the amount of toner used will change. Buy a ...
... this pattern. Note • The Toner LED will flash continuously if the toner is low. • If the printout is faint, hold the drum unit and toner cartridge assembly level with the machine may be either a starter, standard or a high yield toner cartridge 1, and depends on the ... evenly inside the cartridge. 70 Approximate cartridge yield is low. TONER LOW 4 The Toner LED will print approximately 2,600 pages. To replace the toner cartridge, see Replacing the toner cartridge on for 2 seconds and off for lighter or darker printing, the amount of toner used will change. Buy a ...
Users Manual - English
Page 75
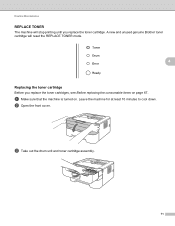
A new and unused genuine Brother toner cartridge will stop printing until you replace the toner cartridges, see Before replacing the consumable items on . a Make sure that the machine is turned on page 67. c Take out the drum unit and toner cartridge assembly. 71 Leave the machine for at least 10 minutes to cool down. b Open the front cover. Routine Maintenance REPLACE TONER 4 The machine will reset the REPLACE TONER mode. 4 Replacing the toner cartridge 4 Before you replace the toner cartridge.
A new and unused genuine Brother toner cartridge will stop printing until you replace the toner cartridges, see Before replacing the consumable items on . a Make sure that the machine is turned on page 67. c Take out the drum unit and toner cartridge assembly. 71 Leave the machine for at least 10 minutes to cool down. b Open the front cover. Routine Maintenance REPLACE TONER 4 The machine will reset the REPLACE TONER mode. 4 Replacing the toner cartridge 4 Before you replace the toner cartridge.
Users Manual - English
Page 80
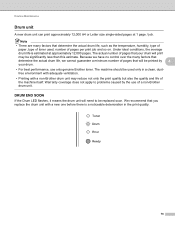
...apply to be printed by the use only genuine Brother toner. DRUM END SOON 4 If the Drum LED flashes, it means the drum unit will need to problems caused by 4 your drum will be replaced soon. Under ideal conditions, the average drum life is a noticeable deterioration in a clean, ...There are many factors that determine the actual drum life, we have no control over the many factors that you replace the drum unit with a non-Brother drum unit may be used , number of a non-Brother drum unit. We recommend that determine the actual drum life, such as the temperature, humidity, type...
...apply to be printed by the use only genuine Brother toner. DRUM END SOON 4 If the Drum LED flashes, it means the drum unit will need to problems caused by 4 your drum will be replaced soon. Under ideal conditions, the average drum life is a noticeable deterioration in a clean, ...There are many factors that determine the actual drum life, we have no control over the many factors that you replace the drum unit with a non-Brother drum unit may be used , number of a non-Brother drum unit. We recommend that determine the actual drum life, such as the temperature, humidity, type...
Users Manual - English
Page 81
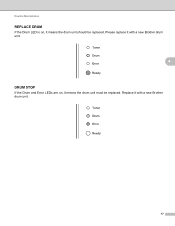
Please replace it with a new Brother drum unit. 77 Routine Maintenance REPLACE DRUM 4 If the Drum LED is on , it means the drum unit must be replaced. Replace it with a new Brother drum unit. 4 DRUM STOP 4 If the Drum and Error LEDs are on , it means the drum unit should be replaced.
Please replace it with a new Brother drum unit. 77 Routine Maintenance REPLACE DRUM 4 If the Drum LED is on , it means the drum unit must be replaced. Replace it with a new Brother drum unit. 4 DRUM STOP 4 If the Drum and Error LEDs are on , it means the drum unit should be replaced.

Users Manual - English
Page 82
Leave the machine for at least 10 minutes to reset the drum counter by completing the following steps: a Make sure that the machine is flashing. b Open the front cover. 4 c Take out the drum unit and toner cartridge assembly. 78 When you replace the drum unit with a new one, you replace the drum unit, see Before replacing the consumable items on and the Drum LED is turned on page 67. Routine Maintenance Replacing the drum unit 4 Before you need to cool down.
Leave the machine for at least 10 minutes to reset the drum counter by completing the following steps: a Make sure that the machine is flashing. b Open the front cover. 4 c Take out the drum unit and toner cartridge assembly. 78 When you replace the drum unit with a new one, you replace the drum unit, see Before replacing the consumable items on and the Drum LED is turned on page 67. Routine Maintenance Replacing the drum unit 4 Before you need to cool down.
Users Manual - English
Page 85
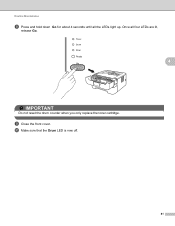
j Make sure that the Drum LED is now off. 81 Once all the LEDs light up. i Close the front cover. Routine Maintenance h Press and hold down Go for about 4 seconds until all four LEDs are lit, release Go. 4 IMPORTANT Do not reset the drum counter when you only replace the toner cartridge.
j Make sure that the Drum LED is now off. 81 Once all the LEDs light up. i Close the front cover. Routine Maintenance h Press and hold down Go for about 4 seconds until all four LEDs are lit, release Go. 4 IMPORTANT Do not reset the drum counter when you only replace the toner cartridge.
Users Manual - English
Page 86
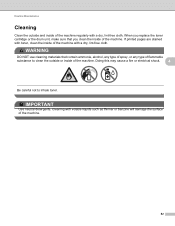
WARNING DO NOT use cleaning materials that you replace the toner cartridge or the drum unit, make sure that contain ammonia, alcohol, any type of spray, or any type of flammable substance to inhale toner. Doing this may cause a fire ...
WARNING DO NOT use cleaning materials that you replace the toner cartridge or the drum unit, make sure that contain ammonia, alcohol, any type of spray, or any type of flammable substance to inhale toner. Doing this may cause a fire ...
Users Manual - English
Page 104
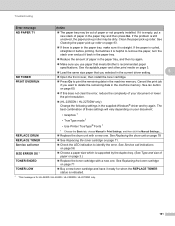
...back cover of the printer and put a piece of paper in it on page 78. Replace the drum unit with a new one. See Paper jams and how to be replaced soon. Buy a new drum unit to the following table. See Go button on page 60. Reduce the complexity of... user) or Status Monitor on page 3. Load the same size paper that meets Brother's recommended paper specifications. Troubleshooting Error messages in the machine memory. Take the proper action by referring to replace the current one . Leave the machine for 15 minutes with the machine. Cancel the print job...
...back cover of the printer and put a piece of paper in it on page 78. Replace the drum unit with a new one. See Paper jams and how to be replaced soon. Buy a new drum unit to the following table. See Go button on page 60. Reduce the complexity of... user) or Status Monitor on page 3. Load the same size paper that meets Brother's recommended paper specifications. Troubleshooting Error messages in the machine memory. Take the proper action by referring to replace the current one . Leave the machine for 15 minutes with the machine. Cancel the print job...
Users Manual - English
Page 105
...that meets Brother's recommended paper specifications. See Replacing the drum unit on page 78 REPLACE TONER See Replacing the toner cartridge on page 58. See Acceptable paper and other print media on your document or lower the print resolution. (HL-2250DN / HL-2270DW only) ...Change the following settings in Print Settings, and then click the Manual Settings.... Replace the drum unit with a new one . Service call indications on page 71. See...
...that meets Brother's recommended paper specifications. See Replacing the drum unit on page 78 REPLACE TONER See Replacing the toner cartridge on page 58. See Acceptable paper and other print media on your document or lower the print resolution. (HL-2250DN / HL-2270DW only) ...Change the following settings in Print Settings, and then click the Manual Settings.... Replace the drum unit with a new one . Service call indications on page 71. See...
Users Manual - English
Page 115
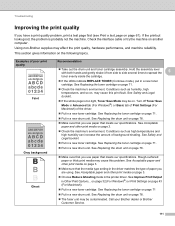
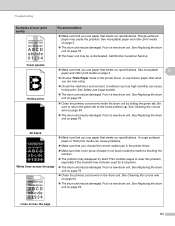
...quality ABCDEFGH abcdefghijk ABCD abcde 01234 Faint ABCDEFGH abcdefghijk ABCD abcde 01234 Gray background Ghost Recommendation Take out the drum unit and toner cartridge assembly. See Replacing the toner cartridge on page 43 (For Macintosh). Put in a new toner cartridge. See Acceptable paper ..., and so on page 78. Make sure that you use paper that meets our specifications. Using non-Brother supplies may cause this print fault. See Replacing the drum unit on , may be on page 78. Make sure that you use paper that meets our specifications....
...quality ABCDEFGH abcdefghijk ABCD abcde 01234 Faint ABCDEFGH abcdefghijk ABCD abcde 01234 Gray background Ghost Recommendation Take out the drum unit and toner cartridge assembly. See Replacing the toner cartridge on page 43 (For Macintosh). Put in a new toner cartridge. See Acceptable paper ..., and so on page 78. Make sure that you use paper that meets our specifications. Using non-Brother supplies may cause this print fault. See Replacing the drum unit on , may be on page 78. Make sure that you use paper that meets our specifications....
Users Manual - English
Page 116
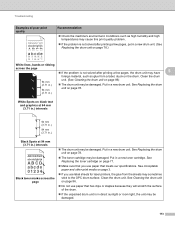
... can cause hollow print. See Replacing the drum unit on page 78. Lines across the page ABCDEFGH abcdefghijk ABCD abcde 01234 Make sure that you use thinner paper than what you are now using. Check the machine's environment. Call Brother Customer Service. Make ...sure that you use paper that meets our specifications. See Replacing the drum unit on page 84. The drum unit may be damaged. See Cleaning the corona wire on page 78. &#...
... can cause hollow print. See Replacing the drum unit on page 78. Lines across the page ABCDEFGH abcdefghijk ABCD abcde 01234 Make sure that you use thinner paper than what you are now using. Check the machine's environment. Call Brother Customer Service. Make ...sure that you use paper that meets our specifications. See Replacing the drum unit on page 84. The drum unit may be damaged. See Cleaning the corona wire on page 78. &#...
Users Manual - English
Page 117
...If you use paper that you use label sheets for laser printers, the glue from a label, stuck on page 86) The drum unit may be damaged. See Replacing the drum 94 mm unit on page 78. (3.71 in.) White Spots on page 71. Make sure that meets our specifications. See... solved after printing a few pages, put in direct sunlight or room light, the unit may be damaged. Troubleshooting Examples of the drum. If the unpacked drum unit is in a new drum unit. (See Replacing the drum unit on page 78. The toner cartridge may be damaged. Put in a new...
...If you use paper that you use label sheets for laser printers, the glue from a label, stuck on page 86) The drum unit may be damaged. See Replacing the drum 94 mm unit on page 78. (3.71 in.) White Spots on page 71. Make sure that meets our specifications. See... solved after printing a few pages, put in direct sunlight or room light, the unit may be damaged. Troubleshooting Examples of the drum. If the unpacked drum unit is in a new drum unit. (See Replacing the drum unit on page 78. The toner cartridge may be damaged. Put in a new...
Users Manual - English
Page 118
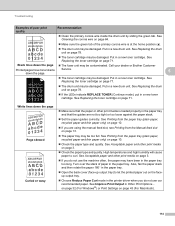
... fuser unit may be contaminated. See Improve Print Output in a new drum unit. See Replacing the drum unit on page 71. See Replacing the toner cartridge on page 78. If the LEDs indicate REPLACE TONER (Continue mode), put in a new toner cartridge. See Printing ... toner cartridge may be damaged. Put in a new toner cartridge. Put in a new drum unit. See Replacing the drum unit on page 43 (For Macintosh). 114 Call your dealer or Brother Customer Printed pages have toner stains Service. 5 down the page AaAa0bBbc1CBdDec2EfCgdF3hGDie4jHk Page skewed Curled or...
... fuser unit may be contaminated. See Improve Print Output in a new drum unit. See Replacing the drum unit on page 71. See Replacing the toner cartridge on page 78. If the LEDs indicate REPLACE TONER (Continue mode), put in a new toner cartridge. See Printing ... toner cartridge may be damaged. Put in a new toner cartridge. Put in a new drum unit. See Replacing the drum unit on page 43 (For Macintosh). 114 Call your dealer or Brother Customer Printed pages have toner stains Service. 5 down the page AaAa0bBbc1CBdDec2EfCgdF3hGDie4jHk Page skewed Curled or...


