Quick Setup Guide - English
Page 1
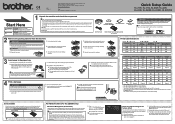
... Setup Guide in death or serious injuries. Quick Setup Guide HL-2130, HL-2132, HL-2220, HL-2230, HL-2240, HL-2240D, HL-2242D, HL-2250DN Start Here WARNING indicates a potentially hazardous situation which ,... situation which , if not avoided, could result in other languages, please visit http://solutions.brother.com/. Lift the elastic band off the machine. Pull the paper tray completely out of... using this machine for Macintosh. Put the drum unit and toner cartridge assembly back in the illustration. a. d. Check that all the LEDs light up , the Ready LED stops blinking and stays green. ...
... Setup Guide in death or serious injuries. Quick Setup Guide HL-2130, HL-2132, HL-2220, HL-2230, HL-2240, HL-2240D, HL-2242D, HL-2250DN Start Here WARNING indicates a potentially hazardous situation which ,... situation which , if not avoided, could result in other languages, please visit http://solutions.brother.com/. Lift the elastic band off the machine. Pull the paper tray completely out of... using this machine for Macintosh. Put the drum unit and toner cartridge assembly back in the illustration. a. d. Check that all the LEDs light up , the Ready LED stops blinking and stays green. ...
User Guide
Page 3
...Windows® ...51 Printer driver for Macintosh ...51 Software ...52 Software for networks (HL-2250DN / HL-2270DW only 52 Remote Printer Console (For Windows® only 52 3 Control Panel 53 LEDs (Light Emitting Diodes)...53 Service call indications ...58 Go button...60 Print a test page ...61 Print a Printer Settings page...62 Print Fonts (HL-2250DN / HL-2270DW only 63 Print a WLAN report (HL-2270DW only 64 Default settings...64 4 Routine Maintenance 66 Replacing consumable items...66 Consumables...66 Before replacing the consumable items 67 Toner cartridge ...70 Drum unit ...77 ii
...Windows® ...51 Printer driver for Macintosh ...51 Software ...52 Software for networks (HL-2250DN / HL-2270DW only 52 Remote Printer Console (For Windows® only 52 3 Control Panel 53 LEDs (Light Emitting Diodes)...53 Service call indications ...58 Go button...60 Print a test page ...61 Print a Printer Settings page...62 Print Fonts (HL-2250DN / HL-2270DW only 63 Print a WLAN report (HL-2270DW only 64 Default settings...64 4 Routine Maintenance 66 Replacing consumable items...66 Consumables...66 Before replacing the consumable items 67 Toner cartridge ...70 Drum unit ...77 ii
User Guide
Page 57
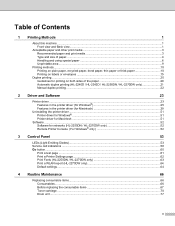
3 Control Panel 3 LEDs (Light Emitting Diodes) 3 This section refers to four LEDs Toner, Drum, Error, Ready and Go button on the control panel. 1 Toner LED 3 1 The Toner LED indicates that the Toner is low. 2 Drum LED 2 The Drum LED indicates that the Drum will flash depending on . The LED is in ... the machine status. 5 5 Go button Wake-up / Error recovery / Form feed / Job Cancel / Reprint / Enable or Disable the wireless network (HL-2270DW only) The LED indications shown in the table below are used in the illustrations in this chapter. LED is off. LED is flashing. 53
3 Control Panel 3 LEDs (Light Emitting Diodes) 3 This section refers to four LEDs Toner, Drum, Error, Ready and Go button on the control panel. 1 Toner LED 3 1 The Toner LED indicates that the Toner is low. 2 Drum LED 2 The Drum LED indicates that the Drum will flash depending on . The LED is in ... the machine status. 5 5 Go button Wake-up / Error recovery / Form feed / Job Cancel / Reprint / Enable or Disable the wireless network (HL-2270DW only) The LED indications shown in the table below are used in the illustrations in this chapter. LED is off. LED is flashing. 53

User Guide
Page 62
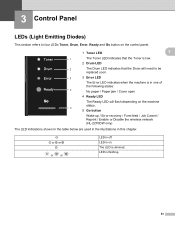
... failure Toner Drum Error Ready Fuser unit failure 1 Laser unit Main motor High voltage FAN Failure Zero Cross failure failure failure Error 1 If this error occurs, turn off the power switch, and then turn it back on page 58, and report the error status to your dealer or Brother Customer...the table on and try to print again. Control Panel Service call indications 3 If there is needed by lighting up as shown below. 3 If you see the service call your dealer or Brother Customer Service. 58 If the error occurs again, call indication shown above, turn off the machine's power ...
... failure Toner Drum Error Ready Fuser unit failure 1 Laser unit Main motor High voltage FAN Failure Zero Cross failure failure failure Error 1 If this error occurs, turn off the power switch, and then turn it back on page 58, and report the error status to your dealer or Brother Customer...the table on and try to print again. Control Panel Service call indications 3 If there is needed by lighting up as shown below. 3 If you see the service call your dealer or Brother Customer Service. 58 If the error occurs again, call indication shown above, turn off the machine's power ...
User Guide
Page 65
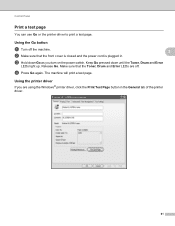
... use Go or the printer driver to print a test page. Keep Go pressed down Go as you are off the machine. 3 b Make sure that the Toner, Drum and Error LEDs are using the Windows® printer driver, click the Print Test Page button in . d Press Go again. Make sure that the... and the power cord is plugged in the General tab of the printer driver. 61 Using the Go button 3 a Turn off . c Hold down until the Toner, Drum and Error LEDs light up. Release Go.
... use Go or the printer driver to print a test page. Keep Go pressed down Go as you are off the machine. 3 b Make sure that the Toner, Drum and Error LEDs are using the Windows® printer driver, click the Print Test Page button in . d Press Go again. Make sure that the... and the power cord is plugged in the General tab of the printer driver. 61 Using the Go button 3 a Turn off . c Hold down until the Toner, Drum and Error LEDs light up. Release Go.
User Guide
Page 67
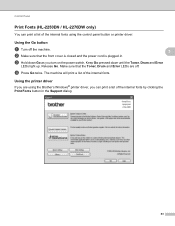
... the Toner, Drum and Error LEDs light up. Release Go. Keep Go pressed down Go as you are off the machine. 3 b Make sure that the Toner, Drum and Error LEDs are using the control panel button or printer driver. The machine will print a list of the internal fonts using the Brother's Windows...in the Support dialog. 63 Using the printer driver 3 If you turn on the power switch. Control Panel Print Fonts (HL-2250DN / HL-2270DW only) 3 You can print a list of the internal fonts by clicking the Print Fonts button in . d Press Go twice. Using the Go button 3 a Turn off ....
... the Toner, Drum and Error LEDs light up. Release Go. Keep Go pressed down Go as you are off the machine. 3 b Make sure that the Toner, Drum and Error LEDs are using the control panel button or printer driver. The machine will print a list of the internal fonts using the Brother's Windows...in the Support dialog. 63 Using the printer driver 3 If you turn on the power switch. Control Panel Print Fonts (HL-2250DN / HL-2270DW only) 3 You can print a list of the internal fonts by clicking the Print Fonts button in . d Press Go twice. Using the Go button 3 a Turn off ....
User Guide
Page 70
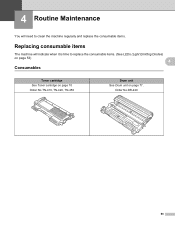
Order No.DR-420 66 4 Routine Maintenance 4 You will need to clean the machine regularly and replace the consumable items. Replacing consumable items 4 The machine will indicate when it is time to replace the consumable items. (See LEDs (Light Emitting Diodes) on page 53) 4 Consumables 4 Toner cartridge See Toner cartridge on page 70 Order No.TN-410, TN-420, TN-450 Drum unit See Drum unit on page 77.
Order No.DR-420 66 4 Routine Maintenance 4 You will need to clean the machine regularly and replace the consumable items. Replacing consumable items 4 The machine will indicate when it is time to replace the consumable items. (See LEDs (Light Emitting Diodes) on page 53) 4 Consumables 4 Toner cartridge See Toner cartridge on page 70 Order No.TN-410, TN-420, TN-450 Drum unit See Drum unit on page 77.
User Guide
Page 73
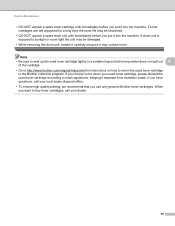
... before you put it into the machine. If you choose not to the Brother collection program. If toner cartridges are left unpacked for instructions on how to return the used toner cartridge according to sunlight or room light the unit may contain toner. If drum unit is exposed to local regulations, keeping it separate from...
... before you put it into the machine. If you choose not to the Brother collection program. If toner cartridges are left unpacked for instructions on how to return the used toner cartridge according to sunlight or room light the unit may contain toner. If drum unit is exposed to local regulations, keeping it separate from...
User Guide
Page 79
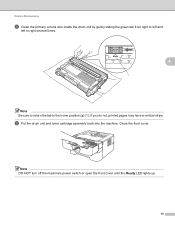
Close the front cover. Routine Maintenance h Clean the primary corona wire inside the drum unit by gently sliding the green tab from right to left and left to right several times. 4 1 Note Be sure to return the tab to the home position (a) (1). i Put the drum unit and toner cartridge assembly back into the machine. If you do not, printed pages may have a vertical stripe. Note DO NOT turn off the machine's power switch or open the front cover until the Ready LED lights up. 75
Close the front cover. Routine Maintenance h Clean the primary corona wire inside the drum unit by gently sliding the green tab from right to left and left to right several times. 4 1 Note Be sure to return the tab to the home position (a) (1). i Put the drum unit and toner cartridge assembly back into the machine. If you do not, printed pages may have a vertical stripe. Note DO NOT turn off the machine's power switch or open the front cover until the Ready LED lights up. 75
User Guide
Page 86
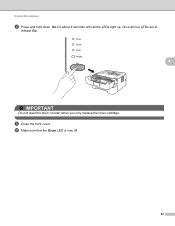
Once all the LEDs light up. j Make sure that the Drum LED is now off. 82 i Close the front cover. Routine Maintenance h Press and hold down Go for about 4 seconds until all four LEDs are lit, release Go. 4 IMPORTANT Do not reset the drum counter when you only replace the toner cartridge.
Once all the LEDs light up. j Make sure that the Drum LED is now off. 82 i Close the front cover. Routine Maintenance h Press and hold down Go for about 4 seconds until all four LEDs are lit, release Go. 4 IMPORTANT Do not reset the drum counter when you only replace the toner cartridge.
User Guide
Page 104
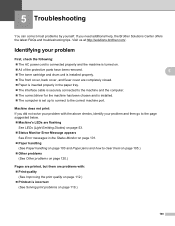
... to the page suggested below. Machine's LEDs are flashing See LEDs (Light Emitting Diodes) on page 53. Status Monitor Error Message appears See Error... Other problems (See Other problems on page 119.) 5 5 5 5 5 100 Visit us at http://solutions.brother.com/. If you did not solve your problem with the above checks, identify your problem First, check the following:...and the machine is turned on. All of the protective parts have been removed. The toner cartridge and drum unit is installed properly. The front cover, back cover, and fuser cover are ...
... to the page suggested below. Machine's LEDs are flashing See LEDs (Light Emitting Diodes) on page 53. Status Monitor Error Message appears See Error... Other problems (See Other problems on page 119.) 5 5 5 5 5 100 Visit us at http://solutions.brother.com/. If you did not solve your problem with the above checks, identify your problem First, check the following:...and the machine is turned on. All of the protective parts have been removed. The toner cartridge and drum unit is installed properly. The front cover, back cover, and fuser cover are ...
User Guide
Page 115
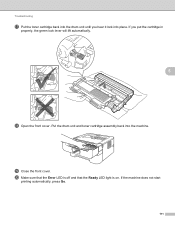
If you hear it lock into place. If the machine does not start printing automatically, press Go. 111 Troubleshooting q Put the toner cartridge back into the drum unit until you put the cartridge in properly, the green lock lever will lift automatically. 5 r Open the front cover. s Close the front cover. Put the drum unit and toner cartridge assembly back into the machine. t Make sure that the Error LED is off and that the Ready LED light is on.
If you hear it lock into place. If the machine does not start printing automatically, press Go. 111 Troubleshooting q Put the toner cartridge back into the drum unit until you put the cartridge in properly, the green lock lever will lift automatically. 5 r Open the front cover. s Close the front cover. Put the drum unit and toner cartridge assembly back into the machine. t Make sure that the Error LED is off and that the Ready LED light is on.
User Guide
Page 116
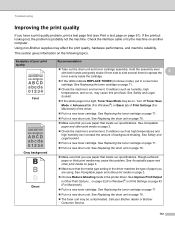
If the printout looks good, the problem is too light, Toner Save Mode may be contaminated. Turn off Toner Save Mode in Advanced tab (For Windows®) or Basic tab of Print Settings (For Macintosh) of paper you have a print quality problem, print a test ... mode), put in the driver matches the type of the driver. Put in a new toner cartridge. Call your Brother dealer or Brother Customer Service. 112 See Replacing the toner cartridge on page 61). Using non-Brother supplies may cause this problem. See Acceptable paper and other print media on page 79. Make sure...
If the printout looks good, the problem is too light, Toner Save Mode may be contaminated. Turn off Toner Save Mode in Advanced tab (For Windows®) or Basic tab of Print Settings (For Macintosh) of paper you have a print quality problem, print a test ... mode), put in the driver matches the type of the driver. Put in a new toner cartridge. Call your Brother dealer or Brother Customer Service. 112 See Replacing the toner cartridge on page 61). Using non-Brother supplies may cause this problem. See Acceptable paper and other print media on page 79. Make sure...
User Guide
Page 118
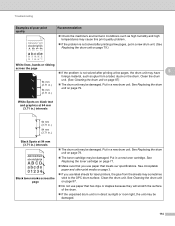
...drum 94 mm (3.71 in a new drum unit. (See Replacing the drum unit on page 79. The toner cartridge may be damaged. See Acceptable paper and other print media on page 3. If you use label sheets ...such as glue from the sheets may be damaged. Put in a new drum unit. Put in a new toner cartridge. See Replacing the toner cartridge on page 87. Do not use paper that meets our specifications. See Cleaning the drum unit...unpacked drum unit is in a new drum unit. Put in direct sunlight or room light, the unit may sometimes stick to the OPC drum surface.
...drum 94 mm (3.71 in a new drum unit. (See Replacing the drum unit on page 79. The toner cartridge may be damaged. See Acceptable paper and other print media on page 3. If you use label sheets ...such as glue from the sheets may be damaged. Put in a new drum unit. Put in a new toner cartridge. See Replacing the toner cartridge on page 87. Do not use paper that meets our specifications. See Cleaning the drum unit...unpacked drum unit is in a new drum unit. Put in direct sunlight or room light, the unit may sometimes stick to the OPC drum surface.


