Users Manual - English
Page 7
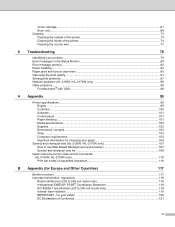
Toner cartridge ...61 Drum unit ...68 Cleaning ...73 Cleaning the outside of the printer...73 Cleaning the inside of the printer...74 Cleaning the corona wire...77 6 Troubleshooting 79 Identifying your problem ...79 Error messages in the Status Monitor ...80 Error message printout ...82 Paper ... information for choosing your paper 104 Symbol and character sets (HL-2150N / HL-2170W only 107 How to 240 volt model only 118 Internal laser radiation ...119 IMPORTANT - for Europe and Other Countries) 117 Brother numbers ...117 Important information: regulations ...118 Radio interference (220...
Toner cartridge ...61 Drum unit ...68 Cleaning ...73 Cleaning the outside of the printer...73 Cleaning the inside of the printer...74 Cleaning the corona wire...77 6 Troubleshooting 79 Identifying your problem ...79 Error messages in the Status Monitor ...80 Error message printout ...82 Paper ... information for choosing your paper 104 Symbol and character sets (HL-2150N / HL-2170W only 107 How to 240 volt model only 118 Internal laser radiation ...119 IMPORTANT - for Europe and Other Countries) 117 Brother numbers ...117 Important information: regulations ...118 Radio interference (220...
Users Manual - English
Page 43
...HL-2150N / HL-2170W only) You can still receive data. Receiving a print file or document or pressing the Go button will appear. Click Off to reprint. In sleep mode, the printer acts as though it enters sleep mode. To reprint the last document, press the Go button and hold it in order (Toner, Drum, Error..., Ready), and then release the Go button. While the printer is in the selection boxes for the following functions you want to stop the printer going into sleep mode. Driver and Software „ Job Spooling The...
...HL-2150N / HL-2170W only) You can still receive data. Receiving a print file or document or pressing the Go button will appear. Click Off to reprint. In sleep mode, the printer acts as though it enters sleep mode. To reprint the last document, press the Go button and hold it in order (Toner, Drum, Error..., Ready), and then release the Go button. While the printer is in the selection boxes for the following functions you want to stop the printer going into sleep mode. Driver and Software „ Job Spooling The...
Users Manual - English
Page 56
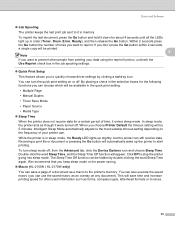
...or LED is dimmed. The LED is blinking. 48 4 Control Panel 4 LEDs (Light Emitting Diodes) 4 This section refers to three LEDs Toner, Drum and Error, and a dual function Ready LED & Go button on the control panel. 1 Toner LED The Toner LED indicates when the Toner is low or at... the end 4 of its life. 2 Drum LED 1 The Drum LED indicates when the Drum is nearing the end of its life. 2 3 Error LED 3 The Error LED indicates when the printer is in this chapter. LED is on the printer status. 4 Go button Wake-up / Error recovery / Form feed / Job Cancel / Reprint The LED...
...or LED is dimmed. The LED is blinking. 48 4 Control Panel 4 LEDs (Light Emitting Diodes) 4 This section refers to three LEDs Toner, Drum and Error, and a dual function Ready LED & Go button on the control panel. 1 Toner LED The Toner LED indicates when the Toner is low or at... the end 4 of its life. 2 Drum LED 1 The Drum LED indicates when the Drum is nearing the end of its life. 2 3 Error LED 3 The Error LED indicates when the printer is in this chapter. LED is on the printer status. 4 Go button Wake-up / Error recovery / Form feed / Job Cancel / Reprint The LED...
Users Manual - English
Page 58
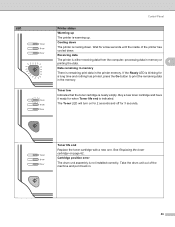
... will turn on page 62. Take the drum unit out of the printer has cooled down . If the Ready LED is blinking for 3 seconds. Toner life end Replace the toner cartridge with a new one. Toner low Indicates that the toner cartridge is warming up The printer is nearly empty. Wait for when Toner... is indicated. Buy a new toner cartridge and have it ready for a few seconds until the inside of the machine and put it back in the printer memory. Cooling down The printer is not installed correctly. Cartridge position error The drum unit assembly is cooling down .
... will turn on page 62. Take the drum unit out of the printer has cooled down . If the Ready LED is blinking for 3 seconds. Toner life end Replace the toner cartridge with a new one. Toner low Indicates that the toner cartridge is warming up The printer is nearly empty. Wait for when Toner... is indicated. Buy a new toner cartridge and have it ready for a few seconds until the inside of the machine and put it back in the printer memory. Cooling down The printer is not installed correctly. Cartridge position error The drum unit assembly is cooling down .

Users Manual - English
Page 60
Put in a new drum unit. LED Control Panel Printer status Drum error The corona wire needs to be cleaned. See Cleaning the corona wire on page 69. 4 52 See Replacing the drum unit on page 77.
Put in a new drum unit. LED Control Panel Printer status Drum error The corona wire needs to be cleaned. See Cleaning the corona wire on page 69. 4 52 See Replacing the drum unit on page 77.
Users Manual - English
Page 61
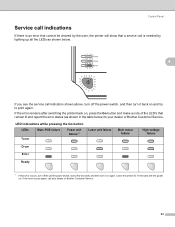
...the LEDs as shown in the table below . 4 If you see the service call your dealer or Brother Customer Service. If the error occurs again, call indication shown above, turn off the printer power switch, wait a few seconds, and then turn it on , press the Go button and ...user, the printer will show that remain lit and report the error status (as shown below ) to print again. LED indications while pressing the Go button LEDs Toner Main PCB failure Fuser unit failure 1 Laser unit failure Main motor failure High voltage failure Drum Error Ready 1 If this error occurs, turn...
...the LEDs as shown in the table below . 4 If you see the service call your dealer or Brother Customer Service. If the error occurs again, call indication shown above, turn off the printer power switch, wait a few seconds, and then turn it on , press the Go button and ...user, the printer will show that remain lit and report the error status (as shown below ) to print again. LED indications while pressing the Go button LEDs Toner Main PCB failure Fuser unit failure 1 Laser unit failure Main motor failure High voltage failure Drum Error Ready 1 If this error occurs, turn...
Users Manual - English
Page 64
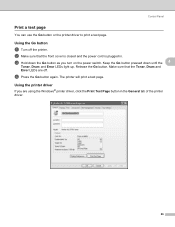
...closed and the power cord is plugged in the General tab of the printer driver. 56 c Hold down until the 4 Toner, Drum and Error LEDs light up. d Press the Go button again. Using the Go button 4 a Turn off . The printer will print a test page. Release the Go button. b Make ...sure that the Toner, Drum and Error LEDs are using the Windows® printer driver, click the Print Test Page button in . Using the printer driver 4 If you turn on the power switch. Control...
...closed and the power cord is plugged in the General tab of the printer driver. 56 c Hold down until the 4 Toner, Drum and Error LEDs light up. d Press the Go button again. Using the Go button 4 a Turn off . The printer will print a test page. Release the Go button. b Make ...sure that the Toner, Drum and Error LEDs are using the Windows® printer driver, click the Print Test Page button in . Using the printer driver 4 If you turn on the power switch. Control...
Users Manual - English
Page 66
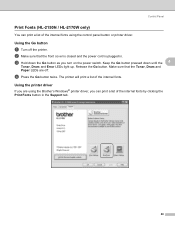
Keep the Go button pressed down the Go button as you can print a list of the internal fonts using the Brother's Windows® printer driver, you turn on the power switch. Release the Go button. Make sure that the front cover is closed and the power cord ... Paper LEDs are using the control panel button or printer driver. c Hold down until the 4 Toner, Drum and Error LEDs light up. Using the printer driver 4 If you are off the printer. Control Panel Print Fonts (HL-2150N / HL-2170W only) 4 You can print a list of the internal fonts by clicking the Print Fonts button in ....
Keep the Go button pressed down the Go button as you can print a list of the internal fonts using the Brother's Windows® printer driver, you turn on the power switch. Release the Go button. Make sure that the front cover is closed and the power cord ... Paper LEDs are using the control panel button or printer driver. c Hold down until the 4 Toner, Drum and Error LEDs light up. Using the printer driver 4 If you are off the printer. Control Panel Print Fonts (HL-2150N / HL-2170W only) 4 You can print a list of the internal fonts by clicking the Print Fonts button in ....
Users Manual - English
Page 67
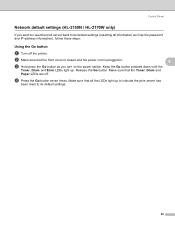
Control Panel Network default settings (HL-2150N / HL-2170W only) 4 If you turn on the power switch. Keep the Go button pressed down the Go button as the password and IP address information), ... . Release the Go button. Make sure that the front cover is closed and the power cord is plugged in. 4 c Hold down until the Toner, Drum and Error LEDs light up to indicate the print server has been reset to its default settings. 59 d Press the Go button seven times. b Make sure that...
Control Panel Network default settings (HL-2150N / HL-2170W only) 4 If you turn on the power switch. Keep the Go button pressed down the Go button as the password and IP address information), ... . Release the Go button. Make sure that the front cover is closed and the power cord is plugged in. 4 c Hold down until the Toner, Drum and Error LEDs light up to indicate the print server has been reset to its default settings. 59 d Press the Go button seven times. b Make sure that...
Users Manual - English
Page 87
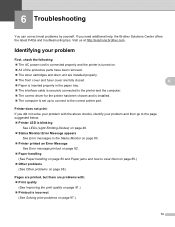
....brother.com. Identifying your problem and then go to the page suggested below. „ Printer LED is blinking See LEDs (Light Emitting Diodes) on page 48. „ Status Monitor Error Message appears See Error messages in the Status Monitor on page 80. „ Printer printed an Error Message See Error...Printout is incorrect (See Solving print problems on . „ All of the protective parts have been removed. „ The toner cartridges and drum unit are installed properly. „ The front cover and fuser cover are problems with the above checks, identify your problem First, check the ...
....brother.com. Identifying your problem and then go to the page suggested below. „ Printer LED is blinking See LEDs (Light Emitting Diodes) on page 48. „ Status Monitor Error Message appears See Error messages in the Status Monitor on page 80. „ Printer printed an Error Message See Error...Printout is incorrect (See Solving print problems on . „ All of the protective parts have been removed. „ The toner cartridges and drum unit are installed properly. „ The front cover and fuser cover are problems with the above checks, identify your problem First, check the ...
Users Manual - English
Page 89
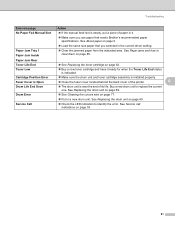
...page 69. „ See Cleaning the corona wire on page 53. 81 Buy a new drum unit to identify the error. Paper Jam Tray 1 Paper Jam Inside „ Load the same size paper that meets Brother's recommended paper specifications. See Service call indications on page 77. See About paper on page 62... in it ready for when the Toner Life End status is indicated. „ Make sure the drum unit and toner cartridge assembly is installed properly. „ Close the fuser cover located behind the back cover of the printer. 6 „ The drum unit is empty, put a piece of its life.
...page 69. „ See Cleaning the corona wire on page 53. 81 Buy a new drum unit to identify the error. Paper Jam Tray 1 Paper Jam Inside „ Load the same size paper that meets Brother's recommended paper specifications. See Service call indications on page 77. See About paper on page 62... in it ready for when the Toner Life End status is indicated. „ Make sure the drum unit and toner cartridge assembly is installed properly. „ Close the fuser cover located behind the back cover of the printer. 6 „ The drum unit is empty, put a piece of its life.
Users Manual - English
Page 98
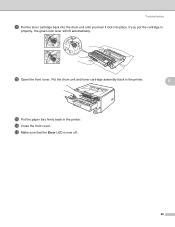
o Make sure that the Error LED is now off. 90 Troubleshooting k Put the toner cartridge back into place. If you hear it lock into the drum unit until you put the cartridge in the printer. Put the drum unit and toner cartridge assembly back in the printer. 6 m Put the paper tray firmly back in properly, the green lock lever will lift automatically. l Open the front cover. n Close the front cover.
o Make sure that the Error LED is now off. 90 Troubleshooting k Put the toner cartridge back into place. If you hear it lock into the drum unit until you put the cartridge in the printer. Put the drum unit and toner cartridge assembly back in the printer. 6 m Put the paper tray firmly back in properly, the green lock lever will lift automatically. l Open the front cover. n Close the front cover.
Users Manual - English
Page 137
...Brother Numbers (USA/Canada 122, 123 C Carton contents 1 Cartridge position error 50 Character sets 107 Cleaning 73 Computer requirements 103 Consumables 60 Control panel 48, 101 Corona wire 67, 77, 78 Cover open 51 D Device options 34 Dimensions 102 Domain 107 Driver Deployment Wizard 46 Drum error 52 Drum... full 51 N Network 46 Network connectivity 100 Network default setting 59 No paper 51 D O OPC drum 93 P Paper 5, 104 Paper handling 101 Paper jams 51, 85 PCL printer driver 29 Plain paper 6 Power supply 4 Print overrun 51 Print quality 91 Print test page 56...
...Brother Numbers (USA/Canada 122, 123 C Carton contents 1 Cartridge position error 50 Character sets 107 Cleaning 73 Computer requirements 103 Consumables 60 Control panel 48, 101 Corona wire 67, 77, 78 Cover open 51 D Device options 34 Dimensions 102 Domain 107 Driver Deployment Wizard 46 Drum error 52 Drum... full 51 N Network 46 Network connectivity 100 Network default setting 59 No paper 51 D O OPC drum 93 P Paper 5, 104 Paper handling 101 Paper jams 51, 85 PCL printer driver 29 Plain paper 6 Power supply 4 Print overrun 51 Print quality 91 Print test page 56...
Quick Setup Guide - English
Page 10
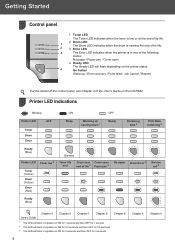
... for 1 second. 2 The LED will blink in a pattern of ON for 0.5 seconds and then OFF for 3 seconds. 8 Chapter 4 Chapter 4 Printer LED Indications 3 : Blinking : ON : OFF Printer LED Toner Drum Error OFF Sleep Warming up / Error recovery / Form feed / Job Cancel / Reprint For the details of the control panel, see Chapter 4 of the User's Guide on...
... for 1 second. 2 The LED will blink in a pattern of ON for 0.5 seconds and then OFF for 3 seconds. 8 Chapter 4 Chapter 4 Printer LED Indications 3 : Blinking : ON : OFF Printer LED Toner Drum Error OFF Sleep Warming up / Error recovery / Form feed / Job Cancel / Reprint For the details of the control panel, see Chapter 4 of the User's Guide on...

Quick Setup Guide - English
Page 20
Toner cartridge Drum unit See Chapter 5 of the User's Guide on the control panel. Consumables 1 Consumables 1 When the time comes to replace consumable items, an error will be indicated by the LED's on the CD-ROM. 18 For more information about the consumables for your printer, visit us at http://solutions.brother.com or contact your local Brother reseller.
Toner cartridge Drum unit See Chapter 5 of the User's Guide on the control panel. Consumables 1 Consumables 1 When the time comes to replace consumable items, an error will be indicated by the LED's on the CD-ROM. 18 For more information about the consumables for your printer, visit us at http://solutions.brother.com or contact your local Brother reseller.


