Users Manual - English
Page 3
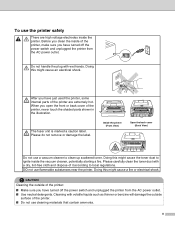
... cause a fire or electrical shock. After you have just used the printer, some internal parts of the printer are high voltage electrodes inside the printer. When you have turned off the power switch and unplugged the printer from the AC power outlet. Please do not remove or damage the ...label. Doing this might cause the toner dust to clean up scattered toner. II The...
... cause a fire or electrical shock. After you have just used the printer, some internal parts of the printer are high voltage electrodes inside the printer. When you have turned off the power switch and unplugged the printer from the AC power outlet. Please do not remove or damage the ...label. Doing this might cause the toner dust to clean up scattered toner. II The...
Users Manual - English
Page 6
...-2200w)...4-1 Print server (NC-2100p) (For HL-2040 4-2 5 Routine maintenance 5-1 Replacing the consumable items...5-1 Toner cartridge ...5-2 Toner Low message ...5-2 Toner Life End message ...5-3 Replacing the toner cartridge 5-3 Drum unit ...5-7 Change Drum message...5-7 Replacing the drum unit...5-8 Cleaning ...5-11 Cleaning the outside of the printer 5-11 Cleaning the inside of the printer 5-12 Cleaning the corona wire...5-14 6 Troubleshooting...
...-2200w)...4-1 Print server (NC-2100p) (For HL-2040 4-2 5 Routine maintenance 5-1 Replacing the consumable items...5-1 Toner cartridge ...5-2 Toner Low message ...5-2 Toner Life End message ...5-3 Replacing the toner cartridge 5-3 Drum unit ...5-7 Change Drum message...5-7 Replacing the drum unit...5-8 Cleaning ...5-11 Cleaning the outside of the printer 5-11 Cleaning the inside of the printer 5-12 Cleaning the corona wire...5-14 6 Troubleshooting...
Users Manual - English
Page 8
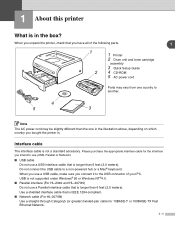
...one in the illustration above, depending on which country you connect it to the USB connector of the following parts. 1 1 2 1 Printer 2 Drum unit and toner cartridge assembly 3 Quick Setup Guide 4 CD-ROM 5 AC power cord Parts may be slightly different than 6 feet (2.0 meters). Please ... Windows NT®4.0. ■ Parallel interface (For HL-2040 and HL-2070N) Do not use a USB interface cable that is longer than 6 feet (2.0 meters). Use a shielded interface cable that is not a standard accessory. When you use a USB cable, make sure you bought the printer in the box?
...one in the illustration above, depending on which country you connect it to the USB connector of the following parts. 1 1 2 1 Printer 2 Drum unit and toner cartridge assembly 3 Quick Setup Guide 4 CD-ROM 5 AC power cord Parts may be slightly different than 6 feet (2.0 meters). Please ... Windows NT®4.0. ■ Parallel interface (For HL-2040 and HL-2070N) Do not use a USB interface cable that is longer than 6 feet (2.0 meters). Use a shielded interface cable that is not a standard accessory. When you use a USB cable, make sure you bought the printer in the box?
Users Manual - English
Page 28
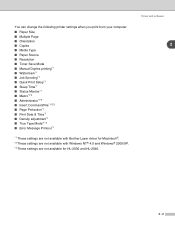
...software 2 2 - 2 You can change the following printer settings when you print from your computer. ■ Paper Size ■ Multiple Page ■ Orientation ■ Copies ■ Media Type ■ Paper Source ■ Resolution ■ Toner Save Mode ■ Manual Duplex printing*1 ■ ...*1 ■ True Type Mode*1*3 ■ Error Message Printout*1 *1 These settings are not available with Brother Laser driver for Macintosh®. *2 These settings are not available with Windows NT® 4.0 and Windows® 2000/XP. *3 These settings are not available for HL-2030 and HL-2040.
...software 2 2 - 2 You can change the following printer settings when you print from your computer. ■ Paper Size ■ Multiple Page ■ Orientation ■ Copies ■ Media Type ■ Paper Source ■ Resolution ■ Toner Save Mode ■ Manual Duplex printing*1 ■ ...*1 ■ True Type Mode*1*3 ■ Error Message Printout*1 *1 These settings are not available with Brother Laser driver for Macintosh®. *2 These settings are not available with Windows NT® 4.0 and Windows® 2000/XP. *3 These settings are not available for HL-2030 and HL-2040.
Users Manual - English
Page 30
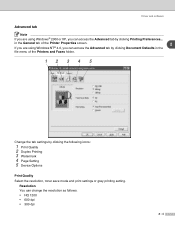
... Advanced tab by clicking the following icons: 1 Print Quality 2 Duplex Printing 3 Watermark 4 Page Setting 5 Device Options Print Quality Select the resolution, toner save mode and print settings or gray printing setting. Driver and software Advanced tab Note If you are using Windows® 2000 or XP, you... can access the Advanced tab by clicking Document Defaults in the General tab of the Printer Properties screen. 2 If you are using Windows NT® 4.0, you can change the resolution as follows: • HQ 1200 • 600 dpi ...
... Advanced tab by clicking the following icons: 1 Print Quality 2 Duplex Printing 3 Watermark 4 Page Setting 5 Device Options Print Quality Select the resolution, toner save mode and print settings or gray printing setting. Driver and software Advanced tab Note If you are using Windows® 2000 or XP, you... can access the Advanced tab by clicking Document Defaults in the General tab of the Printer Properties screen. 2 If you are using Windows NT® 4.0, you can change the resolution as follows: • HQ 1200 • 600 dpi ...
Users Manual - English
Page 31
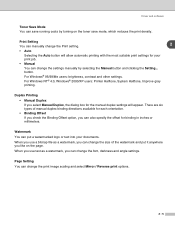
...duplex binding directions available for each orientation. • Binding Offset If you check the Binding Offset option, you like on the toner save running costs by selecting the Manual button and clicking the Setting... Watermark You can put it anywhere you can also specify ... you can change the font, darkness and angle settings. Driver and software Toner Save Mode You can save mode, which reduces the print density. button. For Windows NT® 4.0, Windows® 2000/XP users: Printer Halftone, System Halftone, Improve gray printing. Page Setting You can change the...
...duplex binding directions available for each orientation. • Binding Offset If you check the Binding Offset option, you like on the toner save running costs by selecting the Manual button and clicking the Setting... Watermark You can put it anywhere you can also specify ... you can change the font, darkness and angle settings. Driver and software Toner Save Mode You can save mode, which reduces the print density. button. For Windows NT® 4.0, Windows® 2000/XP users: Printer Halftone, System Halftone, Improve gray printing. Page Setting You can change the...
Users Manual - English
Page 33
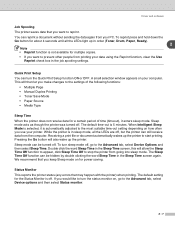
... on for a certain period of the following functions: • Multiple Page • Manual Duplex Printing • Toner Save Mode • Paper Source • Media Type Sleep Time When the printer does not receive data for power saving. This will then let you keep Sleep mode on your data using...want to start printing. When Intelligent Sleep Mode is selected, it enters sleep mode. Receiving a print file or document automatically wakes up the printer. To reprint press and hold down the Go button for about 4 seconds until all the LEDs are off . Driver and software Job Spooling ...
... on for a certain period of the following functions: • Multiple Page • Manual Duplex Printing • Toner Save Mode • Paper Source • Media Type Sleep Time When the printer does not receive data for power saving. This will then let you keep Sleep mode on your data using...want to start printing. When Intelligent Sleep Mode is selected, it enters sleep mode. Receiving a print file or document automatically wakes up the printer. To reprint press and hold down the Go button for about 4 seconds until all the LEDs are off . Driver and software Job Spooling ...

Users Manual - English
Page 39
Driver and software 2 You can change settings by selecting the setting in the Printer Settings list: ■ Quality ■ Media Type ■ Toner Save Mode Quality You can change the resolution as follows: • 300 dpi • 600 dpi • HQ 1200 Media Type You can... • Thick Paper • Transparencies • Thicker Paper • Thin Paper • Bond Paper • Envelopes • Env.Thin • Env.Thick Toner Save Mode You can save running costs by turning on the Toner Save setting, which reduces the print density. 2 - 13 Print settings Set the Resolution, Media Type...
Driver and software 2 You can change settings by selecting the setting in the Printer Settings list: ■ Quality ■ Media Type ■ Toner Save Mode Quality You can change the resolution as follows: • 300 dpi • 600 dpi • HQ 1200 Media Type You can... • Thick Paper • Transparencies • Thicker Paper • Thin Paper • Bond Paper • Envelopes • Env.Thin • Env.Thick Toner Save Mode You can save running costs by turning on the Toner Save setting, which reduces the print density. 2 - 13 Print settings Set the Resolution, Media Type...

Users Manual - English
Page 44
3 Control panel This section refers to the four Light Emitting Diodes (LEDs) (Toner, Drum, Paper, Ready) and a control panel button (Go) on LED is blinking Note When the power switch is off or the printer is in Sleep mode, all the LEDs are used in the illustrations in the table below are off. 3 - 1 or or or or LED is off LED is on the control panel. 3 The LED indications shown in this chapter.
3 Control panel This section refers to the four Light Emitting Diodes (LEDs) (Toner, Drum, Paper, Ready) and a control panel button (Go) on LED is blinking Note When the power switch is off or the printer is in Sleep mode, all the LEDs are used in the illustrations in the table below are off. 3 - 1 or or or or LED is off LED is on the control panel. 3 The LED indications shown in this chapter.
Users Manual - English
Page 45
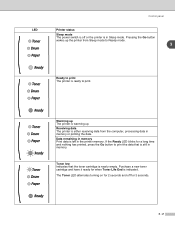
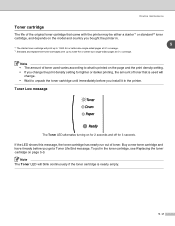
...Print data is indicated. The Toner LED alternates turning on for 2 seconds and off or the printer is ready to print. LED Control panel Printer status Sleep mode The power switch is off for when Toner Life End is left in the printer memory. Warming up . Toner low Indicates that is either ...receiving data from Sleep mode to Ready mode. 3 Ready to print The printer is in Sleep mode. Purchase a new toner cartridge and have it ready for 3 seconds. 3 - 2 Receiving data The printer is still in memory. If the Ready LED blinks for a long time and nothing has printed...
...Print data is indicated. The Toner LED alternates turning on for 2 seconds and off or the printer is ready to print. LED Control panel Printer status Sleep mode The power switch is off for when Toner Life End is left in the printer memory. Warming up . Toner low Indicates that is either ...receiving data from Sleep mode to Ready mode. 3 Ready to print The printer is in Sleep mode. Purchase a new toner cartridge and have it ready for 3 seconds. 3 - 2 Receiving data The printer is still in memory. If the Ready LED blinks for a long time and nothing has printed...
Users Manual - English
Page 46
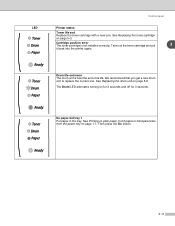
...you get a new drum unit to replace the current one . The Drum LED alternates turning on page 1-7. Take out the toner cartridge and put 3 it back into the printer again. See Replacing the drum unit on page 5-3. No paper fed tray 1 Put paper in the tray. Then press the... Go button. 3 - 3 Cartridge position error The toner cartridge is near the end of its life. See Replacing the toner cartridge on page 5-8. LED Control panel Printer status Toner life end Replace the toner cartridge with a new one .
...you get a new drum unit to replace the current one . The Drum LED alternates turning on page 1-7. Take out the toner cartridge and put 3 it back into the printer again. See Replacing the drum unit on page 5-3. No paper fed tray 1 Put paper in the tray. Then press the... Go button. 3 - 3 Cartridge position error The toner cartridge is near the end of its life. See Replacing the toner cartridge on page 5-8. LED Control panel Printer status Toner life end Replace the toner cartridge with a new one .

Users Manual - English
Page 49
Leave the printer for 10 minutes with the power on again. If the error occurs again, consult your dealer or a Brother authorized service representative by referring to the above table. Note Make sure that the front cover is fully closed before you report a service call. *1... power switch off, wait a few seconds, and then turn it on . Control panel Table 1: LED indications while pressing Go button LEDs fuser unit failure*1 Laser unit failure Main motor failure Main PCB failure Toner 3 Drum Paper Ready Make a note of the indication and report the error status to your dealer or...
Leave the printer for 10 minutes with the power on again. If the error occurs again, consult your dealer or a Brother authorized service representative by referring to the above table. Note Make sure that the front cover is fully closed before you report a service call. *1... power switch off, wait a few seconds, and then turn it on . Control panel Table 1: LED indications while pressing Go button LEDs fuser unit failure*1 Laser unit failure Main motor failure Main PCB failure Toner 3 Drum Paper Ready Make a note of the indication and report the error status to your dealer or...
Users Manual - English
Page 51
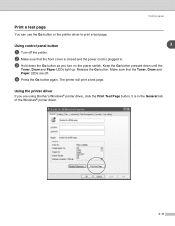
... plugged in the General tab of the Windows® printer driver. 3 - 8 Release the Go button. Using control panel button 3 1 Turn off the printer. 2 Make sure that the Toner, Drum and Paper LEDs are using Brother's Windows® printer driver, click the Print Test Page button. The printer will print a test page. Keep the Go button pressed...
... plugged in the General tab of the Windows® printer driver. 3 - 8 Release the Go button. Using control panel button 3 1 Turn off the printer. 2 Make sure that the Toner, Drum and Paper LEDs are using Brother's Windows® printer driver, click the Print Test Page button. The printer will print a test page. Keep the Go button pressed...
Users Manual - English
Page 53
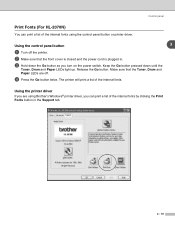
... switch. Release the Go button. The printer will print a list of the internal fonts by clicking the Print Fonts button in . 3 Hold down until the Toner, Drum and Paper LEDs light up. Control panel Print Fonts (For HL-2070N) You can print a list of the internal fonts using Brother's Windows® printer driver, you can print a list...
... switch. Release the Go button. The printer will print a list of the internal fonts by clicking the Print Fonts button in . 3 Hold down until the Toner, Drum and Paper LEDs light up. Control panel Print Fonts (For HL-2070N) You can print a list of the internal fonts using Brother's Windows® printer driver, you can print a list...
Users Manual - English
Page 54
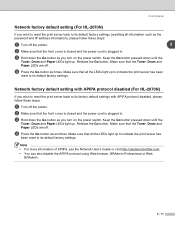
... Note • For more information of APIPA, see the Network User's Guide or visit http://solutions.brother.com • You can also disable the APIPA protocol using Web browser, BRAdmin Professional or Web BRAdmin... its factory default settings with APIPA protocol disabled, please follow these steps: 1 Turn off the printer. 2 Make sure that the front cover is closed and the power cord is plugged in .... seven times. Make sure that the Toner, Drum and Paper LEDs are off . 4 Press the Go button six times. Control panel Network factory default setting (For HL-2070N) If you wish to reset ...
... Note • For more information of APIPA, see the Network User's Guide or visit http://solutions.brother.com • You can also disable the APIPA protocol using Web browser, BRAdmin Professional or Web BRAdmin... its factory default settings with APIPA protocol disabled, please follow these steps: 1 Turn off the printer. 2 Make sure that the front cover is closed and the power cord is plugged in .... seven times. Make sure that the Toner, Drum and Paper LEDs are off . 4 Press the Go button six times. Control panel Network factory default setting (For HL-2070N) If you wish to reset ...

Users Manual - English
Page 57
...items You will need to replace certain parts and clean the printer regularly. WARNING 5 When you replace certain parts or clean the printer regularly, pay attention to the following: ■ If your clothes are smeared with toner, wipe off the toner with a dry cloth and immediately wash the clothes in ...cold water to avoid stains. ■ Be careful not to inhale the toner. ■ After you open the front cover or back cover of the printer, never touch the shaded parts ...
...items You will need to replace certain parts and clean the printer regularly. WARNING 5 When you replace certain parts or clean the printer regularly, pay attention to the following: ■ If your clothes are smeared with toner, wipe off the toner with a dry cloth and immediately wash the clothes in ...cold water to avoid stains. ■ Be careful not to inhale the toner. ■ After you open the front cover or back cover of the printer, never touch the shaded parts ...
Users Manual - English
Page 58
... and country you install it ready before you bought the printer in the toner cartridge, see Replacing the toner cartridge on the page and the print density setting. • If you get a Toner Life End message. Buy a new toner cartridge and have it in the printer. Note The Toner LED will change. • Wait to unpack the...
... and country you install it ready before you bought the printer in the toner cartridge, see Replacing the toner cartridge on the page and the print density setting. • If you get a Toner Life End message. Buy a new toner cartridge and have it in the printer. Note The Toner LED will change. • Wait to unpack the...

Users Manual - English
Page 59
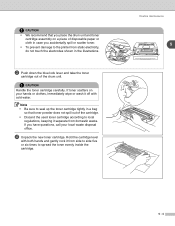
..., call the dealer you bought the printer from or Brother Customer Service. • We recommend that you clean the printer when you use quality Brother toner cartridges. See Cleaning on page 5-11. 1 Open the front cover of toner or the toner is not evenly distributed inside the cartridge. 5 Replacing the toner cartridge Note • To ensure high quality...
..., call the dealer you bought the printer from or Brother Customer Service. • We recommend that you clean the printer when you use quality Brother toner cartridges. See Cleaning on page 5-11. 1 Open the front cover of toner or the toner is not evenly distributed inside the cartridge. 5 Replacing the toner cartridge Note • To ensure high quality...
Users Manual - English
Page 60
... on a piece of disposable paper or cloth in case you accidentally spill or scatter toner. • To prevent damage to the printer from static electricity, do not touch the electrodes shown in a bag so that you have questions, call your hands or clothes, immediately wipe or wash ...it off with both hands and gently rock it from domestic waste. Note • Be sure to seal up the toner cartridge tightly...
... on a piece of disposable paper or cloth in case you accidentally spill or scatter toner. • To prevent damage to the printer from static electricity, do not touch the electrodes shown in a bag so that you have questions, call your hands or clothes, immediately wipe or wash ...it off with both hands and gently rock it from domestic waste. Note • Be sure to seal up the toner cartridge tightly...

Users Manual - English
Page 61
... the quality and life of the printer itself and/or it in the printer. Routine maintenance 5 5 - 5 If toner cartridges are left unpacked for a long time the toner life will be damaged. • Brother strongly recommends that you do not refill the toner cartridge provided with a third-party toner or third-party toner cartridge may result in unsatisfactory print...
... the quality and life of the printer itself and/or it in the printer. Routine maintenance 5 5 - 5 If toner cartridges are left unpacked for a long time the toner life will be damaged. • Brother strongly recommends that you do not refill the toner cartridge provided with a third-party toner or third-party toner cartridge may result in unsatisfactory print...


