
Users Manual - English
Page 4
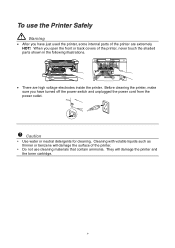
Before cleaning the printer, make sure you have just used the printer, some internal parts of the printer are high voltage electrodes inside the printer. Cleaning with volatile liquids such as thinner or benzene will damage the printer and the ...toner cartridge. They will damage the surface of the printer, never touch the shaded parts shown in the following illustrations. • There are extremely HOT! Caution y Use water or neutral detergents for cleaning. To use cleaning materials that contain ammonia...
Before cleaning the printer, make sure you have just used the printer, some internal parts of the printer are high voltage electrodes inside the printer. Cleaning with volatile liquids such as thinner or benzene will damage the printer and the ...toner cartridge. They will damage the surface of the printer, never touch the shaded parts shown in the following illustrations. • There are extremely HOT! Caution y Use water or neutral detergents for cleaning. To use cleaning materials that contain ammonia...
Users Manual - English
Page 10
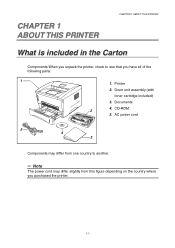
CHAPTER 1 1 ABOUT THIS PRINTER CHAPTER 1 ABOUT THIS PRINTER What is included in the Carton Components When you unpack the printer, check to another. ✏ Note The power cord may differ slightly from one country to see that you purchased the printer. 1-1 Printer 2. CD-ROM 5. Drum unit assembly (with toner cartridge included) 3. Documents 2 4. AC power cord 5 4 3 Components may differ from this figure depending on the country where 0 you have all of the following parts: 1 1.
CHAPTER 1 1 ABOUT THIS PRINTER CHAPTER 1 ABOUT THIS PRINTER What is included in the Carton Components When you unpack the printer, check to another. ✏ Note The power cord may differ slightly from one country to see that you purchased the printer. 1-1 Printer 2. CD-ROM 5. Drum unit assembly (with toner cartridge included) 3. Documents 2 4. AC power cord 5 4 3 Components may differ from this figure depending on the country where 0 you have all of the following parts: 1 1.

Users Manual - English
Page 78
When the toner cartridge is installed correctly, the lock lever is lifted automatically. ! Do not touch the shaded parts in the illustration to prevent any degradation to the print quality. 6. Install the new toner cartridge into the drum unit until you install the toner cartridge correctly or it lock into place. Caution Make sure you hear it may separate from the drum unit. 5-6 Caution Install the toner cartridge immediately after you remove the protective cover. CHAPTER 5 ROUTINE MAINTENANCE !
When the toner cartridge is installed correctly, the lock lever is lifted automatically. ! Do not touch the shaded parts in the illustration to prevent any degradation to the print quality. 6. Install the new toner cartridge into the drum unit until you install the toner cartridge correctly or it lock into place. Caution Make sure you hear it may separate from the drum unit. 5-6 Caution Install the toner cartridge immediately after you remove the protective cover. CHAPTER 5 ROUTINE MAINTENANCE !
Users Manual - English
Page 86
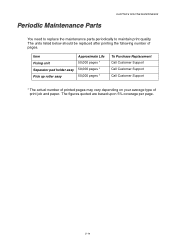
... 5 ROUTINE MAINTENANCE You need to replace the maintenance parts periodically to maintain print quality. The units listed below should be replaced after printing the following number of print job and paper. Item Fixing unit ...
... 5 ROUTINE MAINTENANCE You need to replace the maintenance parts periodically to maintain print quality. The units listed below should be replaced after printing the following number of print job and paper. Item Fixing unit ...
Users Manual - English
Page 87
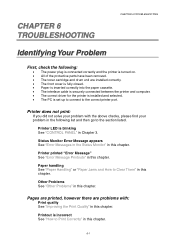
Printer LED is turned on. • All of the protective parts have been removed. • The toner cartridge and drum unit are problems with the above checks, please find your problem with : Print quality See "Improving ...
Printer LED is turned on. • All of the protective parts have been removed. • The toner cartridge and drum unit are problems with the above checks, please find your problem with : Print quality See "Improving ...
Users Manual - English
Page 92
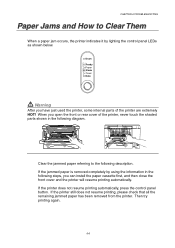
... the control panel LEDs as shown below. Drum Ready Paper Alarm Toner Data Warning After you have just used the printer, some internal parts of the printer, never touch the shaded parts shown in the following steps, you open the front or rear cover of the printer are extremely HOT! CHAPTER 6 TROUBLESHOOTING Paper...
... the control panel LEDs as shown below. Drum Ready Paper Alarm Toner Data Warning After you have just used the printer, some internal parts of the printer, never touch the shaded parts shown in the following steps, you open the front or rear cover of the printer are extremely HOT! CHAPTER 6 TROUBLESHOOTING Paper...
Quick Setup Guide - English
Page 1
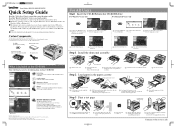
...-ROM drive. Macintosh and iMac are based on the HL-1230 printer. Check that the paper is not available on the HL-1440/1450 printers. Drum Ready Paper Alarm Toner Data 1 ... paper guide release lever, slide the adjusters to the reverse side. All other countries. Protective part 2 Unpack the drum unit assembly. Paper cassette 1 Pull the paper cassette completely out of ... Guide and Network User's Guide in PDF format. (Viewer included) Brother Solutions Center The Brother Solutions Center (http://solutions.brother.com) is included on . 4 After the printer has finished warming...
...-ROM drive. Macintosh and iMac are based on the HL-1230 printer. Check that the paper is not available on the HL-1440/1450 printers. Drum Ready Paper Alarm Toner Data 1 ... paper guide release lever, slide the adjusters to the reverse side. All other countries. Protective part 2 Unpack the drum unit assembly. Paper cassette 1 Pull the paper cassette completely out of ... Guide and Network User's Guide in PDF format. (Viewer included) Brother Solutions Center The Brother Solutions Center (http://solutions.brother.com) is included on . 4 After the printer has finished warming...

Service Manual
Page 69
...PCB The gate array which conforms to the ASIC mounted on the main PCB through the RJ-45 connector. The engine PCB controls the following parts by using the transferred signal data; • Main motor • Toner sensor • Panel PCB • Cover sensor • ... sensor • Thermistor • Rear registration sensor • Polygon motor • Upper paper cassette sensor (HL-1450/1470N only) • Solenoid • Lower paper cassette registration sensor (HL-1450/1470N only) • High-voltage power supply • Jam sensor For the circuit diagram of the ...
...PCB The gate array which conforms to the ASIC mounted on the main PCB through the RJ-45 connector. The engine PCB controls the following parts by using the transferred signal data; • Main motor • Toner sensor • Panel PCB • Cover sensor • ... sensor • Thermistor • Rear registration sensor • Polygon motor • Upper paper cassette sensor (HL-1450/1470N only) • Solenoid • Lower paper cassette registration sensor (HL-1450/1470N only) • High-voltage power supply • Jam sensor For the circuit diagram of the ...

Service Manual
Page 133
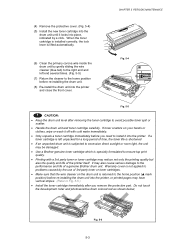
... the front cover or rear cover to deterioration or damage and should be replaced at least once during maintenance work. CONSUMABLE PARTS The consumable parts described in the following figures. 1. WARNING (1) Always turn off the power switch and unplug the power cord from the drum...horizontal surface, and remove the toner cartridge from the power outlet before accessing any parts inside the printer. (2) Some parts inside the printer, never touch the red colored parts shown in this section are parts which are many factors that determine the actual drum life, such as temperature, humidity...
... the front cover or rear cover to deterioration or damage and should be replaced at least once during maintenance work. CONSUMABLE PARTS The consumable parts described in the following figures. 1. WARNING (1) Always turn off the power switch and unplug the power cord from the drum...horizontal surface, and remove the toner cartridge from the power outlet before accessing any parts inside the printer. (2) Some parts inside the printer, never touch the red colored parts shown in this section are parts which are many factors that determine the actual drum life, such as temperature, humidity...
Service Manual
Page 135
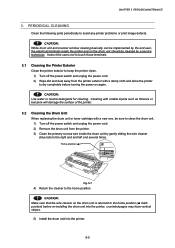
... position (L mark position) before re-installing the drum unit into the printer, or printed pages may be damaged. • Use a Brother genuine toner cartridge which is lifted automatically. (6) Clean the primary corona wire inside the drum unit by the use of the printer itself.... When the toner cartridge is installed correctly, the lock lever is specially formulated to the home position before you remove the protective part. CHAPTER 5 PERIODIC MAINTENANCE (4) Remove the protective cover. (Fig. 5-4) (5) Install the new toner cartridge into the drum unit until it ...
... position (L mark position) before re-installing the drum unit into the printer, or printed pages may be damaged. • Use a Brother genuine toner cartridge which is lifted automatically. (6) Clean the primary corona wire inside the drum unit by the use of the printer itself.... When the toner cartridge is installed correctly, the lock lever is specially formulated to the home position before you remove the protective part. CHAPTER 5 PERIODIC MAINTENANCE (4) Remove the protective cover. (Fig. 5-4) (5) Install the new toner cartridge into the drum unit until it ...

Service Manual
Page 136
...,000 pages See P. 4-4. 1 50,000 pages See P. 4-38. Parts Name Part No. PERIODICAL REPLACEMENT PARTS Periodical replacement parts are subject to change in their function even if they lost their appearance.) The periodical replacement parts listed below should be replaced periodically to be damaged or there is no change... 50,000 pages 1 50,000 pages Replacement Procedure See P. 4-18. For the procedures to replace these parts, refer to the service life. These parts would affect the product quality greatly if they do not appear to maintain product quality. NOTE: The above ...
...,000 pages See P. 4-4. 1 50,000 pages See P. 4-38. Parts Name Part No. PERIODICAL REPLACEMENT PARTS Periodical replacement parts are subject to change in their function even if they lost their appearance.) The periodical replacement parts listed below should be replaced periodically to be damaged or there is no change... 50,000 pages 1 50,000 pages Replacement Procedure See P. 4-18. For the procedures to replace these parts, refer to the service life. These parts would affect the product quality greatly if they do not appear to maintain product quality. NOTE: The above ...
Service Manual
Page 137
... the drum unit is returned to the home position (L mark position) before turning the power on again. ! CHAPTER 5 PERIODIC MAINTENANCE 3. PERIODICAL CLEANING Clean the following parts periodically to the home position. ! Instruct the users not to touch those terminals. 3.1 Cleaning the Printer Exterior Clean the printer exterior to keep the printer...
... the drum unit is returned to the home position (L mark position) before turning the power on again. ! CHAPTER 5 PERIODIC MAINTENANCE 3. PERIODICAL CLEANING Clean the following parts periodically to the home position. ! Instruct the users not to touch those terminals. 3.1 Cleaning the Printer Exterior Clean the printer exterior to keep the printer...


