
Users Manual - English
Page 4
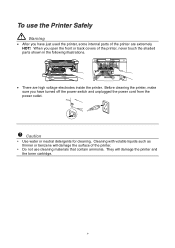
... sure you have just used the printer, some internal parts of the printer are high voltage electrodes inside the printer. iv Caution y Use water or neutral detergents for cleaning. They will damage the surface of the printer, never touch the shaded parts shown in the following illustrations. • There are extremely HOT! Cleaning with volatile liquids such...
... sure you have just used the printer, some internal parts of the printer are high voltage electrodes inside the printer. iv Caution y Use water or neutral detergents for cleaning. They will damage the surface of the printer, never touch the shaded parts shown in the following illustrations. • There are extremely HOT! Cleaning with volatile liquids such...
Users Manual - English
Page 10
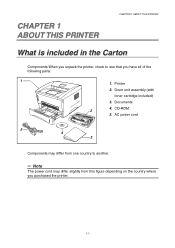
CD-ROM 5. Documents 2 4. AC power cord 5 4 3 Components may differ slightly from this figure depending on the country where 0 you have all of the following parts: 1 1. CHAPTER 1 1 ABOUT THIS PRINTER CHAPTER 1 ABOUT THIS PRINTER What is included in the Carton Components When you unpack the printer, check to another. ✏ Note The power cord may differ from one country to see that you purchased the printer. 1-1 Printer 2. Drum unit assembly (with toner cartridge included) 3.
CD-ROM 5. Documents 2 4. AC power cord 5 4 3 Components may differ slightly from this figure depending on the country where 0 you have all of the following parts: 1 1. CHAPTER 1 1 ABOUT THIS PRINTER CHAPTER 1 ABOUT THIS PRINTER What is included in the Carton Components When you unpack the printer, check to another. ✏ Note The power cord may differ from one country to see that you purchased the printer. 1-1 Printer 2. Drum unit assembly (with toner cartridge included) 3.
Users Manual - English
Page 87
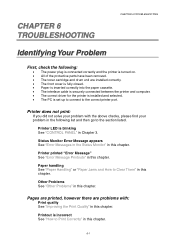
...fully closed. • Paper is inserted correctly into the paper cassette. • The interface cable is securely connected between the printer and computer. • The correct driver for the printer is installed and selected. • The PC is set up to connect to Clear Them" in this chapter. CHAPTER 6 ... If you did not solve your problem in the following : • The power plug is connected correctly and the printer is turned on. • All of the protective parts have been removed. • The toner cartridge and drum unit are problems with the above checks, please find your ...
...fully closed. • Paper is inserted correctly into the paper cassette. • The interface cable is securely connected between the printer and computer. • The correct driver for the printer is installed and selected. • The PC is set up to connect to Clear Them" in this chapter. CHAPTER 6 ... If you did not solve your problem in the following : • The power plug is connected correctly and the printer is turned on. • All of the protective parts have been removed. • The toner cartridge and drum unit are problems with the above checks, please find your ...
Users Manual - English
Page 92
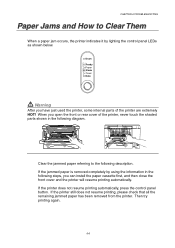
... How to the following description. When you have just used the printer, some internal parts of the printer, never touch the shaded parts shown in the following diagram. Drum Ready Paper Alarm Toner Data Warning After you open the front or rear cover of the printer are extremely HOT! Clear the jammed paper referring to Clear...
... How to the following description. When you have just used the printer, some internal parts of the printer, never touch the shaded parts shown in the following diagram. Drum Ready Paper Alarm Toner Data Warning After you open the front or rear cover of the printer are extremely HOT! Clear the jammed paper referring to Clear...
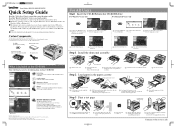
Quick Setup Guide - English
Page 1
...You will appear automatically. 2 Click the model number of Microsoft Corporation in the cassette and below the maximum paper mark. Protective part 2 Unpack the drum unit assembly. Paper cassette 1 Pull the paper cassette completely out of their respective holders. 1 Open the .... ROM drive. Macintosh and iMac are registered trademarks of your printer needs. Continue to use (Parallel, USB or Network). Macintosh® ©2001 Brother Industries, Ltd. Identify the operating system on the HL-1440/1450 printers. Do NOT connect the interface cable. 2 Connect the AC ...
...You will appear automatically. 2 Click the model number of Microsoft Corporation in the cassette and below the maximum paper mark. Protective part 2 Unpack the drum unit assembly. Paper cassette 1 Pull the paper cassette completely out of their respective holders. 1 Open the .... ROM drive. Macintosh and iMac are registered trademarks of your printer needs. Continue to use (Parallel, USB or Network). Macintosh® ©2001 Brother Industries, Ltd. Identify the operating system on the HL-1440/1450 printers. Do NOT connect the interface cable. 2 Connect the AC ...

Service Manual
Page 133
... or damage and should be replaced at the end of the printer and pull out the drum unit. (2) Place the drum unit on when the drum unit is used. Fig. 5-1 5-1 CONSUMABLE PARTS The consumable parts described in the following figures. 1. Life expectancy: 20,000 ...from the power outlet before accessing any parts inside the printer. (2) Some parts inside the printer, never touch the red colored parts shown in this section are parts which are subject to access any parts inside the printer are extremely hot immediately after the printer is nearly at least once during maintenance...
... or damage and should be replaced at the end of the printer and pull out the drum unit. (2) Place the drum unit on when the drum unit is used. Fig. 5-1 5-1 CONSUMABLE PARTS The consumable parts described in the following figures. 1. Life expectancy: 20,000 ...from the power outlet before accessing any parts inside the printer. (2) Some parts inside the printer, never touch the red colored parts shown in this section are parts which are subject to access any parts inside the printer are extremely hot immediately after the printer is nearly at least once during maintenance...
Service Manual
Page 135
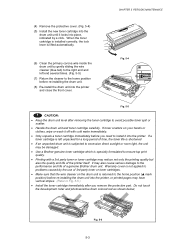
...is returned to the home position (L mark position) before re-installing the drum unit into the printer, or printed pages may be damaged. • Use a Brother genuine toner cartridge which is specially formulated to ensure top print quality. • Printing with cold... water immediately. • Only unpack a toner cartridge immediately before you remove the protective part. Fig. 5-4 Fig. 5-5 ! CHAPTER 5 PERIODIC MAINTENANCE (4)...
...is returned to the home position (L mark position) before re-installing the drum unit into the printer, or printed pages may be damaged. • Use a Brother genuine toner cartridge which is specially formulated to ensure top print quality. • Printing with cold... water immediately. • Only unpack a toner cartridge immediately before you remove the protective part. Fig. 5-4 Fig. 5-5 ! CHAPTER 5 PERIODIC MAINTENANCE (4)...
Service Manual
Page 137
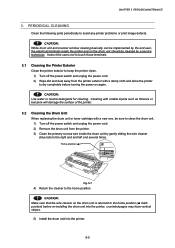
... Clean the following parts periodically to the home position. ! Cleaning with volatile liquids such as thinners or benzene will damage the surface of the printer. 3.2 Cleaning the Drum Unit When replacing the drum unit or toner cartridge with a damp cloth and allow the printer to dry completely ... electrical terminals inside the drum unit by a service technician. Instruct the users not to touch those terminals. 3.1 Cleaning the Printer Exterior Clean the printer exterior to keep the printer clean. 1) Turn off the power switch and unplug the power cord. 2) Remove the drum unit from the...
... Clean the following parts periodically to the home position. ! Cleaning with volatile liquids such as thinners or benzene will damage the surface of the printer. 3.2 Cleaning the Drum Unit When replacing the drum unit or toner cartridge with a damp cloth and allow the printer to dry completely ... electrical terminals inside the drum unit by a service technician. Instruct the users not to touch those terminals. 3.1 Cleaning the Printer Exterior Clean the printer exterior to keep the printer clean. 1) Turn off the power switch and unplug the power cord. 2) Remove the drum unit from the...


