
Users Manual - English
Page 57
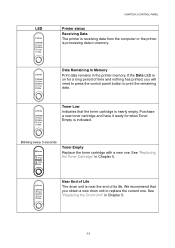
...have it ready for a long period of Life Drum The drum unit is indicated. Toner Data Blinking every 5 seconds Drum Ready Paper Alarm Toner Data Toner Empty Replace the toner cartridge with a new one . See Alarm Toner "Replacing the Drum Unit" in Chapter 5. See "Replacing the Toner Cartridge" in Chapter 5. We recommend ... that Ready Paper you will Paper Alarm need to press the control panel button to replace the current one . Near End of time and nothing has printed, you obtain a new drum unit to print the remaining Toner Data data. If the Data LED is Ready on ...
...have it ready for a long period of Life Drum The drum unit is indicated. Toner Data Blinking every 5 seconds Drum Ready Paper Alarm Toner Data Toner Empty Replace the toner cartridge with a new one . See Alarm Toner "Replacing the Drum Unit" in Chapter 5. See "Replacing the Toner Cartridge" in Chapter 5. We recommend ... that Ready Paper you will Paper Alarm need to press the control panel button to replace the current one . Near End of time and nothing has printed, you obtain a new drum unit to print the remaining Toner Data data. If the Data LED is Ready on ...
Users Manual - English
Page 73
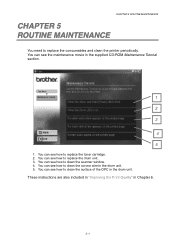
You can see the maintenance movie in the drum unit. You can see how to replace the drum unit. 3. You can see how to clean the surface of the OPC in the supplied CD-ROM Maintenance Tutorial section. 1 2 3 4 5 1. You can see how to ...clean the corona wire in Chapter 6. 5-1 You can see how to clean the scanner window. 4. You can see how to replace the consumables...
You can see the maintenance movie in the drum unit. You can see how to replace the drum unit. 3. You can see how to clean the surface of the OPC in the supplied CD-ROM Maintenance Tutorial section. 1 2 3 4 5 1. You can see how to ...clean the corona wire in Chapter 6. 5-1 You can see how to clean the scanner window. 4. You can see how to replace the consumables...
Users Manual - English
Page 75
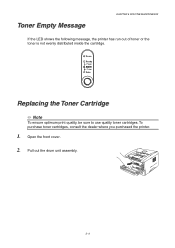
To 1 purchase toner cartridges, consult the dealer where you purchased the printer. 1. Open the front cover. 2. Pull out the drum unit assembly. 5-3 Toner Empty Message CHAPTER 5 ROUTINE MAINTENANCE If the LED shows the following message, the printer has run out of toner or the toner is not evenly distributed inside the cartridge. Drum Ready Paper Alarm Toner Data Replacing the Toner Cartridge ✏ Note To ensure optimum print quality, be sure to use quality toner cartridges.
To 1 purchase toner cartridges, consult the dealer where you purchased the printer. 1. Open the front cover. 2. Pull out the drum unit assembly. 5-3 Toner Empty Message CHAPTER 5 ROUTINE MAINTENANCE If the LED shows the following message, the printer has run out of toner or the toner is not evenly distributed inside the cartridge. Drum Ready Paper Alarm Toner Data Replacing the Toner Cartridge ✏ Note To ensure optimum print quality, be sure to use quality toner cartridges.
Users Manual - English
Page 79
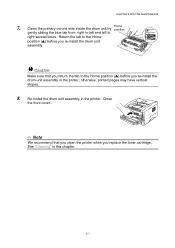
... in the printer. CHAPTER 5 ROUTINE MAINTENANCE 7. Caution Make sure that you clean the printer when you re-install the drum unit assembly. ! Re-install the drum unit assembly in the printer; otherwise, printed pages may have vertical stripes. 8. Close the front cover. ✏ Note... We recommend that you return the tab to the Home position (L) before you replace the toner cartridge. 2 See "Cleaning" in this chapter. ...
... in the printer. CHAPTER 5 ROUTINE MAINTENANCE 7. Caution Make sure that you clean the printer when you re-install the drum unit assembly. ! Re-install the drum unit assembly in the printer; otherwise, printed pages may have vertical stripes. 8. Close the front cover. ✏ Note... We recommend that you return the tab to the Home position (L) before you replace the toner cartridge. 2 See "Cleaning" in this chapter. ...

Users Manual - English
Page 81
Caution • While removing the drum unit, handle it carefully because it means the drum unit is a noticeable deterioration in this chapter. 5-9 We recommend that you replace the drum unit. See "Cleaning" in the print quality. ™ Change Drum Message CHAPTER 5 ROUTINE MAINTENANCE If the Drum LED is on, it may contain toner. • You should clean the printer when you replace the drum unit with a new one before there is near the end of its life. Drum Ready Paper Alarm Toner Data !
Caution • While removing the drum unit, handle it carefully because it means the drum unit is a noticeable deterioration in this chapter. 5-9 We recommend that you replace the drum unit. See "Cleaning" in the print quality. ™ Change Drum Message CHAPTER 5 ROUTINE MAINTENANCE If the Drum LED is on, it may contain toner. • You should clean the printer when you replace the drum unit with a new one before there is near the end of its life. Drum Ready Paper Alarm Toner Data !
Users Manual - English
Page 82
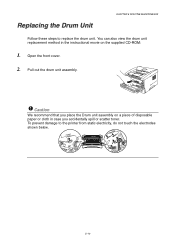
Open the front cover. 2. Pull out the drum unit assembly. ! To prevent damage to replace the drum unit. Caution We recommend that you accidentally spill or scatter toner. You can also view the drum unit replacement method in the instructional movie on a piece of disposable paper or cloth in case you place the Drum unit assembly on the supplied CD-ROM: 1. Replacing the Drum Unit CHAPTER 5 ROUTINE MAINTENANCE Follow these steps to the printer from static electricity, do not touch the electrodes shown below. 5-10
Open the front cover. 2. Pull out the drum unit assembly. ! To prevent damage to replace the drum unit. Caution We recommend that you accidentally spill or scatter toner. You can also view the drum unit replacement method in the instructional movie on a piece of disposable paper or cloth in case you place the Drum unit assembly on the supplied CD-ROM: 1. Replacing the Drum Unit CHAPTER 5 ROUTINE MAINTENANCE Follow these steps to the printer from static electricity, do not touch the electrodes shown below. 5-10
Users Manual - English
Page 84
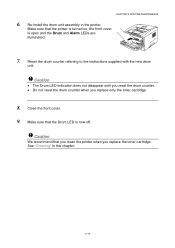
... We recommend that you clean the printer when you replace only the toner cartridge. 8. See "Cleaning" in the printer. CHAPTER 5 ROUTINE MAINTENANCE 6. Reset the drum counter referring to the instructions supplied with the new drum unit. ! Make sure that the Drum LED is open and the Drum and Alarm LEDs are illuminated. 7. Make sure that...
... We recommend that you clean the printer when you replace only the toner cartridge. 8. See "Cleaning" in the printer. CHAPTER 5 ROUTINE MAINTENANCE 6. Reset the drum counter referring to the instructions supplied with the new drum unit. ! Make sure that the Drum LED is open and the Drum and Alarm LEDs are illuminated. 7. Make sure that...
Users Manual - English
Page 98
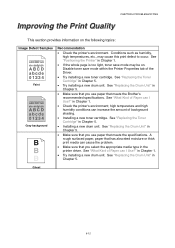
...; Installing a new toner cartridge. A rough surfaced paper, paper that meets the Brother's recommended specifications. in Chapter 5. • Installing a new drum unit. See "Replacing the Toner Cartridge" in Chapter 1. • Try installing a new drum unit. See "Replacing the Drum Unit" in Chapter 5. • Try installing a new drum unit. Conditions such as humidity, high temperatures, etc., may be on...
...; Installing a new toner cartridge. A rough surfaced paper, paper that meets the Brother's recommended specifications. in Chapter 5. • Installing a new drum unit. See "Replacing the Toner Cartridge" in Chapter 1. • Try installing a new drum unit. See "Replacing the Drum Unit" in Chapter 5. • Try installing a new drum unit. Conditions such as humidity, high temperatures, etc., may be on...
Users Manual - English
Page 99
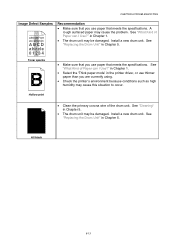
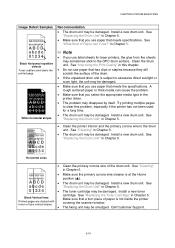
.... See "Cleaning" in Chapter 5. See "Replacing the Drum Unit" in Chapter 5. • The drum unit may be damaged. CHAPTER 6 TROUBLESHOOTING Image Defect Samples ABCDEFGH abcdefghijk ABCD abcde 01234 Recommendation • Make sure that you use paper ... driver, or use thinner paper than you use paper that meets the specifications. Hollow print • Clean the primary corona wire of the drum unit. See "Replacing the Drum Unit" in Chapter 5. Toner specks • Make sure that you are currently using. • Check the printer's environment because conditions such...
.... See "Cleaning" in Chapter 5. See "Replacing the Drum Unit" in Chapter 5. • The drum unit may be damaged. CHAPTER 6 TROUBLESHOOTING Image Defect Samples ABCDEFGH abcdefghijk ABCD abcde 01234 Recommendation • Make sure that you use paper ... driver, or use thinner paper than you use paper that meets the specifications. Hollow print • Clean the primary corona wire of the drum unit. See "Replacing the Drum Unit" in Chapter 5. Toner specks • Make sure that you are currently using. • Check the printer's environment because conditions such...
Users Manual - English
Page 101
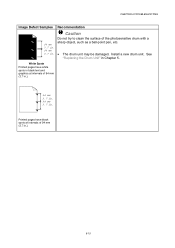
See "Replacing the Drum Unit" in . White Spots Printed pages have black spots at intervals of the photosensitive drum with a sharp object, such as a ball-point pen, etc. • The drum unit may be damaged. Recommendation ! Caution Do not try to clean the surface of 94 mm (3.7 in.). 94 mm 3.7 in. 94 mm 3.7 in .). 6-15 Printed pages have white spots in black text and graphics at intervals of 94 mm (3.7 in . CHAPTER 6 TROUBLESHOOTING Image Defect Samples 94 mm 3.7 in. 94 mm 3.7 in Chapter 5. Install a new drum unit.
See "Replacing the Drum Unit" in . White Spots Printed pages have black spots at intervals of the photosensitive drum with a sharp object, such as a ball-point pen, etc. • The drum unit may be damaged. Recommendation ! Caution Do not try to clean the surface of 94 mm (3.7 in.). 94 mm 3.7 in. 94 mm 3.7 in .). 6-15 Printed pages have white spots in black text and graphics at intervals of 94 mm (3.7 in . CHAPTER 6 TROUBLESHOOTING Image Defect Samples 94 mm 3.7 in. 94 mm 3.7 in Chapter 5. Install a new drum unit.
Users Manual - English
Page 102
...8226; The fixing unit may be damaged. Try printing multiple pages to excessive direct sunlight or room light, the unit may be damaged. See "Replacing the Drum Unit" in Chapter 5. See "Cleaning" in Chapter 5. • Make sure that you use paper that has clips or staples because they ... primary corona wire cleaner is not inside the printer Printed pages are stained with toner or have vertical stripes. See "Replacing the Drum Unit" in Chapter 5. Clean the drum unit. See "What Kind of Paper can cause the problem. • Make sure that you select the appropriate media...
...8226; The fixing unit may be damaged. Try printing multiple pages to excessive direct sunlight or room light, the unit may be damaged. See "Replacing the Drum Unit" in Chapter 5. See "Cleaning" in Chapter 5. • Make sure that you use paper that has clips or staples because they ... primary corona wire cleaner is not inside the printer Printed pages are stained with toner or have vertical stripes. See "Replacing the Drum Unit" in Chapter 5. Clean the drum unit. See "What Kind of Paper can cause the problem. • Make sure that you select the appropriate media...

Service Manual
Page 15
...USB interface. You can be connected using the Remote Printer Console Program. The HL-1440 supports HP LaserJet IIP.The HL-1450/1470N supports HP LaserJet 6P (PCL6), PostScript Level2 language emulation (Brother BR-Script Level 2), Epson FX-850 and IBM Proprinter XL. . This ...drum unit, you to replace only the toner cartridge after around 3,000 pages for the standard cartridge and around 6,000 pages for the optional high-capacity cartridge, which is not in sleep mode. When you operate your printing cost by saving toner. The printer consumes less than 5W (HL-1230), 6W (HL-1440...
...USB interface. You can be connected using the Remote Printer Console Program. The HL-1440 supports HP LaserJet IIP.The HL-1450/1470N supports HP LaserJet 6P (PCL6), PostScript Level2 language emulation (Brother BR-Script Level 2), Epson FX-850 and IBM Proprinter XL. . This ...drum unit, you to replace only the toner cartridge after around 3,000 pages for the standard cartridge and around 6,000 pages for the optional high-capacity cartridge, which is not in sleep mode. When you operate your printing cost by saving toner. The printer consumes less than 5W (HL-1230), 6W (HL-1440...

Service Manual
Page 133
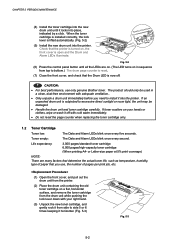
...opening the front cover or rear cover to deterioration or damage and should be replaced at the end of its life. Fig. 5-1 5-1 Life expectancy: 20,000 pages NOTE: There are many factors that determine the actual drum life, such as temperature, humidity, type of paper and toner that you ...secondary problems by mishandling, follow the warnings below during the period of warranty of the product if any print quality problem appears. 1.1 Drum Unit The Drum LED is on a flat, horizontal surface, and remove the toner cartridge from the power outlet before accessing any parts inside the printer...
...opening the front cover or rear cover to deterioration or damage and should be replaced at the end of its life. Fig. 5-1 5-1 Life expectancy: 20,000 pages NOTE: There are many factors that determine the actual drum life, such as temperature, humidity, type of paper and toner that you ...secondary problems by mishandling, follow the warnings below during the period of warranty of the product if any print quality problem appears. 1.1 Drum Unit The Drum LED is on a flat, horizontal surface, and remove the toner cartridge from the power outlet before accessing any parts inside the printer...
Service Manual
Page 134
...8226; Only unpack a drum unit immediately before you use only genuine Brother toner. or Letter-size paper at 5% print coverage) NOTE: There are on. (The LED turns on in a clean, dust-free environment with cold water immediately. • Do not reset the page counter when replacing the toner cartridge only.... 1.2 Toner Cartridge Toner low: The Data and Alarm LEDs blink once every five seconds. If toner scatters on your right hand. (3) Unpack the new toner cartridge, and gently rock it from the drum unit while pushing the ...
...8226; Only unpack a drum unit immediately before you use only genuine Brother toner. or Letter-size paper at 5% print coverage) NOTE: There are on. (The LED turns on in a clean, dust-free environment with cold water immediately. • Do not reset the page counter when replacing the toner cartridge only.... 1.2 Toner Cartridge Toner low: The Data and Alarm LEDs blink once every five seconds. If toner scatters on your right hand. (3) Unpack the new toner cartridge, and gently rock it from the drum unit while pushing the ...
Service Manual
Page 137
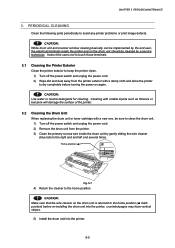
...and on again. ! Cleaning with volatile liquids such as thinners or benzene will damage the surface of the printer. 3.2 Cleaning the Drum Unit When replacing the drum unit or toner cartridge with a damp cloth and allow the printer to the right end and left end several times. Home position (L)... Fig. 5-7 4) Return the cleaner to avoid any printer problems or print image defects. ! CAUTION: While drum unit and scanner window cleaning basically ...
...and on again. ! Cleaning with volatile liquids such as thinners or benzene will damage the surface of the printer. 3.2 Cleaning the Drum Unit When replacing the drum unit or toner cartridge with a damp cloth and allow the printer to the right end and left end several times. Home position (L)... Fig. 5-7 4) Return the cleaner to avoid any printer problems or print image defects. ! CAUTION: While drum unit and scanner window cleaning basically ...

Service Manual
Page 138
... the printer. 3) Wipe the electrical terminals as shown in the figures below with a soft dry cloth. CHAPTER 5 PERIODIC MAINTENANCE 3.3 Cleaning the Scanner Window When replacing the drum unit or toner cartridge with a new one, be sure to clean the scanner window. 1) Turn off the power switch and unplug the power cord. 2) Remove...
... the printer. 3) Wipe the electrical terminals as shown in the figures below with a soft dry cloth. CHAPTER 5 PERIODIC MAINTENANCE 3.3 Cleaning the Scanner Window When replacing the drum unit or toner cartridge with a new one, be sure to clean the scanner window. 1) Turn off the power switch and unplug the power cord. 2) Remove...

Service Manual
Page 209
APPENDIX Note that each maintenance information is stored in NVRAM, then warming-up completes without a Toner Empty or Toner Low error being detected. (Maximum counter: 27) Paper jam When a paper jam occurs. (Maximum counter: 2047) A-11 Information Conditions Drum unit change When drum unit life is 100 pages or more, and the drum counter is reset. (Maximum counter: 63) Toner cartridge change When the toner cartridge is replaced after a Toner Empty error is counted under the conditions below;
APPENDIX Note that each maintenance information is stored in NVRAM, then warming-up completes without a Toner Empty or Toner Low error being detected. (Maximum counter: 27) Paper jam When a paper jam occurs. (Maximum counter: 2047) A-11 Information Conditions Drum unit change When drum unit life is 100 pages or more, and the drum counter is reset. (Maximum counter: 63) Toner cartridge change When the toner cartridge is replaced after a Toner Empty error is counted under the conditions below;


