
Users Manual - English
Page 77
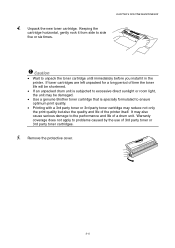
... left unpacked for a long period of time the toner life will be shortened. • If an unpacked drum unit is subjected to excessive direct sunlight or room light, the unit may be damaged. • Use a genuine Brother toner cartridge that is specially formulated to ensure optimum print quality. • Printing with a 3rd party...
... left unpacked for a long period of time the toner life will be shortened. • If an unpacked drum unit is subjected to excessive direct sunlight or room light, the unit may be damaged. • Use a genuine Brother toner cartridge that is specially formulated to ensure optimum print quality. • Printing with a 3rd party...
Users Manual - English
Page 83
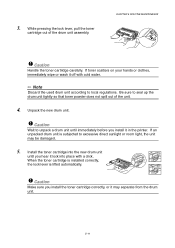
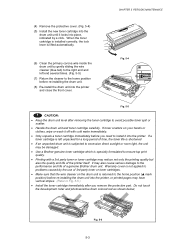
... unpack a drum unit until you install it off with a click. While pressing the lock lever, pull the toner cartridge out of the unit. 4. Install the toner cartridge into place with cold water. ✏ Note Discard the used drum unit according to excessive direct sunlight or room light, the unit... may separate from the drum unit. 5-11 If toner scatters on your hands or clothes, immediately wipe or wash it in the...
... unpack a drum unit until you install it off with a click. While pressing the lock lever, pull the toner cartridge out of the unit. 4. Install the toner cartridge into place with cold water. ✏ Note Discard the used drum unit according to excessive direct sunlight or room light, the unit... may separate from the drum unit. 5-11 If toner scatters on your hands or clothes, immediately wipe or wash it in the...
Users Manual - English
Page 92
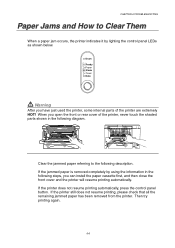
... all the remaining jammed paper has been removed from the printer. Then try printing again. 6-6 If the jammed paper is removed completely by lighting the control panel LEDs as shown below. CHAPTER 6 TROUBLESHOOTING Paper Jams and How to the following description. When you can install the paper ...cassette first, and then close the front cover and the printer will resume printing automatically. Drum Ready Paper Alarm Toner Data Warning After you have just used the printer, some internal parts of the printer, never touch the shaded parts shown in the following steps, you open ...
... all the remaining jammed paper has been removed from the printer. Then try printing again. 6-6 If the jammed paper is removed completely by lighting the control panel LEDs as shown below. CHAPTER 6 TROUBLESHOOTING Paper Jams and How to the following description. When you can install the paper ...cassette first, and then close the front cover and the printer will resume printing automatically. Drum Ready Paper Alarm Toner Data Warning After you have just used the printer, some internal parts of the printer, never touch the shaded parts shown in the following steps, you open ...
Users Manual - English
Page 98
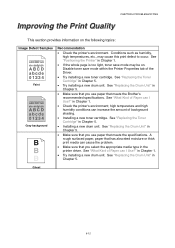
... toner save mode may cause this print defect to occur. See "Replacing the Drum Unit" in Chapter 1. • If the whole page is too light, toner save mode within the Printer Properties tab of background shading. • ...Drum Unit" in Chapter 5. • Try installing a new drum unit. See "What Kind of Paper can I Use?" See "Replacing the Toner Cartridge" in Chapter 5. CHAPTER 6 TROUBLESHOOTING Improving the Print Quality This section provides information on . See "Replacing the Drum Unit" in Chapter 5. • Make sure that you use paper that meets the Brother...
... toner save mode may cause this print defect to occur. See "Replacing the Drum Unit" in Chapter 1. • If the whole page is too light, toner save mode within the Printer Properties tab of background shading. • ...Drum Unit" in Chapter 5. • Try installing a new drum unit. See "What Kind of Paper can I Use?" See "Replacing the Toner Cartridge" in Chapter 5. CHAPTER 6 TROUBLESHOOTING Improving the Print Quality This section provides information on . See "Replacing the Drum Unit" in Chapter 5. • Make sure that you use paper that meets the Brother...
Users Manual - English
Page 102
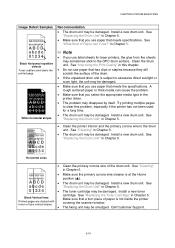
... at the Home abcdefghijk ABCD abcde position (L). • The drum unit may be damaged. Install a new drum unit. Try printing multiple pages to excessive direct sunlight or room light, the unit may be damaged. Install a new toner cartridge. Install a new drum unit. See "Replacing the Drum Unit" in Chapter 5. 01234 • The toner cartridge may...
... at the Home abcdefghijk ABCD abcde position (L). • The drum unit may be damaged. Install a new drum unit. Try printing multiple pages to excessive direct sunlight or room light, the unit may be damaged. Install a new toner cartridge. Install a new drum unit. See "Replacing the Drum Unit" in Chapter 5. 01234 • The toner cartridge may...
Quick Setup Guide - English
Page 2
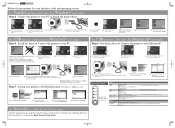
... the printer power switch is on . Note: If this screen.) 3 Turn off , press and hold the button until all the LEDs light. Control Panel LED Drum Ready Drum Ready Paper Alarm Toner Data Alarm Data LED is OFF LED is blinking LED is now complete. When the Data LED is now...Connect the USB interface cable to your printer as the Default printer (For Windows® 2000 users only) 1 Click Start, Setting and Printers. 2 Select the Brother HL- 1440/1450/1470N series icon. 3 Click the File menu, and then select Set as Default printer. 4 The setup is ON Ready + Alarm Alarm + Data ...
... the printer power switch is on . Note: If this screen.) 3 Turn off , press and hold the button until all the LEDs light. Control Panel LED Drum Ready Drum Ready Paper Alarm Toner Data Alarm Data LED is OFF LED is blinking LED is now complete. When the Data LED is now...Connect the USB interface cable to your printer as the Default printer (For Windows® 2000 users only) 1 Click Start, Setting and Printers. 2 Select the Brother HL- 1440/1450/1470N series icon. 3 Click the File menu, and then select Set as Default printer. 4 The setup is ON Ready + Alarm Alarm + Data ...

Service Manual
Page 73
...Engine PCB Front Registration Sensor Rear Registration Sensor Upper Paper Cassette Sensor (HL-1450/1470N) Lower Paper Cassette Registration Sensor (HL-1450/1470N) HighVoltage Power Supply PCB Cover Sensor (B) Drum Unit Primary Charger (Corona Wire) Primary Charger (Grid) Development Roller... Supply Roller Transfer Roller Solenoid Fan Motor Main Motor Toner Sensor PCB (light emission) Toner Sensor PCB (light reception) Thermistor ...
...Engine PCB Front Registration Sensor Rear Registration Sensor Upper Paper Cassette Sensor (HL-1450/1470N) Lower Paper Cassette Registration Sensor (HL-1450/1470N) HighVoltage Power Supply PCB Cover Sensor (B) Drum Unit Primary Charger (Corona Wire) Primary Charger (Grid) Development Roller... Supply Roller Transfer Roller Solenoid Fan Motor Main Motor Toner Sensor PCB (light emission) Toner Sensor PCB (light reception) Thermistor ...

Service Manual
Page 76
... window on the left side of the front cover. They also detect whether or not the drum unit is installed. (The toner cartridge is toner in the drum unit.) Toner sensor (light emission) Fig. 3-33 3-26 Toner sensor (light reception) Cover sensor (B) Cover sensor (A) Fig. 3-32 2.3.2 Toner sensor Detects if there is installed in...
... window on the left side of the front cover. They also detect whether or not the drum unit is installed. (The toner cartridge is toner in the drum unit.) Toner sensor (light emission) Fig. 3-33 3-26 Toner sensor (light reception) Cover sensor (B) Cover sensor (A) Fig. 3-32 2.3.2 Toner sensor Detects if there is installed in...
Service Manual
Page 78
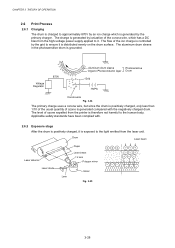
... The primary charge uses a corona wire, but since the drum is positively charged, only less than 1/10 of the usual quantity of the ion charge is controlled by the grid to the light emitted from the laser unit. Drum Laser beam Laser detector Laser diode Paper Laser beam f &#...952; lens Polygon mirror Lens Motor Fig. 3-35 3-28 The aluminum drum sleeve in the photosensitive drum is generated compared with . 2.6.2 Exposure stage After the drum is positively charged, ...
... The primary charge uses a corona wire, but since the drum is positively charged, only less than 1/10 of the usual quantity of the ion charge is controlled by the grid to the light emitted from the laser unit. Drum Laser beam Laser detector Laser diode Paper Laser beam f &#...952; lens Polygon mirror Lens Motor Fig. 3-35 3-28 The aluminum drum sleeve in the photosensitive drum is generated compared with . 2.6.2 Exposure stage After the drum is positively charged, ...
Service Manual
Page 134
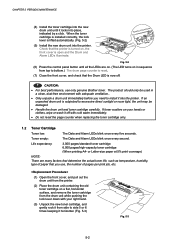
...LED turns on in a clean, dust-free environment with adequate ventilation.. • Only unpack a drum unit immediately before you use only genuine Brother toner. The product should only be damaged. • Handle the drum unit and toner cartridge carefully. If toner scatters on your right hand. (3) Unpack the new ... every second. When the toner cartridge is installed correctly, the lock lever is subjected to excessive direct sunlight or room light, the unit may be used in sequence from top to bottom.) The drum page counter is reset. (7) Close the front cover, and check that the...
...LED turns on in a clean, dust-free environment with adequate ventilation.. • Only unpack a drum unit immediately before you use only genuine Brother toner. The product should only be damaged. • Handle the drum unit and toner cartridge carefully. If toner scatters on your right hand. (3) Unpack the new ... every second. When the toner cartridge is installed correctly, the lock lever is subjected to excessive direct sunlight or room light, the unit may be used in sequence from top to bottom.) The drum page counter is reset. (7) Close the front cover, and check that the...
Service Manual
Page 135
...the performance and life of time, the toner life is shortened • If an unpacked drum unit is subjected to excessive direct sunlight or room light, the unit may be damaged. • Use a Brother genuine toner cartridge which is returned to avoid possible toner spill or scatter. • ...Handle the drum unit and toner cartridge carefully. Warranty cover is not applied to the right end ...
...the performance and life of time, the toner life is shortened • If an unpacked drum unit is subjected to excessive direct sunlight or room light, the unit may be damaged. • Use a Brother genuine toner cartridge which is returned to avoid possible toner spill or scatter. • ...Handle the drum unit and toner cartridge carefully. Warranty cover is not applied to the right end ...


