Users Manual - English
Page 1
... and easy reference at any time. i You can print or view this manual thoroughly before using the printer. Brother Laser Printer HL-1230 HL-1440 HL-1450 HL-1470N USER'S GUIDE Please read this manual from the CD-ROM at all your printers, read the FAQs and troubleshooting tips or learn about special printing solutions in a convenient place for all...
... and easy reference at any time. i You can print or view this manual thoroughly before using the printer. Brother Laser Printer HL-1230 HL-1440 HL-1450 HL-1470N USER'S GUIDE Please read this manual from the CD-ROM at all your printers, read the FAQs and troubleshooting tips or learn about special printing solutions in a convenient place for all...

Users Manual - English
Page 2
...685-5381 (within Montreal) If you have comments or suggestions, please write us at: In USA Printer Customer Support Brother International Corporation 15 Musick Irvine, CA 92618 In CANADA Brother International Corporation (Canada), Ltd. - Call and follow the voice prompts to receive faxed instructions on how... to use the system to send the information to common technical questions and product information for all Brother products. Calls must call...
...685-5381 (within Montreal) If you have comments or suggestions, please write us at: In USA Printer Customer Support Brother International Corporation 15 Musick Irvine, CA 92618 In CANADA Brother International Corporation (Canada), Ltd. - Call and follow the voice prompts to receive faxed instructions on how... to use the system to send the information to common technical questions and product information for all Brother products. Calls must call...
Users Manual - English
Page 3
iii Caution Indicates cautions that must be observed to remember when using the printer. Definitions of Warnings, Cautions, and Notes The following conventions are used in this User's Guide: Warning Indicates warnings that must be observed to use the printer properly or prevent damage to the printer. ✏ Note Indicates notes and useful tips to prevent possible personal injury. !
iii Caution Indicates cautions that must be observed to remember when using the printer. Definitions of Warnings, Cautions, and Notes The following conventions are used in this User's Guide: Warning Indicates warnings that must be observed to use the printer properly or prevent damage to the printer. ✏ Note Indicates notes and useful tips to prevent possible personal injury. !
Users Manual - English
Page 4
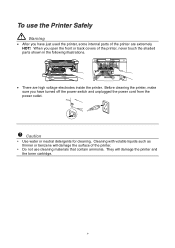
... volatile liquids such as thinner or benzene will damage the printer and the toner cartridge. iv Caution y Use water or neutral detergents for cleaning. When you have just used the printer, some internal parts of the printer, never touch the shaded parts shown in the following illustrations.... • There are extremely HOT! Before cleaning the printer, make sure you open the front or back covers of ...
... volatile liquids such as thinner or benzene will damage the printer and the toner cartridge. iv Caution y Use water or neutral detergents for cleaning. When you have just used the printer, some internal parts of the printer, never touch the shaded parts shown in the following illustrations.... • There are extremely HOT! Before cleaning the printer, make sure you open the front or back covers of ...

Users Manual - English
Page 5
... PPaappeerr ffrroomm tthhee MMaannuuaall FFeeeedd SSlloott 11--1144 Printing on Thicker Paper and Card Stock 1-16 v Table of Contents CHAPTER 1 ABOUT THIS PRINTER What is included in the Carton IInntteerrffaaccee ccaabbllee GGeenneerraallVViieeww 1-1 11--22 11--33 Positioning the Printer 1-6 PPoowweerr SSuuppppllyy 11--66 EEnnvviirroonnmmeenntt 11--77 What kind of Paper can I Use?
... PPaappeerr ffrroomm tthhee MMaannuuaall FFeeeedd SSlloott 11--1144 Printing on Thicker Paper and Card Stock 1-16 v Table of Contents CHAPTER 1 ABOUT THIS PRINTER What is included in the Carton IInntteerrffaaccee ccaabbllee GGeenneerraallVViieeww 1-1 11--22 11--33 Positioning the Printer 1-6 PPoowweerr SSuuppppllyy 11--66 EEnnvviirroonnmmeenntt 11--77 What kind of Paper can I Use?

Users Manual - English
Page 9
Error Messages in the Status Monitor 6-2 Error Message Printouts 6-4 Paper Handling 6-5 Paper Jams and How to Clear Them 6-6 Other Problems FFoorr MMaacciinnttoosshh wwiitthh UUSSBB Improving the Print Quality 6-10 66--1111 6-12 How to Print Correctly APPENDIX Printer Specifications 6-18 A-1 Important Information for Choosing Your Paper A-6 Trademarks A-10 INDEX I-1 ix
Error Messages in the Status Monitor 6-2 Error Message Printouts 6-4 Paper Handling 6-5 Paper Jams and How to Clear Them 6-6 Other Problems FFoorr MMaacciinnttoosshh wwiitthh UUSSBB Improving the Print Quality 6-10 66--1111 6-12 How to Print Correctly APPENDIX Printer Specifications 6-18 A-1 Important Information for Choosing Your Paper A-6 Trademarks A-10 INDEX I-1 ix
Users Manual - English
Page 10
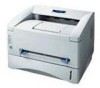
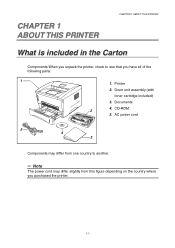
Printer 2. Documents 2 4. Drum unit assembly (with toner cartridge included) 3. AC power cord 5 4 3 Components may differ slightly from one country to see that you purchased the printer. 1-1 CD-ROM 5. CHAPTER 1 1 ABOUT THIS PRINTER CHAPTER 1 ABOUT THIS PRINTER What is included in the Carton Components When you unpack the printer, check to another. ✏ Note The power cord may differ from this figure depending on the country where 0 you have all of the following parts: 1 1.
Printer 2. Documents 2 4. Drum unit assembly (with toner cartridge included) 3. AC power cord 5 4 3 Components may differ slightly from one country to see that you purchased the printer. 1-1 CD-ROM 5. CHAPTER 1 1 ABOUT THIS PRINTER CHAPTER 1 ABOUT THIS PRINTER What is included in the Carton Components When you unpack the printer, check to another. ✏ Note The power cord may differ from this figure depending on the country where 0 you have all of the following parts: 1 1.

Users Manual - English
Page 11
... connector on the front of your PC or on the iMac keyboard. 1-2 ™ Interface cable CHAPTER 1 ABOUT THIS PRINTER • An interface cable is longer than 3 metres (10 feet). (For HL-1440, HL-1450 and HL-1470N Users) • When you intend to the USB connector of your PC. • Do not use . •...
... connector on the front of your PC or on the iMac keyboard. 1-2 ™ Interface cable CHAPTER 1 ABOUT THIS PRINTER • An interface cable is longer than 3 metres (10 feet). (For HL-1440, HL-1450 and HL-1470N Users) • When you intend to the USB connector of your PC. • Do not use . •...
Users Manual - English
Page 12
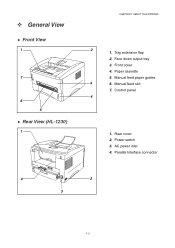
Paper cassette 5. AC power inlet 4. Manual feed paper guides 3 6. Rear cover 2. Face down output tray 3. Front cover 4. Power switch 3. ™ General View ♦ Front View 1 7 6 5 ♦ Rear View (HL-1230) 1 CHAPTER 1 ABOUT THIS PRINTER 2 1. Control panel 4 1. Manual feed slot 7. Tray extension flap 2. Parallel Interface connector 4 2 3 1-3
Paper cassette 5. AC power inlet 4. Manual feed paper guides 3 6. Rear cover 2. Face down output tray 3. Front cover 4. Power switch 3. ™ General View ♦ Front View 1 7 6 5 ♦ Rear View (HL-1230) 1 CHAPTER 1 ABOUT THIS PRINTER 2 1. Control panel 4 1. Manual feed slot 7. Tray extension flap 2. Parallel Interface connector 4 2 3 1-3

Users Manual - English
Page 13
AC power inlet 4. Power switch 3. USB Interface connector 6. Rear cover 2. USB connector 2 1. Mini Din connector for lower tray unit 2 1-4 Parallel Interface connector 5. Parallel Interface connector 5. AC power inlet 4. Power switch 3. ♦ Rear View (HL-1440) 1 5 4 3 ♦ Rear View (HL-1450) 1 6 5 4 3 CHAPTER 1 ABOUT THIS PRINTER 1. Rear cover 2.
AC power inlet 4. Power switch 3. USB Interface connector 6. Rear cover 2. USB connector 2 1. Mini Din connector for lower tray unit 2 1-4 Parallel Interface connector 5. Parallel Interface connector 5. AC power inlet 4. Power switch 3. ♦ Rear View (HL-1440) 1 5 4 3 ♦ Rear View (HL-1450) 1 6 5 4 3 CHAPTER 1 ABOUT THIS PRINTER 1. Rear cover 2.
Users Manual - English
Page 14
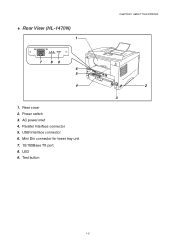
Rear cover 2. Mini Din connector for lower tray unit 7. 10/100Base TX port 8. USB Interface connector 6. ♦ Rear View (HL-1470N) 1 10/100BASE TX L F A TEST 7 89 6 5 4 1. Test button CHAPTER 1 ABOUT THIS PRINTER 2 3 1-5 Parallel Interface connector 5. AC power inlet 4. LED 9. Power switch 3.
Rear cover 2. Mini Din connector for lower tray unit 7. 10/100Base TX port 8. USB Interface connector 6. ♦ Rear View (HL-1470N) 1 10/100BASE TX L F A TEST 7 89 6 5 4 1. Test button CHAPTER 1 ABOUT THIS PRINTER 2 3 1-5 Parallel Interface connector 5. AC power inlet 4. LED 9. Power switch 3.

Users Manual - English
Page 15
...isolation transformer or a highfrequency noise filter. If you cannot avoid using the printer. Use a voltage regulator if the power source is not stable. 1-6 Positioning the Printer CHAPTER 1 ABOUT THIS PRINTER Please take note of the following before using the printer with other high-power appliances such as an air conditioner, copier, shredder... and so on. Power Supply Use the printer within the specified power range. AC power: AC 220 - 240V or AC 110 - 120V Frequency: 50 Hz (220 V- 240 V) or 50/60 Hz (110...
...isolation transformer or a highfrequency noise filter. If you cannot avoid using the printer. Use a voltage regulator if the power source is not stable. 1-6 Positioning the Printer CHAPTER 1 ABOUT THIS PRINTER Please take note of the following before using the printer with other high-power appliances such as an air conditioner, copier, shredder... and so on. Power Supply Use the printer within the specified power range. AC power: AC 220 - 240V or AC 110 - 120V Frequency: 50 Hz (220 V- 240 V) or 50/60 Hz (110...
Users Manual - English
Page 16
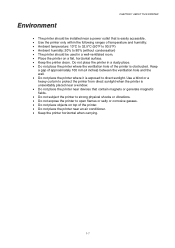
... gasses. • Do not place objects on a flat, horizontal surface. • Keep the printer clean. Environment CHAPTER 1 ABOUT THIS PRINTER • The printer should be used in a dusty place. • Do not place the printer where the ventilation hole of the printer is exposed to direct sunlight. Keep a gap of approximately 100 mm (4 inches) between...
... gasses. • Do not place objects on a flat, horizontal surface. • Keep the printer clean. Environment CHAPTER 1 ABOUT THIS PRINTER • The printer should be used in a dusty place. • Do not place the printer where the ventilation hole of the printer is exposed to direct sunlight. Keep a gap of approximately 100 mm (4 inches) between...
Users Manual - English
Page 17
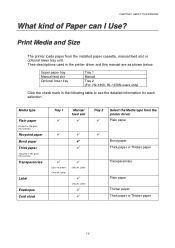
... see the detailed information for each selection. Upper paper tray Manual feed slot Optional lower tray Tray 1 Manual Tray 2 (For HL-1450, HL-1470N users only) Click the check mark in the printer driver and this manual are as shown below. Media type Plain paper 60 g/m2 to 105 g/m2 (16 to 28...
... see the detailed information for each selection. Upper paper tray Manual feed slot Optional lower tray Tray 1 Manual Tray 2 (For HL-1450, HL-1470N users only) Click the check mark in the printer driver and this manual are as shown below. Media type Plain paper 60 g/m2 to 105 g/m2 (16 to 28...
Users Manual - English
Page 18
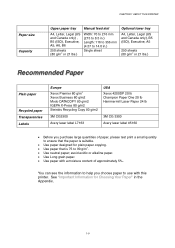
... 80 g/m2 IGEPA X-Press 80 g/m2 Steinbis Recycling Copy 80 g/m2 3M CG3300 Avery laser label L7163 USA Xerox 4200DP 20 lb Champion Paper One 20 lb Hammermill Laser Paper 24 lb 3M CG 3300 Avery laser label #5160 • Before you choose paper to 90 g/m2. • Use neutral... paper; See "Important Information for plain paper copying. • Use paper that the paper is 75 to use with a moisture content of approximately 5%. Paper size Capacity CHAPTER 1 ABOUT THIS PRINTER Upper paper ...
... 80 g/m2 IGEPA X-Press 80 g/m2 Steinbis Recycling Copy 80 g/m2 3M CG3300 Avery laser label L7163 USA Xerox 4200DP 20 lb Champion Paper One 20 lb Hammermill Laser Paper 24 lb 3M CG 3300 Avery laser label #5160 • Before you choose paper to 90 g/m2. • Use neutral... paper; See "Important Information for plain paper copying. • Use paper that the paper is 75 to use with a moisture content of approximately 5%. Paper size Capacity CHAPTER 1 ABOUT THIS PRINTER Upper paper ...

Users Manual - English
Page 19
Printable Area The figure below shows the printable area. Portrait 1 CHAPTER 1 ABOUT THIS PRINTER USA/Canada Europe/other countries 1 0.17 inch (4.2 mm) 4.2 mm 2 0.25 inch (6.35 mm) 6.01 mm 3 0.17 inch (4.2 mm) 4.2 mm 2 4 4 0.25 inch (6.35 mm) 6.01 mm 3 Landscape 1 2 3 USA/Canada 1 0.17 inch (4.2 mm) 2 0.2 inch (5.08 mm) 3 0.17 inch (4.2 mm) 4 4 0.2 inch (5.08 mm) Europe/other countries 4.2 mm 5.0 mm 4.2 mm 5.0 mm 1-10
Printable Area The figure below shows the printable area. Portrait 1 CHAPTER 1 ABOUT THIS PRINTER USA/Canada Europe/other countries 1 0.17 inch (4.2 mm) 4.2 mm 2 0.25 inch (6.35 mm) 6.01 mm 3 0.17 inch (4.2 mm) 4.2 mm 2 4 4 0.25 inch (6.35 mm) 6.01 mm 3 Landscape 1 2 3 USA/Canada 1 0.17 inch (4.2 mm) 2 0.2 inch (5.08 mm) 3 0.17 inch (4.2 mm) 4 4 0.2 inch (5.08 mm) Europe/other countries 4.2 mm 5.0 mm 4.2 mm 5.0 mm 1-10

Users Manual - English
Page 20
Select the Paper Size, Media Type and paper Source etc. Printing on Plain Paper from the paper cassette or manual feed slot. Media Type: Plain Paper Paper Source: Tray1 PCL driver PS driver 1-11 in this chapter. Printing on Plain Paper CHAPTER 1 ABOUT THIS PRINTER You can I Use?" in the printer driver. Select the paper you use referring to "What Kind of Paper can print on plain paper from the Paper Cassette 1.
Select the Paper Size, Media Type and paper Source etc. Printing on Plain Paper from the paper cassette or manual feed slot. Media Type: Plain Paper Paper Source: Tray1 PCL driver PS driver 1-11 in this chapter. Printing on Plain Paper CHAPTER 1 ABOUT THIS PRINTER You can I Use?" in the printer driver. Select the paper you use referring to "What Kind of Paper can print on plain paper from the Paper Cassette 1.

Users Manual - English
Page 21
Pull the paper cassette completely out of the paper cassette to match the paper size you want to load. Make sure the paper is flat in the cassette at the right and rear of the printer. CHAPTER 1 ABOUT THIS PRINTER 3. Load paper into the slots correctly. 4. Make sure that the tips of the paper guides fit into the paper cassette. Adjust the paper guides at all four corners. 1-12 2.
Pull the paper cassette completely out of the paper cassette to match the paper size you want to load. Make sure the paper is flat in the cassette at the right and rear of the printer. CHAPTER 1 ABOUT THIS PRINTER 3. Load paper into the slots correctly. 4. Make sure that the tips of the paper guides fit into the paper cassette. Adjust the paper guides at all four corners. 1-12 2.
Users Manual - English
Page 22
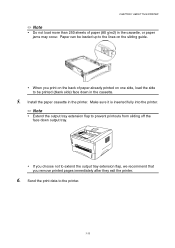
... paper already printed on one side, load the side to be loaded up to the lines on the back of paper (80 g/m2) in the printer. Install the paper cassette in the cassette, or paper jams may occur. Paper can be printed (blank side) face down output tray. 1 y If you choose... extend the output tray extension flap, we recommend that you print on the sliding guide. Make sure it is inserted fully into the printer. ✏ Note y Extend the output tray extension flap to the printer. 1-13 Send the print data to prevent printouts from sliding off the face down in the cassette. 5.
... paper already printed on one side, load the side to be loaded up to the lines on the back of paper (80 g/m2) in the printer. Install the paper cassette in the cassette, or paper jams may occur. Paper can be printed (blank side) face down output tray. 1 y If you choose... extend the output tray extension flap, we recommend that you print on the sliding guide. Make sure it is inserted fully into the printer. ✏ Note y Extend the output tray extension flap to the printer. 1-13 Send the print data to prevent printouts from sliding off the face down in the cassette. 5.
Users Manual - English
Page 23
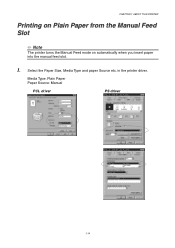
Media Type: Plain Paper Paper Source: Manual PCL driver PS driver 1-14 CHAPTER 1 ABOUT THIS PRINTER Printing on Plain Paper from the Manual Feed Slot ✏ Note The printer turns the Manual Feed mode on automatically when you insert paper 2 into the manual feed slot. 1. Select the Paper Size, Media Type and paper Source etc. in the printer driver.
Media Type: Plain Paper Paper Source: Manual PCL driver PS driver 1-14 CHAPTER 1 ABOUT THIS PRINTER Printing on Plain Paper from the Manual Feed Slot ✏ Note The printer turns the Manual Feed mode on automatically when you insert paper 2 into the manual feed slot. 1. Select the Paper Size, Media Type and paper Source etc. in the printer driver.


