
Quick Setup Guide - English
Page 4
Please purchase the appropriate interface cable for repacking Waste Toner Box (pre-installed) Toner cartridges (Black, Cyan, Magenta and Yellow) Drum Unit (pre-installed) The interface cable is no longer than 6 feet (2 meters). Connecting the interface cable is done during the software installation ... 10 Multi-purpose tray (MP tray) 11 USB direct interface CD-ROMs For Windows® For Macintosh® Quick Setup Guide User's Guide Belt Unit (pre-installed) AC Power Cord Insertion Sheet and Plastic bag for the interface you intend to use a USB 2.0 interface cable that is not...
Please purchase the appropriate interface cable for repacking Waste Toner Box (pre-installed) Toner cartridges (Black, Cyan, Magenta and Yellow) Drum Unit (pre-installed) The interface cable is no longer than 6 feet (2 meters). Connecting the interface cable is done during the software installation ... 10 Multi-purpose tray (MP tray) 11 USB direct interface CD-ROMs For Windows® For Macintosh® Quick Setup Guide User's Guide Belt Unit (pre-installed) AC Power Cord Insertion Sheet and Plastic bag for the interface you intend to use a USB 2.0 interface cable that is not...

Quick Setup Guide - English
Page 30
...TN-115C/TN-115M/TN-115Y/TN-115BK Drum Unit DR-110CL Belt Unit (BU-100CL) Waste Toner Box (WT-100CL) 28 You can expand the capabilities of the machine by adding these items. Lower Tray Unit LT-100CL DIMM Memory The lower paper tray unit can expand the memory by installing a (...144-pin When the lower tray unit is installed, the machine expands SO-DIMM) memory module. (See the User's Guide for your machine, visit us at http://solutions.brother.com or contact your local Brother reseller. details.) Consumables 2 When the time comes to 500 sheets...
...TN-115C/TN-115M/TN-115Y/TN-115BK Drum Unit DR-110CL Belt Unit (BU-100CL) Waste Toner Box (WT-100CL) 28 You can expand the capabilities of the machine by adding these items. Lower Tray Unit LT-100CL DIMM Memory The lower paper tray unit can expand the memory by installing a (...144-pin When the lower tray unit is installed, the machine expands SO-DIMM) memory module. (See the User's Guide for your machine, visit us at http://solutions.brother.com or contact your local Brother reseller. details.) Consumables 2 When the time comes to 500 sheets...

Users Manual - English
Page 5
...can order accessories directly from Brother. (You can visit us online for a complete selection of the Brother accessories and supplies that are available at most Brother retailers. Ordering accessories and supplies For best quality results use only genuine Brother accessories, which are available ...MALL (1-877-552-6255) 1-800-947-1445 (fax) http://www.brothermall.com In Canada: 1-877-BROTHER http://www.brother.ca Description Toner Cartridge Standard Toner Cartridge High Yield Drum Unit Belt Unit Waste Toner Box Paper Tray #2 (Option) User's Guide Quick Setup Guide Item Black: Cyan: Magenta...
...can order accessories directly from Brother. (You can visit us online for a complete selection of the Brother accessories and supplies that are available at most Brother retailers. Ordering accessories and supplies For best quality results use only genuine Brother accessories, which are available ...MALL (1-877-552-6255) 1-800-947-1445 (fax) http://www.brothermall.com In Canada: 1-877-BROTHER http://www.brother.ca Description Toner Cartridge Standard Toner Cartridge High Yield Drum Unit Belt Unit Waste Toner Box Paper Tray #2 (Option) User's Guide Quick Setup Guide Item Black: Cyan: Magenta...

Users Manual - English
Page 7
... misuse, neglect or accident (including but not limited to transporting this Product without authorization from someone other than an authorized Brother reseller in the United States. This limited warranty is VOID if this Product has been altered or modified in any way (including but are ...you think your Product is eligible for warranty service: Report your purchase you are not limited to Toner Cartridges, Drum Unit, Belt Unit, and Waste Toner Box. „ Except as otherwise provided herein, Brother warrants that you purchased is not covered by another device or software used in the...
... misuse, neglect or accident (including but not limited to transporting this Product without authorization from someone other than an authorized Brother reseller in the United States. This limited warranty is VOID if this Product has been altered or modified in any way (including but are ...you think your Product is eligible for warranty service: Report your purchase you are not limited to Toner Cartridges, Drum Unit, Belt Unit, and Waste Toner Box. „ Except as otherwise provided herein, Brother warrants that you purchased is not covered by another device or software used in the...

Users Manual - English
Page 12
... 98 Cleaning the scanner 99 Cleaning the laser scanner windows 100 Cleaning the corona wires 104 Cleaning the drum unit 108 Replacing the consumable items 115 Replacing a toner cartridge 118 Replacing the drum unit 123 Replacing the belt unit 129 Replacing the waste toner box 134 Packing and shipping the machine 141 Repacking the machine 142...
... 98 Cleaning the scanner 99 Cleaning the laser scanner windows 100 Cleaning the corona wires 104 Cleaning the drum unit 108 Replacing the consumable items 115 Replacing a toner cartridge 118 Replacing the drum unit 123 Replacing the belt unit 129 Replacing the waste toner box 134 Packing and shipping the machine 141 Repacking the machine 142...

Users Manual - English
Page 87
...; Identify the color that is installed properly. 73 abcdefghijklmnopqrstuvwxyz. Put in a new drum unit. (See C Replacing the drum unit on page 123.) „ Put in a new belt unit. (See Replacing the belt unit on page 129.) All one color „ Clean the corona wires of the drum unit for the color causing the problem. (See Cleaning the corona wires on...
...; Identify the color that is installed properly. 73 abcdefghijklmnopqrstuvwxyz. Put in a new drum unit. (See C Replacing the drum unit on page 123.) „ Put in a new belt unit. (See Replacing the belt unit on page 129.) All one color „ Clean the corona wires of the drum unit for the color causing the problem. (See Cleaning the corona wires on...

Users Manual - English
Page 88
..., take all the toner cartridges out of the drum unit and turn the drum unit over, then make sure that four drum unit gears are in the home position. abcdefghijklmnopqrstuvwxyz. ABCDEFGHIJKLMNOPQRSTUVWXYZ. 0123456789. Put in a new drum unit. (See Replacing the drum unit on page 123.) „ Put in a new belt unit. (See Replacing the belt unit on page 134.) „ Perform the auto color...
..., take all the toner cartridges out of the drum unit and turn the drum unit over, then make sure that four drum unit gears are in the home position. abcdefghijklmnopqrstuvwxyz. ABCDEFGHIJKLMNOPQRSTUVWXYZ. 0123456789. Put in a new drum unit. (See Replacing the drum unit on page 123.) „ Put in a new belt unit. (See Replacing the belt unit on page 134.) „ Perform the auto color...

Users Manual - English
Page 95
.... Press Stop/Exit. Press Black Start or Color Start and try to choose Drum. Replace the belt unit. (See Replacing the belt unit on page 134.) „ If the problem continues, call your Brother dealer to replace the belt unit. Change Parts Fuser Unit Change Parts Laser Unit It is near the end of the following: „ Turn off the...
.... Press Stop/Exit. Press Black Start or Color Start and try to choose Drum. Replace the belt unit. (See Replacing the belt unit on page 134.) „ If the problem continues, call your Brother dealer to replace the belt unit. Change Parts Fuser Unit Change Parts Laser Unit It is near the end of the following: „ Turn off the...

Users Manual - English
Page 97
... load it on page 87.) tray of the machine. C Install the waste toner box. (See Replacing the waste toner box on page 129.) No Drum Unit The drum unit is full. machine to copy the scanned pages. „ Press Stop/Exit and wait until the other operations in the paper (See Paper jams on... machine's power switch and then turn it again. Jam MP Tray The paper is jammed in the MP (See Paper jams on again. No Belt Unit The belt unit is not completely Close the paper tray properly. No Tray The paper tray is not installed. closed. Jam Duplex The paper is jammed in the...
... load it on page 87.) tray of the machine. C Install the waste toner box. (See Replacing the waste toner box on page 129.) No Drum Unit The drum unit is full. machine to copy the scanned pages. „ Press Stop/Exit and wait until the other operations in the paper (See Paper jams on... machine's power switch and then turn it again. Jam MP Tray The paper is jammed in the MP (See Paper jams on again. No Belt Unit The belt unit is not completely Close the paper tray properly. No Tray The paper tray is not installed. closed. Jam Duplex The paper is jammed in the...
Users Manual - English
Page 98
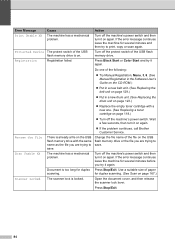
... 8. (See Manual Registration in the Software User's Guide on the CD-ROM.) „ Put in a new belt unit. (See Replacing the belt unit on page 129.) „ Put in a new drum unit. (See Replacing the drum unit on again. Do one . (See Replacing a toner cartridge on page 118.) „ Turn off the machine's ...for duplex scanning. (See Scan on page 167.) Scanner Locked The scanner lock is on again. „ If the problem continues, call Brother Customer Service. Turn off the machine's power switch. Error Message Cause Action Print Unable XX The machine has a mechanical problem. Use a ...
... 8. (See Manual Registration in the Software User's Guide on the CD-ROM.) „ Put in a new belt unit. (See Replacing the belt unit on page 129.) „ Put in a new drum unit. (See Replacing the drum unit on again. Do one . (See Replacing a toner cartridge on page 118.) „ Turn off the machine's ...for duplex scanning. (See Scan on page 167.) Scanner Locked The scanner lock is on again. „ If the problem continues, call Brother Customer Service. Turn off the machine's power switch. Error Message Cause Action Print Unable XX The machine has a mechanical problem. Use a ...

Users Manual - English
Page 131
...consumable items on the print jobs and paper you have questions, call your local waste disposal office. Change Parts Drum Drum unit 17,000 pages 1 See Replacing the drum unit on the upper row of life has been reached. Service to replace Order No. If you use. Troubleshooting ... replace How to replace the paper feeding kit MP. DR-110CL Change Parts Belt Unit Belt unit 50,000 pages 2 See Replacing the belt unit on the LCD. BU-100CL Change Parts Fuser Unit Fuser unit 80,000 pages 3 Call Brother Customer - Change Parts PF Kit 2 (when the optional lower tray is ...
...consumable items on the print jobs and paper you have questions, call your local waste disposal office. Change Parts Drum Drum unit 17,000 pages 1 See Replacing the drum unit on the upper row of life has been reached. Service to replace Order No. If you use. Troubleshooting ... replace How to replace the paper feeding kit MP. DR-110CL Change Parts Belt Unit Belt unit 50,000 pages 2 See Replacing the belt unit on the LCD. BU-100CL Change Parts Fuser Unit Fuser unit 80,000 pages 3 Call Brother Customer - Change Parts PF Kit 2 (when the optional lower tray is ...

Users Manual - English
Page 143
... OK k Press a or b to reset the drum unit counter. l Press 1 to choose Drum. When you see this message, you touch it, it could degrade print quality. C 129 j Press Menu, 6, 6. Press OK. Troubleshooting and routine maintenance Replacing the belt unit C Order Number: BU-100CL Change Parts Belt Unit message C When the belt unit runs out, the following message appears on...
... OK k Press a or b to reset the drum unit counter. l Press 1 to choose Drum. When you see this message, you touch it, it could degrade print quality. C 129 j Press Menu, 6, 6. Press OK. Troubleshooting and routine maintenance Replacing the belt unit C Order Number: BU-100CL Change Parts Belt Unit message C When the belt unit runs out, the following message appears on...

Users Manual - English
Page 144
c Hold the green handle of the drum unit. Lift the drum unit up and then pull it out until it stops. 130 Replacing the belt unit C a Turn off the machine's power switch. b Press the front cover release button and then open the front cover.
c Hold the green handle of the drum unit. Lift the drum unit up and then pull it out until it stops. 130 Replacing the belt unit C a Turn off the machine's power switch. b Press the front cover release button and then open the front cover.

Users Manual - English
Page 148
... Change Parts Waste Toner Box message C After you have printed approximately 20,000 images at 5% coverage for CMYK each, you need to reset the belt unit counter by completing the following message appears on the LCD and the machine will vary depending on the machine's power switch. When you replace the...waste toner box is full, the following steps: j Turn on the print jobs and paper you must change the waste toner box. m Press 1 to choose Belt Unit. 2 Push the drum unit in until it stops. i Close the front cover of the counter that needs to be reset. 66.Reset Menu...
... Change Parts Waste Toner Box message C After you have printed approximately 20,000 images at 5% coverage for CMYK each, you need to reset the belt unit counter by completing the following message appears on the LCD and the machine will vary depending on the machine's power switch. When you replace the...waste toner box is full, the following steps: j Turn on the print jobs and paper you must change the waste toner box. m Press 1 to choose Belt Unit. 2 Push the drum unit in until it stops. i Close the front cover of the counter that needs to be reset. 66.Reset Menu...

Users Manual - English
Page 151
Troubleshooting and routine maintenance d Hold the green parts of the belt unit with both hands and lift the belt unit up, then pull it in case you accidentally spill or scatter toner. C CAUTION We recommend that you place the drum unit on a clean, flat surface with a piece of disposable paper underneath it ...DO NOT touch the electrodes shown in case you accidentally spill or scatter toner. 137 DO NOT hold the sides of the drum unit. We recommend that you place the belt unit on your hands or clothes, wipe or wash it . If toner scatters on a clean, flat surface with a piece ...
Troubleshooting and routine maintenance d Hold the green parts of the belt unit with both hands and lift the belt unit up, then pull it in case you accidentally spill or scatter toner. C CAUTION We recommend that you place the drum unit on a clean, flat surface with a piece of disposable paper underneath it ...DO NOT touch the electrodes shown in case you accidentally spill or scatter toner. 137 DO NOT hold the sides of the drum unit. We recommend that you place the belt unit on your hands or clothes, wipe or wash it . If toner scatters on a clean, flat surface with a piece ...
Users Manual - English
Page 155
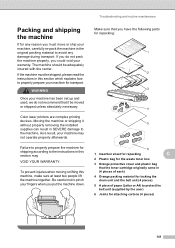
... the machine properly, you could void your machine may VOID YOUR WARRANTY. Failure to properly prepare the machine for shipping according to protect the belt unit (supplied by the user) 6 Joints for attaching cartons (4 pieces) 141 Make sure that you have the following parts for repacking: 1 ...down. If you do not recommend that the toner cartridge originally came in (4 pieces of each) 4 Orange packing material for locking the drum unit and the belt unit (4 pieces) 5 A piece of paper (Letter or A4) to the instructions in this section may not operate properly afterwards. The ...
... the machine properly, you could void your machine may VOID YOUR WARRANTY. Failure to properly prepare the machine for shipping according to protect the belt unit (supplied by the user) 6 Joints for attaching cartons (4 pieces) 141 Make sure that you have the following parts for repacking: 1 ...down. If you do not recommend that the toner cartridge originally came in (4 pieces of each) 4 Orange packing material for locking the drum unit and the belt unit (4 pieces) 5 A piece of paper (Letter or A4) to the instructions in this section may not operate properly afterwards. The ...

Users Manual - English
Page 159
l Put a piece of paper (letter or A4) on the belt unit to prevent damage to the belt unit. 1 C 1 145 Troubleshooting and routine maintenance m Put the drum unit back in the machine as shown in the machine. k Insert the original orange packing material for locking the belt unit as follows. 1 Make sure that the gray lock lever (1) is in the up position and put the drum unit in the illustration. Push down the gray lock lever (1).
l Put a piece of paper (letter or A4) on the belt unit to prevent damage to the belt unit. 1 C 1 145 Troubleshooting and routine maintenance m Put the drum unit back in the machine as shown in the machine. k Insert the original orange packing material for locking the belt unit as follows. 1 Make sure that the gray lock lever (1) is in the up position and put the drum unit in the illustration. Push down the gray lock lever (1).

Users Manual - English
Page 163
... on the LCD. c Press Stop/Exit. a Press Menu, 6, 2. 62.Serial No. The LCD shows the total number of pages for which you want to choose 1.Drum, 2.Belt Unit, 3.PF Kit MP, 4.PF Kit 1, 5.PF Kit 2 1, 6.Fuser or 7.Laser. Press OK. 63.Page Counter Total Color :XXXXXX B&W :XXXXXX d Press Stop/Exit. ...reports and lists or a summary total. XXXXXXXXX b Press Stop/Exit. Note The life check of the used part. 149 a Press Menu, 6, 5. 65.Parts Life 1.Drum 2.Belt Unit 3.PF Kit MP Select ab or OK b Press a or b to see the machine's page counters for color and black & white.
... on the LCD. c Press Stop/Exit. a Press Menu, 6, 2. 62.Serial No. The LCD shows the total number of pages for which you want to choose 1.Drum, 2.Belt Unit, 3.PF Kit MP, 4.PF Kit 1, 5.PF Kit 2 1, 6.Fuser or 7.Laser. Press OK. 63.Page Counter Total Color :XXXXXX B&W :XXXXXX d Press Stop/Exit. ...reports and lists or a summary total. XXXXXXXXX b Press Stop/Exit. Note The life check of the used part. 149 a Press Menu, 6, 5. 65.Parts Life 1.Drum 2.Belt Unit 3.PF Kit MP Select ab or OK b Press a or b to see the machine's page counters for color and black & white.

Users Manual - English
Page 174
Drum Belt Unit PF Kit MP PF Kit 1 PF Kit 2 Descriptions You can check the 149 percentage of your settings including the network configuration. Page 24 You can ... optional LT-100CL tray is installed. Resets the machine part's 123 life counter. Main Menu 6.Machine Info. (continued) Submenu Menu Selections 4.User Settings - 5.Parts Life 1.Drum 2.Belt Unit 3.PF Kit MP 4.PF Kit 1 5.PF Kit 2 6.Fuser 7.Laser 6.Reset Menu -
Drum Belt Unit PF Kit MP PF Kit 1 PF Kit 2 Descriptions You can check the 149 percentage of your settings including the network configuration. Page 24 You can ... optional LT-100CL tray is installed. Resets the machine part's 123 life counter. Main Menu 6.Machine Info. (continued) Submenu Menu Selections 4.User Settings - 5.Parts Life 1.Drum 2.Belt Unit 3.PF Kit MP 4.PF Kit 1 5.PF Kit 2 6.Fuser 7.Laser 6.Reset Menu -

Users Manual - English
Page 185
yields based on 5% page coverage (Letter) 2 Drum yield is approximate, and may vary by type of use. 3 When printing on Letter size paper 4 When printing on Letter size paper at 5% print coverage ... pages 1 5,000 pages 1 4,000 pages 1 Approx. 17,000 pages 2 Approx. 50,000 pages 3 Approx. 20,000 pages 4 E 171 Specifications Consumable items E Toner Cartridge Life Drum Unit Life Expectancy Belt Unit Waste Toner Box Standard Toner Cartridges: TN-110BK (Black): TN-110C, TN-110M, TN-110Y (Cyan, Magenta, Yellow): High-Yield Toner Cartridges: TN-115BK...
yields based on 5% page coverage (Letter) 2 Drum yield is approximate, and may vary by type of use. 3 When printing on Letter size paper 4 When printing on Letter size paper at 5% print coverage ... pages 1 5,000 pages 1 4,000 pages 1 Approx. 17,000 pages 2 Approx. 50,000 pages 3 Approx. 20,000 pages 4 E 171 Specifications Consumable items E Toner Cartridge Life Drum Unit Life Expectancy Belt Unit Waste Toner Box Standard Toner Cartridges: TN-110BK (Black): TN-110C, TN-110M, TN-110Y (Cyan, Magenta, Yellow): High-Yield Toner Cartridges: TN-115BK...


