
Quick Setup Guide - English
Page 4
... Unit (pre-installed) AC Power Cord Insertion Sheet and Plastic bag for repacking Waste Toner Box (pre-installed) Toner cartridges (Black, Cyan, Magenta and Yellow) Drum Unit (pre-installed) The interface cable is not a standard accessory. When you use a USB cable, make sure you connect it to another.
... Unit (pre-installed) AC Power Cord Insertion Sheet and Plastic bag for repacking Waste Toner Box (pre-installed) Toner cartridges (Black, Cyan, Magenta and Yellow) Drum Unit (pre-installed) The interface cable is not a standard accessory. When you use a USB cable, make sure you connect it to another.

Quick Setup Guide - English
Page 6
... DO NOT plug in the AC power cord yet. 4 Hold the green handle of orange packing material as shown in the illustration below . 4 Lift the drum unit up and then pull it out until it stops. 1 Remove the packing tape from the machine Important Save all packing materials and the carton... cover release button and open the front cover. 5 Remove the orange packing material as shown in the illustration below . 3 Remove the four pieces of the drum unit.
... DO NOT plug in the AC power cord yet. 4 Hold the green handle of orange packing material as shown in the illustration below . 4 Lift the drum unit up and then pull it out until it stops. 1 Remove the packing tape from the machine Important Save all packing materials and the carton... cover release button and open the front cover. 5 Remove the orange packing material as shown in the illustration below . 3 Remove the four pieces of the drum unit.

Quick Setup Guide - English
Page 7
...off the protective cover. 6 Close the front cover of the machine. 3 Hold the handle of the toner cartridge and slide it into the drum unit. Setting Up the Machine 2 Installing the toner cartridges 1 Unpack the toner cartridges and rock each toner cartridge from side to side 5 ...to the same color label on the drum unit, and make sure that you fold down the toner cartridge handle (1) once the toner cartridge is in place. (1) (1) 1 2 3 4 1 C - Cyan 2 M - Magenta 3 ...
...off the protective cover. 6 Close the front cover of the machine. 3 Hold the handle of the toner cartridge and slide it into the drum unit. Setting Up the Machine 2 Installing the toner cartridges 1 Unpack the toner cartridges and rock each toner cartridge from side to side 5 ...to the same color label on the drum unit, and make sure that you fold down the toner cartridge handle (1) once the toner cartridge is in place. (1) (1) 1 2 3 4 1 C - Cyan 2 M - Magenta 3 ...

Quick Setup Guide - English
Page 30
... 2 When the time comes to 800 sheets. Toner Cartridge TN-110C/TN-110M/TN-110Y/TN-110BK TN-115C/TN-115M/TN-115Y/TN-115BK Drum Unit DR-110CL Belt Unit (BU-100CL) Waste Toner Box (WT-100CL) 28 You can expand the memory by adding these items. Lower Tray Unit... the lower tray unit is installed, the machine expands SO-DIMM) memory module. (See the User's Guide for your machine, visit us at http://solutions.brother.com or contact your local Brother reseller. Consumables and Options 1 Options 1 The machine has the following optional accessories.
... 2 When the time comes to 800 sheets. Toner Cartridge TN-110C/TN-110M/TN-110Y/TN-110BK TN-115C/TN-115M/TN-115Y/TN-115BK Drum Unit DR-110CL Belt Unit (BU-100CL) Waste Toner Box (WT-100CL) 28 You can expand the memory by adding these items. Lower Tray Unit... the lower tray unit is installed, the machine expands SO-DIMM) memory module. (See the User's Guide for your machine, visit us at http://solutions.brother.com or contact your local Brother reseller. Consumables and Options 1 Options 1 The machine has the following optional accessories.

Users Manual - English
Page 5
...you cannot find the accessory you need and you have a Visa, MasterCard, Discover, or American Express credit card, you can order accessories directly from Brother. (You can visit us online for purchase.) In USA: 1-877-552-MALL (1-877-552-6255) 1-800-947-1445 (fax) http://www....brothermall.com In Canada: 1-877-BROTHER http://www.brother.ca Description Toner Cartridge Standard Toner Cartridge High Yield Drum Unit Belt Unit Waste Toner Box Paper Tray #2 (Option) User's Guide Quick Setup Guide Item Black: Cyan: Magenta:...
...you cannot find the accessory you need and you have a Visa, MasterCard, Discover, or American Express credit card, you can order accessories directly from Brother. (You can visit us online for purchase.) In USA: 1-877-552-MALL (1-877-552-6255) 1-800-947-1445 (fax) http://www....brothermall.com In Canada: 1-877-BROTHER http://www.brother.ca Description Toner Cartridge Standard Toner Cartridge High Yield Drum Unit Belt Unit Waste Toner Box Paper Tray #2 (Option) User's Guide Quick Setup Guide Item Black: Cyan: Magenta:...

Users Manual - English
Page 7
...warranty service: Report your issue to our Customer Service Hotline at 1-877-BROTHER (1-877-276-8437) or to do : After contacting Brother or a Brother Authorized Service Center, you think your purchase you are not limited to Toner Cartridges, Drum Unit, Belt Unit, and Waste Toner Box. „ Except as ...otherwise provided herein, Brother warrants that the Machine and the accompanying Consumable and Accessory Items will ask you to do if you may...
...warranty service: Report your issue to our Customer Service Hotline at 1-877-BROTHER (1-877-276-8437) or to do : After contacting Brother or a Brother Authorized Service Center, you think your purchase you are not limited to Toner Cartridges, Drum Unit, Belt Unit, and Waste Toner Box. „ Except as ...otherwise provided herein, Brother warrants that the Machine and the accompanying Consumable and Accessory Items will ask you to do if you may...

Users Manual - English
Page 9
... WARRANTY (Canada only) For a limited on-site warranty of 1 year labour and parts from the date of purchase, Brother International Corporation (Canada) Ltd. ("Brother"), or its Authorized Service Centres, Distributors, Dealers, Agents or employees, shall create another warranty or modify this Laser Printer/MFC...warranty applies only to Province. This limited Warranty does not include cleaning, consumables (including, without limitation, toner cartridges and drum units, OPC belts, fixing units, print heads, paper feed rollers, transfer rolls, cleaning rollers, waste toner packs, oil bottles) ...
... WARRANTY (Canada only) For a limited on-site warranty of 1 year labour and parts from the date of purchase, Brother International Corporation (Canada) Ltd. ("Brother"), or its Authorized Service Centres, Distributors, Dealers, Agents or employees, shall create another warranty or modify this Laser Printer/MFC...warranty applies only to Province. This limited Warranty does not include cleaning, consumables (including, without limitation, toner cartridges and drum units, OPC belts, fixing units, print heads, paper feed rollers, transfer rolls, cleaning rollers, waste toner packs, oil bottles) ...

Users Manual - English
Page 12
... machine 98 Cleaning the scanner 99 Cleaning the laser scanner windows 100 Cleaning the corona wires 104 Cleaning the drum unit 108 Replacing the consumable items 115 Replacing a toner cartridge 118 Replacing the drum unit 123 Replacing the belt unit 129 Replacing the waste toner box 134 Packing and shipping the machine...
... machine 98 Cleaning the scanner 99 Cleaning the laser scanner windows 100 Cleaning the corona wires 104 Cleaning the drum unit 108 Replacing the consumable items 115 Replacing a toner cartridge 118 Replacing the drum unit 123 Replacing the belt unit 129 Replacing the waste toner box 134 Packing and shipping the machine...

Users Manual - English
Page 79
...in your document to work with of the page. Troubleshooting and routine maintenance Printing difficulties Difficulties No printout. Right-click Brother DCP-9045CDN Printer. Right-click Brother DCP-9045CDN Printer. The machine is unchecked. „ Pull out the paper tray and wait until the machine stops printing. ...Click the Start button and select Printers and Faxes. Suggestions „ Check that the toner cartridges and drum unit are installed properly. (See Replacing the drum unit on page 123.) „ Check the interface cable connection on both Check the paper size ...
...in your document to work with of the page. Troubleshooting and routine maintenance Printing difficulties Difficulties No printout. Right-click Brother DCP-9045CDN Printer. Right-click Brother DCP-9045CDN Printer. The machine is unchecked. „ Pull out the paper tray and wait until the machine stops printing. ...Click the Start button and select Printers and Faxes. Suggestions „ Check that the toner cartridges and drum unit are installed properly. (See Replacing the drum unit on page 123.) „ Check the interface cable connection on both Check the paper size ...
Users Manual - English
Page 84
... unpacked paper. „ Make sure that the front cover is installed properly. (See Replacing the drum unit on the whole page. abcdefghijklmnopqrstuvwxyz. abcdefghijklmnopqrstuvwxyz. abcdefghijklmnopqrstuvwxyz. ABCDEFGHIJKLMNOPQRSTUVWXYZ. 0123456789. abcdefghijklmnopqrstuvwxyz. abcdefghijklmnopqrstuvwxyz. ABCDEFGHIJKLMNOPQRSTUVWXYZ. ...windows with a soft cloth. (See Cleaning the laser scanner windows on page 100.) „ The drum unit may be damaged. ABCDEFGHIJKLMNOPQRSTUVWXYZ. 0123456789. abcdefghijklmnopqrstuvwxyz. Recommendation „ Make sure that the machine is ...
... unpacked paper. „ Make sure that the front cover is installed properly. (See Replacing the drum unit on the whole page. abcdefghijklmnopqrstuvwxyz. abcdefghijklmnopqrstuvwxyz. abcdefghijklmnopqrstuvwxyz. ABCDEFGHIJKLMNOPQRSTUVWXYZ. 0123456789. abcdefghijklmnopqrstuvwxyz. abcdefghijklmnopqrstuvwxyz. ABCDEFGHIJKLMNOPQRSTUVWXYZ. ...windows with a soft cloth. (See Cleaning the laser scanner windows on page 100.) „ The drum unit may be damaged. ABCDEFGHIJKLMNOPQRSTUVWXYZ. 0123456789. abcdefghijklmnopqrstuvwxyz. Recommendation „ Make sure that the machine is ...
Users Manual - English
Page 85
abcdefghijklmnopqrstuvwxyz. ABCDEFGHIJKLMNOPQRSTUVWXYZ. 0123456789. ABCDEFGHIJKLMNOPQRSTUVWXYZ. 0123456789. abcdefghijklmnopqrstuvwxyz. Call Brother Customer Service at the home position (b). „ The drum unit may be damaged. abcdefghijklmnopqrstuvwxyz. abcdefghijklmnopqrstuvwxyz. abcdefghijklmnopqrstuvwxyz. abcdefghijklmnopqrstuvwxyz. Troubleshooting and routine maintenance Examples of the toner cartridges may be damaged. abcdefghijklmnopqrstuvwxyz. ABCDEFGHIJKLMNOPQRSTUVWXYZ. 0123456789. ABCDEFGHIJKLMNOPQRSTUVWXYZ. 0123456789. ...
abcdefghijklmnopqrstuvwxyz. ABCDEFGHIJKLMNOPQRSTUVWXYZ. 0123456789. ABCDEFGHIJKLMNOPQRSTUVWXYZ. 0123456789. abcdefghijklmnopqrstuvwxyz. Call Brother Customer Service at the home position (b). „ The drum unit may be damaged. abcdefghijklmnopqrstuvwxyz. abcdefghijklmnopqrstuvwxyz. abcdefghijklmnopqrstuvwxyz. abcdefghijklmnopqrstuvwxyz. Troubleshooting and routine maintenance Examples of the toner cartridges may be damaged. abcdefghijklmnopqrstuvwxyz. ABCDEFGHIJKLMNOPQRSTUVWXYZ. 0123456789. ABCDEFGHIJKLMNOPQRSTUVWXYZ. 0123456789. ...

Users Manual - English
Page 86
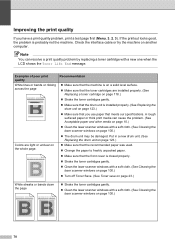
...toner cartridge for the color causing the problem. (See Replacing a toner cartridge on page 118.) „ Clean the corona wires and the drum unit for the color causing the problem. (See Cleaning the corona wires on page 104.) If the print quality has not improved, put in.... 0123456789. abcdefghijklmnopqrstuvwxyz. ABCDEFGHIJKLMNOPQRSTUVWXYZ. 0123456789. Roughsurfaced paper may stick to the surface of the photosensitive drum (OPC) and cause black or white spots to install a new drum. (See Replacing the drum unit on page 50.) „ Make sure that you still see the spots on printed ...
...toner cartridge for the color causing the problem. (See Replacing a toner cartridge on page 118.) „ Clean the corona wires and the drum unit for the color causing the problem. (See Cleaning the corona wires on page 104.) If the print quality has not improved, put in.... 0123456789. abcdefghijklmnopqrstuvwxyz. ABCDEFGHIJKLMNOPQRSTUVWXYZ. 0123456789. Roughsurfaced paper may stick to the surface of the photosensitive drum (OPC) and cause black or white spots to install a new drum. (See Replacing the drum unit on page 50.) „ Make sure that you still see the spots on printed ...

Users Manual - English
Page 87
... type in the printer driver or in the machine's Paper Type menu setting. (See Acceptable paper and other media on page 10.) „ The drum unit may be damaged. Colors the machine can print and colors you use paper that meets our specifications. (See Acceptable paper and other media on...damaged. a Press OK to select Yes. (For more information, see on page 123.) „ Make sure that meets our specifications. Put in a new drum unit. (See C Replacing the drum unit on page 123.) „ Put in a new belt unit. (See Replacing the belt unit on page 129.) All one color „ Clean...
... type in the printer driver or in the machine's Paper Type menu setting. (See Acceptable paper and other media on page 10.) „ The drum unit may be damaged. Colors the machine can print and colors you use paper that meets our specifications. (See Acceptable paper and other media on...damaged. a Press OK to select Yes. (For more information, see on page 123.) „ Make sure that meets our specifications. Put in a new drum unit. (See C Replacing the drum unit on page 123.) „ Put in a new belt unit. (See Replacing the belt unit on page 129.) All one color „ Clean...

Users Manual - English
Page 88
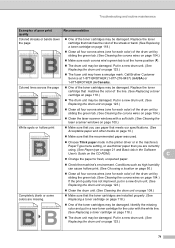
.... If the color misregistration is not corrected after registering the color manually, take all the toner cartridges out of the drum unit and turn the drum unit over, then make sure that the waste toner box is installed properly. (See Replacing the belt unit on page..., you can be damaged. The home position of poor print quality Color misregistration ABCDEFGHIJKLMNOPQRSTUVWXYZ. 0123456789. ABCDEFGHIJKLMNOPQRSTUVWXYZ. 0123456789. Put in a new drum unit. (See Replacing the drum unit on page 123.) „ Put in a new belt unit. (See Replacing the belt unit on page 129.) „ ...
.... If the color misregistration is not corrected after registering the color manually, take all the toner cartridges out of the drum unit and turn the drum unit over, then make sure that the waste toner box is installed properly. (See Replacing the belt unit on page..., you can be damaged. The home position of poor print quality Color misregistration ABCDEFGHIJKLMNOPQRSTUVWXYZ. 0123456789. ABCDEFGHIJKLMNOPQRSTUVWXYZ. 0123456789. Put in a new drum unit. (See Replacing the drum unit on page 123.) „ Put in a new belt unit. (See Replacing the belt unit on page 129.) „ ...

Users Manual - English
Page 89
...routine maintenance Examples of paper. (See Recommended paper on page 10.) 75 ABCDEFGHIJKLMNOPQRSTUVWXYZ. 0123456789. abcdefghijklmnopqrstuvwxyz. abcdefghijklmnopqrstuvwxyz. abcdefghijklmnopqrstuvwxyz. Call Brother Customer Service. „ Change to the recommended type of paper. (See Recommended paper on page 10.) „ ...; Make sure that the back cover is closed properly. „ Make sure that paper is installed properly. (See Replacing the drum unit on the CD-ROM.) „ Turn over the stack of the toner cartridges may be damaged. Insufficient gloss Recommendation „...
...routine maintenance Examples of paper. (See Recommended paper on page 10.) 75 ABCDEFGHIJKLMNOPQRSTUVWXYZ. 0123456789. abcdefghijklmnopqrstuvwxyz. abcdefghijklmnopqrstuvwxyz. abcdefghijklmnopqrstuvwxyz. Call Brother Customer Service. „ Change to the recommended type of paper. (See Recommended paper on page 10.) „ ...; Make sure that the back cover is closed properly. „ Make sure that paper is installed properly. (See Replacing the drum unit on the CD-ROM.) „ Turn over the stack of the toner cartridges may be damaged. Insufficient gloss Recommendation „...

Users Manual - English
Page 90
...ABCDEFGHIJKLMNOPQRSTUVWXYZ. 0123456789. abcdefghijklmnopqrstuvwxyz. abcdefghijklmnopqrstuvwxyz. ABCDEFGHIJKLMNOPQRSTUVWXYZ. 0123456789. ABCDEFGHIJKLMNOPQRSTUVWXYZ. 0123456789. Put in a new drum unit. (See Replacing the drum unit on page 123.) „ Make sure that you use paper that meets our specifications...you choose the proper media type in the printer driver or in the closed position. „ Call Brother Customer Service to the recommended type of poor print quality Offset image ABCDEFGHIJKLMNOPQRSTUVWXYZ. 0123456789. abcdefghijklmnopqrstuvwxyz. ABCDEFGHIJKLMNOPQRSTUVWXYZ. 0123456789...
...ABCDEFGHIJKLMNOPQRSTUVWXYZ. 0123456789. abcdefghijklmnopqrstuvwxyz. abcdefghijklmnopqrstuvwxyz. ABCDEFGHIJKLMNOPQRSTUVWXYZ. 0123456789. ABCDEFGHIJKLMNOPQRSTUVWXYZ. 0123456789. Put in a new drum unit. (See Replacing the drum unit on page 123.) „ Make sure that you use paper that meets our specifications...you choose the proper media type in the printer driver or in the closed position. „ Call Brother Customer Service to the recommended type of poor print quality Offset image ABCDEFGHIJKLMNOPQRSTUVWXYZ. 0123456789. abcdefghijklmnopqrstuvwxyz. ABCDEFGHIJKLMNOPQRSTUVWXYZ. 0123456789...

Users Manual - English
Page 94
... or toner stain on the edge of the photosensitive drum. ABCDEFGHIJKLMNOPQRSTUVWXYZ. 0123456789. DO NOT touch the surface of duplex pages Recommendation CAUTION ABCDEFGHIJKLMNOPQRSTUVWXYZ. 0123456789. Wipe the toner on a clean, flat surface with a piece of drum unit with a dry lint free soft cloth as ...shown in case you place the drum unit and toner cartridges on the edge of disposable paper underneath them in the illustration. 80...
... or toner stain on the edge of the photosensitive drum. ABCDEFGHIJKLMNOPQRSTUVWXYZ. 0123456789. DO NOT touch the surface of duplex pages Recommendation CAUTION ABCDEFGHIJKLMNOPQRSTUVWXYZ. 0123456789. Wipe the toner on a clean, flat surface with a piece of drum unit with a dry lint free soft cloth as ...shown in case you place the drum unit and toner cartridges on the edge of disposable paper underneath them in the illustration. 80...

Users Manual - English
Page 95
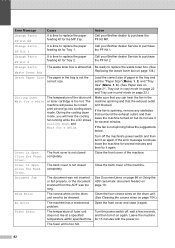
... time to replace the laser unit. Reinsert the device and try again. Do one . (See Replacing the drum unit on page 134.) „ If the problem continues, call your Brother dealer. Change Parts Belt Unit It is processing. Change Parts Fuser Unit Change Parts Laser Unit It is time... unit. It is time to purchase the laser unit. 81 then replace the drum unit with direct print or PictBridge. Call your Brother dealer to replace the fuser unit. Press OK and press 1 to choose Drum. Call your Brother dealer to print with a new one of its life. Press Stop/Exit....
... time to replace the laser unit. Reinsert the device and try again. Do one . (See Replacing the drum unit on page 134.) „ If the problem continues, call your Brother dealer. Change Parts Belt Unit It is processing. Change Parts Fuser Unit Change Parts Laser Unit It is time... unit. It is time to purchase the laser unit. 81 then replace the drum unit with direct print or PictBridge. Call your Brother dealer to replace the fuser unit. Press OK and press 1 to choose Drum. Call your Brother dealer to print with a new one of its life. Press Stop/Exit....
Users Manual - English
Page 96
... try it for Tray 1. Cover is Open Close the Back Cover. Cover is Open Close the Front Cover. Clean the four corona wires on the drum unit. (See Cleaning the corona wires on page 134.) Check Paper Size The paper in the machine spinning and that you will pause its current... print job and go into cooling down mode, you can hear the fan in the tray is not closed completely. Call your Brother dealer Service to replace the paper feeding kit for Tray 2. Close the back cover of the machine. During the cooling down mode. Make sure that...
... try it for Tray 1. Cover is Open Close the Back Cover. Cover is Open Close the Front Cover. Clean the four corona wires on the drum unit. (See Cleaning the corona wires on page 134.) Check Paper Size The paper in the machine spinning and that you will pause its current... print job and go into cooling down mode, you can hear the fan in the tray is not closed completely. Call your Brother dealer Service to replace the paper feeding kit for Tray 2. Close the back cover of the machine. During the cooling down mode. Make sure that...

Users Manual - English
Page 97
... XX The machine has a mechanical problem. Jam Tray 1 Jam Tray 2 The paper is jammed in the paper (See Paper jams on page 129.) No Drum Unit The drum unit is not properly loaded in the paper tray or MP tray. „ Remove the paper and load it on page 123.) No Paper... paper in the paper tray. Do one of the machine. Turn off the machine's power switch and then turn it again. Install the drum unit. (See Replacing the drum unit on again. closed. Print operation in process „ Reduce print resolution. (See Advanced tab in the Software User's Guide on page 87...
... XX The machine has a mechanical problem. Jam Tray 1 Jam Tray 2 The paper is jammed in the paper (See Paper jams on page 129.) No Drum Unit The drum unit is not properly loaded in the paper tray or MP tray. „ Remove the paper and load it on page 123.) No Paper... paper in the paper tray. Do one of the machine. Turn off the machine's power switch and then turn it again. Install the drum unit. (See Replacing the drum unit on again. closed. Print operation in process „ Reduce print resolution. (See Advanced tab in the Software User's Guide on page 87...


