Users Manual - English
Page 32
...in figure below • with any part of the machine, because the label stock may stick to the drum unit or rollers and cause jams and print quality problems. No adhesive should be exposed between the labels. Labels exceeding ...and may result in labels peeling off and causing serious jams or print problems. All labels used in the fuser unit. Labels should have not been folded at the high temperatures in this machine must be damaged. 19 Using ...an adhesive that is acrylic-based since this material is not covered under any Brother warranty or service agreement.
...in figure below • with any part of the machine, because the label stock may stick to the drum unit or rollers and cause jams and print quality problems. No adhesive should be exposed between the labels. Labels exceeding ...and may result in labels peeling off and causing serious jams or print problems. All labels used in the fuser unit. Labels should have not been folded at the high temperatures in this machine must be damaged. 19 Using ...an adhesive that is acrylic-based since this material is not covered under any Brother warranty or service agreement.

Users Manual - English
Page 69
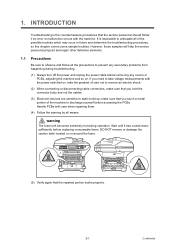
Please DO NOT remove or damage the label. 56 When you move the machine, grasp the side hand holds that are under the scanner. To prevent injuries, be careful not to put your fingers in the areas shown in the illustrations. IMPORTANT The fuser unit is marked with a Caution label.
Please DO NOT remove or damage the label. 56 When you move the machine, grasp the side hand holds that are under the scanner. To prevent injuries, be careful not to put your fingers in the areas shown in the illustrations. IMPORTANT The fuser unit is marked with a Caution label.

Users Manual - English
Page 88
...-276-8437) (in USA) or 1-877-BROTHER (in Canada). „ Check the paper type and quality. (See Acceptable paper and...is loaded properly. (See Loading paper in the C standard paper tray on the CD-ROM.) „ The drum unit may be damaged. Troubleshooting and routine maintenance Examples of paper in the tray or rotate the paper 180° in...stack. „ Set the paper guides correctly. (See Loading paper in a new drum unit. (See Replacing the drum unit on page 103.) „ The fuser unit may be contaminated. Roughsurfaced paper or thick paper may cause the problem. (See Acceptable ...
...-276-8437) (in USA) or 1-877-BROTHER (in Canada). „ Check the paper type and quality. (See Acceptable paper and...is loaded properly. (See Loading paper in the C standard paper tray on the CD-ROM.) „ The drum unit may be damaged. Troubleshooting and routine maintenance Examples of paper in the tray or rotate the paper 180° in...stack. „ Set the paper guides correctly. (See Loading paper in a new drum unit. (See Replacing the drum unit on page 103.) „ The fuser unit may be contaminated. Roughsurfaced paper or thick paper may cause the problem. (See Acceptable ...

Users Manual - English
Page 92
...sure that meets our specifications. Put in Canada). Call Brother Customer Service at 1-877-BROTHER (1-877-276-8437) (in USA) or 1-877-BROTHER (in a new drum unit. (See Replacing the drum unit on page 103.) Toner specks „ The fuser unit may sometimes stick to the home position (a). (See ...Cleaning the corona wire on page 103.) „ The fuser unit may be contaminated. All black ABCDEFGH ...
...sure that meets our specifications. Put in Canada). Call Brother Customer Service at 1-877-BROTHER (1-877-276-8437) (in USA) or 1-877-BROTHER (in a new drum unit. (See Replacing the drum unit on page 103.) Toner specks „ The fuser unit may sometimes stick to the home position (a). (See ...Cleaning the corona wire on page 103.) „ The fuser unit may be contaminated. All black ABCDEFGH ...
Users Manual - English
Page 93
...-276-8437) (in USA) or 1-877-BROTHER (in Canada). „ Open the back cover and make sure that the two blue ...return the blue tab to the home position (a). (See Cleaning the corona wire on page 103.) „ The fuser unit may be damaged. Examples of poor print quality ABCDEFGH abcdefghijk ABCD abcde 01234 Black lines down the page Printed pages have... ABCDEFGH abcdefghijk ABCD abcde 01234 Recommendation „ Clean the corona wire inside the drum unit by sliding the blue tab. Put in a new drum unit. (See Replacing the drum unit on page 96.) „ The toner cartridge may be damaged.
...-276-8437) (in USA) or 1-877-BROTHER (in Canada). „ Open the back cover and make sure that the two blue ...return the blue tab to the home position (a). (See Cleaning the corona wire on page 103.) „ The fuser unit may be damaged. Examples of poor print quality ABCDEFGH abcdefghijk ABCD abcde 01234 Black lines down the page Printed pages have... ABCDEFGH abcdefghijk ABCD abcde 01234 Recommendation „ Clean the corona wire inside the drum unit by sliding the blue tab. Put in a new drum unit. (See Replacing the drum unit on page 96.) „ The toner cartridge may be damaged.

Users Manual - English
Page 95
... the machine. The toner cartridge or the drum Re-install the toner cartridge or the drum unit unit and toner cartridge assembly and toner cartridge assembly. The paper is on page 86.) tray of... No Toner No Tray Out of Memory Print Unable XX Protected Device Cause Action The temperature of fuser unit Turn the power switch off the protect switch of the USB Flash memory drive. 82 Copy operation...with the power on again. Leave the temperature within specified time. The fuser unit is full. machine for problem. The paper is not properly loaded in the Software User's Guide on...
... the machine. The toner cartridge or the drum Re-install the toner cartridge or the drum unit unit and toner cartridge assembly and toner cartridge assembly. The paper is on page 86.) tray of... No Toner No Tray Out of Memory Print Unable XX Protected Device Cause Action The temperature of fuser unit Turn the power switch off the protect switch of the USB Flash memory drive. 82 Copy operation...with the power on again. Leave the temperature within specified time. The fuser unit is full. machine for problem. The paper is not properly loaded in the Software User's Guide on...

Users Manual - English
Page 96
... is time to replace the paper feeding kit for duplex scanning. several minutes, then reconnect it. Replace the drum unit. Call Brother Customer Service to replace the fuser unit. 1-877-BROTHER (1-877-276-8437) (in USA) 1-877-BROTHER (in Canada) Rename the File There is at the end of the file on page 101.) Scan Unable...
... is time to replace the paper feeding kit for duplex scanning. several minutes, then reconnect it. Replace the drum unit. Call Brother Customer Service to replace the fuser unit. 1-877-BROTHER (1-877-276-8437) (in USA) 1-877-BROTHER (in Canada) Rename the File There is at the end of the file on page 101.) Scan Unable...

Users Manual - English
Page 104
...sides toward you to open the front cover. clean, flat surface with a sheet of the fuser unit. C g Put the drum unit and toner cartridge assembly back in case you place the drum unit and toner cartridge assembly on a (back output tray). Troubleshooting and routine maintenance d Pull the... tabs at the back of the machine C a Press the front cover release button and open the fuser cover (1). 1 b Slowly take out the drum unit and toner cartridge ...
...sides toward you to open the front cover. clean, flat surface with a sheet of the fuser unit. C g Put the drum unit and toner cartridge assembly back in case you place the drum unit and toner cartridge assembly on a (back output tray). Troubleshooting and routine maintenance d Pull the... tabs at the back of the machine C a Press the front cover release button and open the fuser cover (1). 1 b Slowly take out the drum unit and toner cartridge ...
Users Manual - English
Page 119
... a summary total. XXXXXXXXX b Press Stop/Exit. Replace fuser unit. a Press Menu, 6, 3. 63.Serial No. Checking the Page Counters C You can see the machine's Serial Number on the LCD please call Brother Customer Service (in USA) 1-877-BROTHER (1-877-276-8437) (in Canada) 1-877- The ... after printing approximately 50,000 pages for PF Kit MP and 100,000 pages for PF Kit1, PF Kit2, Fuser and Laser. Fuser Unit Replace Parts Replace laser unit. BROTHER. Laser Unit Machine Information C Checking the Serial Number C You can see Total, List, Copy or Print. 64.Page Counter...
... a summary total. XXXXXXXXX b Press Stop/Exit. Replace fuser unit. a Press Menu, 6, 3. 63.Serial No. Checking the Page Counters C You can see the machine's Serial Number on the LCD please call Brother Customer Service (in USA) 1-877-BROTHER (1-877-276-8437) (in Canada) 1-877- The ... after printing approximately 50,000 pages for PF Kit MP and 100,000 pages for PF Kit1, PF Kit2, Fuser and Laser. Fuser Unit Replace Parts Replace laser unit. BROTHER. Laser Unit Machine Information C Checking the Serial Number C You can see Total, List, Copy or Print. 64.Page Counter...
Parts List
Page 3
LASER UNIT 5 4. SCANNER 17 10. PRINTED MATERIALS 30 16. DUPLEX 9 6. PAPER TRAY 11 7. ACCESSORIES 27 15. PACKING MATERIALS 32 17. CONTENTS 1. FRAME UNIT 3 3. OTHERS 35 ADF 2 21 12. COVERS 15 9. FRAME L & DRIVE UNIT 1 2. PCB ...25 14. PANEL 23 13. ADF 1 19 11. PAPER FEEDER 7 5. FUSER UNIT 13 8.
LASER UNIT 5 4. SCANNER 17 10. PRINTED MATERIALS 30 16. DUPLEX 9 6. PAPER TRAY 11 7. ACCESSORIES 27 15. PACKING MATERIALS 32 17. CONTENTS 1. FRAME UNIT 3 3. OTHERS 35 ADF 2 21 12. COVERS 15 9. FRAME L & DRIVE UNIT 1 2. PCB ...25 14. PANEL 23 13. ADF 1 19 11. PAPER FEEDER 7 5. FUSER UNIT 13 8.
Service Manual
Page 14
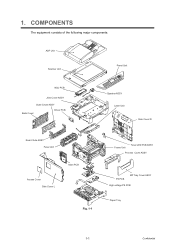
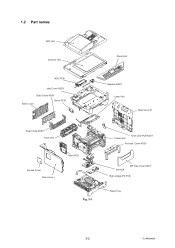
1. COMPONENTS The equipment consists of the following major components: ADF Unit Scanner Unit Panel Unit NCU PCB Joint Cover ASSY Outer Chute ASSY Back Cover Driver PCB Speaker ASSY Laser Unit Side Cover R Rear Chute ASSY Fuser Unit Access Cover Side Cover L Main PCB Fig. 1-1 Frame Unit Toner LED PCB ASSY Process Cover ASSY PS PCB MP Tray Cover ASSY High-voltage PS PCB Paper Tray 1-1 Confidential
1. COMPONENTS The equipment consists of the following major components: ADF Unit Scanner Unit Panel Unit NCU PCB Joint Cover ASSY Outer Chute ASSY Back Cover Driver PCB Speaker ASSY Laser Unit Side Cover R Rear Chute ASSY Fuser Unit Access Cover Side Cover L Main PCB Fig. 1-1 Frame Unit Toner LED PCB ASSY Process Cover ASSY PS PCB MP Tray Cover ASSY High-voltage PS PCB Paper Tray 1-1 Confidential

Service Manual
Page 21
Machine life: 200,000 pages MTBF (Meantime between failure): Up to 4000 hours MTTR (Meantime to repair): Average 0.5 hours Monthly volume: 30,000 pages Periodical replacement parts: Parts Approximate Life (pages) Fuser unit 100,000 Laser unit 100,000 PF kit China MP: 25,000 Tray 1/2: 100,000 India MP: 12,000 Tray 1/2: 80,000 Others MP: 50,000 Tray 1/2: 100,000 * As for periodical replacement parts, refer to maintain the product. 2.5 Service Information These are key service information to CHAPTER 4 in the Service Manual. 1-8 Confidential
Machine life: 200,000 pages MTBF (Meantime between failure): Up to 4000 hours MTTR (Meantime to repair): Average 0.5 hours Monthly volume: 30,000 pages Periodical replacement parts: Parts Approximate Life (pages) Fuser unit 100,000 Laser unit 100,000 PF kit China MP: 25,000 Tray 1/2: 100,000 India MP: 12,000 Tray 1/2: 80,000 Others MP: 50,000 Tray 1/2: 100,000 * As for periodical replacement parts, refer to maintain the product. 2.5 Service Information These are key service information to CHAPTER 4 in the Service Manual. 1-8 Confidential
Service Manual
Page 31
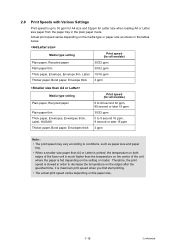
... tray. • When a smaller size paper than A4 or Letter is printed, the temperature on both edges of the fuser unit is much higher than the temperature on the center of the unit where the paper is maximum print speed when you first start printing. • The actual print speed varies depending on...
... tray. • When a smaller size paper than A4 or Letter is printed, the temperature on both edges of the fuser unit is much higher than the temperature on the center of the unit where the paper is maximum print speed when you first start printing. • The actual print speed varies depending on...
Service Manual
Page 55
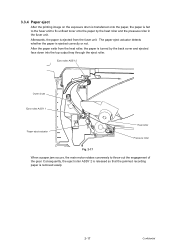
... the paper by the back cover and ejected face down into the top output tray through the eject roller. After the paper exits from the fuser unit. Consequently, the eject roller ASSY 2 is released so that the jammed recording paper is ejected correctly or not. Afterwards, the paper is ejected from the... heat roller, the paper is turned by the heat roller and the pressure roller in the fuser unit. 3.3.4 Paper eject After the printing image on the exposure drum is transferred onto the paper, the paper is fed to the...
... the paper by the back cover and ejected face down into the top output tray through the eject roller. After the paper exits from the fuser unit. Consequently, the eject roller ASSY 2 is released so that the jammed recording paper is ejected correctly or not. Afterwards, the paper is ejected from the... heat roller, the paper is turned by the heat roller and the pressure roller in the fuser unit. 3.3.4 Paper eject After the printing image on the exposure drum is transferred onto the paper, the paper is fed to the...
Service Manual
Page 68
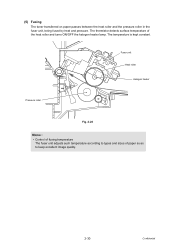
The temperature is kept constant. Fuser unit Heat roller Halogen heater Pressure roller Fig. 2-28 Memo : • Control of fusing temperature The fuser unit adjusts such temperature according to types and sizes of the heat roller and turns ON/OFF the halogen heater lamp. The thermistor detects surface temperature of paper so as to keep excellent image quality. 2-30 Confidential (5) Fusing The toner transferred on paper passes between the heat roller and the pressure roller in the fuser unit, being fused by heat and pressure.
The temperature is kept constant. Fuser unit Heat roller Halogen heater Pressure roller Fig. 2-28 Memo : • Control of fusing temperature The fuser unit adjusts such temperature according to types and sizes of the heat roller and turns ON/OFF the halogen heater lamp. The thermistor detects surface temperature of paper so as to keep excellent image quality. 2-30 Confidential (5) Fusing The toner transferred on paper passes between the heat roller and the pressure roller in the fuser unit, being fused by heat and pressure.
Service Manual
Page 73
warning The fuser unit becomes extremely hot during troubleshooting. (1) Always turn off the power and unplug the power cable before removing any covers or PCBs, adjusting the machine and ... cables. (3) Electronic devices are sensitive to discharge yourself before replacing consumable items. DO NOT remove or damage the caution label located on or around the fuser. (5) Verify again that you touch a metal portion of the possible troubles which may occur in future and determine the troubleshooting procedures, so this chapter covers...
warning The fuser unit becomes extremely hot during troubleshooting. (1) Always turn off the power and unplug the power cable before removing any covers or PCBs, adjusting the machine and ... cables. (3) Electronic devices are sensitive to discharge yourself before replacing consumable items. DO NOT remove or damage the caution label located on or around the fuser. (5) Verify again that you touch a metal portion of the possible troubles which may occur in future and determine the troubleshooting procedures, so this chapter covers...
Service Manual
Page 74
1.2 Part names ADF Unit Scanner Unit NCU PCB Joint Cover ASSY Outer Chute ASSY Back Cover Driver PCB Panel Unit Speaker ASSY Laser Unit Side Cover R Rear Chute ASSY Fuser Unit Access Cover Side Cover L Main PCB Fig. 3-1 Frame Unit Toner LED PCB ASSY Process Cover ASSY PS PCB MP Tray Cover ASSY High-voltage PS PCB Paper Tray 3-2 Confidential
1.2 Part names ADF Unit Scanner Unit NCU PCB Joint Cover ASSY Outer Chute ASSY Back Cover Driver PCB Panel Unit Speaker ASSY Laser Unit Side Cover R Rear Chute ASSY Fuser Unit Access Cover Side Cover L Main PCB Fig. 3-1 Frame Unit Toner LED PCB ASSY Process Cover ASSY PS PCB MP Tray Cover ASSY High-voltage PS PCB Paper Tray 3-2 Confidential
Service Manual
Page 77
...3-14 It is time to The device is indicated on the LCD Error Message Access Error Cartridge Error Replace Parts Drum Replace Parts Fuser Unit Replace Parts Laser Unit Replace Parts PF Kit MP Replace Parts PF Kit 1 Replace Parts PF Kit 2 Comm.Error Connection Fail Type of Error Action... Refer to replace the fuser unit. Replace the laser unit. 3-15 It is time to replace the paper feeding kit for equipment errors and communications errors. its life. Replace the fuser unit. 3-15 It is time to poll a fax Send the fax again....
...3-14 It is time to The device is indicated on the LCD Error Message Access Error Cartridge Error Replace Parts Drum Replace Parts Fuser Unit Replace Parts Laser Unit Replace Parts PF Kit MP Replace Parts PF Kit 1 Replace Parts PF Kit 2 Comm.Error Connection Fail Type of Error Action... Refer to replace the fuser unit. Replace the laser unit. 3-15 It is time to replace the paper feeding kit for equipment errors and communications errors. its life. Replace the fuser unit. 3-15 It is time to poll a fax Send the fax again....

Service Manual
Page 78
... one of its current print job and go into cooling down mode, you can hear the fan in Use The machine is jammed inside of fuser unit does not rise at a specified temperature within specified time. the end of the following: Turn the power switch off, wait a few seconds,... and then turn it again. 3-16 Fuser Error The temperature of the machine. 3-25 3-6 Confidential The fuser unit is not closed completely or paper was jammed in the duplex tray. Jam Duplex The paper is not closed completely. Close...
... one of its current print job and go into cooling down mode, you can hear the fan in Use The machine is jammed inside of fuser unit does not rise at a specified temperature within specified time. the end of the following: Turn the power switch off, wait a few seconds,... and then turn it again. 3-16 Fuser Error The temperature of the machine. 3-25 3-6 Confidential The fuser unit is not closed completely or paper was jammed in the duplex tray. Jam Duplex The paper is not closed completely. Close...

Service Manual
Page 81
...user to quickly find out the problem. 3.1 Error Indication Error codes Problem 1E Replacement time of the drum unit 1F Two or more optional trays are installed 24 Internal temperature sensor failure 35 EEPROM of main PCB failure 36 HVPS PCB during standby failure Main PCB RAM failure ... of the paper feed kit T2 Replacement time of the fuser 54 unit 55 Replacement time of the laser unit 56 Back cover opened 57 Paper jam (Duplex tray) 58 Fuser unit failure Refer Error to: codes Problem 3-12 59 Fuser unit failure (Detect fuser failure at start-up) 3-12 63 Replace toner or ...
...user to quickly find out the problem. 3.1 Error Indication Error codes Problem 1E Replacement time of the drum unit 1F Two or more optional trays are installed 24 Internal temperature sensor failure 35 EEPROM of main PCB failure 36 HVPS PCB during standby failure Main PCB RAM failure ... of the paper feed kit T2 Replacement time of the fuser 54 unit 55 Replacement time of the laser unit 56 Back cover opened 57 Paper jam (Duplex tray) 58 Fuser unit failure Refer Error to: codes Problem 3-12 59 Fuser unit failure (Detect fuser failure at start-up) 3-12 63 Replace toner or ...


