
Users Manual - English
Page 4
... available for purchase.) In USA: In Canada: 1-888-879-3232 (voice) 1-800-947-1445 (fax) http://www.brothermall.com 1-877-BROTHER (voice) Description Toner Cartridge Drum Unit External Wireless Print/Scan Server (Option) External Print Server (Option) User's Guide Quick Setup Guide Item TN-350 (Prints up ... for USA and Canada) LF6552002 (French for Canada) LF6557001 (English for USA and Canada) LF6557002 (French for Canada) ii Brother fax back system (USA only) Brother has installed an easy-to-use fax back system, so you can visit us online for a complete selection of fax back subjects...
... available for purchase.) In USA: In Canada: 1-888-879-3232 (voice) 1-800-947-1445 (fax) http://www.brothermall.com 1-877-BROTHER (voice) Description Toner Cartridge Drum Unit External Wireless Print/Scan Server (Option) External Print Server (Option) User's Guide Quick Setup Guide Item TN-350 (Prints up ... for USA and Canada) LF6552002 (French for Canada) LF6557001 (English for USA and Canada) LF6557002 (French for Canada) ii Brother fax back system (USA only) Brother has installed an easy-to-use fax back system, so you can visit us online for a complete selection of fax back subjects...
Users Manual - English
Page 6
...DCP and 1-800-276-7746 for the cost of the serial number). This limited warranty is VOID if this warranty and if you first reported the problem to Brother... Items is made by Brother in its Authorized Service Center will be required to deliver (by this warranty. Brother® One Year Limited Warranty and ...cartridges, refill ribbons, therma PLUS paper and thermal paper. • Except as otherwise provided herein, Brother warrants that expired in materials or workmanship. (6)Normal Periodic Maintenance Items, such as Paper Feeding Kit, Fuser and Laser Units. What Brother...
...DCP and 1-800-276-7746 for the cost of the serial number). This limited warranty is VOID if this warranty and if you first reported the problem to Brother... Items is made by Brother in its Authorized Service Center will be required to deliver (by this warranty. Brother® One Year Limited Warranty and ...cartridges, refill ribbons, therma PLUS paper and thermal paper. • Except as otherwise provided herein, Brother warrants that expired in materials or workmanship. (6)Normal Periodic Maintenance Items, such as Paper Feeding Kit, Fuser and Laser Units. What Brother...
Users Manual - English
Page 8
... support: support@brother.ca or browse Brother's Web Site: www.brother.com Brother International Corporation (Canada) Ltd. 1 Rue Hôtel de Ville Dollard-Des-Ormeaux, QC H9B 3H6 vi BROTHER MULTIFUNCTION CENTER/FACSIMILE...Brother International Corporation (Canada) Ltd. ("Brother"), or its Authorized Service Centers, Distributors, Dealers, Agents or employees, shall create another warranty or modify this warranty. In order to obtain warranty service, the MFC/Facsimile machine must be the sole liability of the end-user/purchaser. For laser products: Failure to remove the Toner Cartridge...
... support: support@brother.ca or browse Brother's Web Site: www.brother.com Brother International Corporation (Canada) Ltd. 1 Rue Hôtel de Ville Dollard-Des-Ormeaux, QC H9B 3H6 vi BROTHER MULTIFUNCTION CENTER/FACSIMILE...Brother International Corporation (Canada) Ltd. ("Brother"), or its Authorized Service Centers, Distributors, Dealers, Agents or employees, shall create another warranty or modify this warranty. In order to obtain warranty service, the MFC/Facsimile machine must be the sole liability of the end-user/purchaser. For laser products: Failure to remove the Toner Cartridge...
Users Manual - English
Page 12
... device 5-2 International Energy Star® Compliance Statement 5-2 Laser safety 5-2 FDA regulations 5-2 Important safety instructions 5-3 Trademarks 5-4 6 Troubleshooting and routine maintenance Troubleshooting 6-1 Error messages 6-1 Document jams 6-3 Paper jams ...6-4 If you are having difficulty with your DCP 6-8 Improving ...DCP 6-15 Routine maintenance 6-16 Cleaning the outside of the DCP 6-16 Cleaning the scanner glass 6-17 Cleaning the laser scanner window 6-17 Cleaning the corona wire 6-19 Replacing the toner cartridge (TN-350 6-19 How to replace the toner cartridge...
... device 5-2 International Energy Star® Compliance Statement 5-2 Laser safety 5-2 FDA regulations 5-2 Important safety instructions 5-3 Trademarks 5-4 6 Troubleshooting and routine maintenance Troubleshooting 6-1 Error messages 6-1 Document jams 6-3 Paper jams ...6-4 If you are having difficulty with your DCP 6-8 Improving ...DCP 6-15 Routine maintenance 6-16 Cleaning the outside of the DCP 6-16 Cleaning the scanner glass 6-17 Cleaning the laser scanner window 6-17 Cleaning the corona wire 6-19 Replacing the toner cartridge (TN-350 6-19 How to replace the toner cartridge...
Users Manual - English
Page 41
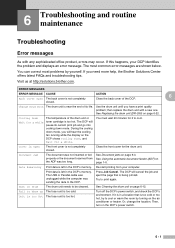
... drum unit until you need more help, the Brother Solutions Center offers latest FAQs and troubleshooting tips. The DCP will pause its life. Press Job Cancel. The DCP will hear the cooling fan running while the display... for a while The temperature of the drum unit or toner cartridge is near the end of the DCP. Turn off the DCP's power switch, and check the DCP's environment. You can correct most common error messages are shown .... 6 Troubleshooting and routine maintenance Troubleshooting Error messages As with a new one. Data Remaining Print data is left in the...
... drum unit until you need more help, the Brother Solutions Center offers latest FAQs and troubleshooting tips. The DCP will pause its life. Press Job Cancel. The DCP will hear the cooling fan running while the display... for a while The temperature of the drum unit or toner cartridge is near the end of the DCP. Turn off the DCP's power switch, and check the DCP's environment. You can correct most common error messages are shown .... 6 Troubleshooting and routine maintenance Troubleshooting Error messages As with a new one. Data Remaining Print data is left in the...
Users Manual - English
Page 42
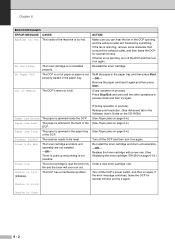
... outlet, and then leave the DCP for several minutes. If the fan is not properly loaded in the paper tray. Remove the paper and load it on again. Paper Jam Tray The paper is full. Replace the toner cartridge with a new one. (See Replacing the toner cartridge (TN-350) on again, ...If the error message continues, leave the DCP for several minutes and try again. Out of Memory The DCP's memory is jammed in process finish and then try it again...
... outlet, and then leave the DCP for several minutes. If the fan is not properly loaded in the paper tray. Remove the paper and load it on again. Paper Jam Tray The paper is full. Replace the toner cartridge with a new one. (See Replacing the toner cartridge (TN-350) on again, ...If the error message continues, leave the DCP for several minutes and try again. Out of Memory The DCP's memory is jammed in process finish and then try it again...
Users Manual - English
Page 44
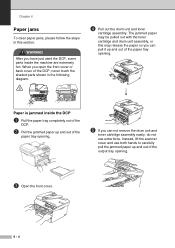
... scanner cover and use extra force. When you can not remove the drum unit and toner cartridge assembly easily, do not use both hands to carefully pull the jammed paper up and out of the DCP, never touch the shaded parts shown in this may release the paper so you open the... of the output tray opening . The jammed paper may be pulled out with the toner cartridge and drum unit assembly, or this section. Paper is jammed inside the DCP 1 Pull the paper tray completely out of the DCP. 2 Pull the jammed paper up and out of the paper tray opening . 3 Open the front...
... scanner cover and use extra force. When you can not remove the drum unit and toner cartridge assembly easily, do not use both hands to carefully pull the jammed paper up and out of the DCP, never touch the shaded parts shown in this may release the paper so you open the... of the output tray opening . The jammed paper may be pulled out with the toner cartridge and drum unit assembly, or this section. Paper is jammed inside the DCP 1 Pull the paper tray completely out of the DCP. 2 Pull the jammed paper up and out of the paper tray opening . 3 Open the front...
Users Manual - English
Page 45
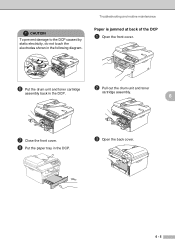
cartridge assembly. 6 7 Close the front cover. 8 Put the paper tray in the following diagram. CAUTION To prevent damage to the DCP caused by static electricity, do not touch the electrodes shown in the DCP. 3 Open the back cover. 6 - 5 Troubleshooting and routine maintenance Paper is jammed at back of the DCP 1 Open the front cover. 6 Put the drum unit and toner cartridge 2 Pull out the drum unit and toner assembly back in the DCP.
cartridge assembly. 6 7 Close the front cover. 8 Put the paper tray in the following diagram. CAUTION To prevent damage to the DCP caused by static electricity, do not touch the electrodes shown in the DCP. 3 Open the back cover. 6 - 5 Troubleshooting and routine maintenance Paper is jammed at back of the DCP 1 Open the front cover. 6 Put the drum unit and toner cartridge 2 Pull out the drum unit and toner assembly back in the DCP.

Users Manual - English
Page 46
Chapter 6 4 Pull the tab toward you gently pull out the paper with one hand as you to open the rear chute cover. 7 Put the drum unit and toner cartridge assembly back into the DCP. 8 Close the front cover. 5 Pull the jammed paper out of the fuser unit. If the jammed paper cannot be pulled out easily, push down on the blue tab with the other hand. 6 Close the back cover. 6 - 6
Chapter 6 4 Pull the tab toward you gently pull out the paper with one hand as you to open the rear chute cover. 7 Put the drum unit and toner cartridge assembly back into the DCP. 8 Close the front cover. 5 Pull the jammed paper out of the fuser unit. If the jammed paper cannot be pulled out easily, push down on the blue tab with the other hand. 6 Close the back cover. 6 - 6

Users Manual - English
Page 47
..., the lock lever will lift automatically. 2 Pull out the drum unit and toner cartridge assembly. 5 Put the drum unit and toner cartridge assembly back in the DCP. 6 3 Hold down the lock lever on the left and pull the toner cartridge out of the drum unit. Paper is any inside the drum unit and toner... cartridge assembly 1 Open the front cover. Take out the jammed paper if there is ...
..., the lock lever will lift automatically. 2 Pull out the drum unit and toner cartridge assembly. 5 Put the drum unit and toner cartridge assembly back in the DCP. 6 3 Hold down the lock lever on the left and pull the toner cartridge out of the drum unit. Paper is any inside the drum unit and toner... cartridge assembly 1 Open the front cover. Take out the jammed paper if there is ...

Users Manual - English
Page 48
... bottom margins in the Software User's Guide on page 6-19.) Printer Difficulties The DCP does not print. Vertical black lines. Select the 'Brother DCP-7020' and right-click. Your DCP can print 62 lines per page. DIFFICULTY SUGGESTIONS Printing Difficulties Poor print quality See ...8226; The DCP is plugged in copies. The DCP prints unexpectedly or it on . -OR- • The toner cartridge and drum unit are a restricted area that "Use Printer Offline" is not recognizing the DCP's input buffer full signal. Your computer is unchecked. The Brother Solutions Center...
... bottom margins in the Software User's Guide on page 6-19.) Printer Difficulties The DCP does not print. Vertical black lines. Select the 'Brother DCP-7020' and right-click. Your DCP can print 62 lines per page. DIFFICULTY SUGGESTIONS Printing Difficulties Poor print quality See ...8226; The DCP is plugged in copies. The DCP prints unexpectedly or it on . -OR- • The toner cartridge and drum unit are a restricted area that "Use Printer Offline" is not recognizing the DCP's input buffer full signal. Your computer is unchecked. The Brother Solutions Center...
Users Manual - English
Page 51
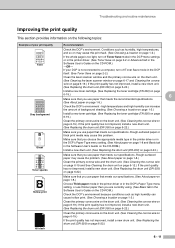
... the drum unit (DR-350) on the following topics: Examples of background shading. (See Choosing a location on page 1-2.) Install a new toner cartridge. (See Replacing the toner cartridge (TN-350) on page 6-19.) Clean the primary corona wire on the drum unit. (See Cleaning the corona wire on page 6-19.) If...page is not connected to a computer, turn off Toner Save mode in the DCP itself. (See Toner Save on page 2-2.) Clean the laser scanner window and the primary corona wire on the drum unit. (See Cleaning the laser scanner window on page 6-17 and Cleaning the corona wire on page 6-19.)...
... the drum unit (DR-350) on the following topics: Examples of background shading. (See Choosing a location on page 1-2.) Install a new toner cartridge. (See Replacing the toner cartridge (TN-350) on page 6-19.) Clean the primary corona wire on the drum unit. (See Cleaning the corona wire on page 6-19.) If...page is not connected to a computer, turn off Toner Save mode in the DCP itself. (See Toner Save on page 2-2.) Clean the laser scanner window and the primary corona wire on the drum unit. (See Cleaning the laser scanner window on page 6-17 and Cleaning the corona wire on page 6-19.)...

Users Manual - English
Page 52
... drum that is causing the poor print. 3 Turn the black gear on the drum as follows: 1 Remove the drum unit and toner cartridge assembly, and then remove the toner cartridge from the drum unit. 2 Position the print sample in . (78.5 mm) intervals Recommendation Cleaning the drum unit Dust, paper powder, glue, and...
... drum that is causing the poor print. 3 Turn the black gear on the drum as follows: 1 Remove the drum unit and toner cartridge assembly, and then remove the toner cartridge from the drum unit. 2 Position the print sample in . (78.5 mm) intervals Recommendation Cleaning the drum unit Dust, paper powder, glue, and...
Users Manual - English
Page 53
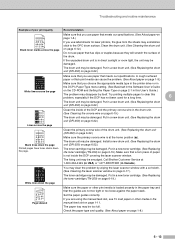
...manual feed slot on page 1-11. Put in a new toner cartridge. (See Replacing the toner cartridge (TN-350) on page 6-19.) Make sure that a torn piece of paper is at 1-800-284-4329 (in USA) or 1-877-BROTHER (in Canada). Set the paper guides correctly. Try printing multiple ...DCP has not been used for laser printers, the glue from the sheets may sometimes stick to clear this User's Guide.) The problem may be damaged. The paper tray may disappear by wiping the laser scanner window with a soft cloth. (See Cleaning the laser scanner window on page 6-17.) The toner cartridge...
...manual feed slot on page 1-11. Put in a new toner cartridge. (See Replacing the toner cartridge (TN-350) on page 6-19.) Make sure that a torn piece of paper is at 1-800-284-4329 (in USA) or 1-877-BROTHER (in Canada). Set the paper guides correctly. Try printing multiple ...DCP has not been used for laser printers, the glue from the sheets may sometimes stick to clear this User's Guide.) The problem may be damaged. The paper tray may disappear by wiping the laser scanner window with a soft cloth. (See Cleaning the laser scanner window on page 6-17.) The toner cartridge...

Users Manual - English
Page 55
... the front cover. 5 Remove the drum unit and toner cartridge assembly. Keep all separate parts and printed materials to Brother as part of the Exchange Service, pack only the DCP. If you do not pack the DCP properly, you are returning your DCP to use the packing materials that came with the original packing material...
... the front cover. 5 Remove the drum unit and toner cartridge assembly. Keep all separate parts and printed materials to Brother as part of the Exchange Service, pack only the DCP. If you do not pack the DCP properly, you are returning your DCP to use the packing materials that came with the original packing material...
Users Manual - English
Page 57
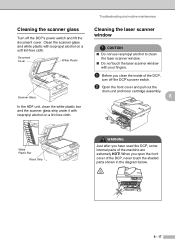
... isopropyl alcohol to clean the laser scanner window. ■ Do not touch the laser scanner window with isopropyl alcohol on a lint-free cloth. Clean the scanner glass and white plastic with your fingers. 1 Before you clean the inside of the DCP, turn off the DCP's power switch and lift the... a soft lint-free cloth. Cleaning the scanner glass Turn off the DCP's power switch. 2 Open the front cover and pull out the drum unit and toner cartridge assembly. 6 White Plastic Bar Glass Strip WARNING Just after you have used the DCP, some internal parts of the machine are extremely HOT!
... isopropyl alcohol to clean the laser scanner window. ■ Do not touch the laser scanner window with isopropyl alcohol on a lint-free cloth. Clean the scanner glass and white plastic with your fingers. 1 Before you clean the inside of the DCP, turn off the DCP's power switch and lift the... a soft lint-free cloth. Cleaning the scanner glass Turn off the DCP's power switch. 2 Open the front cover and pull out the drum unit and toner cartridge assembly. 6 White Plastic Bar Glass Strip WARNING Just after you have used the DCP, some internal parts of the machine are extremely HOT!
Users Manual - English
Page 58
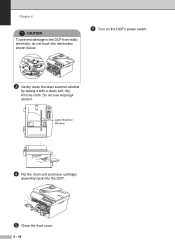
Do not use isopropyl alcohol. Chapter 6 CAUTION To prevent damage to the DCP from static electricity, do not touch the electrodes shown below. 6 Turn on the DCP's power switch. 3 Gently clean the laser scanner window by wiping it with a clean soft, dry, lint-free cloth. Laser Scanner Window 4 Put the drum unit and toner cartridge assembly back into the DCP. 5 Close the front cover. 6 - 18
Do not use isopropyl alcohol. Chapter 6 CAUTION To prevent damage to the DCP from static electricity, do not touch the electrodes shown below. 6 Turn on the DCP's power switch. 3 Gently clean the laser scanner window by wiping it with a clean soft, dry, lint-free cloth. Laser Scanner Window 4 Put the drum unit and toner cartridge assembly back into the DCP. 5 Close the front cover. 6 - 18
Users Manual - English
Page 59
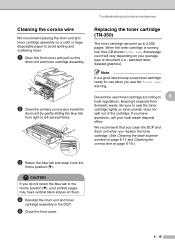
... out of document (i.e., standard letter, detailed graphics). CAUTION If you replace the toner cartridge. (See Cleaning the laser scanner window on page 6-17 and Cleaning the corona wire on them. 4 Reinstall the drum unit and toner cartridge assembly in the DCP. 5 Close the front cover. 6 - 19 If you see the Toner Low warning. We...
... out of document (i.e., standard letter, detailed graphics). CAUTION If you replace the toner cartridge. (See Cleaning the laser scanner window on page 6-17 and Cleaning the corona wire on them. 4 Reinstall the drum unit and toner cartridge assembly in the DCP. 5 Close the front cover. 6 - 19 If you see the Toner Low warning. We...

Users Manual - English
Page 60
... replace the toner cartridge WARNING Just after you use the DCP, some internal parts of disposable paper to avoid spilling and scattering the toner. ■ Handle the toner cartridge carefully. If toner scatters on your hands or clothes, immediately wipe it off or wash it according to the DCP from static electricity,... do not touch the electrodes shown below. CAUTION ■ Place the drum unit on the left and pull the toner cartridge out of the drum unit. 1 Open the front cover and pull ...
... replace the toner cartridge WARNING Just after you use the DCP, some internal parts of disposable paper to avoid spilling and scattering the toner. ■ Handle the toner cartridge carefully. If toner scatters on your hands or clothes, immediately wipe it off or wash it according to the DCP from static electricity,... do not touch the electrodes shown below. CAUTION ■ Place the drum unit on the left and pull the toner cartridge out of the drum unit. 1 Open the front cover and pull ...
Users Manual - English
Page 61
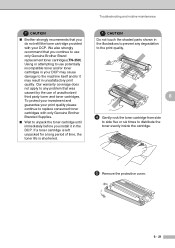
... attempting to use potentially incompatible toner and/or toner cartridges in the DCP. We also strongly recommend that you install it may result in the illustrations to distribute the toner evenly inside the cartridge. 5 Remove the protective cover. 6 - 21 Troubleshooting and routine maintenance CAUTION ■ Brother strongly recommends that you do not refill the...
... attempting to use potentially incompatible toner and/or toner cartridges in the DCP. We also strongly recommend that you install it may result in the illustrations to distribute the toner evenly inside the cartridge. 5 Remove the protective cover. 6 - 21 Troubleshooting and routine maintenance CAUTION ■ Brother strongly recommends that you do not refill the...


