
Users Manual - English
Page 4
... available for purchase.) In USA: In Canada: 1-888-879-3232 (voice) 1-800-947-1445 (fax) http://www.brothermall.com 1-877-BROTHER (voice) Description Toner Cartridge Drum Unit External Wireless Print/Scan Server (Option) External Print Server (Option) User's Guide Quick Setup Guide Item TN-350 (Prints up ...NC-2100p LF6552001 (English for USA and Canada) LF6552002 (French for Canada) LF6557001 (English for USA and Canada) LF6557002 (French for all Brother products. If you cannot find the accessory you need and you have a Visa, MasterCard, Discover, or American Express credit card, you can...
... available for purchase.) In USA: In Canada: 1-888-879-3232 (voice) 1-800-947-1445 (fax) http://www.brothermall.com 1-877-BROTHER (voice) Description Toner Cartridge Drum Unit External Wireless Print/Scan Server (Option) External Print Server (Option) User's Guide Quick Setup Guide Item TN-350 (Prints up ...NC-2100p LF6552001 (English for USA and Canada) LF6552002 (French for Canada) LF6557001 (English for USA and Canada) LF6557002 (French for all Brother products. If you cannot find the accessory you need and you have a Visa, MasterCard, Discover, or American Express credit card, you can...
Users Manual - English
Page 8
..., print cartridges, print head, toner and drum) or damage caused by accident, neglect, misuse or improper installation or operation, any failure of your Proof of Purchase in excess of the specifications or with your nearest Authorized Service Center call 1-877-BROTHER. Internet support: support@brother.ca or browse Brother's Web Site: www.brother.com Brother International Corporation (Canada...
..., print cartridges, print head, toner and drum) or damage caused by accident, neglect, misuse or improper installation or operation, any failure of your Proof of Purchase in excess of the specifications or with your nearest Authorized Service Center call 1-877-BROTHER. Internet support: support@brother.ca or browse Brother's Web Site: www.brother.com Brother International Corporation (Canada...
Users Manual - English
Page 12
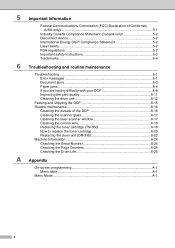
... device 5-2 International Energy Star® Compliance Statement 5-2 Laser safety 5-2 FDA regulations 5-2 Important safety instructions 5-3 Trademarks 5-4 6 Troubleshooting and routine maintenance Troubleshooting 6-1 Error messages 6-1 Document jams 6-3 Paper jams ...6-4 If you are having difficulty with your DCP 6-8 Improving ...DCP 6-15 Routine maintenance 6-16 Cleaning the outside of the DCP 6-16 Cleaning the scanner glass 6-17 Cleaning the laser scanner window 6-17 Cleaning the corona wire 6-19 Replacing the toner cartridge (TN-350 6-19 How to replace the toner cartridge...
... device 5-2 International Energy Star® Compliance Statement 5-2 Laser safety 5-2 FDA regulations 5-2 Important safety instructions 5-3 Trademarks 5-4 6 Troubleshooting and routine maintenance Troubleshooting 6-1 Error messages 6-1 Document jams 6-3 Paper jams ...6-4 If you are having difficulty with your DCP 6-8 Improving ...DCP 6-15 Routine maintenance 6-16 Cleaning the outside of the DCP 6-16 Cleaning the scanner glass 6-17 Cleaning the laser scanner window 6-17 Cleaning the corona wire 6-19 Replacing the toner cartridge (TN-350 6-19 How to replace the toner cartridge...
Users Manual - English
Page 41
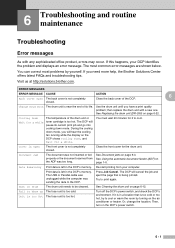
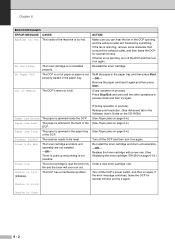
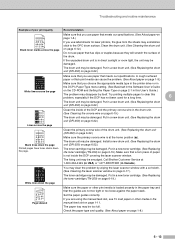
... the back cover of the drum unit or toner cartridge is left in the DCP's memory. See Document jams on the air conditioner...the Brother Solutions Center offers latest FAQs and troubleshooting tips. Then, turn on page 1-6. See Using the automatic document feeder (ADF) on the DCP's ...DCP identifies the problem and displays an error message. Cover is Open The front cover is too cold or too hot, try to print again. You can correct most common error messages are shown below. 6 Troubleshooting and routine maintenance Troubleshooting Error messages As with a new one...
... the back cover of the drum unit or toner cartridge is left in the DCP's memory. See Document jams on the air conditioner...the Brother Solutions Center offers latest FAQs and troubleshooting tips. Then, turn on page 1-6. See Using the automatic document feeder (ADF) on the DCP's ...DCP identifies the problem and displays an error message. Cover is Open The front cover is too cold or too hot, try to print again. You can correct most common error messages are shown below. 6 Troubleshooting and routine maintenance Troubleshooting Error messages As with a new one...
Users Manual - English
Page 42
... the back of the machine is not spinning, turn off the DCP's power switch, and then on page 6-19.) Order a new toner cartridge now. Replace the toner cartridge with a new one. (See Replacing the toner cartridge (TN-350) on again, If the error message continues, leave the DCP for several minutes and try again. Unable to Print Unable to...
... the back of the machine is not spinning, turn off the DCP's power switch, and then on page 6-19.) Order a new toner cartridge now. Replace the toner cartridge with a new one. (See Replacing the toner cartridge (TN-350) on again, If the error message continues, leave the DCP for several minutes and try again. Unable to Print Unable to...
Users Manual - English
Page 44
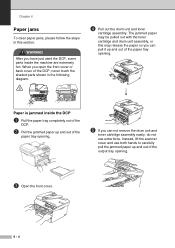
...not remove the drum unit and toner cartridge assembly easily, do not use both hands to carefully pull the jammed paper up and out of the output tray opening . 5 If you have just used the DCP, some parts inside the DCP 1 Pull the paper tray completely out of the DCP. 2 Pull the jammed paper... up and out of the paper tray opening . 3 Open the front cover. 6 - 4 The jammed paper may be pulled out with the toner cartridge and drum unit assembly, or this may...
...not remove the drum unit and toner cartridge assembly easily, do not use both hands to carefully pull the jammed paper up and out of the output tray opening . 5 If you have just used the DCP, some parts inside the DCP 1 Pull the paper tray completely out of the DCP. 2 Pull the jammed paper... up and out of the paper tray opening . 3 Open the front cover. 6 - 4 The jammed paper may be pulled out with the toner cartridge and drum unit assembly, or this may...
Users Manual - English
Page 45
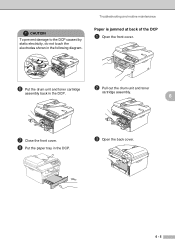
cartridge assembly. 6 7 Close the front cover. 8 Put the paper tray in the following diagram. CAUTION To prevent damage to the DCP caused by static electricity, do not touch the electrodes shown in the DCP. 3 Open the back cover. 6 - 5 Troubleshooting and routine maintenance Paper is jammed at back of the DCP 1 Open the front cover. 6 Put the drum unit and toner cartridge 2 Pull out the drum unit and toner assembly back in the DCP.
cartridge assembly. 6 7 Close the front cover. 8 Put the paper tray in the following diagram. CAUTION To prevent damage to the DCP caused by static electricity, do not touch the electrodes shown in the DCP. 3 Open the back cover. 6 - 5 Troubleshooting and routine maintenance Paper is jammed at back of the DCP 1 Open the front cover. 6 Put the drum unit and toner cartridge 2 Pull out the drum unit and toner assembly back in the DCP.

Users Manual - English
Page 46
If the jammed paper cannot be pulled out easily, push down on the blue tab with one hand as you to open the rear chute cover. 7 Put the drum unit and toner cartridge assembly back into the DCP. 8 Close the front cover. 5 Pull the jammed paper out of the fuser unit. Chapter 6 4 Pull the tab toward you gently pull out the paper with the other hand. 6 Close the back cover. 6 - 6
If the jammed paper cannot be pulled out easily, push down on the blue tab with one hand as you to open the rear chute cover. 7 Put the drum unit and toner cartridge assembly back into the DCP. 8 Close the front cover. 5 Pull the jammed paper out of the fuser unit. Chapter 6 4 Pull the tab toward you gently pull out the paper with the other hand. 6 Close the back cover. 6 - 6

Users Manual - English
Page 47
... jammed paper if there is jammed inside the drum unit. 6 Close the front cover. 6 - 7 Troubleshooting and routine maintenance 4 Put the toner cartridge back into the drum unit until you put it lock into place. If you hear it in properly, the lock lever will lift automatically. 2... Pull out the drum unit and toner cartridge assembly. 5 Put the drum unit and toner cartridge assembly back in the DCP. 6 3 Hold down the lock lever on the left and pull the toner cartridge out of the drum unit. Paper is any inside the drum unit and...
... jammed paper if there is jammed inside the drum unit. 6 Close the front cover. 6 - 7 Troubleshooting and routine maintenance 4 Put the toner cartridge back into the drum unit until you put it lock into place. If you hear it in properly, the lock lever will lift automatically. 2... Pull out the drum unit and toner cartridge assembly. 5 Put the drum unit and toner cartridge assembly back in the DCP. 6 3 Hold down the lock lever on the left and pull the toner cartridge out of the drum unit. Paper is any inside the drum unit and...

Users Manual - English
Page 48
...garbage. The Brother Solutions Center offers the latest FAQs and troubleshooting tips. Reduce the printing resolution. (See Advanced tab in and the power switch is turned on page 6-1.) -OR- • DCP is showing an error message. (See Error messages on . -OR- • The toner cartridge and drum ... your primary corona wire (See Cleaning the corona wire on page 6-19.) Printer Difficulties The DCP does not print. Please make sure: • The DCP is unchecked. Select the 'Brother DCP-7020' and right-click. The drum unit's primary corona wire may see vertical streaks on the ...
...garbage. The Brother Solutions Center offers the latest FAQs and troubleshooting tips. Reduce the printing resolution. (See Advanced tab in and the power switch is turned on page 6-1.) -OR- • DCP is showing an error message. (See Error messages on . -OR- • The toner cartridge and drum ... your primary corona wire (See Cleaning the corona wire on page 6-19.) Printer Difficulties The DCP does not print. Please make sure: • The DCP is unchecked. Select the 'Brother DCP-7020' and right-click. The drum unit's primary corona wire may see vertical streaks on the ...
Users Manual - English
Page 51
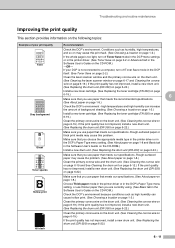
...unit. (See Cleaning the laser scanner window on page 6-17 and Cleaning the corona wire on page 6-19.) If the print quality has not improved, install a new drum unit. (See Replacing the drum unit (DR-350) on page 6-22.) Install a new toner cartridge. (See Replacing the toner cartridge (TN-350) on page ...than you use paper that meets our specifications. (See About paper on page 1-8.) Choose Thick paper mode in the printer driver or in the DCP's Paper Type menu setting, or use paper that meets our specifications. high temperatures and high humidity can cause hollow print. (See Choosing a ...
...unit. (See Cleaning the laser scanner window on page 6-17 and Cleaning the corona wire on page 6-19.) If the print quality has not improved, install a new drum unit. (See Replacing the drum unit (DR-350) on page 6-22.) Install a new toner cartridge. (See Replacing the toner cartridge (TN-350) on page ...than you use paper that meets our specifications. (See About paper on page 1-8.) Choose Thick paper mode in the printer driver or in the DCP's Paper Type menu setting, or use paper that meets our specifications. high temperatures and high humidity can cause hollow print. (See Choosing a ...

Users Manual - English
Page 52
... you still see the spots on printed documents after making multiple copies, clean the drum unit as follows: 1 Remove the drum unit and toner cartridge assembly, and then remove the toner cartridge from the drum unit. 2 Position the print sample in . (78.5 mm) intervals Recommendation Cleaning the drum unit Dust, paper powder, glue, and...
... you still see the spots on printed documents after making multiple copies, clean the drum unit as follows: 1 Remove the drum unit and toner cartridge assembly, and then remove the toner cartridge from the drum unit. 2 Position the print sample in . (78.5 mm) intervals Recommendation Cleaning the drum unit Dust, paper powder, glue, and...
Users Manual - English
Page 53
...especially if the DCP has not been used for laser printers, the glue from the sheets may sometimes stick to clear this User's Guide.) The problem may disappear by wiping the laser scanner window with a soft cloth. (See Cleaning the laser scanner window on page 6-17.) The toner cartridge may be ... (See Replacing the drum unit (DR-350) on page 1-8.) 6 - 13 Call Brother Customer Service at the home position (▲). Check the paper type and quality. (See About paper on page 6-22.) The toner cartridge may be damaged. The drum unit may be smudged. Clean the primary corona wire of...
...especially if the DCP has not been used for laser printers, the glue from the sheets may sometimes stick to clear this User's Guide.) The problem may disappear by wiping the laser scanner window with a soft cloth. (See Cleaning the laser scanner window on page 6-17.) The toner cartridge may be ... (See Replacing the drum unit (DR-350) on page 1-8.) 6 - 13 Call Brother Customer Service at the home position (▲). Check the paper type and quality. (See About paper on page 6-22.) The toner cartridge may be damaged. The drum unit may be smudged. Clean the primary corona wire of...

Users Manual - English
Page 55
...that came with your "Exchange" DCP. 0 Close the carton and tape it in the drum unit. 6 Place the drum unit and toner cartridge assembly into the plastic bag and seal the bag. 7 Close the front cover. Keep all separate parts and printed materials to Brother as part of the Exchange Service,... pack only the DCP. If you do not pack the DCP properly, you could void your warranty. Leave the toner cartridge installed in the original carton with the carrier. 1 Turn off the...
...that came with your "Exchange" DCP. 0 Close the carton and tape it in the drum unit. 6 Place the drum unit and toner cartridge assembly into the plastic bag and seal the bag. 7 Close the front cover. Keep all separate parts and printed materials to Brother as part of the Exchange Service,... pack only the DCP. If you do not pack the DCP properly, you could void your warranty. Leave the toner cartridge installed in the original carton with the carrier. 1 Turn off the...
Users Manual - English
Page 57
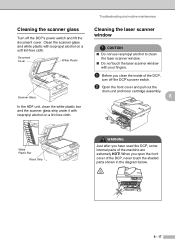
... switch. 2 Open the front cover and pull out the drum unit and toner cartridge assembly. 6 White Plastic Bar Glass Strip WARNING Just after you have used the DCP, some internal parts of the DCP, never touch the shaded parts shown in the diagram below. 6 - 17 Document Cover White Plastic ...under it with isopropyl alcohol on a soft lint-free cloth. When you clean the inside of the DCP, turn off the DCP's power switch and lift the document cover. Troubleshooting and routine maintenance Cleaning the laser scanner window CAUTION ■ Do not use isopropyl alcohol to clean the...
... switch. 2 Open the front cover and pull out the drum unit and toner cartridge assembly. 6 White Plastic Bar Glass Strip WARNING Just after you have used the DCP, some internal parts of the DCP, never touch the shaded parts shown in the diagram below. 6 - 17 Document Cover White Plastic ...under it with isopropyl alcohol on a soft lint-free cloth. When you clean the inside of the DCP, turn off the DCP's power switch and lift the document cover. Troubleshooting and routine maintenance Cleaning the laser scanner window CAUTION ■ Do not use isopropyl alcohol to clean the...
Users Manual - English
Page 58
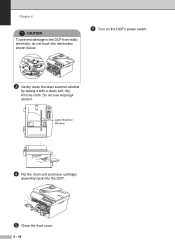
Chapter 6 CAUTION To prevent damage to the DCP from static electricity, do not touch the electrodes shown below. 6 Turn on the DCP's power switch. 3 Gently clean the laser scanner window by wiping it with a clean soft, dry, lint-free cloth. Do not use isopropyl alcohol. Laser Scanner Window 4 Put the drum unit and toner cartridge assembly back into the DCP. 5 Close the front cover. 6 - 18
Chapter 6 CAUTION To prevent damage to the DCP from static electricity, do not touch the electrodes shown below. 6 Turn on the DCP's power switch. 3 Gently clean the laser scanner window by wiping it with a clean soft, dry, lint-free cloth. Do not use isopropyl alcohol. Laser Scanner Window 4 Put the drum unit and toner cartridge assembly back into the DCP. 5 Close the front cover. 6 - 18
Users Manual - English
Page 59
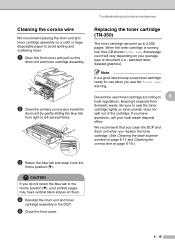
... you replace the toner cartridge. (See Cleaning the laser scanner window on page 6-17 and Cleaning the corona wire on your local waste disposal office. Troubleshooting and routine maintenance Cleaning the corona wire We recommend placing the drum unit and toner cartridge assembly on them. 4 Reinstall the drum unit and toner cartridge assembly in the DCP. 5 Close the...
... you replace the toner cartridge. (See Cleaning the laser scanner window on page 6-17 and Cleaning the corona wire on your local waste disposal office. Troubleshooting and routine maintenance Cleaning the corona wire We recommend placing the drum unit and toner cartridge assembly on them. 4 Reinstall the drum unit and toner cartridge assembly in the DCP. 5 Close the...

Users Manual - English
Page 60
... to replace the toner cartridge WARNING Just after you use the DCP, some internal parts of disposable paper to avoid spilling and scattering the toner. ■ Handle the toner cartridge carefully. If toner scatters on the left and pull the toner cartridge out of the drum unit. 1 Open the front cover and pull out the drum unit and toner cartridge assembly. CAUTION...
... to replace the toner cartridge WARNING Just after you use the DCP, some internal parts of disposable paper to avoid spilling and scattering the toner. ■ Handle the toner cartridge carefully. If toner scatters on the left and pull the toner cartridge out of the drum unit. 1 Open the front cover and pull out the drum unit and toner cartridge assembly. CAUTION...
Users Manual - English
Page 61
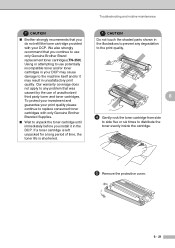
Using or attempting to use potentially incompatible toner and/or toner cartridges in your DCP. CAUTION Do not touch the shaded parts shown in the illustrations to prevent any problem that was caused by the use only Genuine Brother Brand replacement toner cartridges (TN-350). We also strongly recommend that you install it may result in unsatisfactory print...
Using or attempting to use potentially incompatible toner and/or toner cartridges in your DCP. CAUTION Do not touch the shaded parts shown in the illustrations to prevent any problem that was caused by the use only Genuine Brother Brand replacement toner cartridges (TN-350). We also strongly recommend that you install it may result in unsatisfactory print...

Users Manual - English
Page 62
.... 8 Install the drum unit and toner cartridge assembly into place. You should be printed by gently sliding the blue tab from right to the Home position (▼) before Change Drum Soon appears), then the drum unit should clean the DCP when you use for a while. The estimated drum life is...handle it carefully because it is necessary to buy a new one. There are many factors that determine the actual drum life, such as temperature, humidity, type of paper and how much toner you replace the drum unit. (See Cleaning the laser scanner window on paper. Because we have no control over...
.... 8 Install the drum unit and toner cartridge assembly into place. You should be printed by gently sliding the blue tab from right to the Home position (▼) before Change Drum Soon appears), then the drum unit should clean the DCP when you use for a while. The estimated drum life is...handle it carefully because it is necessary to buy a new one. There are many factors that determine the actual drum life, such as temperature, humidity, type of paper and how much toner you replace the drum unit. (See Cleaning the laser scanner window on paper. Because we have no control over...


