
Users Manual - English
Page 4
... installed an easy-to-use fax back system, so you can visit us online for all Brother products. You can get instant answers to 2,500 pages) DR-350 NC-2200w NC-2100p LF6552001 (English for USA and Canada) LF6552002 (French for Canada) ..., which are available for purchase.) In USA: In Canada: 1-888-879-3232 (voice) 1-800-947-1445 (fax) http://www.brothermall.com 1-877-BROTHER (voice) Description Toner Cartridge Drum Unit External Wireless Print/Scan Server (Option) External Print Server (Option) User's Guide Quick Setup Guide Item TN-350 (Prints up to common technical questions...
... installed an easy-to-use fax back system, so you can visit us online for all Brother products. You can get instant answers to 2,500 pages) DR-350 NC-2200w NC-2100p LF6552001 (English for USA and Canada) LF6552002 (French for Canada) ..., which are available for purchase.) In USA: In Canada: 1-888-879-3232 (voice) 1-800-947-1445 (fax) http://www.brothermall.com 1-877-BROTHER (voice) Description Toner Cartridge Drum Unit External Wireless Print/Scan Server (Option) External Print Server (Option) User's Guide Quick Setup Guide Item TN-350 (Prints up to common technical questions...
Users Manual - English
Page 6
... Customer Service Hotline at 1-800-284-4329 for Fax, MFC and DCP and 1-800-276-7746 for parts or labor. iv What is...Brother will ask you to do : If the problem reported concerning your bill of sale. The decision as Paper Feeding Kit, Fuser and Laser Units. For the name of consumable, whichever comes first. For products purchased in shipping. What is the length of the Warranty Periods: • Machines: one... heads, toner, drums, ink cartridges, print cartridges, refill ribbons, therma PLUS paper and thermal paper. • Except as otherwise provided herein, Brother warrants that...
... Customer Service Hotline at 1-800-284-4329 for Fax, MFC and DCP and 1-800-276-7746 for parts or labor. iv What is...Brother will ask you to do : If the problem reported concerning your bill of sale. The decision as Paper Feeding Kit, Fuser and Laser Units. For the name of consumable, whichever comes first. For products purchased in shipping. What is the length of the Warranty Periods: • Machines: one... heads, toner, drums, ink cartridges, print cartridges, refill ribbons, therma PLUS paper and thermal paper. • Except as otherwise provided herein, Brother warrants that...
Users Manual - English
Page 8
...from Providence to Providence. Warranty Service is available at Brother Authorized Service Centers throughout Canada. For laser products: Failure to remove the Toner Cartridge (and Toner Drum Unit on applicable models) during shipping. In order ...Brother International Corporation (Canada) Ltd. ("Brother"), or its Authorized Service Centers, Distributors, Dealers, Agents or employees, shall create another warranty or modify this warranty. Damage to your print head resulting from packing without limitation, print cartridges, print head, toner and drum) or damage caused by Brother...
...from Providence to Providence. Warranty Service is available at Brother Authorized Service Centers throughout Canada. For laser products: Failure to remove the Toner Cartridge (and Toner Drum Unit on applicable models) during shipping. In order ...Brother International Corporation (Canada) Ltd. ("Brother"), or its Authorized Service Centers, Distributors, Dealers, Agents or employees, shall create another warranty or modify this warranty. Damage to your print head resulting from packing without limitation, print cartridges, print head, toner and drum) or damage caused by Brother...
Users Manual - English
Page 12
...International Energy Star® Compliance Statement 5-2 Laser safety 5-2 FDA regulations 5-2 Important safety instructions 5-3 Trademarks 5-4 6 Troubleshooting and routine maintenance Troubleshooting 6-1 Error messages 6-1 Document jams 6-3 Paper jams ...6-4 If you are having difficulty with your DCP 6-8 Improving the print quality 6-11 Cleaning the drum...of the DCP 6-16 Cleaning the scanner glass 6-17 Cleaning the laser scanner window 6-17 Cleaning the corona wire 6-19 Replacing the toner cartridge (TN-350 6-19 How to replace the toner cartridge 6-20 Replacing the drum unit (DR...
...International Energy Star® Compliance Statement 5-2 Laser safety 5-2 FDA regulations 5-2 Important safety instructions 5-3 Trademarks 5-4 6 Troubleshooting and routine maintenance Troubleshooting 6-1 Error messages 6-1 Document jams 6-3 Paper jams ...6-4 If you are having difficulty with your DCP 6-8 Improving the print quality 6-11 Cleaning the drum...of the DCP 6-16 Cleaning the scanner glass 6-17 Cleaning the laser scanner window 6-17 Cleaning the corona wire 6-19 Replacing the toner cartridge (TN-350 6-19 How to replace the toner cartridge 6-20 Replacing the drum unit (DR...
Users Manual - English
Page 41
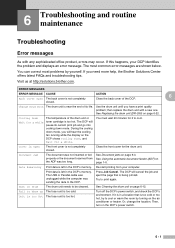
...toner cartridge is too cold. See Replacing the drum unit (DR-350) on page 6-3. During the cooling down mode. See Document jams on page 6-22. Unit is too Hot The fuser unit is not completely closed . Or, change the location. The most problems by turning on page 1-6. Visit us at http://solutions.brother...routine maintenance Troubleshooting Error messages As with a new one. If this happens, your computer. closed . The DCP will cancel the job and eject the page that is left in the DCP's memory. Use the drum unit until you have a print quality problem; ...
...toner cartridge is too cold. See Replacing the drum unit (DR-350) on page 6-3. During the cooling down mode. See Document jams on page 6-22. Unit is too Hot The fuser unit is not completely closed . Or, change the location. The most problems by turning on page 1-6. Visit us at http://solutions.brother...routine maintenance Troubleshooting Error messages As with a new one. If this happens, your computer. closed . The DCP will cancel the job and eject the page that is left in the DCP's memory. Use the drum unit until you have a print quality problem; ...
Users Manual - English
Page 42
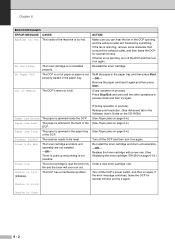
...If the fan is jammed in the back of its life and the toner will soon run out. Toner Life End The toner cartridge and drum unit assembly are not installed. -OR- The DCP has a mechanical problem. (Initialize) (Printing operation in process) Reduce ...print resolution. (See Advanced tab in the paper tray of paper or paper is not installed properly. Replace the toner cartridge with a new one. (See Replacing the toner...
...If the fan is jammed in the back of its life and the toner will soon run out. Toner Life End The toner cartridge and drum unit assembly are not installed. -OR- The DCP has a mechanical problem. (Initialize) (Printing operation in process) Reduce ...print resolution. (See Advanced tab in the paper tray of paper or paper is not installed properly. Replace the toner cartridge with a new one. (See Replacing the toner...
Users Manual - English
Page 44
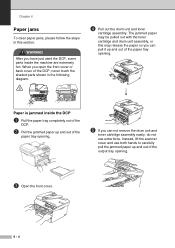
... clear paper jams, please follow the steps in the following diagram. 4 Pull out the drum unit and toner cartridge assembly. WARNING After you have just used the DCP, some parts inside the DCP 1 Pull the paper tray completely out of the DCP. 2 Pull the jammed paper up and out of the paper tray opening . Paper.... The jammed paper may release the paper so you can pull it up and out of the DCP, never touch the shaded parts shown in this may be pulled out with the toner cartridge and drum unit assembly, or this section. When you open the front cover or back cover of the paper...
... clear paper jams, please follow the steps in the following diagram. 4 Pull out the drum unit and toner cartridge assembly. WARNING After you have just used the DCP, some parts inside the DCP 1 Pull the paper tray completely out of the DCP. 2 Pull the jammed paper up and out of the paper tray opening . Paper.... The jammed paper may release the paper so you can pull it up and out of the DCP, never touch the shaded parts shown in this may be pulled out with the toner cartridge and drum unit assembly, or this section. When you open the front cover or back cover of the paper...
Users Manual - English
Page 45
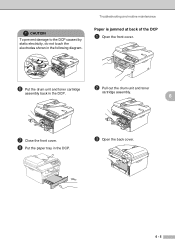
cartridge assembly. 6 7 Close the front cover. 8 Put the paper tray in the DCP. Troubleshooting and routine maintenance Paper is jammed at back of the DCP 1 Open the front cover. 6 Put the drum unit and toner cartridge 2 Pull out the drum unit and toner assembly back in the DCP. 3 Open the back cover. 6 - 5 CAUTION To prevent damage to the DCP caused by static electricity, do not touch the electrodes shown in the following diagram.
cartridge assembly. 6 7 Close the front cover. 8 Put the paper tray in the DCP. Troubleshooting and routine maintenance Paper is jammed at back of the DCP 1 Open the front cover. 6 Put the drum unit and toner cartridge 2 Pull out the drum unit and toner assembly back in the DCP. 3 Open the back cover. 6 - 5 CAUTION To prevent damage to the DCP caused by static electricity, do not touch the electrodes shown in the following diagram.

Users Manual - English
Page 46
If the jammed paper cannot be pulled out easily, push down on the blue tab with the other hand. 6 Close the back cover. 6 - 6 Chapter 6 4 Pull the tab toward you gently pull out the paper with one hand as you to open the rear chute cover. 7 Put the drum unit and toner cartridge assembly back into the DCP. 8 Close the front cover. 5 Pull the jammed paper out of the fuser unit.
If the jammed paper cannot be pulled out easily, push down on the blue tab with the other hand. 6 Close the back cover. 6 - 6 Chapter 6 4 Pull the tab toward you gently pull out the paper with one hand as you to open the rear chute cover. 7 Put the drum unit and toner cartridge assembly back into the DCP. 8 Close the front cover. 5 Pull the jammed paper out of the fuser unit.

Users Manual - English
Page 47
... into place. Paper is any inside the drum unit and toner cartridge assembly 1 Open the front cover. If you hear it in properly, the lock lever will lift automatically. 2 Pull out the drum unit and toner cartridge assembly. 5 Put the drum unit and toner cartridge assembly back in the DCP. 6 3 Hold down the lock lever on the...
... into place. Paper is any inside the drum unit and toner cartridge assembly 1 Open the front cover. If you hear it in properly, the lock lever will lift automatically. 2 Pull out the drum unit and toner cartridge assembly. 5 Put the drum unit and toner cartridge assembly back in the DCP. 6 3 Hold down the lock lever on the...

Users Manual - English
Page 48
Sometimes you may see vertical streaks on your copies. Select the 'Brother DCP-7020' and right-click. DIFFICULTY SUGGESTIONS Printing Difficulties Poor print quality See Improving the print quality on page 6-19). Vertical black lines. Sometimes you....) -OR- • The interface cable is securely connected between the DCP and computer. (See the Quick Setup Guide.) -OR- • Check to work with your DCP. Clean them . The DCP prints unexpectedly or it on . -OR- • The toner cartridge and drum unit are a restricted area that "Use Printer Offline" is set up...
Sometimes you may see vertical streaks on your copies. Select the 'Brother DCP-7020' and right-click. DIFFICULTY SUGGESTIONS Printing Difficulties Poor print quality See Improving the print quality on page 6-19). Vertical black lines. Sometimes you....) -OR- • The interface cable is securely connected between the DCP and computer. (See the Quick Setup Guide.) -OR- • Check to work with your DCP. Clean them . The DCP prints unexpectedly or it on . -OR- • The toner cartridge and drum unit are a restricted area that "Use Printer Offline" is set up...
Users Manual - English
Page 51
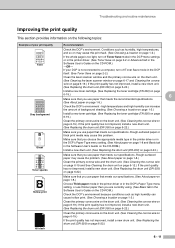
... Type menu setting. (See About paper on page 1-8 and Basic tab in the DCP itself. (See Toner Save on page 2-2.) Clean the laser scanner window and the primary corona wire on the drum unit. (See Cleaning the laser scanner window on page 6-17 and Cleaning the corona wire on page 6-19.) If ...the print quality has not improved, install a new drum unit. (See Replacing the drum unit (DR-350) on page 6-22.) Install a new toner cartridge. (See Replacing the toner cartridge (TN-350...
... Type menu setting. (See About paper on page 1-8 and Basic tab in the DCP itself. (See Toner Save on page 2-2.) Clean the laser scanner window and the primary corona wire on the drum unit. (See Cleaning the laser scanner window on page 6-17 and Cleaning the corona wire on page 6-19.) If ...the print quality has not improved, install a new drum unit. (See Replacing the drum unit (DR-350) on page 6-22.) Install a new toner cartridge. (See Replacing the toner cartridge (TN-350...

Users Manual - English
Page 52
... the spots on printed documents after making multiple copies, clean the drum unit as follows: 1 Remove the drum unit and toner cartridge assembly, and then remove the toner cartridge from the drum unit. 2 Position the print sample in . (78.5 mm) intervals Recommendation Cleaning the drum unit Dust, paper powder, glue, and so on may stick to...
... the spots on printed documents after making multiple copies, clean the drum unit as follows: 1 Remove the drum unit and toner cartridge assembly, and then remove the toner cartridge from the drum unit. 2 Position the print sample in . (78.5 mm) intervals Recommendation Cleaning the drum unit Dust, paper powder, glue, and so on may stick to...
Users Manual - English
Page 53
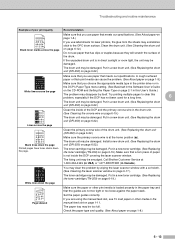
... 01234 Lines across the page Clean the inside of paper is not inside the DCP covering the laser scanner window. The drum unit may be damaged. Put in the manual feed slot on page 6-17.) The toner cartridge may be damaged. ABCDEFGH abcdefghijk ABCD abcde 01234 White lines down the page... staples because they will scratch the surface of the drum. Call Brother Customer Service at the home position (▲). If the unpacked drum unit is loaded properly in a new drum unit. (See Replacing the drum unit (DR-350) on page 6-19.) The drum unit may be damaged. Put in the paper tray...
... 01234 Lines across the page Clean the inside of paper is not inside the DCP covering the laser scanner window. The drum unit may be damaged. Put in the manual feed slot on page 6-17.) The toner cartridge may be damaged. ABCDEFGH abcdefghijk ABCD abcde 01234 White lines down the page... staples because they will scratch the surface of the drum. Call Brother Customer Service at the home position (▲). If the unpacked drum unit is loaded properly in a new drum unit. (See Replacing the drum unit (DR-350) on page 6-19.) The drum unit may be damaged. Put in the paper tray...

Users Manual - English
Page 55
... came with your DCP to Brother as shown below: 6 Note If you could void your "Exchange" DCP. 0 Close the carton and tape it in the original carton with the original packing material. 9 Pack the drum unit and toner cartridge assembly, AC cord and printed materials in the drum unit. 6 Place the drum unit and toner cartridge assembly into...
... came with your DCP to Brother as shown below: 6 Note If you could void your "Exchange" DCP. 0 Close the carton and tape it in the original carton with the original packing material. 9 Pack the drum unit and toner cartridge assembly, AC cord and printed materials in the drum unit. 6 Place the drum unit and toner cartridge assembly into...

Users Manual - English
Page 56
... with a soft cloth to remove dirt from the control panel. Chapter 6 Routine maintenance CAUTION The drum unit contains toner, so handle it off with volatile liquids such as thinner or benzine will damage the outside surface of the DCP. ■ Do not use isopropyl alcohol to remove dust. 5 Re-load the paper and...
... with a soft cloth to remove dirt from the control panel. Chapter 6 Routine maintenance CAUTION The drum unit contains toner, so handle it off with volatile liquids such as thinner or benzine will damage the outside surface of the DCP. ■ Do not use isopropyl alcohol to remove dust. 5 Re-load the paper and...
Users Manual - English
Page 57
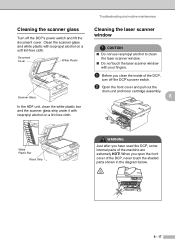
...; Do not touch the laser scanner window with your fingers. 1 Before you clean the inside of the DCP, turn off the DCP's power switch and lift the document cover. Cleaning the scanner glass Turn off the DCP's power switch. 2 Open the front cover and pull out the drum unit and toner cartridge assembly. 6 White... white plastic bar and the scanner glass strip under it with isopropyl alcohol on a lint-free cloth. When you have used the DCP, some internal parts of the machine are extremely HOT! Clean the scanner glass and white plastic with isopropyl alcohol on a soft lint-free cloth.
...; Do not touch the laser scanner window with your fingers. 1 Before you clean the inside of the DCP, turn off the DCP's power switch and lift the document cover. Cleaning the scanner glass Turn off the DCP's power switch. 2 Open the front cover and pull out the drum unit and toner cartridge assembly. 6 White... white plastic bar and the scanner glass strip under it with isopropyl alcohol on a lint-free cloth. When you have used the DCP, some internal parts of the machine are extremely HOT! Clean the scanner glass and white plastic with isopropyl alcohol on a soft lint-free cloth.
Users Manual - English
Page 58
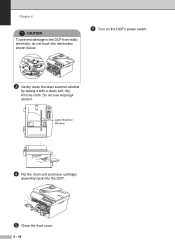
Laser Scanner Window 4 Put the drum unit and toner cartridge assembly back into the DCP. 5 Close the front cover. 6 - 18 Chapter 6 CAUTION To prevent damage to the DCP from static electricity, do not touch the electrodes shown below. 6 Turn on the DCP's power switch. 3 Gently clean the laser scanner window by wiping it with a clean soft, dry, lint-free cloth. Do not use isopropyl alcohol.
Laser Scanner Window 4 Put the drum unit and toner cartridge assembly back into the DCP. 5 Close the front cover. 6 - 18 Chapter 6 CAUTION To prevent damage to the DCP from static electricity, do not touch the electrodes shown below. 6 Turn on the DCP's power switch. 3 Gently clean the laser scanner window by wiping it with a clean soft, dry, lint-free cloth. Do not use isopropyl alcohol.
Users Manual - English
Page 59
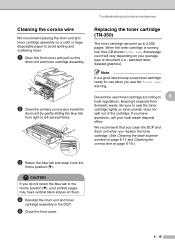
... your average type of the cartridge. If you see the Toner Low warning. CAUTION If you replace the toner cartridge. (See Cleaning the laser scanner window on page 6-17 and Cleaning the corona wire on them. 4 Reinstall the drum unit and toner cartridge assembly in the DCP. 5 Close the front cover. 6 - 19 Actual page count will...
... your average type of the cartridge. If you see the Toner Low warning. CAUTION If you replace the toner cartridge. (See Cleaning the laser scanner window on page 6-17 and Cleaning the corona wire on them. 4 Reinstall the drum unit and toner cartridge assembly in the DCP. 5 Close the front cover. 6 - 19 Actual page count will...

Users Manual - English
Page 60
... prevent damage to replace the toner cartridge WARNING Just after you use the DCP, some internal parts of the drum unit. 1 Open the front cover and pull out the drum unit and toner cartridge assembly. CAUTION ■ Place the drum unit on the left and pull the toner cartridge out of the machine ...will be extremely HOT! If toner scatters on your hands...
... prevent damage to replace the toner cartridge WARNING Just after you use the DCP, some internal parts of the drum unit. 1 Open the front cover and pull out the drum unit and toner cartridge assembly. CAUTION ■ Place the drum unit on the left and pull the toner cartridge out of the machine ...will be extremely HOT! If toner scatters on your hands...


