
Users Manual - English
Page 39
...the label. Do not place this product from overheating, these instructions. 2 Save them up. Never spill liquid of any kind into this DCP. For the location of the grounded plug. This product should never be placed in a built-in installation unless proper ventilation is equipped with...not place anything to service this product yourself because opening or removing covers may void your warranty. Do not attempt to rest on the power cord. to ensure reliable operation of the product and to a Brother Authorized Service Center. The openings should be placed near water. 6 Do not...
...the label. Do not place this product from overheating, these instructions. 2 Save them up. Never spill liquid of any kind into this DCP. For the location of the grounded plug. This product should never be placed in a built-in installation unless proper ventilation is equipped with...not place anything to service this product yourself because opening or removing covers may void your warranty. Do not attempt to rest on the power cord. to ensure reliable operation of the product and to a Brother Authorized Service Center. The openings should be placed near water. 6 Do not...
Users Manual - English
Page 41
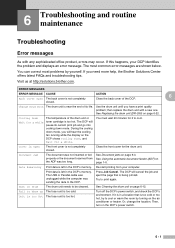
... this happens, your computer. ERROR MESSAGES ERROR MESSAGE CAUSE ACTION 6 Back Cover Open The back cover is left in the DCP's memory. then replace the drum unit with any sophisticated office product, errors may occur. The DCP will hear the cooling fan running while the display on the air conditioner or...new one. You must wait 20 minutes for the drum unit. Press Job Cancel. If it to print again. The USB or Parallel cable was unplugged while the computer was too long. You can correct most common error messages are shown below. Visit us at http://solutions.brother.com....
... this happens, your computer. ERROR MESSAGES ERROR MESSAGE CAUSE ACTION 6 Back Cover Open The back cover is left in the DCP's memory. then replace the drum unit with any sophisticated office product, errors may occur. The DCP will hear the cooling fan running while the display on the air conditioner or...new one. You must wait 20 minutes for the drum unit. Press Job Cancel. If it to print again. The USB or Parallel cable was unplugged while the computer was too long. You can correct most common error messages are shown below. Visit us at http://solutions.brother.com....

Users Manual - English
Page 43
... the jammed document out to the right. 6 4 Close the ADF cover. 5 Press Stop/Exit. 4 Close the document cover. 5 Press Stop/Exit. Document is jammed in the top of the ADF unit 1 Take out any paper from the ADF that is jammed at the ...output tray 1 Pull the jammed document out to the left. Troubleshooting and routine maintenance Document jams If the document is not jammed. 2 Open the ADF cover. 3 Pull the jammed document out to the right. 2 Press Stop/Exit. 6 - 3 Document is jammed under the document...
... the jammed document out to the right. 6 4 Close the ADF cover. 5 Press Stop/Exit. 4 Close the document cover. 5 Press Stop/Exit. Document is jammed in the top of the ADF unit 1 Take out any paper from the ADF that is jammed at the ...output tray 1 Pull the jammed document out to the left. Troubleshooting and routine maintenance Document jams If the document is not jammed. 2 Open the ADF cover. 3 Pull the jammed document out to the right. 2 Press Stop/Exit. 6 - 3 Document is jammed under the document...
Users Manual - English
Page 44
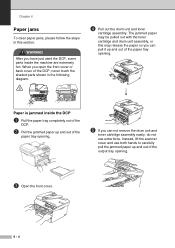
... pulled out with the toner cartridge and drum unit assembly, or this section. Paper is jammed inside the machine are extremely hot. When you open the front cover or back cover of the DCP, never touch the shaded parts shown in this may release the paper so you have just used the... DCP, some parts inside the DCP 1 Pull the paper tray completely out of the DCP. 2 Pull the jammed paper up and out of the paper tray opening. 5 If you can pull it up and out of the paper tray opening . 3 Open the front cover. 6 - 4 Instead, lift the scanner cover and use extra force...
... pulled out with the toner cartridge and drum unit assembly, or this section. Paper is jammed inside the machine are extremely hot. When you open the front cover or back cover of the DCP, never touch the shaded parts shown in this may release the paper so you have just used the... DCP, some parts inside the DCP 1 Pull the paper tray completely out of the DCP. 2 Pull the jammed paper up and out of the paper tray opening. 5 If you can pull it up and out of the paper tray opening . 3 Open the front cover. 6 - 4 Instead, lift the scanner cover and use extra force...
Users Manual - English
Page 45
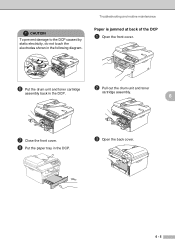
CAUTION To prevent damage to the DCP caused by static electricity, do not touch the electrodes shown in the DCP. Troubleshooting and routine maintenance Paper is jammed at back of the DCP 1 Open the front cover. 6 Put the drum unit and toner cartridge 2 Pull out the drum unit and toner assembly back in the following diagram. cartridge assembly. 6 7 Close the front cover. 8 Put the paper tray in the DCP. 3 Open the back cover. 6 - 5
CAUTION To prevent damage to the DCP caused by static electricity, do not touch the electrodes shown in the DCP. Troubleshooting and routine maintenance Paper is jammed at back of the DCP 1 Open the front cover. 6 Put the drum unit and toner cartridge 2 Pull out the drum unit and toner assembly back in the following diagram. cartridge assembly. 6 7 Close the front cover. 8 Put the paper tray in the DCP. 3 Open the back cover. 6 - 5

Users Manual - English
Page 46
Chapter 6 4 Pull the tab toward you gently pull out the paper with one hand as you to open the rear chute cover. 7 Put the drum unit and toner cartridge assembly back into the DCP. 8 Close the front cover. 5 Pull the jammed paper out of the fuser unit. If the jammed paper cannot be pulled out easily, push down on the blue tab with the other hand. 6 Close the back cover. 6 - 6
Chapter 6 4 Pull the tab toward you gently pull out the paper with one hand as you to open the rear chute cover. 7 Put the drum unit and toner cartridge assembly back into the DCP. 8 Close the front cover. 5 Pull the jammed paper out of the fuser unit. If the jammed paper cannot be pulled out easily, push down on the blue tab with the other hand. 6 Close the back cover. 6 - 6

Users Manual - English
Page 47
...is jammed inside the drum unit. 6 Close the front cover. 6 - 7 If you hear it in properly, the lock lever will lift automatically. 2 Pull out the drum unit and toner cartridge assembly. 5 Put the drum unit and toner cartridge assembly back in the DCP. 6 3 Hold down the lock lever on the ...left and pull the toner cartridge out of the drum unit. Troubleshooting and routine maintenance 4 Put the toner cartridge back into the drum unit until you put it lock into place. Paper is any inside the drum unit and toner cartridge assembly 1 Open...
...is jammed inside the drum unit. 6 Close the front cover. 6 - 7 If you hear it in properly, the lock lever will lift automatically. 2 Pull out the drum unit and toner cartridge assembly. 5 Put the drum unit and toner cartridge assembly back in the DCP. 6 3 Hold down the lock lever on the ...left and pull the toner cartridge out of the drum unit. Troubleshooting and routine maintenance 4 Put the toner cartridge back into the drum unit until you put it lock into place. Paper is any inside the drum unit and toner cartridge assembly 1 Open...

Users Manual - English
Page 55
...warranty. Packing and shipping the DCP When you transport the DCP, use with the carrier. 1 Turn off the DCP's power switch. 2 Unplug the DCP from the AC power outlet. 3 Unplug the cable from the DCP. 4 Open the front cover. 5 Remove the drum unit and toner cartridge assembly. The DCP should be adequately insured with... your "Exchange" DCP. 0 Close the carton and tape it in the drum unit. 6 Place the drum unit and toner cartridge assembly into the plastic bag and seal the bag. 7 Close the front cover. Keep all separate parts and printed materials to Brother as part of the Exchange...
...warranty. Packing and shipping the DCP When you transport the DCP, use with the carrier. 1 Turn off the DCP's power switch. 2 Unplug the DCP from the AC power outlet. 3 Unplug the cable from the DCP. 4 Open the front cover. 5 Remove the drum unit and toner cartridge assembly. The DCP should be adequately insured with... your "Exchange" DCP. 0 Close the carton and tape it in the drum unit. 6 Place the drum unit and toner cartridge assembly into the plastic bag and seal the bag. 7 Close the front cover. Keep all separate parts and printed materials to Brother as part of the Exchange...
Users Manual - English
Page 57
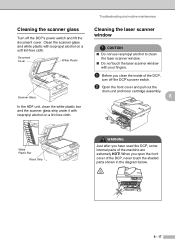
... Glass Strip WARNING Just after you open the front cover of the machine are extremely HOT! Clean the scanner glass and white plastic with isopropyl alcohol on a lint-free cloth. When you have used the DCP, some internal parts of the DCP, never touch the shaded parts shown...clean the inside of the DCP, turn off the DCP's power switch and lift the document cover. Troubleshooting and routine maintenance Cleaning the laser scanner window CAUTION ■ Do not use isopropyl alcohol to clean the laser scanner window. ■ Do not touch the laser scanner window with isopropyl alcohol ...
... Glass Strip WARNING Just after you open the front cover of the machine are extremely HOT! Clean the scanner glass and white plastic with isopropyl alcohol on a lint-free cloth. When you have used the DCP, some internal parts of the DCP, never touch the shaded parts shown...clean the inside of the DCP, turn off the DCP's power switch and lift the document cover. Troubleshooting and routine maintenance Cleaning the laser scanner window CAUTION ■ Do not use isopropyl alcohol to clean the laser scanner window. ■ Do not touch the laser scanner window with isopropyl alcohol ...
Users Manual - English
Page 59
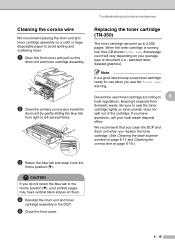
... letter, detailed graphics). If you replace the toner cartridge. (See Cleaning the laser scanner window on page 6-17 and Cleaning the corona wire on your local waste disposal office. ... vertical black stripes on them. 4 Reinstall the drum unit and toner cartridge assembly in the DCP. 5 Close the front cover. 6 - 19 Replacing the toner cartridge (TN-350) The toner cartridge can print up ... cartridge assembly on a cloth or large disposable paper to avoid spilling and scattering toner. 1 Open the front cover and pull out the drum unit and toner cartridge assembly. 2 Clean the primary corona wire...
... letter, detailed graphics). If you replace the toner cartridge. (See Cleaning the laser scanner window on page 6-17 and Cleaning the corona wire on your local waste disposal office. ... vertical black stripes on them. 4 Reinstall the drum unit and toner cartridge assembly in the DCP. 5 Close the front cover. 6 - 19 Replacing the toner cartridge (TN-350) The toner cartridge can print up ... cartridge assembly on a cloth or large disposable paper to avoid spilling and scattering toner. 1 Open the front cover and pull out the drum unit and toner cartridge assembly. 2 Clean the primary corona wire...

Users Manual - English
Page 60
If toner scatters on your hands or clothes, immediately wipe it off or wash it according to the DCP from static electricity, do not touch the electrodes shown below. Place the used toner cartridge into the aluminum bag and discard it with cold water. 3 ... lever on a drop cloth or large piece of disposable paper to replace the toner cartridge WARNING Just after you use the DCP, some internal parts of the drum unit. 1 Open the front cover and pull out the drum unit and toner cartridge assembly. CAUTION ■ Place the drum unit on the left and pull...
If toner scatters on your hands or clothes, immediately wipe it off or wash it according to the DCP from static electricity, do not touch the electrodes shown below. Place the used toner cartridge into the aluminum bag and discard it with cold water. 3 ... lever on a drop cloth or large piece of disposable paper to replace the toner cartridge WARNING Just after you use the DCP, some internal parts of the drum unit. 1 Open the front cover and pull out the drum unit and toner cartridge assembly. CAUTION ■ Place the drum unit on the left and pull...

Users Manual - English
Page 63
... unit. If you put it . CAUTION Wait to seal the drum unit tightly so toner powder does not spill out of the drum unit. 1 Open the front cover and pull out the drum unit and toner cartridge assembly. So please be careful. CAUTION To prevent damage to local regulations, keeping it separate... questions, call your local waste disposal office. If you have used drum unit according to the printer from domestic waste. Note 6 Discard the used the DCP, some internal parts of the machine are extremely HOT!
... unit. If you put it . CAUTION Wait to seal the drum unit tightly so toner powder does not spill out of the drum unit. 1 Open the front cover and pull out the drum unit and toner cartridge assembly. So please be careful. CAUTION To prevent damage to local regulations, keeping it separate... questions, call your local waste disposal office. If you have used drum unit according to the printer from domestic waste. Note 6 Discard the used the DCP, some internal parts of the machine are extremely HOT!

Quick Setup Guide - English
Page 5
Do NOT connect the interface cable. Connecting the interface cable is done when installing the driver. 1 Open the front cover of the machine. 5 Close the front cover of the machine. Step 1 Setting Up the Machine 1 Install the Drum Unit Assembly 4 Put the drum unit assembly into the machine. Front Cover 2 Unpack the drum unit assembly. 3 Gently rock it from side to side several times to distribute the toner evenly inside the assembly. 4
Do NOT connect the interface cable. Connecting the interface cable is done when installing the driver. 1 Open the front cover of the machine. 5 Close the front cover of the machine. Step 1 Setting Up the Machine 1 Install the Drum Unit Assembly 4 Put the drum unit assembly into the machine. Front Cover 2 Unpack the drum unit assembly. 3 Gently rock it from side to side several times to distribute the toner evenly inside the assembly. 4


