
Quick Setup Guide - English
Page 2
... and copyrighted works (For example, books, paintings, drawings, photos, fanciful characters, and so forth) owned by the developer of Microsoft Corporation. ii Pacesetter BES Lettering Instruction Manual Copyright © Copyright 2009 Pulse Microsystems Ltd. No part of this publication and the software may be used or copied only in accordance with the...
... and copyrighted works (For example, books, paintings, drawings, photos, fanciful characters, and so forth) owned by the developer of Microsoft Corporation. ii Pacesetter BES Lettering Instruction Manual Copyright © Copyright 2009 Pulse Microsystems Ltd. No part of this publication and the software may be used or copied only in accordance with the...

Users Manual - English
Page 1
Pacesetter BES Lettering Instruction Manual
Pacesetter BES Lettering Instruction Manual
Users Manual - English
Page 2
... identified by TM or tm are copyrighted by other product names are registered trademarks of those agreements. This instruction manual and software are trademarks of embroidery patterns without notice. Other patents pending. All other companies or persons, for ... paintings, drawings, photos, fanciful characters, and so forth) owned by the developer of their respective manufacturers. ii Pacesetter BES Lettering Instruction Manual Copyright © Copyright 2009 Pulse Microsystems Ltd. All rights reserved. Information in this document is furnished under a license agreement...
... identified by TM or tm are copyrighted by other product names are registered trademarks of those agreements. This instruction manual and software are trademarks of embroidery patterns without notice. Other patents pending. All other companies or persons, for ... paintings, drawings, photos, fanciful characters, and so forth) owned by the developer of their respective manufacturers. ii Pacesetter BES Lettering Instruction Manual Copyright © Copyright 2009 Pulse Microsystems Ltd. All rights reserved. Information in this document is furnished under a license agreement...

Users Manual - English
Page 4
2 Pacesetter BES Lettering Instruction Manual Creating Lettering 33 Creating Lettering 34 Normal Text Tool 34 Path Text Tool 35 Custom Shapes for Text on a Path 37 Vertical Text Frame 39 Circle Text Frame 40 Creating ... Text Width in the Circle Frame 46 Changing the Diameter of the Circle Frame 47 Working with Individual Letters 48 Adjusting the Space between Letters (Kerning 48 Moving Individual Letters 49 Resizing Individual Letters 49 Rotating Individual Letters 50 Working with Color 51 Changing the Color of a Text Segment 51 Creating Multi-color Text Segments...
2 Pacesetter BES Lettering Instruction Manual Creating Lettering 33 Creating Lettering 34 Normal Text Tool 34 Path Text Tool 35 Custom Shapes for Text on a Path 37 Vertical Text Frame 39 Circle Text Frame 40 Creating ... Text Width in the Circle Frame 46 Changing the Diameter of the Circle Frame 47 Working with Individual Letters 48 Adjusting the Space between Letters (Kerning 48 Moving Individual Letters 49 Resizing Individual Letters 49 Rotating Individual Letters 50 Working with Color 51 Changing the Color of a Text Segment 51 Creating Multi-color Text Segments...
Users Manual - English
Page 5
... 90 The Select Tool 90 Copying, Cutting, and Pasting Design Components 93 Aligning Items in the Design Horizontally and Vertically 95 Moving Parts of a Design Manually 96 Nudging Design Components 96 Deleting Design Components 97 Rotating Design Components 97 Working with the Color Palette 99 Selecting a Thread Chart 99 Searching for...
... 90 The Select Tool 90 Copying, Cutting, and Pasting Design Components 93 Aligning Items in the Design Horizontally and Vertically 95 Moving Parts of a Design Manually 96 Nudging Design Components 96 Deleting Design Components 97 Rotating Design Components 97 Working with the Color Palette 99 Selecting a Thread Chart 99 Searching for...
Users Manual - English
Page 6
4 Pacesetter BES Lettering Instruction Manual Special Design Tools 101 Merging Design Files 101 Add Designs Feature 103 Distorting Segments 105 Sequencing Outline Segments 109 Sequencing Segments 109 Inserting Segments Earlier in the Segment Sequence 110 Moving a Segment Forward or Backward 110 Moving a Segment to the Start or End of the Design 112 Moving a Segment to the nearest Matching Color Group 113 Printing Designs 116 Previewing a Design before Printing 116 Printing Design Worksheets 117 Changing the Print Settings 118 Glossary 121 Index 127
4 Pacesetter BES Lettering Instruction Manual Special Design Tools 101 Merging Design Files 101 Add Designs Feature 103 Distorting Segments 105 Sequencing Outline Segments 109 Sequencing Segments 109 Inserting Segments Earlier in the Segment Sequence 110 Moving a Segment Forward or Backward 110 Moving a Segment to the Start or End of the Design 112 Moving a Segment to the nearest Matching Color Group 113 Printing Designs 116 Previewing a Design before Printing 116 Printing Design Worksheets 117 Changing the Print Settings 118 Glossary 121 Index 127
Users Manual - English
Page 8
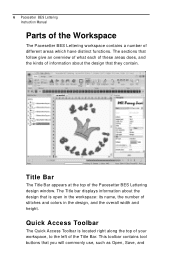
... that follow give an overview of what each of these areas does, and the kinds of the Pacesetter BES Lettering design window. 6 Pacesetter BES Lettering Instruction Manual Parts of the Workspace The Pacesetter BES Lettering workspace contains a number of the Title Bar. Quick Access Toolbar The Quick Access Toolbar is open in the workspace...
... that follow give an overview of what each of these areas does, and the kinds of the Pacesetter BES Lettering design window. 6 Pacesetter BES Lettering Instruction Manual Parts of the Workspace The Pacesetter BES Lettering workspace contains a number of the Title Bar. Quick Access Toolbar The Quick Access Toolbar is open in the workspace...
Users Manual - English
Page 10
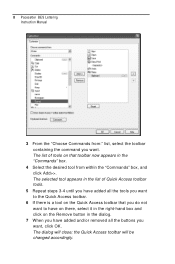
8 Pacesetter BES Lettering Instruction Manual 3 From the "Choose Commands from within the "Commands" box, and click Add>>. the Quick Access toolbar will close; The list of Quick Access toolbar tools. 5 ...
8 Pacesetter BES Lettering Instruction Manual 3 From the "Choose Commands from within the "Commands" box, and click Add>>. the Quick Access toolbar will close; The list of Quick Access toolbar tools. 5 ...
Users Manual - English
Page 12
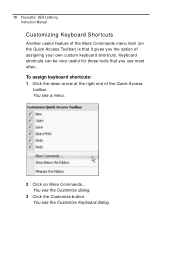
To assign keyboard shortcuts: 1 Click the down arrow at the right end of the Quick Access toolbar. You see a menu. 2 Click on the Quick Access Toolbar) is that you the option of assigning your own custom keyboard shortcuts. You see the Customize Keyboard dialog. You see the Customize dialog. 3 Click the Customize button. Keyboard shortcuts can be very useful for those tools that it gives you use most often. 10 Pacesetter BES Lettering Instruction Manual Customizing Keyboard Shortcuts Another useful feature of the More Commands menu item (on More Commands...
To assign keyboard shortcuts: 1 Click the down arrow at the right end of the Quick Access toolbar. You see a menu. 2 Click on the Quick Access Toolbar) is that you the option of assigning your own custom keyboard shortcuts. You see the Customize Keyboard dialog. You see the Customize dialog. 3 Click the Customize button. Keyboard shortcuts can be very useful for those tools that it gives you use most often. 10 Pacesetter BES Lettering Instruction Manual Customizing Keyboard Shortcuts Another useful feature of the More Commands menu item (on More Commands...

Users Manual - English
Page 14
... Direct Print: Prints a copy of what the button does is also included. Merge: Opens the Merge Design dialog, which in Pacesetter BES Lettering through the various tool bars. The tables below show the buttons, grouped by function. Pacesetter Menu Tools Tool What it as. Save As:...you print the current design. Print: Opens the printer dialog on (the active file) leaving any other files open. 12 Pacesetter BES Lettering Instruction Manual Toolbar and Ribbon Buttons You can use to import existing stitch or outline files into the current design Save: Saves the current design....
... Direct Print: Prints a copy of what the button does is also included. Merge: Opens the Merge Design dialog, which in Pacesetter BES Lettering through the various tool bars. The tables below show the buttons, grouped by function. Pacesetter Menu Tools Tool What it as. Save As:...you print the current design. Print: Opens the printer dialog on (the active file) leaving any other files open. 12 Pacesetter BES Lettering Instruction Manual Toolbar and Ribbon Buttons You can use to import existing stitch or outline files into the current design Save: Saves the current design....
Users Manual - English
Page 16
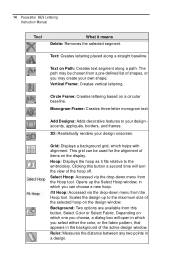
... selected hoop on a circular baseline. Grid: Displays a background grid, which you may create your design onscreen. Vertical Frame: Creates vertical lettering. Select Hoop: Accessed via the drop-down menu from a pre-defined list of items on Path: Creates text segment along a straight ... from the Hoop tool. Clicking this button, Select Color or Select Fabric. 14 Pacesetter BES Lettering Instruction Manual Tool What it fits relative to the embroidery. Circle Frame: Creates lettering based on the design window. Opens up to the maximum size of the active design window....
... selected hoop on a circular baseline. Grid: Displays a background grid, which you may create your design onscreen. Vertical Frame: Creates vertical lettering. Select Hoop: Accessed via the drop-down menu from a pre-defined list of items on Path: Creates text segment along a straight ... from the Hoop tool. Clicking this button, Select Color or Select Fabric. 14 Pacesetter BES Lettering Instruction Manual Tool What it fits relative to the embroidery. Circle Frame: Creates lettering based on the design window. Opens up to the maximum size of the active design window....
Users Manual - English
Page 18
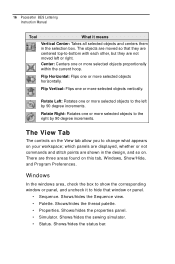
... View Tab The controls on the View tab allow you to change what appears on . Shows/hides the sewing simulator. • Status. 16 Pacesetter BES Lettering Instruction Manual Tool What it to the right by 90 degree increments.
... View Tab The controls on the View tab allow you to change what appears on . Shows/hides the sewing simulator. • Status. 16 Pacesetter BES Lettering Instruction Manual Tool What it to the right by 90 degree increments.

Users Manual - English
Page 20
... Stitch: Move backward in the opened design. You can push various control buttons and slide the speed control to a particular point. 18 Pacesetter BES Lettering Instruction Manual The length of the scrollbar slider represents all of the stitches in the design by one stitch. Sewing Simulator The sewing simulator allows you will...
... Stitch: Move backward in the opened design. You can push various control buttons and slide the speed control to a particular point. 18 Pacesetter BES Lettering Instruction Manual The length of the scrollbar slider represents all of the stitches in the design by one stitch. Sewing Simulator The sewing simulator allows you will...
Users Manual - English
Page 21
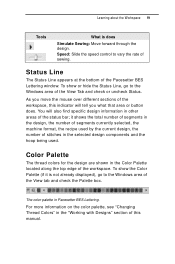
... the design, the number of segments currently selected, the machine format, the recipe used by the current design, the number of the Pacesetter BES Lettering window. You will tell you what that area or button does. To show or hide the Status Line, go to the Windows area of the...top edge of the workspace. For more information on the color palette, see "Changing Thread Colors" in Pacesetter BES Lettering. As you move the mouse over different sections of the workspace, this manual. Status Line The Status Line appears at the bottom of stitches in the selected design components and the hoop...
... the design, the number of segments currently selected, the machine format, the recipe used by the current design, the number of the Pacesetter BES Lettering window. You will tell you what that area or button does. To show or hide the Status Line, go to the Windows area of the...top edge of the workspace. For more information on the color palette, see "Changing Thread Colors" in Pacesetter BES Lettering. As you move the mouse over different sections of the workspace, this manual. Status Line The Status Line appears at the bottom of stitches in the selected design components and the hoop...
Users Manual - English
Page 22
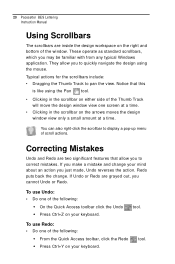
.... Š Press Ctrl+Z on the right and bottom of the Thumb Track will move the design window view one screen at a time. 20 Pacesetter BES Lettering Instruction Manual Using Scrollbars The scrollbars are inside the design workspace on your keyboard. If Undo or Redo are grayed out, you to correct mistakes.
.... Š Press Ctrl+Z on the right and bottom of the Thumb Track will move the design window view one screen at a time. 20 Pacesetter BES Lettering Instruction Manual Using Scrollbars The scrollbars are inside the design workspace on your keyboard. If Undo or Redo are grayed out, you to correct mistakes.

Users Manual - English
Page 24
... in that determine how embroidery information will override whichever recipe is read. You see "Creating new designs". 22 Pacesetter BES Lettering Instruction Manual Changing Machine Format Properties All designs in Pacesetter BES Lettering have their own profile settings that design. This will be interpreted when you save design files. The selected machine format...
... in that determine how embroidery information will override whichever recipe is read. You see "Creating new designs". 22 Pacesetter BES Lettering Instruction Manual Changing Machine Format Properties All designs in Pacesetter BES Lettering have their own profile settings that design. This will be interpreted when you save design files. The selected machine format...

Users Manual - English
Page 26
... Selection to zoom to the size of the currently selected embroidery segment, or set the Sequence and Properties panels to a narrow sidebar. 24 Pacesetter BES Lettering Instruction Manual 4 Do one is selected. • 1:1 to see an option menu. as soon as you will be hidden. When the panel is in Auto hide...
... Selection to zoom to the size of the currently selected embroidery segment, or set the Sequence and Properties panels to a narrow sidebar. 24 Pacesetter BES Lettering Instruction Manual 4 Do one is selected. • 1:1 to see an option menu. as soon as you will be hidden. When the panel is in Auto hide...
Users Manual - English
Page 28
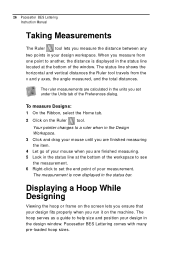
... the distance is now displayed in the design window. Your pointer changes to help size and position your design workspace. Pacesetter BES Lettering comes with many pre-loaded hoop sizes. The measurement is displayed in the status line at the bottom of the window. 26 Pacesetter BES... Lettering Instruction Manual Taking Measurements The Ruler tool lets you set the end point of your design fits properly when you measure from the x and y axes...
... the distance is now displayed in the design window. Your pointer changes to help size and position your design workspace. Pacesetter BES Lettering comes with many pre-loaded hoop sizes. The measurement is displayed in the status line at the bottom of the window. 26 Pacesetter BES... Lettering Instruction Manual Taking Measurements The Ruler tool lets you set the end point of your design fits properly when you measure from the x and y axes...

Users Manual - English
Page 30
28 Pacesetter BES Lettering Instruction Manual 3 Select the machine format from in future designs. You see the New Hoop dialog. 4 Enter the dimensions for your new hoop in the Width and ...
28 Pacesetter BES Lettering Instruction Manual 3 Select the machine format from in future designs. You see the New Hoop dialog. 4 Enter the dimensions for your new hoop in the Width and ...
Users Manual - English
Page 32
... the word or words you want to search for . 5 Click the topic you searched for . You see the topic in the Pacesetter BES Lettering Help. 30 Pacesetter BES Lettering Instruction Manual Using the Index The Help index is more about. You see the Help. 2 Select the Search tab. 3 In the "Keyword" box, enter...
... the word or words you want to search for . 5 Click the topic you searched for . You see the topic in the Pacesetter BES Lettering Help. 30 Pacesetter BES Lettering Instruction Manual Using the Index The Help index is more about. You see the Help. 2 Select the Search tab. 3 In the "Keyword" box, enter...


