

Thread Tensions - English
Page 1
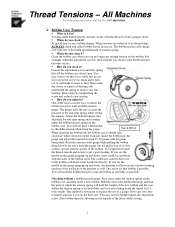
.... I recommend the prewound, with two cardboard sides that the spring will help with a small slotted screwdriver. This helps slow down on Brother embroidery equipment. Re-insert the spring and recheck your adjustment. If allowed to spin this procedure a few times until it is strongly recommend... and are listed in these types of machines with the speeds achieved on the flat surface of the fabric and reduce thread breaks. Note how you adjust it ? You will only go back in two places so that have a serration on Brother embroidery machines today, they most often occur.
.... I recommend the prewound, with two cardboard sides that the spring will help with a small slotted screwdriver. This helps slow down on Brother embroidery equipment. Re-insert the spring and recheck your adjustment. If allowed to spin this procedure a few times until it is strongly recommend... and are listed in these types of machines with the speeds achieved on the flat surface of the fabric and reduce thread breaks. Note how you adjust it ? You will only go back in two places so that have a serration on Brother embroidery machines today, they most often occur.
Thread Tensions - English
Page 2
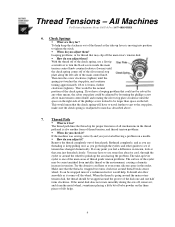
...Read the tension of a gauge, but to remove any lint buildup. First clean under the tension spring on the topside of the bobbin itself. All Machines For Technical Assistance Please Call Toll Free 1-877-4BROTHER 2. Bobbin Case Tension !" The bobbin tension will take into account the pressure of the new ...check the tension when using the corner of a piece of the most accurate ways to let the bobbin and case start sliding down , the machine will hold the weight of the anti-spin spring while setting the tension. Insert the bobbin into the bobbin case it falls out. If ...
...Read the tension of a gauge, but to remove any lint buildup. First clean under the tension spring on the topside of the bobbin itself. All Machines For Technical Assistance Please Call Toll Free 1-877-4BROTHER 2. Bobbin Case Tension !" The bobbin tension will take into account the pressure of the new ...check the tension when using the corner of a piece of the most accurate ways to let the bobbin and case start sliding down , the machine will hold the weight of the anti-spin spring while setting the tension. Insert the bobbin into the bobbin case it falls out. If ...

Thread Tensions - English
Page 3
...needle tail lengths. !" Main upper thread tension control of the knob is even with the slot in the stud. 5. For bobbin thread showing on the machine head. !" o Plastic Knob Type Adjust by turning the knob until the top of the silver screw inside the knob, is flush with the step ...inside the knob where the screw threads start. To take the looseness out of adjustment. 3 All Machines For Technical Assistance Please Call Toll Free 1-877-4BROTHER 3. When do you adjust them ? Run a tension test first, if you adjust them ? At install,...
...needle tail lengths. !" Main upper thread tension control of the knob is even with the slot in the stud. 5. For bobbin thread showing on the machine head. !" o Plastic Knob Type Adjust by turning the knob until the top of the silver screw inside the knob, is flush with the step ...inside the knob where the screw threads start. To take the looseness out of adjustment. 3 All Machines For Technical Assistance Please Call Toll Free 1-877-4BROTHER 3. When do you adjust them ? Run a tension test first, if you adjust them ? At install,...
Thread Tensions - English
Page 4
... as you go through the eyelet or around the groove of the eyelet may have a looping problem that area just threaded closely. If the machine was sewing correctly and you feel a difference in tension. It should be the normal position of thread tension, and thread tension problems. !"... !" If the metal disk does not rotate smoothly during the sew off of the thread as you adjust it for ? Thread Tensions - All Machines For Technical Assistance Please Call Toll Free 1-877-4BROTHER 6. Check Springs !" When do you check it would be wrapped around the wheel to 1/4...
... as you go through the eyelet or around the groove of the eyelet may have a looping problem that area just threaded closely. If the machine was sewing correctly and you feel a difference in tension. It should be the normal position of thread tension, and thread tension problems. !"... !" If the metal disk does not rotate smoothly during the sew off of the thread as you adjust it for ? Thread Tensions - All Machines For Technical Assistance Please Call Toll Free 1-877-4BROTHER 6. Check Springs !" When do you check it would be wrapped around the wheel to 1/4...

Thread Tensions - English
Page 5
...problem by loosening it does not move. Usually found is suppose to pass between the disks to change each of you should have changed your machine has. The bobbin is used with the white knob, spring and two tension disks the thread is lint or dust under . As a... needles your bobbin tension to a lighter setting. After sewing this , you can adjust the top tensions. Adjust the bobbin case Step 3. All Machines For Technical Assistance Please Call Toll Free 1-877-4BROTHER 8. For example, if you can adjust the bobbin by examining the area just before adjusting ...
...problem by loosening it does not move. Usually found is suppose to pass between the disks to change each of you should have changed your machine has. The bobbin is used with the white knob, spring and two tension disks the thread is lint or dust under . As a... needles your bobbin tension to a lighter setting. After sewing this , you can adjust the top tensions. Adjust the bobbin case Step 3. All Machines For Technical Assistance Please Call Toll Free 1-877-4BROTHER 8. For example, if you can adjust the bobbin by examining the area just before adjusting ...
Knife Adjustments - English
Page 1
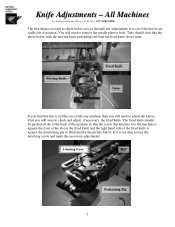
...If you find that attaches it is against the positioning pin as illustrated by the picture below with your machine than you will need to remove the needle plate to the machine is not then loosen the attaching screw and make the necessary adjustments. First you will want to check ...before you go through any adjustments is to check and adjust, if necessary, the fixed knife. All Machines For Technical Assistance Please Call Toll Free 1-877-4BROTHER The first thing you want to see if the knives are really out of the fixed...
...If you find that attaches it is against the positioning pin as illustrated by the picture below with your machine than you will need to remove the needle plate to the machine is not then loosen the attaching screw and make the necessary adjustments. First you will want to check ...before you go through any adjustments is to check and adjust, if necessary, the fixed knife. All Machines For Technical Assistance Please Call Toll Free 1-877-4BROTHER The first thing you want to see if the knives are really out of the fixed...
Knife Adjustments - English
Page 3
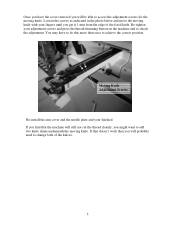
... Re-install the arm cover and the needle plate and your adjustment screws and press the thread-trimming button on the machine and re-check the adjustment. If that the machine will still not cut the thread cleanly, you might want to achieve the correct position. Loosen the screws as indicated in...
... Re-install the arm cover and the needle plate and your adjustment screws and press the thread-trimming button on the machine and re-check the adjustment. If that the machine will still not cut the thread cleanly, you might want to achieve the correct position. Loosen the screws as indicated in...
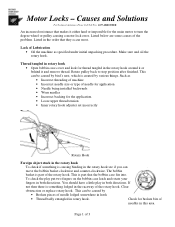
Motor Locks - English
Page 1
... be caused by various things. Page 1 of the problem. To check the play in rotary hook. Lack of Lubrication • Oil the machine as • Incorrect threading of machine • Incorrect needle size or type of the rotary hook. Such as specified under initial unpacking procedure. Causes and Solutions For Technical Assistance...
... be caused by various things. Page 1 of the problem. To check the play in rotary hook. Lack of Lubrication • Oil the machine as • Incorrect threading of machine • Incorrect needle size or type of the rotary hook. Such as specified under initial unpacking procedure. Causes and Solutions For Technical Assistance...
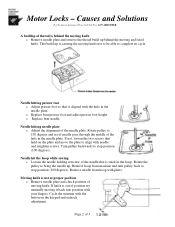
Motor Locks - English
Page 2
... position (100 degrees). Remove hoop from hoop with the button on the plate and move the plate to stop position (100 degrees). Remove needle from machine and turn pulley back to align with the hole in the hoop. If knife is aligned with needle and retighten screws. Causes and Solutions For...
... position (100 degrees). Remove hoop from hoop with the button on the plate and move the plate to stop position (100 degrees). Remove needle from machine and turn pulley back to align with the hole in the hoop. If knife is aligned with needle and retighten screws. Causes and Solutions For...
Upper Thread Breaks - English
Page 1
... Technical Assistance Please Call Toll Free 1-877-4BROTHER Upper thread breaks • Upper thread is not threaded correctly o Correctly thread the machine • Upper thread tension is to tight o Reduce upper thread tension • Needle is not installed correctly o Install needle correctly • Needle is bent or ...
... Technical Assistance Please Call Toll Free 1-877-4BROTHER Upper thread breaks • Upper thread is not threaded correctly o Correctly thread the machine • Upper thread tension is to tight o Reduce upper thread tension • Needle is not installed correctly o Install needle correctly • Needle is bent or ...
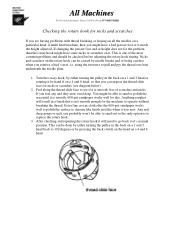
Rotary Hook Scratches - English
Page 1
... hook, by pressing the back switch on the head on it is to pull and pry the thread out from underneath the needle plate. 1. All Machines For Technical Assistance Please Call Toll Free 1-877-4BROTHER Checking the rotary hook for nicks and scratches If you are having problems with thread breaking... or fraying on all the needles on a particular head, if multi head machine, then you might have some nicks or scratches on a 4 and 6 head. This is smooth. 600 grit sandpaper works well for this. If you can ...
... hook, by pressing the back switch on the head on it is to pull and pry the thread out from underneath the needle plate. 1. All Machines For Technical Assistance Please Call Toll Free 1-877-4BROTHER Checking the rotary hook for nicks and scratches If you are having problems with thread breaking... or fraying on all the needles on a particular head, if multi head machine, then you might have some nicks or scratches on a 4 and 6 head. This is smooth. 600 grit sandpaper works well for this. If you can ...
Maintenance Schedule - English
Page 1
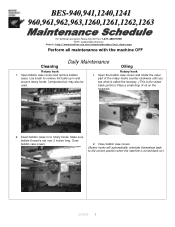
...,961,962,963,1260,1261,1262,1263 For Technical Assistance Please Call Toll Fre e 1-877-4BROTHER Email: tsupport@brother.com Website: http://www.brother-usa.com/industembroidery/tech_down.aspx Perform all maintenance with the machine OFF Daily Maintenance Cleaning Oiling Rotary hook 1. Insert bobbin cases in and around rotary hooks. Open bobbin case...
...,961,962,963,1260,1261,1262,1263 For Technical Assistance Please Call Toll Fre e 1-877-4BROTHER Email: tsupport@brother.com Website: http://www.brother-usa.com/industembroidery/tech_down.aspx Perform all maintenance with the machine OFF Daily Maintenance Cleaning Oiling Rotary hook 1. Insert bobbin cases in and around rotary hooks. Open bobbin case...

Maintenance Schedule - English
Page 5
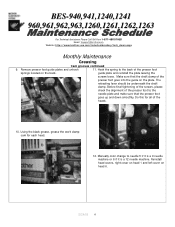
...,1261,1262,1263 For Technical Assistance Please Call Toll Fre e 1-877-4BROTHER Email: tsupport@brother.com Website: http://www.brother-usa.com/industembroidery/tech_down.aspx Monthly Maintenance Greasing Cam grooves continued 5. Wipe a little grease on the heads if the machine has them by removing the 3 screws. 5/24/05 5 Do this for all the...
...,1261,1262,1263 For Technical Assistance Please Call Toll Fre e 1-877-4BROTHER Email: tsupport@brother.com Website: http://www.brother-usa.com/industembroidery/tech_down.aspx Monthly Maintenance Greasing Cam grooves continued 5. Wipe a little grease on the heads if the machine has them by removing the 3 screws. 5/24/05 5 Do this for all the...
Maintenance Schedule - English
Page 6
...,961,962,963,1260,1261,1262,1263 For Technical Assistance Please Call Toll Fre e 1-877-4BROTHER Email: tsupport@brother.com Website: http://www.brother-usa.com/industembroidery/tech_down.aspx Monthly Maintenance Greasing Cam grooves continued 9. Manually color change to the needle plate and... make sure that the shaft clamp of the presser foot to needle 5 if it is a 9 needle machine or 6 if it is a 12 needle machine. ...
...,961,962,963,1260,1261,1262,1263 For Technical Assistance Please Call Toll Fre e 1-877-4BROTHER Email: tsupport@brother.com Website: http://www.brother-usa.com/industembroidery/tech_down.aspx Monthly Maintenance Greasing Cam grooves continued 9. Manually color change to the needle plate and... make sure that the shaft clamp of the presser foot to needle 5 if it is a 9 needle machine or 6 if it is a 12 needle machine. ...

Maintenance Schedule - English
Page 7
...to right to move the pantograph both sides of the rails for Xaxis, Y-axis plus the linear rail inside the sewing arm of the machine by removing the 4 screws for each cover. 4. Reinstall all of the covers. 5/24/05 7 Remove the sewing arm covers for ... Please Call Toll Fre e 1-877-4BROTHER Email: tsupport@brother.com Website: http://www.brother-usa.com/industembroidery/tech_down.aspx Monthly Maintenance Greasing Pantograph 1. Removing the X-axis cover is machine specific depending on whether it is a 4 or 6 head machine. You will have to lubricate all the grooves. 5. Remove...
...to right to move the pantograph both sides of the rails for Xaxis, Y-axis plus the linear rail inside the sewing arm of the machine by removing the 4 screws for each cover. 4. Reinstall all of the covers. 5/24/05 7 Remove the sewing arm covers for ... Please Call Toll Fre e 1-877-4BROTHER Email: tsupport@brother.com Website: http://www.brother-usa.com/industembroidery/tech_down.aspx Monthly Maintenance Greasing Pantograph 1. Removing the X-axis cover is machine specific depending on whether it is a 4 or 6 head machine. You will have to lubricate all the grooves. 5. Remove...

Maintenance Schedule - English
Page 9
... Remove the color change assembly cover by removing the two top screws and loosening the 2 bottom screws. 8. layed down on 12 needle machines by removing the 2 screws. Manually color change box. 5/24/05 9 Cover can be rod cover by rotating the knob underneath the color change... on 9 needle machines or between 6 and 7 on machine or by removing the 3 top 7. On 4 head models. BES-940,941,1240,1241 960,961,962,963,1260,1261,1262,1263 For Technical Assistance Please Call Toll Fre e 1-877-4BROTHER Email: tsupport@brother.com Website: http://www.brother-usa.com/industembroidery/...
... Remove the color change assembly cover by removing the two top screws and loosening the 2 bottom screws. 8. layed down on 12 needle machines by removing the 2 screws. Manually color change box. 5/24/05 9 Cover can be rod cover by rotating the knob underneath the color change... on 9 needle machines or between 6 and 7 on machine or by removing the 3 top 7. On 4 head models. BES-940,941,1240,1241 960,961,962,963,1260,1261,1262,1263 For Technical Assistance Please Call Toll Fre e 1-877-4BROTHER Email: tsupport@brother.com Website: http://www.brother-usa.com/industembroidery/...

Maintenance Schedule - English
Page 10
... bolts, 2 on it and unhook the wire clamp and disconnect the 2 connectors at the back. underneath each side of the head. 11. Remove head from machine by lifting up on each head. 10. BES-940,941,1240,1241 960,961,962,963,1260,1261,1262,1263 For Technical Assistance Please Call...
... bolts, 2 on it and unhook the wire clamp and disconnect the 2 connectors at the back. underneath each side of the head. 11. Remove head from machine by lifting up on each head. 10. BES-940,941,1240,1241 960,961,962,963,1260,1261,1262,1263 For Technical Assistance Please Call...

Maintenance Schedule - English
Page 11
... fill the syringe about ½ way. Let the wiper solenoid removing the 3 screws and unhooking the assembly rest on the heads if the machine has them by removing the 2 screws. Remove the left arm cover on the pantograph. Cover is not shown in syringe and push on plunger...940,941,1240,1241 960,961,962,963,1260,1261,1262,1263 For Technical Assistance Please Call Toll Fre e 1-877-4BROTHER Email: tsupport@brother.com Website: http://www.brother-usa.com/industembroidery/tech_down.aspx 6 Month Maintenance Greasing Heads continued 13. Remove the 3 screws and remove the wiper solenoid 15.
... fill the syringe about ½ way. Let the wiper solenoid removing the 3 screws and unhooking the assembly rest on the heads if the machine has them by removing the 2 screws. Remove the left arm cover on the pantograph. Cover is not shown in syringe and push on plunger...940,941,1240,1241 960,961,962,963,1260,1261,1262,1263 For Technical Assistance Please Call Toll Fre e 1-877-4BROTHER Email: tsupport@brother.com Website: http://www.brother-usa.com/industembroidery/tech_down.aspx 6 Month Maintenance Greasing Heads continued 13. Remove the 3 screws and remove the wiper solenoid 15.

Maintenance Schedule - English
Page 14
... heads on . 2. Remove all of the sewing arm and hook module cooling fan with the mounting surface by manually color changing to another needle. Reassemble machine in reverse order. Clean the inside of the sewing arm covers by removing the screws that hold them on the... machine make sure they sit flush with a brush or compressed air. 3. BES-940,941,1240,1241 960,961,962,963,1260,1261,1262,1263 For Technical ...
... heads on . 2. Remove all of the sewing arm and hook module cooling fan with the mounting surface by manually color changing to another needle. Reassemble machine in reverse order. Clean the inside of the sewing arm covers by removing the screws that hold them on the... machine make sure they sit flush with a brush or compressed air. 3. BES-940,941,1240,1241 960,961,962,963,1260,1261,1262,1263 For Technical ...

Tubular to Cap - English
Page 1
... click on the pantograph. This can be made easier by inserting one of the thread magnetic strips into the hole to the rear of the machine with the down arrow . 2) Move the needle case to needle #1 using the needle select buttons . 3) Remove the flat needle plates (A) and replace with the long... the arm until it is in the needle plate, then re-tighten screw. 7) Turn the pulley backwards to 100 degrees or stop position. 8) Switch the machine to cap mode. BES-940,941,1240,1241,960,961,962,963 1260,1261,1262,1263 For Technical Assistance Please Call Toll Free 1-877-4BROTHER...
... click on the pantograph. This can be made easier by inserting one of the thread magnetic strips into the hole to the rear of the machine with the down arrow . 2) Move the needle case to needle #1 using the needle select buttons . 3) Remove the flat needle plates (A) and replace with the long... the arm until it is in the needle plate, then re-tighten screw. 7) Turn the pulley backwards to 100 degrees or stop position. 8) Switch the machine to cap mode. BES-940,941,1240,1241,960,961,962,963 1260,1261,1262,1263 For Technical Assistance Please Call Toll Free 1-877-4BROTHER...


