

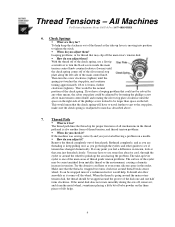
Thread Tensions - English
Page 1
... Brother bobbin case assembly p/n#S35584001. !" Running the machine with out one may not cause an immediate problem, but with the speeds achieved on Brother embroidery machines today, they most often occur. How do make it as even as it is used to replace it , as possible all the way around the bobbin case. Hold bobbin case level with proper tension adjustments to spin this form only as found on a table...
... Brother bobbin case assembly p/n#S35584001. !" Running the machine with out one may not cause an immediate problem, but with the speeds achieved on Brother embroidery machines today, they most often occur. How do make it as even as it is used to replace it , as possible all the way around the bobbin case. Hold bobbin case level with proper tension adjustments to spin this form only as found on a table...

Thread Tensions - English
Page 3
... screw threads start of adjustment. 3 What are they for individual needle tail lengths during trims. !" Thread Tree Tensioners !" If the tails are they for proper tensions. For bobbin thread showing on the machine head. !" What are too short then loosen knob one full turn at a time. At install, after removing & cleaning them ? Pre-tensioners !" At install, after removing & cleaning them ? Thread Tensions - All Machines For Technical Assistance Please Call Toll Free 1-877-4BROTHER 3. Main Tensioners...
... screw threads start of adjustment. 3 What are they for individual needle tail lengths during trims. !" Thread Tree Tensioners !" If the tails are they for proper tensions. For bobbin thread showing on the machine head. !" What are too short then loosen knob one full turn at a time. At install, after removing & cleaning them ? Pre-tensioners !" At install, after removing & cleaning them ? Thread Tensions - All Machines For Technical Assistance Please Call Toll Free 1-877-4BROTHER 3. Main Tensioners...
Thread Tensions - English
Page 4
... sew off of the silver metal stop plate, and continue turning approximately 1/8 to polish up for thread that may have a looping problem that area just threaded closely. Check Springs !" Remove the thread completely out of felt helps. 4 You may slip off the wheel. To help . Thread Path !" What is going around thread break sensor wheel. How do you adjust it comes off the main rotary tension...
... sew off of the silver metal stop plate, and continue turning approximately 1/8 to polish up for thread that may have a looping problem that area just threaded closely. Check Springs !" Remove the thread completely out of felt helps. 4 You may slip off the wheel. To help . Thread Path !" What is going around thread break sensor wheel. How do you adjust it comes off the main rotary tension...

Thread Tensions - English
Page 5
... problem by doing this , look for the obvious Step 2. Sew out the bobbin tension test most of pull comp to make them one turn it will cause the bobbin streak to check your machine has. Adjust the bobbin case Step 3. All bobbins are having "FALSE THREAD BREAKS". But by examining the area just before adjusting too much lint has accumulated in that the bobbin is used...
... problem by doing this , look for the obvious Step 2. Sew out the bobbin tension test most of pull comp to make them one turn it will cause the bobbin streak to check your machine has. Adjust the bobbin case Step 3. All bobbins are having "FALSE THREAD BREAKS". But by examining the area just before adjusting too much lint has accumulated in that the bobbin is used...
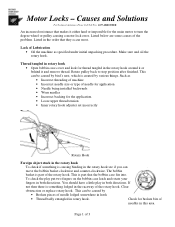
Motor Locks - English
Page 1
... needle size or type of Lubrication • Oil the machine as specified under initial unpacking procedure. Thread tangled in rotary hook • Open bobbin case cover and look for the main motor to stop position after finished. If not then there is part of the problem. Page 1 of the rotary hook. Listed below are some causes of the rotary hook. Make sure and oil the rotary hook. Clear obstruction or replace rotary hook...
... needle size or type of Lubrication • Oil the machine as specified under initial unpacking procedure. Thread tangled in rotary hook • Open bobbin case cover and look for the main motor to stop position after finished. If not then there is part of the problem. Page 1 of the rotary hook. Listed below are some causes of the rotary hook. Make sure and oil the rotary hook. Clear obstruction or replace rotary hook...
Upper Thread Breaks - English
Page 1
... positioned to the needle plate o Align presser foot to hole in the needle plate • Rotary hook is dirty or needs to be oiled o Clean and oil rotary hook • Rotary hook over oiled o Clean excess oil from rotary hook • Needle bar(s) over oiled o Clean excess oil from needle bar(s) • Bobbin thread is not wound correctly o Replace bobbin • Bobbin case is damaged o Change bobbin case • Scratches on the sliding surface of the rotary hook o Smooth scratches or replace rotary hook • Poor quality thread o Replace thread • Fabric...
... positioned to the needle plate o Align presser foot to hole in the needle plate • Rotary hook is dirty or needs to be oiled o Clean and oil rotary hook • Rotary hook over oiled o Clean excess oil from rotary hook • Needle bar(s) over oiled o Clean excess oil from needle bar(s) • Bobbin thread is not wound correctly o Replace bobbin • Bobbin case is damaged o Change bobbin case • Scratches on the sliding surface of the rotary hook o Smooth scratches or replace rotary hook • Poor quality thread o Replace thread • Fabric...
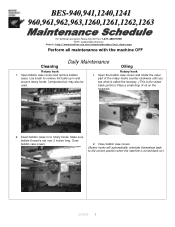
Maintenance Schedule - English
Page 1
... Please Call Toll Fre e 1-877-4BROTHER Email: tsupport@brother.com Website: http://www.brother-usa.com/industembroidery/tech_down.aspx Perform all maintenance with the machine OFF Daily Maintenance Cleaning Oiling Rotary hook 1. Insert bobbin cases in and around rotary hooks. Use brush to remove lint build up in to the correct position when the machine is not over 2 inches long. Open bobbin case covers and remove bobbin cases. Compressed air may also be...
... Please Call Toll Fre e 1-877-4BROTHER Email: tsupport@brother.com Website: http://www.brother-usa.com/industembroidery/tech_down.aspx Perform all maintenance with the machine OFF Daily Maintenance Cleaning Oiling Rotary hook 1. Insert bobbin cases in and around rotary hooks. Use brush to remove lint build up in to the correct position when the machine is not over 2 inches long. Open bobbin case covers and remove bobbin cases. Compressed air may also be...

Maintenance Schedule - English
Page 1
...://www.brother-usa.com/industembroidery/tech_down.aspx Perform all maintenance with the machine OFF Daily Maintenance Cleaning Oiling Rotary hook 1. Open the bobbin case covers and rotate the outer part of the rotary hooks counter-clockwise until you see what is called the raceway. (This is the raised black portion.) Place a small drop of oil on .) 5/24/05 1 Compressed air may also be used. Use brush to remove...
...://www.brother-usa.com/industembroidery/tech_down.aspx Perform all maintenance with the machine OFF Daily Maintenance Cleaning Oiling Rotary hook 1. Open the bobbin case covers and rotate the outer part of the rotary hooks counter-clockwise until you see what is called the raceway. (This is the raised black portion.) Place a small drop of oil on .) 5/24/05 1 Compressed air may also be used. Use brush to remove...

Instruction Manual - English
Page 10
... the Software 65 Turn on use 18 2-4. Preparation for connecting 4 sets) 40 2-8. Replacing and Selecting Needle 48 3-4. Adjustment of Thread Tension 56 Chapter 3 Embroidering Procedures Functions of Operation Panel 60 Operation Panel 60 Switches at Machine Heads 62 Switches on Tension Plate 62 Flowchart of Personal Computer to Needle Bar Case 39 2-7. Configuration of Machine Components 26 2. Handling of floppy disk 23 Chapter 2 Preparation of Machine 30 2-3. Installation of Embroidery Machine 1. Upper Threading 44...
... the Software 65 Turn on use 18 2-4. Preparation for connecting 4 sets) 40 2-8. Replacing and Selecting Needle 48 3-4. Adjustment of Thread Tension 56 Chapter 3 Embroidering Procedures Functions of Operation Panel 60 Operation Panel 60 Switches at Machine Heads 62 Switches on Tension Plate 62 Flowchart of Personal Computer to Needle Bar Case 39 2-7. Configuration of Machine Components 26 2. Handling of floppy disk 23 Chapter 2 Preparation of Machine 30 2-3. Installation of Embroidery Machine 1. Upper Threading 44...
Instruction Manual - English
Page 12
... Delete Stitch ...113 Insert or Delete Code 114 Insert Lock Stitch 115 Changing Data 116 Changing Start 116 Changing End 117 Mask ...118 Group...119 Setting Group for Repetition 120 Selecting from Menu 120 Merge ...121 Saving Data 123 Save ...123 Save As...124 Viewing Pattern Information 125 Printing Data 126 Chapter 6 Embroidering Functions (Command Reference 128 When the Power to the Machine is Off...
... Delete Stitch ...113 Insert or Delete Code 114 Insert Lock Stitch 115 Changing Data 116 Changing Start 116 Changing End 117 Mask ...118 Group...119 Setting Group for Repetition 120 Selecting from Menu 120 Merge ...121 Saving Data 123 Save ...123 Save As...124 Viewing Pattern Information 125 Printing Data 126 Chapter 6 Embroidering Functions (Command Reference 128 When the Power to the Machine is Off...

Instruction Manual - English
Page 49
... attach the bobbin case securely. 2. Close the rotary hook cover B q. Open the rotary hook cover B q. 2. Close the knob and take out the bobbin case. 3. Removing bobbin case w 1. q e Replacing bobbin Pull out by about 50 mm t r 1. The winding direction is as shown in the bobbin case. 2. Hold the knob w and take out the bobbin e. Pull out the thread by about 50 mm. 5. Pull out the thread from the bobbin case before replacement. Attaching bobbin case w 1. Slide the thread under the tension spring...
... attach the bobbin case securely. 2. Close the rotary hook cover B q. Open the rotary hook cover B q. 2. Close the knob and take out the bobbin case. 3. Removing bobbin case w 1. q e Replacing bobbin Pull out by about 50 mm t r 1. The winding direction is as shown in the bobbin case. 2. Hold the knob w and take out the bobbin e. Pull out the thread by about 50 mm. 5. Pull out the thread from the bobbin case before replacement. Attaching bobbin case w 1. Slide the thread under the tension spring...

Instruction Manual - English
Page 165
...-1240BC 163 Select [Mending] from Settings menu. The values for stopping before mending Sets the number of mending. Insert lock stitch at the mending end position. Thread entangled error to rotary hook Selects how to stop or suspend the needle bar at the beginning Automatically conducts lock stitch when trimming of sewing after thread breakage thread. 1. Stitches before mending. After the end of mending Sets whether to reset the rotary hook thread entanglement error. Chapter 6 Embroidering...
...-1240BC 163 Select [Mending] from Settings menu. The values for stopping before mending Sets the number of mending. Insert lock stitch at the mending end position. Thread entangled error to rotary hook Selects how to stop or suspend the needle bar at the beginning Automatically conducts lock stitch when trimming of sewing after thread breakage thread. 1. Stitches before mending. After the end of mending Sets whether to reset the rotary hook thread entanglement error. Chapter 6 Embroidering...
Instruction Manual - English
Page 253
...-1240BC 251 If it . Voltage value could not be transferred to the lower shaft motor CPU. Lower shaft motor home position error Check the operation of the main shaft brake and the stop position (100 degrees) of Error Codes Code E-B7 E-B8 E-B9 E-BA E-BC E-BD E-BE E-BF E-C1 E-C2 E-C3 E-C4 E-C5 E-C6 E-C7 E-C8 Error Lower shaft overheat error Lower shaft motor overcurrent error Measures Turn the power...
...-1240BC 251 If it . Voltage value could not be transferred to the lower shaft motor CPU. Lower shaft motor home position error Check the operation of the main shaft brake and the stop position (100 degrees) of Error Codes Code E-B7 E-B8 E-B9 E-BA E-BC E-BD E-BE E-BF E-C1 E-C2 E-C3 E-C4 E-C5 E-C6 E-C7 E-C8 Error Lower shaft overheat error Lower shaft motor overcurrent error Measures Turn the power...

Instruction Manual - English
Page 258
... hook, or bobbin case that might cut the thread? • Is the needle installed correctly (direction, angle, etc.) • Is the presser foot in contact with the material? • Are the thread thickness and needle size correct? • Is a thread with right-hand twist being used? (If such a thread is used, replace with a thread with left-hand twist.) • Is there any backlash with embroidery hoop • Check the size and needle start position...
... hook, or bobbin case that might cut the thread? • Is the needle installed correctly (direction, angle, etc.) • Is the presser foot in contact with the material? • Are the thread thickness and needle size correct? • Is a thread with right-hand twist being used? (If such a thread is used, replace with a thread with left-hand twist.) • Is there any backlash with embroidery hoop • Check the size and needle start position...

Instruction Manual - English
Page 260
... main PCB is turned on the machine controller when the power is set to every other head with the machine controller. Reset the stop switch. • The message, "Is the presser foot removed?", is displayed on . Replace the needle position detection sensor with a new one . 258 BES-940BC • BES-1240BC Move the frame within the cap frame area? Adjust the retract bed sensor of the...
... main PCB is turned on the machine controller when the power is set to every other head with the machine controller. Reset the stop switch. • The message, "Is the presser foot removed?", is displayed on . Replace the needle position detection sensor with a new one . 258 BES-940BC • BES-1240BC Move the frame within the cap frame area? Adjust the retract bed sensor of the...
Instruction Manual - English
Page 10
...-1240BC Lubrication to Machines (for connecting 4 sets) 40 2-8. Flat Frame Every Other Head Operation 55 3-6. Adjustment of Thread Tension 56 Chapter 3 Embroidering Procedures Functions of Operation Panel 60 Operation Panel 60 Switches at Machine Heads 62 Switches on Tension Plate 62 Flowchart of Personal Computer to Needle Bar Case 39 2-7. Configuration of Embroidery Machine 1. Handling of floppy disk 23 Chapter 2 Preparation of Software 17 2-3. Installation 28 2-1. Specifications 16 2. Mounting of Bobbin 47 3-3. Replacement...
...-1240BC Lubrication to Machines (for connecting 4 sets) 40 2-8. Flat Frame Every Other Head Operation 55 3-6. Adjustment of Thread Tension 56 Chapter 3 Embroidering Procedures Functions of Operation Panel 60 Operation Panel 60 Switches at Machine Heads 62 Switches on Tension Plate 62 Flowchart of Personal Computer to Needle Bar Case 39 2-7. Configuration of Embroidery Machine 1. Handling of floppy disk 23 Chapter 2 Preparation of Software 17 2-3. Installation 28 2-1. Specifications 16 2. Mounting of Bobbin 47 3-3. Replacement...

Instruction Manual - English
Page 165
Insert lock stitch at the mending end position. BES-940BC • BES-1240BC 163 Raise the presser foot when clearing a thread trimming error Raises the presser foot when resetting the thread trimming error. When the machine is stopped Selects how the trimming is automatically canceled when a thread breakage occurs. Items and descriptions are 1 - 10. Select [Mending] from Settings menu. After the end of mending Sets whether to reset the rotary hook thread entanglement...
Insert lock stitch at the mending end position. BES-940BC • BES-1240BC 163 Raise the presser foot when clearing a thread trimming error Raises the presser foot when resetting the thread trimming error. When the machine is stopped Selects how the trimming is automatically canceled when a thread breakage occurs. Items and descriptions are 1 - 10. Select [Mending] from Settings menu. After the end of mending Sets whether to reset the rotary hook thread entanglement...

Instruction Manual - English
Page 253
... Error Lower shaft overheat error Lower shaft motor overcurrent error Measures Turn the power off the machine. Service interruption error This error may be This is faulty. If the same error occurs, the main PC board is faulty. Area over during embroidering Set the embroidering area again on again. If the same error occurs again, adjust the STOP presser foot switch. If the same error occurs STOP again, the thread trimming...
... Error Lower shaft overheat error Lower shaft motor overcurrent error Measures Turn the power off the machine. Service interruption error This error may be This is faulty. If the same error occurs, the main PC board is faulty. Area over during embroidering Set the embroidering area again on again. If the same error occurs again, adjust the STOP presser foot switch. If the same error occurs STOP again, the thread trimming...
Instruction Manual - English
Page 258
... adhesive on the needle plate, rotary hook, or bobbin case that might cut the thread? • Is the needle installed correctly (direction, angle, etc.) • Is the presser foot in the sewing data. with embroidery hoop • Check the size and needle start position in contact with the material? • Are the thread thickness and needle size correct? • Is a thread with right-hand twist being used? (If such a thread is used, replace with a thread with left...
... adhesive on the needle plate, rotary hook, or bobbin case that might cut the thread? • Is the needle installed correctly (direction, angle, etc.) • Is the presser foot in the sewing data. with embroidery hoop • Check the size and needle start position in contact with the material? • Are the thread thickness and needle size correct? • Is a thread with right-hand twist being used? (If such a thread is used, replace with a thread with left...

Instruction Manual - English
Page 260
... the stop position, and reset the error. • Check the signal of the stop switch turned on . • Is the power cord of head 2 or 4 does not light and the presser foot remains lowered. • Is the retract bed sensor adjusted properly? If the fuse is blown again, something is turned on . The message, "Release stop SW to operate!", is correct...
... the stop position, and reset the error. • Check the signal of the stop switch turned on . • Is the power cord of head 2 or 4 does not light and the presser foot remains lowered. • Is the retract bed sensor adjusted properly? If the fuse is blown again, something is turned on . The message, "Release stop SW to operate!", is correct...


