

Tubular to Cap - English
Page 1
...next step). 14) Attach the Phillip's head or thumbscrew (J) located on Settings, Embroidery Hoop, Wide Cap (All). On the computer left click on the right side of the machine and place the driver over limit error occurs after turning the machine back on just press the Stop key repeatedly...thumbscrews (D). 11) Slide the guide bar (F) into the contact portion area (P) and pulling the cap driver forward before proceeding to cap. 9) Turn machine off for 5 seconds and power back on the pantograph. If a over the locator pins (C) and secure with the cap needle plates. 4)Manually ...
...next step). 14) Attach the Phillip's head or thumbscrew (J) located on Settings, Embroidery Hoop, Wide Cap (All). On the computer left click on the right side of the machine and place the driver over limit error occurs after turning the machine back on just press the Stop key repeatedly...thumbscrews (D). 11) Slide the guide bar (F) into the contact portion area (P) and pulling the cap driver forward before proceeding to cap. 9) Turn machine off for 5 seconds and power back on the pantograph. If a over the locator pins (C) and secure with the cap needle plates. 4)Manually ...

Cap to Tubular - English
Page 1
...,961,962,963 1260,1261,1262,1263 For Technical Assistance Please Call Toll Free 1-877-4BROTHER Flat Cap With the power to the machine ON. 1) Remove the Phillip's head or thumbscrew (J) on the side of the cap drive system. 2) Pivot the arm bracket lever (K) up and slide the bracket ... replace with the flat needle plates. 7) Manually lower all the parts removed on the driver for 5 seconds and power back on Settings, Embroidery Hoop, Tubular (All). Note: You should store all presser feet by using a stand-alone machine by pressing the down arrow . 1 Revised 1/10/05 Computer model -
...,961,962,963 1260,1261,1262,1263 For Technical Assistance Please Call Toll Free 1-877-4BROTHER Flat Cap With the power to the machine ON. 1) Remove the Phillip's head or thumbscrew (J) on the side of the cap drive system. 2) Pivot the arm bracket lever (K) up and slide the bracket ... replace with the flat needle plates. 7) Manually lower all the parts removed on the driver for 5 seconds and power back on Settings, Embroidery Hoop, Tubular (All). Note: You should store all presser feet by using a stand-alone machine by pressing the down arrow . 1 Revised 1/10/05 Computer model -

Cap to Tubular - English
Page 1
... 5 seconds and power back on. On the computer left click on Settings, Embroidery Hoop, Tubular (All). This can be made easier by moving the pantograph to the back of the machine by using the lever on the right of each head. 8) Turn the pulley in the direction of the arrow to 200 degrees...,961,962,963 1260,1261,1262,1263 For Technical Assistance Please Call Toll Free 1-877-4BROTHER Flat Cap With the power to the machine ON. 1) Remove the Phillip's head or thumbscrew (J) on the side of the cap drive system. 2) Pivot the arm bracket lever (K) up and slide the bracket (H) to the right...
... 5 seconds and power back on. On the computer left click on Settings, Embroidery Hoop, Tubular (All). This can be made easier by moving the pantograph to the back of the machine by using the lever on the right of each head. 8) Turn the pulley in the direction of the arrow to 200 degrees...,961,962,963 1260,1261,1262,1263 For Technical Assistance Please Call Toll Free 1-877-4BROTHER Flat Cap With the power to the machine ON. 1) Remove the Phillip's head or thumbscrew (J) on the side of the cap drive system. 2) Pivot the arm bracket lever (K) up and slide the bracket (H) to the right...

Instruction Manual - English
Page 1
BES-940BC BES-1240BC INSTRUCTION MANUAL Please read this manual within easy reach for quick reference. NINE NEEDLE FOUR HEAD ELECTRONIC EMBROIDERY MACHINE TWELVE NEEDLE FOUR HEAD ELECTRONIC EMBROIDERY MACHINE Please keep this manual before using the machine.
BES-940BC BES-1240BC INSTRUCTION MANUAL Please read this manual within easy reach for quick reference. NINE NEEDLE FOUR HEAD ELECTRONIC EMBROIDERY MACHINE TWELVE NEEDLE FOUR HEAD ELECTRONIC EMBROIDERY MACHINE Please keep this manual before using the machine.

Instruction Manual - English
Page 10
...1240BC Handling of floppy disk 23 Chapter 2 Preparation of Machine 28 2-2. Transportation of Embroidery Machine 1. Connection of Preparation for Embroidering 64 Run the Software 65 Turn on use 18 2-4. Replacing and Selecting Needle 48 3-4. Specifications 16 2. Basic Operation of Power Supply 42 2-9. Lubrication to Machines... at Machine Heads 62 Switches on Tension Plate 62 Flowchart of Personal Computer to Needle Bar Case 39 2-7. Preparation of Software 43 3. Installation of needle bar case 31 2-4. Help ...18 2-5. Mounting of Embroidery Machine 1....
...1240BC Handling of floppy disk 23 Chapter 2 Preparation of Machine 28 2-2. Transportation of Embroidery Machine 1. Connection of Preparation for Embroidering 64 Run the Software 65 Turn on use 18 2-4. Replacing and Selecting Needle 48 3-4. Specifications 16 2. Basic Operation of Power Supply 42 2-9. Lubrication to Machines... at Machine Heads 62 Switches on Tension Plate 62 Flowchart of Personal Computer to Needle Bar Case 39 2-7. Preparation of Software 43 3. Installation of needle bar case 31 2-4. Help ...18 2-5. Mounting of Embroidery Machine 1....

Instruction Manual - English
Page 13
... to Other Machines 149 Configuration 150 Upgrading the Machine Program 150 Setting the Machine 151 Needle Bar ...151 Same Speed Range 152 Pause ...152 Speed Range 153 Head Operation Suspend 153 Hoop Feed Position 154 Embroidery Area 155 Embroidery Hoop 155 ...Thread Trimming 158 Boring ...159 Thread Breakage Sensor 160 Automatic Step Back 161 Automatic Hoop Feed 162 End of embroidery 162 Mending ...163 Adjust ...164 Activating speed up of driving shaft 165 BES-940BC • BES-1240BC...
... to Other Machines 149 Configuration 150 Upgrading the Machine Program 150 Setting the Machine 151 Needle Bar ...151 Same Speed Range 152 Pause ...152 Speed Range 153 Head Operation Suspend 153 Hoop Feed Position 154 Embroidery Area 155 Embroidery Hoop 155 ...Thread Trimming 158 Boring ...159 Thread Breakage Sensor 160 Automatic Step Back 161 Automatic Hoop Feed 162 End of embroidery 162 Mending ...163 Adjust ...164 Activating speed up of driving shaft 165 BES-940BC • BES-1240BC...
Instruction Manual - English
Page 18
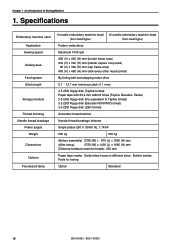
... Dimensions Options Fluorescent lamp 9 needle embroidery machine head 12 needle embroidery machine head (four-head type) (four-head type) Pattern embroidery Maximum 1000 rpm 450 (V) x 400... (H) mm (border frame area) 430 (V) x 300 (H) mm (tubular square hoop area) 85 (V) x 360 (H) mm (cap frame area) 450 (V) x 460 (H) mm (with every other head...1665 (H) mm (Distance between machine heads) 400 mm Paper tape reader, Embroidery hoops in different sizes, Bobbin winder, Parts for boring...
... Dimensions Options Fluorescent lamp 9 needle embroidery machine head 12 needle embroidery machine head (four-head type) (four-head type) Pattern embroidery Maximum 1000 rpm 450 (V) x 400... (H) mm (border frame area) 430 (V) x 300 (H) mm (tubular square hoop area) 85 (V) x 360 (H) mm (cap frame area) 450 (V) x 460 (H) mm (with every other head...1665 (H) mm (Distance between machine heads) 400 mm Paper tape reader, Embroidery hoops in different sizes, Bobbin winder, Parts for boring...
Instruction Manual - English
Page 25
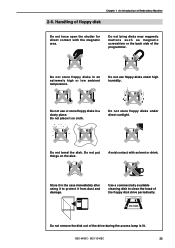
... things on cloth. Store it in an extremely high or low ambient temperature. BES-940BC • BES-1240BC 23 Do not store floppy disks in the case immediately after using it to clean the head of the programmer. Avoid contact with the magnetic area. Use a commercially available cleaning disk to protect it... not remove the disk out of floppy disk Do not force open the shutter for direct contact with solvent or drink. Chapter 1 An Introduction of Embroidery Machine 2-6.
... things on cloth. Store it in an extremely high or low ambient temperature. BES-940BC • BES-1240BC 23 Do not store floppy disks in the case immediately after using it to clean the head of the programmer. Avoid contact with the magnetic area. Use a commercially available cleaning disk to protect it... not remove the disk out of floppy disk Do not force open the shutter for direct contact with solvent or drink. Chapter 1 An Introduction of Embroidery Machine 2-6.

Instruction Manual - English
Page 28
Names of Embroidery Machine 1. Chapter 2 Preparation of Machine Components BES-940BC Operation panel Pulley cover Pulley Fluorescent lamp switch Thread tension dial Thread tension switch Thread guide A Thread guide B Thread guide C Cotton stand Rear Fluorescent lamp Power switch F table Control box Head switch Leg Thumb bolt BES-1240BC Operation panel Pulley cover Pulley Fluorescent lamp switch...
Names of Embroidery Machine 1. Chapter 2 Preparation of Machine Components BES-940BC Operation panel Pulley cover Pulley Fluorescent lamp switch Thread tension dial Thread tension switch Thread guide A Thread guide B Thread guide C Cotton stand Rear Fluorescent lamp Power switch F table Control box Head switch Leg Thumb bolt BES-1240BC Operation panel Pulley cover Pulley Fluorescent lamp switch...
Instruction Manual - English
Page 41
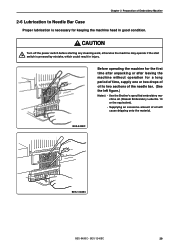
...-1240BC 39 CAUTION Turn off the power switch before starting any cleaning work, otherwise the machine may operate if the start switch is necessary for a long period of time, supply one or two drops of oil to two sections of the needle bar. (See the left figure.) Notes) • Use the Brother's specified embroidery machine...
...-1240BC 39 CAUTION Turn off the power switch before starting any cleaning work, otherwise the machine may operate if the start switch is necessary for a long period of time, supply one or two drops of oil to two sections of the needle bar. (See the left figure.) Notes) • Use the Brother's specified embroidery machine...

Instruction Manual - English
Page 57
Set the frame to flat hoop every other head operation only for heads No. 2 and No. 3. 2. Put the needle bar case at the needle bar No. 1 position and remove the presser feet for No. 1 and No. 4. 1. BES-940BC • BES-1240BC 55 Chapter 2 Preparation of Embroidery Machine 3-5 Flat Frame Every Other Head Operation When sewing with the flat frame, the sewing range becomes 460 mm maximum in the X direction by conducting every other head operation.
Set the frame to flat hoop every other head operation only for heads No. 2 and No. 3. 2. Put the needle bar case at the needle bar No. 1 position and remove the presser feet for No. 1 and No. 4. 1. BES-940BC • BES-1240BC 55 Chapter 2 Preparation of Embroidery Machine 3-5 Flat Frame Every Other Head Operation When sewing with the flat frame, the sewing range becomes 460 mm maximum in the X direction by conducting every other head operation.

Instruction Manual - English
Page 65
...the mending mode. If you let the switch alone. BES-940BC • BES-1240BC 63 HEAD switch When it is not effective. When the light is off, the sensor is turned to suspend the machine head during embroidering for a designated period of timing Between Needle and Rotary Hook" ( page... 242) for embroidering. When it is set to ON to drive or to the opposite side, the machine stops. MENDING lamp This lamp lights up when the embroidery machine is in ...
...the mending mode. If you let the switch alone. BES-940BC • BES-1240BC 63 HEAD switch When it is not effective. When the light is off, the sensor is turned to suspend the machine head during embroidering for a designated period of timing Between Needle and Rotary Hook" ( page... 242) for embroidering. When it is set to ON to drive or to the opposite side, the machine stops. MENDING lamp This lamp lights up when the embroidery machine is in ...

Instruction Manual - English
Page 1
NINE NEEDLE FOUR HEAD ELECTRONIC EMBROIDERY MACHINE TWELVE NEEDLE FOUR HEAD ELECTRONIC EMBROIDERY MACHINE BES-940BC BES-1240BC INSTRUCTION MANUAL Please read this manual within easy reach for quick reference. Please keep this manual before using the machine.
NINE NEEDLE FOUR HEAD ELECTRONIC EMBROIDERY MACHINE TWELVE NEEDLE FOUR HEAD ELECTRONIC EMBROIDERY MACHINE BES-940BC BES-1240BC INSTRUCTION MANUAL Please read this manual within easy reach for quick reference. Please keep this manual before using the machine.
Instruction Manual - English
Page 10
... 60 Operation Panel 60 Switches at Machine Heads 62 Switches on Tension Plate 62 Flowchart of Embroidery Machine 1. Contents SAFTY INSTRUCTIONS 1 Procedure of Reading This Manual 6 Contents ...8 Chapter 1 An Introduction of Preparation for Embroidering 64 Run the Software 65 Turn on the Machine Power 65 8 BES-940BC • BES-1240BC Configuration of Software 43 3. Installation of...
... 60 Operation Panel 60 Switches at Machine Heads 62 Switches on Tension Plate 62 Flowchart of Embroidery Machine 1. Contents SAFTY INSTRUCTIONS 1 Procedure of Reading This Manual 6 Contents ...8 Chapter 1 An Introduction of Preparation for Embroidering 64 Run the Software 65 Turn on the Machine Power 65 8 BES-940BC • BES-1240BC Configuration of Software 43 3. Installation of...

Instruction Manual - English
Page 18
... Dimensions Options Fluorescent lamp 9 needle embroidery machine head 12 needle embroidery machine head (four-head type) (four-head type) Pattern embroidery Maximum 1000 rpm 450 (V) x 400... (H) mm (border frame area) 430 (V) x 300 (H) mm (tubular square hoop area) 85 (V) x 360 (H) mm (cap frame area) 450 (V) x 460 (H) mm (with every other head...1665 (H) mm (Distance between machine heads) 400 mm Paper tape reader, Embroidery hoops in different sizes, Bobbin winder, Parts for boring...
... Dimensions Options Fluorescent lamp 9 needle embroidery machine head 12 needle embroidery machine head (four-head type) (four-head type) Pattern embroidery Maximum 1000 rpm 450 (V) x 400... (H) mm (border frame area) 430 (V) x 300 (H) mm (tubular square hoop area) 85 (V) x 360 (H) mm (cap frame area) 450 (V) x 460 (H) mm (with every other head...1665 (H) mm (Distance between machine heads) 400 mm Paper tape reader, Embroidery hoops in different sizes, Bobbin winder, Parts for boring...

Instruction Manual - English
Page 25
... matters such as magnetic screwdriver or the back side of the drive during the access lamp is lit. Do not place it to clean the head of Embroidery Machine 2-6. Do not use or store floppy disks in an extremely high or low ambient temperature. Chapter 1 An Introduction of the floppy disk drive periodically...
... matters such as magnetic screwdriver or the back side of the drive during the access lamp is lit. Do not place it to clean the head of Embroidery Machine 2-6. Do not use or store floppy disks in an extremely high or low ambient temperature. Chapter 1 An Introduction of the floppy disk drive periodically...

Instruction Manual - English
Page 28
Names of Embroidery Machine 1. Chapter 2 Preparation of Machine Components BES-940BC Operation panel Pulley cover Pulley Fluorescent lamp switch Thread tension dial Thread tension switch Thread guide A Thread guide B Thread guide C Cotton stand Rear Fluorescent lamp Power switch F table Control box Head switch Leg Thumb bolt BES-1240BC Operation panel Pulley cover Pulley Fluorescent lamp switch...
Names of Embroidery Machine 1. Chapter 2 Preparation of Machine Components BES-940BC Operation panel Pulley cover Pulley Fluorescent lamp switch Thread tension dial Thread tension switch Thread guide A Thread guide B Thread guide C Cotton stand Rear Fluorescent lamp Power switch F table Control box Head switch Leg Thumb bolt BES-1240BC Operation panel Pulley cover Pulley Fluorescent lamp switch...

Instruction Manual - English
Page 41
...Brother's specified embroidery machine oil (Nisseki Embroidery Lube No. 10 or the equivalent). • Supplying an excessive amount of oil to Needle Bar Case Proper lubrication is pressed by mistake, which could result in good condition. BES-940BC BES-1240BC BES-940BC • BES-1240BC 39 Before operating the machine... for the first time after unpacking or after leaving the machine without operation for keeping the machine head in injury. CAUTION Turn off the power ...
...Brother's specified embroidery machine oil (Nisseki Embroidery Lube No. 10 or the equivalent). • Supplying an excessive amount of oil to Needle Bar Case Proper lubrication is pressed by mistake, which could result in good condition. BES-940BC BES-1240BC BES-940BC • BES-1240BC 39 Before operating the machine... for the first time after unpacking or after leaving the machine without operation for keeping the machine head in injury. CAUTION Turn off the power ...

Instruction Manual - English
Page 57
Set the frame to flat hoop every other head operation only for heads No. 2 and No. 3. 2. Chapter 2 Preparation of Embroidery Machine 3-5 Flat Frame Every Other Head Operation When sewing with the flat frame, the sewing range becomes 460 mm maximum in the X direction by conducting every other head operation. Put the needle bar case at the needle bar No. 1 position and remove the presser feet for No. 1 and No. 4. 1. BES-940BC • BES-1240BC 55
Set the frame to flat hoop every other head operation only for heads No. 2 and No. 3. 2. Chapter 2 Preparation of Embroidery Machine 3-5 Flat Frame Every Other Head Operation When sewing with the flat frame, the sewing range becomes 460 mm maximum in the X direction by conducting every other head operation. Put the needle bar case at the needle bar No. 1 position and remove the presser feet for No. 1 and No. 4. 1. BES-940BC • BES-1240BC 55

Instruction Manual - English
Page 65
... lights up when the embroidery machine is set to ON, needle bar on , thread breakage sensor is turned to left /right when this switch is functioning. When it is set to ON to drive or to suspend the machine head during embroidering for a designated period of time. BES-940BC • BES-1240BC 63 Refer to...
... lights up when the embroidery machine is set to ON, needle bar on , thread breakage sensor is turned to left /right when this switch is functioning. When it is set to ON to drive or to suspend the machine head during embroidering for a designated period of time. BES-940BC • BES-1240BC 63 Refer to...


