Brother International BAS-300A Support and Manuals
Get Help and Manuals for this Brother International item

View All Support Options Below
Free Brother International BAS-300A manuals!
Problems with Brother International BAS-300A?
Ask a Question
Free Brother International BAS-300A manuals!
Problems with Brother International BAS-300A?
Ask a Question
Popular Brother International BAS-300A Manual Pages
Application Instruction Manual - English - Page 1

brother
PROGRAMMABLE ELECTRONIC PATTERN SEWER PROGRAMMER
BAS-304A • 311A • 314A • 315A 326A • 326LA • 341A • 342A
INSTRUCTION MANUAL
Application Instruction Manual - English - Page 8
The last two digits entered are different according to the
sewing machine models.
V-0) 905"
Example: Program the pattern below with the enlarged input mode.
(X-0 • ... (7) After pressing the CD key at 0, press numeral key
M three times. Thus, the initial stitch will be set for programming. (This
should read "905".
(4) Press the LI key. (5) Use the direction keys to position the ...
Application Instruction Manual - English - Page 12

...the conversion.
-9- This can also be easily accomplished by converting the pitch setting to an enlarged or reduced setting.
[Changing the Pitch]
X Refer to "To Program Enlargement/Reduction Patterns"... (9), press the E key, and then program "888" E "100" E "100" 1:1 to set an
enlargement ratio of the pattern will beep, indicating that "999" is
now programmed.
X Programming can...
Application Instruction Manual - English - Page 13

...position.
(3) Use the direction keys to 2 mm.
(7) Press the N key. Y-0), "0" will automatically be set from
0-, C-> 0. Then press the M
key three times to use the smoothing function alone
when programming double ...12.7 mm ("127" on page 7.) X If there are the
stitch width, which can be set to position the needle at
the sewing start position ® on the pattern, and
then press
...
Application Instruction Manual - English - Page 19

...foot
Example: Sewing with a special purpose work clamp (inner clamp). [programmed method] (1) Set the power source switch on the STEP display, and then press the
key.
®. (5)... work piece as shown in split sewing. The work clamp will sew from position 0 to ®.
(Operation) (1) Set the work clamps (inner clamps).
•
L
fe
0
3
888E
•
®
///Inner clam,
O
Amount...
Application Instruction Manual - English - Page 21
... (5) Operate the numeral keys to indicate the proper stitch length on the STEP display.
(For example, to set to 2mm. (6) Operate the direction keys to accurately trace the pattern with the tip of the needle movement.... 3 times to the point of the needle. Note 2 The tO and C3 keys can easily be set the proper stitch length when the actual stitch length is 3 mm, and use the numeral keys to ...
Application Instruction Manual - English - Page 24

... (For example, for a sewing width of 20 mm and a stitch length of 10.0 mm or more is set up to between 1 -25.5mm. The sewing width
"ODD" can beset to a maximum of 253 mm. ...of the needle when the
material is sent in the direction of
® to 3.
• The sewing width can be set , press "700" M and then press " OLIO" N.
If a sewing width of 10 mm, input "700" fEJ, "200" ...
Application Instruction Manual - English - Page 25

... in the figures below.
• •
9)
-% (1) (2)
(3) (4)
Turn the power on the error No. Y-0) becomes the enlargement/reduction reference
point. (5) Press the El key three times to display "888" ... this happens, repeat the procedure from disk. The enlargement / reduction ratio can be set from
Reference point
If the reference point is changed
length is to sew the
enlargement ...
Application Instruction Manual - English - Page 26

... on a floppy disk, load the data from the floppy disk. (3) Using the E and El keys, move the needle to the position where you wish to set the optional output to ON or OFF. (4) Press the 0 key twice, followed by the 0, El, or 0, then the El key to...
Application Instruction Manual - English - Page 29

... read operation.
(4) Press the numeral key E 3 times to indicate "999" on the STEP display in the stitch pattern design
Before revision
Interposed stitches
After revision
4
5
5
6
6
6
7
7
B
8
(1) Set the power source switch to enter the sewing mode.
-26- Y-0), the numeral "0" will be
indicated on the STEP display, and the command indicator "F" will be...
Application Instruction Manual - English - Page 30
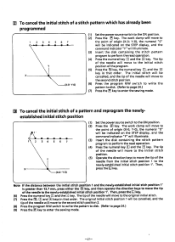
...of a pattern and reprogram the newlyestablished initial stitch position
34 5 6 7 (X-0 • l'-(0
(1) Set the power source switch to the original initial stitch. (7) Press the M, u1 and keys in that ...the initial stitch of a stitch pattern which has already been programmed
1 2 34 567 (X-0.r-0)
(1) Set the power source switch to
the point of origin (X-0; The tip of the needle will move ...
Application Instruction Manual - English - Page 33

...the tip of the needle can easily be moved (the distance between A and B) is turned manually.
(11) Turn the pulley manually to raise the needle to the highest position. (12) Press theE key. Then, press the... axis or Y axis
A.When the initial stitch is the shunting point of the sewing operation
(1) Set the power source switch to the ON position.
(2) Press the key.
The work clamp will move...
Application Instruction Manual - English - Page 38

NAGOYA JAPAN
151-300A Series S93Z11-012 1993.5, H C) Printed in Japan BROTHER INDUSTRIES, LTD.
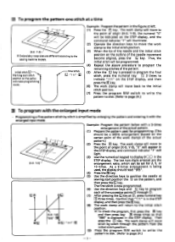
Progammer Instruction Manual BAS-300A Series - English - Page 12

...at a time
(X-0 • Y-0) )K Embroidery noop sizes are the
enlargement ratio, which can be set for programming. (This
should read "905".
(4) Press the EA key.
(5) Use the direction keys ... Press the program R/W switch to write the
pattern to disk. (Refer to the
sewing machine models. The last two digits entered are different according to page 24.)
0 To program with the enlarged...
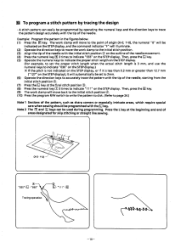
Progammer Instruction Manual BAS-300A Series - English - Page 37

... key W and the D key. D
x (X-0 • Y-0)
(1) Set the power source switch to the ON position. (2) Press the 0 key.
When the initial stitch is turned manually.
(11) Turn the pulley manually to raise the needle to point D.
(10) Make a mark at point... position when the pulley is the beginning of the sewing operation
(1) Set the power source switch to the ON position.
(2) Press the C] key.
Brother International BAS-300A Reviews
We have not received any reviews for Brother International yet.