
Quick Setup Guide - English
Page 3
... the interface cable is no longer than 6 feet (2.0 meters). Use a shielded interface cable that is IEEE 1284-compliant. ■ Network cable (DCP-8065DN only) Use a straight-through Category5 (or greater) twisted-pair cable for the interface you use a USB 2.0 interface cable that is done during ... Flap (Support Flap) 4. ADF Document Output Support Flap Quick Setup Guide CD-ROMs For Windows® For Macintosh® User's Guide Drum Unit Assembly (including Toner Cartridge) AC Power Cord Carton components may differ from one country to use a USB cable, make sure you...
... the interface cable is no longer than 6 feet (2.0 meters). Use a shielded interface cable that is IEEE 1284-compliant. ■ Network cable (DCP-8065DN only) Use a straight-through Category5 (or greater) twisted-pair cable for the interface you use a USB 2.0 interface cable that is done during ... Flap (Support Flap) 4. ADF Document Output Support Flap Quick Setup Guide CD-ROMs For Windows® For Macintosh® User's Guide Drum Unit Assembly (including Toner Cartridge) AC Power Cord Carton components may differ from one country to use a USB cable, make sure you...
Quick Setup Guide - English
Page 5
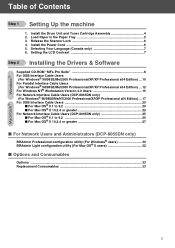
Install the Power Cord 6 5. Release the Scanner Lock 6 4. Install the Drum Unit and Toner Cartridge Assembly 4 2. Table of Contents Step 1 Setting Up the machine ...Professional x64 Edition) ... 12 For Windows NT® Workstation Version 4.0 Users 15 For Network Interface Cable Users (DCP-8065DN only) (For Windows® 98/98SE/Me/NT/2000 Professional/XP/XP Professional x64 Edition) ... 17 ...® 9.1 to 9.2 20 ■ For Mac OS® X 10.2.4 or greater 22 For Network Interface Cable Users (DCP-8065DN only 25 ■ For Mac OS® 9.1 to 9.2 25 ■ For Mac OS® X 10.2.4 or...
Install the Power Cord 6 5. Release the Scanner Lock 6 4. Install the Drum Unit and Toner Cartridge Assembly 4 2. Table of Contents Step 1 Setting Up the machine ...Professional x64 Edition) ... 12 For Windows NT® Workstation Version 4.0 Users 15 For Network Interface Cable Users (DCP-8065DN only) (For Windows® 98/98SE/Me/NT/2000 Professional/XP/XP Professional x64 Edition) ... 17 ...® 9.1 to 9.2 20 ■ For Mac OS® X 10.2.4 or greater 22 For Network Interface Cable Users (DCP-8065DN only 25 ■ For Mac OS® 9.1 to 9.2 25 ■ For Mac OS® X 10.2.4 or...

Quick Setup Guide - English
Page 6
Step 1 Setting Up the machine 1 Install the Drum Unit and Toner Cartridge Assembly Do NOT connect the interface cable. Connection the interface cable is done during the software installation process. 2 Unpack the drum unit and toner cartridge assembly. 1 Open the front cover by pressing the front cover release button (1). 3 Gently rock the drum assembly from side to side several times to distribute the toner evenly inside the cartridge. 4 Put the drum unit and toner cartridge into (1) the machine so that it clicks into the place. 5 Close the front cover of the machine. 4
Step 1 Setting Up the machine 1 Install the Drum Unit and Toner Cartridge Assembly Do NOT connect the interface cable. Connection the interface cable is done during the software installation process. 2 Unpack the drum unit and toner cartridge assembly. 1 Open the front cover by pressing the front cover release button (1). 3 Gently rock the drum assembly from side to side several times to distribute the toner evenly inside the cartridge. 4 Put the drum unit and toner cartridge into (1) the machine so that it clicks into the place. 5 Close the front cover of the machine. 4
Quick Setup Guide - English
Page 35
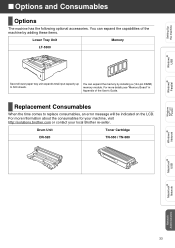
... Drum Unit Toner Cartridge DR-520 TN-550 / TN-580 Windows® Parallel Windows NT® 4.0 Parallel Windows® Network Macintosh® USB Macintosh® Network Network Administrators 33 For more information about the consumables for your machine, visit http://solutions.brother....com or contact your local Brother re-seller. Replacement Consumables When the time comes to 500 sheets. For more details,see "Memory Board" ...
... Drum Unit Toner Cartridge DR-520 TN-550 / TN-580 Windows® Parallel Windows NT® 4.0 Parallel Windows® Network Macintosh® USB Macintosh® Network Network Administrators 33 For more information about the consumables for your machine, visit http://solutions.brother....com or contact your local Brother re-seller. Replacement Consumables When the time comes to 500 sheets. For more details,see "Memory Board" ...
Users Manual - English
Page 4
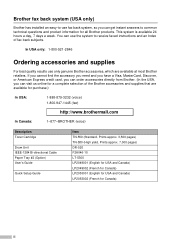
...complete selection of fax back subjects. In USA only: 1-800-521-2846 Ordering accessories and supplies For best quality results use only genuine Brother accessories, which are available for purchase.) In USA: 1-888-879-3232 (voice) 1-800-947-1445 (fax) http://www.brothermall.com In ...Canada: 1-877-BROTHER (voice) Description Toner Cartridge Drum Unit IEEE-1284 Bi-directional Cable Paper Tray #2 (Option) User's Guide Quick Setup Guide Item TN-550 (Standard, Prints approx. 3,500...
...complete selection of fax back subjects. In USA only: 1-800-521-2846 Ordering accessories and supplies For best quality results use only genuine Brother accessories, which are available for purchase.) In USA: 1-888-879-3232 (voice) 1-800-947-1445 (fax) http://www.brothermall.com In ...Canada: 1-877-BROTHER (voice) Description Toner Cartridge Drum Unit IEEE-1284 Bi-directional Cable Paper Tray #2 (Option) User's Guide Quick Setup Guide Item TN-550 (Standard, Prints approx. 3,500...

Users Manual - English
Page 6
..., consumables and accessories (collectively referred to in this warranty as Paper Feeding Kit, Fuser and Laser Units. and, 5 Problems arising from other than defects in materials or workmanship. 6 Normal ... limited to damage resulting from Brother and/or alteration/removal of the serial number). Brother® Three-Year Limited Warranty and Exchange Service For DCP-8060 and DCP-8065DN (USA only) Who ... warranty. You are not limited to toner, drums, print heads and ink cartridges. „ Except as otherwise provided herein, Brother warrants that you may be free from the ...
..., consumables and accessories (collectively referred to in this warranty as Paper Feeding Kit, Fuser and Laser Units. and, 5 Problems arising from other than defects in materials or workmanship. 6 Normal ... limited to damage resulting from Brother and/or alteration/removal of the serial number). Brother® Three-Year Limited Warranty and Exchange Service For DCP-8060 and DCP-8065DN (USA only) Who ... warranty. You are not limited to toner, drums, print heads and ink cartridges. „ Except as otherwise provided herein, Brother warrants that you may be free from the ...
Users Manual - English
Page 9
... liability of the end-user/purchaser. For laser products: Failure to remove the Toner Cartridge (and Toner Drum Unit on applicable models) during shipping. In order to use of a Sales Receipt. Damage to your exclusive remedy against Brother for any indirect, incidental, special, consequential,... free of charge if defective in the form of supplies or consumable items that are non-Brother products. Internet support: support@brother.ca or browse Brother's Web Site: www.brother.com Brother International Corporation (Canada) Ltd. 1 Rue Hôtel de Ville Dollard-Des-Ormeaux, QC H9B...
... liability of the end-user/purchaser. For laser products: Failure to remove the Toner Cartridge (and Toner Drum Unit on applicable models) during shipping. In order to use of a Sales Receipt. Damage to your exclusive remedy against Brother for any indirect, incidental, special, consequential,... free of charge if defective in the form of supplies or consumable items that are non-Brother products. Internet support: support@brother.ca or browse Brother's Web Site: www.brother.com Brother International Corporation (Canada) Ltd. 1 Rue Hôtel de Ville Dollard-Des-Ormeaux, QC H9B...

Users Manual - English
Page 12
... Cleaning the outside of the machine 68 Cleaning the scanner glass 69 Cleaning the laser scanner window 70 Cleaning the corona wire 71 Cleaning the drum unit 72 Replacing the toner cartridge (TN-550/TN-580 73 Replacing the toner... cartridge 74 Replacing the drum unit (DR-520 76 Replacing periodic maintenance parts 78 Packing and shipping the machine 79 ... Scan...94 Print ...95 Interfaces ...95 Computer requirements 96 Consumable items 97 Ethernet wired network (DCP-8065DN only 98 F Glossary Glossary...99 G Index Index ...100 x
... Cleaning the outside of the machine 68 Cleaning the scanner glass 69 Cleaning the laser scanner window 70 Cleaning the corona wire 71 Cleaning the drum unit 72 Replacing the toner cartridge (TN-550/TN-580 73 Replacing the toner... cartridge 74 Replacing the drum unit (DR-520 76 Replacing periodic maintenance parts 78 Packing and shipping the machine 79 ... Scan...94 Print ...95 Interfaces ...95 Computer requirements 96 Consumable items 97 Ethernet wired network (DCP-8065DN only 98 F Glossary Glossary...99 G Index Index ...100 x

Users Manual - English
Page 63
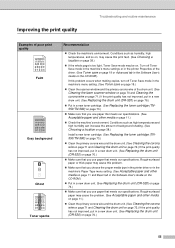
...primary corona wire for printing is unchecked. 51 Right-click 'Brother DCP-XXXX (where XXXX is probably not your model name)'. If the copy looks good, the problem is your machine. Visit us at 1-800-284-4329 (in USA) or 1-877-BROTHER (in Canada). „ Check that country. Clean your ... Difficulties Poor print quality Vertical black lines on page 55. If you think there is online. Make sure that the toner cartridge and drum unit are having difficulty with the way your PC, click Start, then Settings, and then Printers and Faxes. Clean them both the machine...
...primary corona wire for printing is unchecked. 51 Right-click 'Brother DCP-XXXX (where XXXX is probably not your model name)'. If the copy looks good, the problem is your machine. Visit us at 1-800-284-4329 (in USA) or 1-877-BROTHER (in Canada). „ Check that country. Clean your ... Difficulties Poor print quality Vertical black lines on page 55. If you think there is online. Make sure that the toner cartridge and drum unit are having difficulty with the way your PC, click Start, then Settings, and then Printers and Faxes. Clean them both the machine...
Users Manual - English
Page 67
... in the machine's menu setting. (See Toner save on page 19.) „ Clean the scanner window and the primary corona wire of the drum unit. (See Cleaning the laser scanner window on page 70 and Cleaning the corona wire on page 71.) If the print quality has not improved, put in a new... drum unit. (See Replacing the drum unit (DR-520) on page 76.) „ Make sure that you use paper that meets our specifications. Rough-surfaced paper...
... in the machine's menu setting. (See Toner save on page 19.) „ Clean the scanner window and the primary corona wire of the drum unit. (See Cleaning the laser scanner window on page 70 and Cleaning the corona wire on page 71.) If the print quality has not improved, put in a new... drum unit. (See Replacing the drum unit (DR-520) on page 76.) „ Make sure that you use paper that meets our specifications. Rough-surfaced paper...

Users Manual - English
Page 68
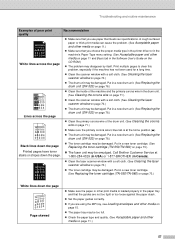
If you still see the spots on printed documents after making multiple copies, clean the drum unit (see Cleaning the drum unit on page 76.) 56 Put in a new drum unit. (See Replacing the drum unit (DR-520) on page 76.) All black White Spots on black text and graphics at 3.7 in. (94 mm) intervals... meets our specifications. (See Acceptable paper and other media on page 11.) „ If you use label sheets for laser printers, the glue from the sheets may sometimes stick to the OPC drum surface. If the print quality still has not improved you need to appear on may be damaged. Put in...
If you still see the spots on printed documents after making multiple copies, clean the drum unit (see Cleaning the drum unit on page 76.) 56 Put in a new drum unit. (See Replacing the drum unit (DR-520) on page 76.) All black White Spots on black text and graphics at 3.7 in. (94 mm) intervals... meets our specifications. (See Acceptable paper and other media on page 11.) „ If you use label sheets for laser printers, the glue from the sheets may sometimes stick to the OPC drum surface. If the print quality still has not improved you need to appear on may be damaged. Put in...
Users Manual - English
Page 69
... (in USA) or 1-877-BROTHER (in Canada). Print multiple pages to clear this problem, especially if the machine has not been used for a long time. „ Clean the scanner window with a soft cloth. (See Cleaning the laser scanner window on page 70.) „ The drum unit may be damaged. Put... the page „ Make sure that you use paper that meets our specifications. Call Brother Customer Service at the home position (a). „ The drum unit may be damaged. Put in a new drum unit. (See Replacing the drum unit (DR-520) on page 76.) ABCDEFGH abcdefghijk ABCD abcde 01234 „ Clean ...
... (in USA) or 1-877-BROTHER (in Canada). Print multiple pages to clear this problem, especially if the machine has not been used for a long time. „ Clean the scanner window with a soft cloth. (See Cleaning the laser scanner window on page 70.) „ The drum unit may be damaged. Put... the page „ Make sure that you use paper that meets our specifications. Call Brother Customer Service at the home position (a). „ The drum unit may be damaged. Put in a new drum unit. (See Replacing the drum unit (DR-520) on page 76.) ABCDEFGH abcdefghijk ABCD abcde 01234 „ Clean ...
Users Manual - English
Page 71
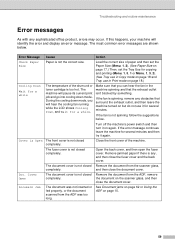
... the document on but do not use in Copy mode on page 18.) Cooling Down Wait for several minutes. Close the front cover of the drum unit or toner cartridge is not the correct size.
... the document on but do not use in Copy mode on page 18.) Cooling Down Wait for several minutes. Close the front cover of the drum unit or toner cartridge is not the correct size.

Users Manual - English
Page 72
Duplex The duplex tray is not installed Disabled properly. (DCP-8065DN only) Dust on Drum The primary corona wire on . Leave the machine for within specified time. 15...„ Press Stop/Exit and wait until you have a print quality problem; Clean the primary corona wire on the drum unit. (See Cleaning the corona wire on the CD-ROM.) „ Clear the data from the memory by pressing ...Job cancel. The paper tray is full. Action Use the drum unit until the other operations in the paper tray or MP tray. „ Remove the paper and load it...
Duplex The duplex tray is not installed Disabled properly. (DCP-8065DN only) Dust on Drum The primary corona wire on . Leave the machine for within specified time. 15...„ Press Stop/Exit and wait until you have a print quality problem; Clean the primary corona wire on the drum unit. (See Cleaning the corona wire on the CD-ROM.) „ Clear the data from the memory by pressing ...Job cancel. The paper tray is full. Action Use the drum unit until the other operations in the paper tray or MP tray. „ Remove the paper and load it...

Users Manual - English
Page 73
... paper tray of its life and the toner will soon run out. Do one of the following: „ Re-install the toner cartridge and drum unit assembly. „ Replace the toner cartridge with a new one . If the error message continues leave the machine for several minutes and then... not possible. Open the document cover, then release the scanner lock lever, and press Stop/Exit. See Scan on page 63.) Call Brother Customer Service to replace the laser unit. Document is one . (See Replacing the toner cartridge (TN550/TN-580) on again. Use a suitable size of optional trays ...
... paper tray of its life and the toner will soon run out. Do one of the following: „ Re-install the toner cartridge and drum unit assembly. „ Replace the toner cartridge with a new one . If the error message continues leave the machine for several minutes and then... not possible. Open the document cover, then release the scanner lock lever, and press Stop/Exit. See Scan on page 63.) Call Brother Customer Service to replace the laser unit. Document is one . (See Replacing the toner cartridge (TN550/TN-580) on again. Use a suitable size of optional trays ...

Users Manual - English
Page 76
The jammed paper may be pulled out with the toner cartridge and drum unit assembly, or this may release the paper so you can pull it out of the paper tray opening. CAUTION To prevent damage to open the front cover. e Put the drum unit and toner cartridge assembly back in the illustration. f Close the front cover. g Put the paper tray firmly back in the machine. 64 c Press the cover release lever to the machine from static electricity, DO NOT touch the electrodes shown in the machine. d Slowly take out the drum unit and toner cartridge assembly.
The jammed paper may be pulled out with the toner cartridge and drum unit assembly, or this may release the paper so you can pull it out of the paper tray opening. CAUTION To prevent damage to open the front cover. e Put the drum unit and toner cartridge assembly back in the illustration. f Close the front cover. g Put the paper tray firmly back in the machine. 64 c Press the cover release lever to the machine from static electricity, DO NOT touch the electrodes shown in the machine. d Slowly take out the drum unit and toner cartridge assembly.

Users Manual - English
Page 77
f Close the back cover. 65 c Open the back cover. e Using both hands, gently pull the jammed paper out of the machine C a Press the cover release lever to open the front cover. Troubleshooting and routine maintenance d Pull the tabs at the back of the fuser unit. Paper is jammed at the left and right hand sides toward you to open the fuser cover (1). 1 b Take out the drum unit and toner cartridge assembly.
f Close the back cover. 65 c Open the back cover. e Using both hands, gently pull the jammed paper out of the machine C a Press the cover release lever to open the front cover. Troubleshooting and routine maintenance d Pull the tabs at the back of the fuser unit. Paper is jammed at the left and right hand sides toward you to open the fuser cover (1). 1 b Take out the drum unit and toner cartridge assembly.

Users Manual - English
Page 78
b Pull the jammed paper out of the machine. Paper is jammed in the machine. g Put the drum unit and toner cartridge assembly back in the duplex tray (DCP-8065DN only) C a Pull the duplex tray completely out of the machine or the duplex tray. h Close the front cover. c Put the duplex tray back in the machine. 66
b Pull the jammed paper out of the machine. Paper is jammed in the machine. g Put the drum unit and toner cartridge assembly back in the duplex tray (DCP-8065DN only) C a Pull the duplex tray completely out of the machine or the duplex tray. h Close the front cover. c Put the duplex tray back in the machine. 66

Users Manual - English
Page 79
... cover release lever to open the front cover. b Take out the drum unit and toner cartridge assembly. c Hold down the lock lever on the right and take the toner cartridge out of the drum unit. If you put it lock into the drum unit until you hear it in the machine. e Put the... drum unit and toner cartridge assembly back in properly, the lock lever will lift automatically. f Close the...
... cover release lever to open the front cover. b Take out the drum unit and toner cartridge assembly. c Hold down the lock lever on the right and take the toner cartridge out of the drum unit. If you put it lock into the drum unit until you hear it in the machine. e Put the... drum unit and toner cartridge assembly back in properly, the lock lever will lift automatically. f Close the...

Users Manual - English
Page 80
... dust. b Wipe the outside surface of the machine. DO NOT use cleaning materials that is stuck inside the paper tray. 68 Routine maintenance C CAUTION The drum unit contains toner, so handle it off with volatile liquids such as follows: C a Pull the paper tray completely out of the machine. If toner scatters...
... dust. b Wipe the outside surface of the machine. DO NOT use cleaning materials that is stuck inside the paper tray. 68 Routine maintenance C CAUTION The drum unit contains toner, so handle it off with volatile liquids such as follows: C a Pull the paper tray completely out of the machine. If toner scatters...


