Quick Setup Guide - English
Page 10
... the Brother Product Registration Web page for using your machine. Repair MFL-Pro Suite (For USB and Parallel cable users only) If you experience errors while installing the MFL-Pro Suite, you can get important information and troubleshooting tips. MFL-Pro Suite includes Printer Driver, Scanner Driver, ScanSoft® PaperPort® SE with OCR, Brother ControlCenter2 and True Type® fonts. printing, scanning and networking details). Documentation View the User's Guide and other document in PDF format...
... the Brother Product Registration Web page for using your machine. Repair MFL-Pro Suite (For USB and Parallel cable users only) If you experience errors while installing the MFL-Pro Suite, you can get important information and troubleshooting tips. MFL-Pro Suite includes Printer Driver, Scanner Driver, ScanSoft® PaperPort® SE with OCR, Brother ControlCenter2 and True Type® fonts. printing, scanning and networking details). Documentation View the User's Guide and other document in PDF format...
Quick Setup Guide - English
Page 12
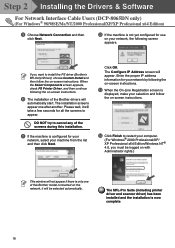
... (DCP-8060) or Local Connection (DCP-8065DN), and then click Next. The installation continues. Step 2 Installing the Drivers & Software For USB Interface Cable Users (For Windows® 98/98SE/Me/2000 Professional/XP/XP Professional x64 Edition) Make sure that you have finished the instructions from Step 1 "Setting Up the machine" on with Administrator rights.) 3 Put the supplied CD-ROM for Windows® into your CD-ROM drive. Please...
... (DCP-8060) or Local Connection (DCP-8065DN), and then click Next. The installation continues. Step 2 Installing the Drivers & Software For USB Interface Cable Users (For Windows® 98/98SE/Me/2000 Professional/XP/XP Professional x64 Edition) Make sure that you have finished the instructions from Step 1 "Setting Up the machine" on with Administrator rights.) 3 Put the supplied CD-ROM for Windows® into your CD-ROM drive. Please...

Quick Setup Guide - English
Page 14
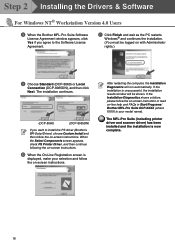
... model name screen appears, choose your language. 4 The CD-ROM main menu will automatically start and is followed by the installation of the Brother CD-ROM. (DCP-8060) (DCP-8065DN) If you have finished the instructions from Step 1 "Setting Up the machine" on pages 4 - 7. The installation of PaperPort® SE will appear. When the Select Components screen appears, check PS Printer Driver, and then continue following the on-screen instructions...
... model name screen appears, choose your language. 4 The CD-ROM main menu will automatically start and is followed by the installation of the Brother CD-ROM. (DCP-8060) (DCP-8065DN) If you have finished the instructions from Step 1 "Setting Up the machine" on pages 4 - 7. The installation of PaperPort® SE will appear. When the Select Components screen appears, check PS Printer Driver, and then continue following the on-screen instructions...
Quick Setup Guide - English
Page 18
... installation is displayed, make your model name). A Click Finish and wait as the PC restarts Windows® and continues the installation. (You must be shown. After restarting the computer, the Installation Diagnostics will be logged on -screen instructions. The installation continues. (DCP-8060) (DCP-8065DN) If you agree to install the PS driver (Brother's BR-Script Driver), choose Custom Install and then follow the on -line help and FAQs in Start/Programs/ Brother...
... installation is displayed, make your model name). A Click Finish and wait as the PC restarts Windows® and continues the installation. (You must be shown. After restarting the computer, the Installation Diagnostics will be logged on -screen instructions. The installation continues. (DCP-8060) (DCP-8065DN) If you agree to install the PS driver (Brother's BR-Script Driver), choose Custom Install and then follow the on -line help and FAQs in Start/Programs/ Brother...
Quick Setup Guide - English
Page 20
... OK. The MFL-Pro Suite (including printer driver and scanner driver) has been installed and the installation is only one after another. If you must be selected automatically. The Configure IP Address screen will automatically start. Enter the proper IP address information for your network, select your network, the following screen appears. Step 2 Installing the Drivers & Software For Network Interface Cable Users (DCP-8065DN only) (For Windows® 98/98SE/Me/NT/2000...
... OK. The MFL-Pro Suite (including printer driver and scanner driver) has been installed and the installation is only one after another. If you must be selected automatically. The Configure IP Address screen will automatically start. Enter the proper IP address information for your network, select your network, the following screen appears. Step 2 Installing the Drivers & Software For Network Interface Cable Users (DCP-8065DN only) (For Windows® 98/98SE/Me/NT/2000...

Quick Setup Guide - English
Page 21
... Add button. 6 To add port 137 for this service: - Enter "Localhost" (without the inverted commas). 4) In Internal Port number for network scanning, enter the information below : 1) In Description of the computer hosting this service on your software or contact the software manufacturer. ■ Windows® XP SP2 users: 1 Click the Start button, Control Panel and then Windows Firewall. Setting Up the machine Installing the Drivers & Software Windows® Network ■ After restarting the computer, the Installation Diagnostics will be shown. Make...
... Add button. 6 To add port 137 for this service: - Enter "Localhost" (without the inverted commas). 4) In Internal Port number for network scanning, enter the information below : 1) In Description of the computer hosting this service on your software or contact the software manufacturer. ■ Windows® XP SP2 users: 1 Click the Start button, Control Panel and then Windows Firewall. Setting Up the machine Installing the Drivers & Software Windows® Network ■ After restarting the computer, the Installation Diagnostics will be shown. Make...
Quick Setup Guide - English
Page 34
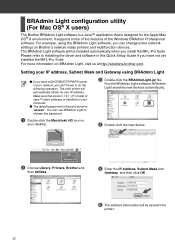
... its own IP address. Make sure that is designed for the print server is installed on BRAdmin Light, visit us at http://solutions.brother.com. The BRAdmin Light software will be saved to change some of the features of Java™ client software is "access". It supports some network settings on your computer. ■ The default password for the Apple Mac OS® X environment. For example, using BRAdmin Light ■ If...
... its own IP address. Make sure that is designed for the print server is installed on BRAdmin Light, visit us at http://solutions.brother.com. The BRAdmin Light software will be saved to change some of the features of Java™ client software is "access". It supports some network settings on your computer. ■ The default password for the Apple Mac OS® X environment. For example, using BRAdmin Light ■ If...

Users Manual - English
Page 21
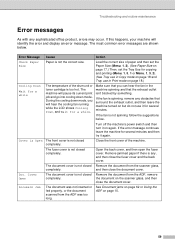
... power switch is off or the machine is in the tray or clear the paper jam. Replace the toner cartridge with a new one. General information Service error Red Cover open . Check the LCD message. Put paper in Sleep mode, the LED is open Toner Life End Red Paper error Scan lock Others Out of memory Follow the steps below. 1. Close the cover. Memory is released. If you cannot clear the error and you see the same service call indication after turning...
... power switch is off or the machine is in the tray or clear the paper jam. Replace the toner cartridge with a new one. General information Service error Red Cover open . Check the LCD message. Put paper in Sleep mode, the LED is open Toner Life End Red Paper error Scan lock Others Out of memory Follow the steps below. 1. Close the cover. Memory is released. If you cannot clear the error and you see the same service call indication after turning...
Users Manual - English
Page 30
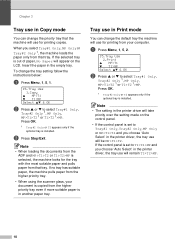
... and you select Tray#1 Only, MP Only or Tray#2 Only 1, the machine loads the paper only from your document is copied from the ADF and MP>T1>T2 or T1>T2>MP is installed. To change the default tray the machine will use will appear on the control panel. • If the control panel is out of paper, No Paper will remain T1>T2>MP. 18 a Press Menu, 1, 5, 2. 15.Tray Use 2.Print a MP>T1...
... and you select Tray#1 Only, MP Only or Tray#2 Only 1, the machine loads the paper only from your document is copied from the ADF and MP>T1>T2 or T1>T2>MP is installed. To change the default tray the machine will use will appear on the control panel. • If the control panel is out of paper, No Paper will remain T1>T2>MP. 18 a Press Menu, 1, 5, 2. 15.Tray Use 2.Print a MP>T1...

Users Manual - English
Page 33
This feature also prevents users from changing the Default settings of the machine by creating a restricted user. Make a careful note of the machine's functions to certain operations (Copy, Scan and PCprint). This password is used to set up restricted users and to turn on Secure Function Lock for each user. • When PCprint is disabled, computer print jobs will be enabled by limiting access to use the machine. Press OK. See Setting up a Public user, you can restrict one...
This feature also prevents users from changing the Default settings of the machine by creating a restricted user. Make a careful note of the machine's functions to certain operations (Copy, Scan and PCprint). This password is used to set up restricted users and to turn on Secure Function Lock for each user. • When PCprint is disabled, computer print jobs will be enabled by limiting access to use the machine. Press OK. See Setting up a Public user, you can restrict one...

Users Manual - English
Page 34
... Menu, 1, 7. 17.Function Lock a Lock OffiOn Set Password b Setup User Select ab & OK b Press a or b to select User01. Press OK. c Enter the administrator password. Public users do not need to select Enable or Disable for Scan. Press OK. c Enter the administrator password. Press OK. g Press a or b to enter a password. i Press Stop/Exit. 22 Press OK. e Press a or b to g for Copy. h Repeat d to select Enable or Disable for entering each additional user and password. Press OK. e Use...
... Menu, 1, 7. 17.Function Lock a Lock OffiOn Set Password b Setup User Select ab & OK b Press a or b to select User01. Press OK. c Enter the administrator password. Public users do not need to select Enable or Disable for Scan. Press OK. c Enter the administrator password. Press OK. g Press a or b to enter a password. i Press Stop/Exit. 22 Press OK. e Press a or b to g for Copy. h Repeat d to select Enable or Disable for entering each additional user and password. Press OK. e Use...

Users Manual - English
Page 63
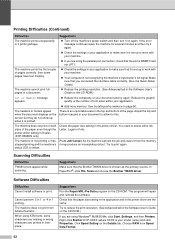
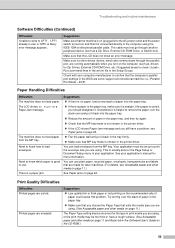
... follow the troubleshooting tips. Copy Quality Difficulties Difficulties Vertical streaks appear in and the power switch is turned on. „ Check that the correct printer driver has been installed and chosen. „ Check to see if the LCD is showing an error message. (See Error messages on page 55. Clean them both the machine and your faxes look, make a copy first. Your machine's primary corona wire for printing is online. Right-click 'Brother DCP-XXXX...
... follow the troubleshooting tips. Copy Quality Difficulties Difficulties Vertical streaks appear in and the power switch is turned on. „ Check that the correct printer driver has been installed and chosen. „ Check to see if the LCD is showing an error message. (See Error messages on page 55. Clean them both the machine and your faxes look, make a copy first. Your machine's primary corona wire for printing is online. Right-click 'Brother DCP-XXXX...
Users Manual - English
Page 64
... the Brother TWAIN driver. Suggestions Run the Repair MFL-Pro Suite program on the CD-ROM.) If you connected the interface cable correctly. (See the Quick Setup Guide.) „ Reduce the printing resolution. (See Advanced tab in the Software User's Guide on the CD-ROM. Press Job Cancel. The machine does not print from Spool Data Format. 52 Try to work with your machine. „ If you are using the parallel port connection, check...
... the Brother TWAIN driver. Suggestions Run the Repair MFL-Pro Suite program on the CD-ROM.) If you connected the interface cable correctly. (See the Quick Setup Guide.) „ Reduce the printing resolution. (See Advanced tab in the Software User's Guide on the CD-ROM. Press Job Cancel. The machine does not print from Spool Data Format. 52 Try to work with your machine. „ If you are using the parallel port connection, check...
Users Manual - English
Page 65
... Software User's Guide on page 63. If the paper is curled, you are set up to support a bi-directional machine; You can load envelopes from the MP tray. Suggestions Make sure that the computer's parallel port settings in the printer driver. Make sure that the MP tray mode is not chosen in the printer driver. „ If the LCD shows Paper Jam message and you are made for the type of paper in the tray firmly. „ Make...
... Software User's Guide on page 63. If the paper is curled, you are set up to support a bi-directional machine; You can load envelopes from the MP tray. Suggestions Make sure that the computer's parallel port settings in the printer driver. Make sure that the MP tray mode is not chosen in the printer driver. „ If the LCD shows Paper Jam message and you are made for the type of paper in the tray firmly. „ Make...
Users Manual - English
Page 71
.... Remove the document form the ADF, remove the document on again. Turn off the machine's power switch and then turn it on the scanner glass, and then close the document cover. See Document jams on page 62 or Using the ADF on page 18.) Cooling Down Wait for copying and printing (Menu, 1, 5, 1 or Menu, 1, 5, 2). (See Tray use in Copy mode on page 18 and Tray use it again. Action Load the correct size of paper and then set the Paper Size (Menu, 1, 2). (See Paper Size on page 17.) Then, set the Tray Use...
.... Remove the document form the ADF, remove the document on again. Turn off the machine's power switch and then turn it on the scanner glass, and then close the document cover. See Document jams on page 62 or Using the ADF on page 18.) Cooling Down Wait for copying and printing (Menu, 1, 5, 1 or Menu, 1, 5, 2). (See Tray use in Copy mode on page 18 and Tray use it again. Action Load the correct size of paper and then set the Paper Size (Menu, 1, 2). (See Paper Size on page 17.) Then, set the Tray Use...

Users Manual - English
Page 72
... copy the scanned pages. „ Press Stop/Exit and wait until you have a print quality problem; The paper is jammed in the duplex tray. (See Paper jams on page 63.) (See Paper jams on page 63.) Paper Jam Inside The paper is jammed inside the machine. (See Paper jams on page 63.) Paper Jam MPTray The paper is jammed in the Software User's Guide on page 76 The drum counter was not reset when a new drum was installed. 1. Error Message Drum Near End Cause The drum unit is near the end of Memory The fuser unit...
... copy the scanned pages. „ Press Stop/Exit and wait until you have a print quality problem; The paper is jammed in the duplex tray. (See Paper jams on page 63.) (See Paper jams on page 63.) Paper Jam Inside The paper is jammed inside the machine. (See Paper jams on page 63.) Paper Jam MPTray The paper is jammed in the Software User's Guide on page 76 The drum counter was not reset when a new drum was installed. 1. Error Message Drum Near End Cause The drum unit is near the end of Memory The fuser unit...

Users Manual - English
Page 73
.... If the error message continues leave the machine for duplex scanning. Use a suitable size of its life and the toner will soon run out. Call Brother Customer Service to print, copy or scan again. Remove any additional trays. The toner cartridge and drum unit assembly is not installed properly, or the toner cartridge is used up and printing is not installed properly. The machine has a mechanical problem. Call Brother Customer Service to replace the fuser unit. Turn off the machine's power switch and then turn it on...
.... If the error message continues leave the machine for duplex scanning. Use a suitable size of its life and the toner will soon run out. Call Brother Customer Service to print, copy or scan again. Remove any additional trays. The toner cartridge and drum unit assembly is not installed properly, or the toner cartridge is used up and printing is not installed properly. The machine has a mechanical problem. Call Brother Customer Service to replace the fuser unit. Turn off the machine's power switch and then turn it on...

Users Manual - English
Page 90
... maintenance parts will need to be replaced after printing approximately 100,000 pages. LCD message Description Replace PF KitMP Replace paper feeding kit for Tray 2. Replace PF Kit2 Replace paper feeding kit for MP tray. d Put the toner cartridge firmly into the plastic bag. f Press Clear/Back. Replace Drum? Replace PF Kit1 Replace paper feeding kit for Tray 1. CAUTION Wait to unpack a new drum unit until you are installing a new drum, press 1. Replace Fuser Replace fuser unit. g When the LCD shows Accepted, close the front cover. Replace Laser Replace laser unit...
... maintenance parts will need to be replaced after printing approximately 100,000 pages. LCD message Description Replace PF KitMP Replace paper feeding kit for Tray 2. Replace PF Kit2 Replace paper feeding kit for MP tray. d Put the toner cartridge firmly into the plastic bag. f Press Clear/Back. Replace Drum? Replace PF Kit1 Replace paper feeding kit for Tray 1. CAUTION Wait to unpack a new drum unit until you are installing a new drum, press 1. Replace Fuser Replace fuser unit. g When the LCD shows Accepted, close the front cover. Replace Laser Replace laser unit...

Users Manual - English
Page 98
... Proprinter 1.Internal Font - 2.Configuration - - 1.Reset 2.Exit Descriptions You can change to the default settings. You can choose the Copy resolution for copies. Chooses the emulation mode. Page 27 27 33 86 See Software User's Guide on the CD-ROM. Main Menu 2.Copy 3.Printer Submenu 1.Quality 2.FB Txt Quality 3.Contrast 1.Emulation 2.Print Options 3.Reset Printer Menu Selections - - Returns the PCL setting to the higher Copy resolution when you make a text copy with 100% ratio using the scanner glass.
... Proprinter 1.Internal Font - 2.Configuration - - 1.Reset 2.Exit Descriptions You can change to the default settings. You can choose the Copy resolution for copies. Chooses the emulation mode. Page 27 27 33 86 See Software User's Guide on the CD-ROM. Main Menu 2.Copy 3.Printer Submenu 1.Quality 2.FB Txt Quality 3.Contrast 1.Emulation 2.Print Options 3.Reset Printer Menu Selections - - Returns the PCL setting to the higher Copy resolution when you make a text copy with 100% ratio using the scanner glass.
Users Manual - English
Page 111
Cancel Job Cancels a print job and clears the printer memory. Resolution The number of the machine. 99 LCD (liquid crystal display) The display screen on the machine that shows the current settings of vertical and horizontal lines per inch. Menu mode Programming mode for changing your computer. OCR (optical character recognition) The bundled ScanSoft® Paper Port® or Presto!® PageManager® software application converts an image of text to compensate for each copy without changing the default settings. Gray...
Cancel Job Cancels a print job and clears the printer memory. Resolution The number of the machine. 99 LCD (liquid crystal display) The display screen on the machine that shows the current settings of vertical and horizontal lines per inch. Menu mode Programming mode for changing your computer. OCR (optical character recognition) The bundled ScanSoft® Paper Port® or Presto!® PageManager® software application converts an image of text to compensate for each copy without changing the default settings. Gray...


