User Guide
Page 5
...DISCLAIMER OF WARRANTIES iii Notice - Disclaimer of this manual has been compiled and published, covering the latest product descriptions and specifications. THE ABOVE EXCLUSION MAY NOT APPLY TO YOU. BROTHER'S LICENSOR(S) DOES NOT WARRANT, GUARANTEE OR MAKE ANY...ACCURACY, RELIABILITY, CURRENTNESS OR OTHERWISE. Brother reserves the right to the publication. The contents of this manual and the specifications of Warranties (USA and Canada) BROTHER'S LICENSOR(S), AND THEIR DIRECTORS, OFFICERS, EMPLOYEES OR AGENTS (COLLECTIVELY BROTHER'S LICENSOR) MAKE NO WARRANTIES, EXPRESS...
...DISCLAIMER OF WARRANTIES iii Notice - Disclaimer of this manual has been compiled and published, covering the latest product descriptions and specifications. THE ABOVE EXCLUSION MAY NOT APPLY TO YOU. BROTHER'S LICENSOR(S) DOES NOT WARRANT, GUARANTEE OR MAKE ANY...ACCURACY, RELIABILITY, CURRENTNESS OR OTHERWISE. Brother reserves the right to the publication. The contents of this manual and the specifications of Warranties (USA and Canada) BROTHER'S LICENSOR(S), AND THEIR DIRECTORS, OFFICERS, EMPLOYEES OR AGENTS (COLLECTIVELY BROTHER'S LICENSOR) MAKE NO WARRANTIES, EXPRESS...
User Guide
Page 9
...modifications, or tampering by the end user/purchaser of the possibility of such damages. Neither Brother nor anyone other rights which vary from Providence to Providence. For laser products: Failure to remove the Toner Cartridge (and Toner Drum Unit on applicable models) ...consumable items that are non-Brother products. In order to obtain warranty service, the DCP/Facsimile machine must be the sole liability of the end-user/purchaser. Damage to your Operation Manual for labour and parts, Brother International Corporation (Canada) Ltd. ("Brother"), or its Authorized Service ...
...modifications, or tampering by the end user/purchaser of the possibility of such damages. Neither Brother nor anyone other rights which vary from Providence to Providence. For laser products: Failure to remove the Toner Cartridge (and Toner Drum Unit on applicable models) ...consumable items that are non-Brother products. In order to obtain warranty service, the DCP/Facsimile machine must be the sole liability of the end-user/purchaser. Damage to your Operation Manual for labour and parts, Brother International Corporation (Canada) Ltd. ("Brother"), or its Authorized Service ...

User Guide
Page 13
... Introduction 1-1 Using this Guide 1-1 Finding information 1-1 Symbols used in this Guide 1-1 On-line Registration (USA and Canada 1-2 DCP part names and operations 1-3 Control panel overview 1-6 Status LED indications 1-8 Inserting originals for copying (and scanning 1-10 Using the...2-5 To load paper or other media in the manual feed tray (For DCP-8020 2-7 To load paper or other media in the multi-purpose tray (MP tray) (For DCP-8025D 2-9 To use Automatic Duplexing for copy and print operations (For DCP-8025D 2-11 3 On-screen programming 3-1 User-friendly ...
... Introduction 1-1 Using this Guide 1-1 Finding information 1-1 Symbols used in this Guide 1-1 On-line Registration (USA and Canada 1-2 DCP part names and operations 1-3 Control panel overview 1-6 Status LED indications 1-8 Inserting originals for copying (and scanning 1-10 Using the...2-5 To load paper or other media in the manual feed tray (For DCP-8020 2-7 To load paper or other media in the multi-purpose tray (MP tray) (For DCP-8025D 2-9 To use Automatic Duplexing for copy and print operations (For DCP-8025D 2-11 3 On-screen programming 3-1 User-friendly ...

User Guide
Page 14
... 5-17 6 Using the DCP as a printer 6-1 Using the Brother DCP-8020, DCP-8025D printer driver ... 6-1 How to print your document 6-2 Simultaneous printing and scanning 6-3 Two-sided printing (Duplex Printing 6-3 Automatic Duplex Printing (For DCP-8025D) ......... 6-3 Manual Duplex Printing 6-4 Face-down output tray 6-4 Printing on plain paper 6-5 The manual feed tray (For DCP-8020 6-5 The MP tray (For DCP-8025D 6-6 Printing on thicker...
... 5-17 6 Using the DCP as a printer 6-1 Using the Brother DCP-8020, DCP-8025D printer driver ... 6-1 How to print your document 6-2 Simultaneous printing and scanning 6-3 Two-sided printing (Duplex Printing 6-3 Automatic Duplex Printing (For DCP-8025D) ......... 6-3 Manual Duplex Printing 6-4 Face-down output tray 6-4 Printing on plain paper 6-5 The manual feed tray (For DCP-8020 6-5 The MP tray (For DCP-8025D 6-6 Printing on thicker...
User Guide
Page 23
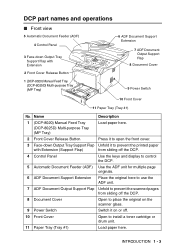
... Output Tray Support Flap Unfold it on or off. 10 Front Cover Open to prevent the printed paper with Extension 2 Front Cover Release Button 1 (DCP-8020) Manual Feed Tray (DCP-8025D) Multi-purpose Tray (MP Tray) 6 ADF Document Support Extension 7 ADF Document Output Support Flap 8 Document Cover 9 Power Switch 10 Front Cover 11 Paper...
... Output Tray Support Flap Unfold it on or off. 10 Front Cover Open to prevent the printed paper with Extension 2 Front Cover Release Button 1 (DCP-8020) Manual Feed Tray (DCP-8025D) Multi-purpose Tray (MP Tray) 6 ADF Document Support Extension 7 ADF Document Output Support Flap 8 Document Cover 9 Power Switch 10 Front Cover 11 Paper...

User Guide
Page 24
... to match your paper size for Duplex Printing (DCP-8025D) No. Open it when thicker paper is placed in the MP tray or Manual feed tray. Connect the USB Cable here. Name 12 Paper Adjustment Lever for Duplex Printing (DCP-8025D) 13 Duplex Tray (DCP-8025D) 14 AC Power Connector 15 Face-up Output... Tray (Back Output Tray) 14 AC Power Connector 13 Duplex Tray (DCP-8025D ) 12 Paper Adjustment Lever ...
... to match your paper size for Duplex Printing (DCP-8025D) No. Open it when thicker paper is placed in the MP tray or Manual feed tray. Connect the USB Cable here. Name 12 Paper Adjustment Lever for Duplex Printing (DCP-8025D) 13 Duplex Tray (DCP-8025D) 14 AC Power Connector 15 Face-up Output... Tray (Back Output Tray) 14 AC Power Connector 13 Duplex Tray (DCP-8025D ) 12 Paper Adjustment Lever ...
User Guide
Page 33
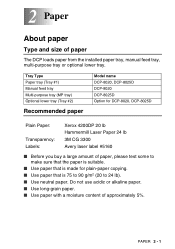
... approximately 5%. PAPER 2 - 1 Tray Type Paper tray (Tray #1) Manual feed tray Multi-purpose tray (MP tray) Optional lower tray (Tray #2) Recommended paper Model name DCP-8020, DCP-8025D DCP-8020 DCP-8025D Option for DCP-8020, DCP-8025D Plain Paper: Transparency: Labels: Xerox 4200DP 20 lb Hammermill Laser Paper 24 lb 3M CG 3300 Avery laser label #5160 ■ Before you buy a large...
... approximately 5%. PAPER 2 - 1 Tray Type Paper tray (Tray #1) Manual feed tray Multi-purpose tray (MP tray) Optional lower tray (Tray #2) Recommended paper Model name DCP-8020, DCP-8025D DCP-8020 DCP-8025D Option for DCP-8020, DCP-8025D Plain Paper: Transparency: Labels: Xerox 4200DP 20 lb Hammermill Laser Paper 24 lb 3M CG 3300 Avery laser label #5160 ■ Before you buy a large...
User Guide
Page 34
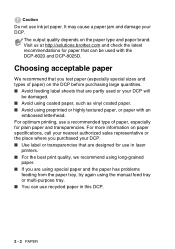
...paper and transparencies. Visit us at http://solutions.brother.com and check the latest recommendations for use in this DCP. 2 - 2 PAPER The output quality depends...paper in laser printers. ■ For the best print quality, we recommend using preprinted or highly textured paper, or paper with the DCP-8020 and DCP-8025D. For... more information on the paper type and paper brand. It may cause a paper jam and damage your DCP. ■ Use label or transparencies that are using special paper and the paper has problems feeding from the paper tray, try again using the manual...
...paper and transparencies. Visit us at http://solutions.brother.com and check the latest recommendations for use in this DCP. 2 - 2 PAPER The output quality depends...paper in laser printers. ■ For the best print quality, we recommend using preprinted or highly textured paper, or paper with the DCP-8020 and DCP-8025D. For... more information on the paper type and paper brand. It may cause a paper jam and damage your DCP. ■ Use label or transparencies that are using special paper and the paper has problems feeding from the paper tray, try again using the manual...

User Guide
Page 35
Paper capacity of the paper trays Multi-purpose tray (MP tray) (DCP-8025D) Manual feed tray (DCP-8020) Paper tray (Tray #1) Optional lower tray (Tray #2) Duplex printing (DCP-8025D) Paper size Number of sheets Width: 2.75 to 8.66 in. (69.8 to 220 mm) Height: 4.57 to 16.0 in. (116 to 406.4 mm) 50 sheets (...
Paper capacity of the paper trays Multi-purpose tray (MP tray) (DCP-8025D) Manual feed tray (DCP-8020) Paper tray (Tray #1) Optional lower tray (Tray #2) Duplex printing (DCP-8025D) Paper size Number of sheets Width: 2.75 to 8.66 in. (69.8 to 220 mm) Height: 4.57 to 16.0 in. (116 to 406.4 mm) 50 sheets (...

User Guide
Page 36
..., remove each paper tray Model Paper types Paper weights Paper sizes DCP-8020 DCP-8025D Multi- N/A feed tray (69.8 to 220 mm) Height: 4.57 to 16.0 in . Paper specifications for each one from the face-down output tray after it exists the DCP. 2 - 4 PAPER N/A purpose tray Width: 2.75 to ...8.66 in. (69.8 to 220 mm) Height: 4.57 to 16.0 in. (116 to 406.4 mm) Manual...
..., remove each paper tray Model Paper types Paper weights Paper sizes DCP-8020 DCP-8025D Multi- N/A feed tray (69.8 to 220 mm) Height: 4.57 to 16.0 in . Paper specifications for each one from the face-down output tray after it exists the DCP. 2 - 4 PAPER N/A purpose tray Width: 2.75 to ...8.66 in. (69.8 to 220 mm) Height: 4.57 to 16.0 in. (116 to 406.4 mm) Manual...

User Guide
Page 39
To load paper or other media in for a short distance, and then let go of the paper touches the paper feed roller. Slide the paper guides to fit the paper size. 2 Using both hands put paper in the manual feed tray until the DCP automatically feeds the paper in the manual feed tray (For DCP-8020) When printing envelopes and labels you should only use the manual feed tray. 1 Open the manual feed tray. PAPER 2 - 7 Hold the paper in this position until the front edge of the paper.
To load paper or other media in for a short distance, and then let go of the paper touches the paper feed roller. Slide the paper guides to fit the paper size. 2 Using both hands put paper in the manual feed tray until the DCP automatically feeds the paper in the manual feed tray (For DCP-8020) When printing envelopes and labels you should only use the manual feed tray. 1 Open the manual feed tray. PAPER 2 - 7 Hold the paper in this position until the front edge of the paper.

User Guide
Page 40
When you put paper in the manual feed tray, please remember the following ■ The side to be printed on must be fed properly, resulting in a skewed printout or a paper jam. ■ Do not put more than one time, or it gently into the tray. ■ Make sure that the paper is not, the paper may cause a jam. 2 - 8 PAPER If it is straight and in the manual feed tray at any one sheet of the paper) in first and push it may not be face up. ■ Put the leading edge (top of paper or envelope in the proper position on the manual feed tray.
When you put paper in the manual feed tray, please remember the following ■ The side to be printed on must be fed properly, resulting in a skewed printout or a paper jam. ■ Do not put more than one time, or it gently into the tray. ■ Make sure that the paper is not, the paper may cause a jam. 2 - 8 PAPER If it is straight and in the manual feed tray at any one sheet of the paper) in first and push it may not be face up. ■ Put the leading edge (top of paper or envelope in the proper position on the manual feed tray.

User Guide
Page 58
... day to day use the scanning feature. Turning off the scanner lamp will reduce the lamp's life. The factory setting is automatically reset when the DCP receives PC data, or makes a copy. The timer is 05 minutes. Turning off the Scanner Lamp The scanner lamp stays on the LCD. Please ...while the fuser warms up to working temperature. 1 Press Menu, 1, 4, 2. 2 Use the Numeric keys to turn off the scanner lamp manually if you wish by turning off the fuser inside the DCP, while it is not necessary for 16 hours before it goes into sleep mode. Sleep Time Setting the Sleep Time...
... day to day use the scanning feature. Turning off the scanner lamp will reduce the lamp's life. The factory setting is automatically reset when the DCP receives PC data, or makes a copy. The timer is 05 minutes. Turning off the Scanner Lamp The scanner lamp stays on the LCD. Please ...while the fuser warms up to working temperature. 1 Press Menu, 1, 4, 2. 2 Use the Numeric keys to turn off the scanner lamp manually if you wish by turning off the fuser inside the DCP, while it is not necessary for 16 hours before it goes into sleep mode. Sleep Time Setting the Sleep Time...

User Guide
Page 81
Very thin or very thick paper is not recommended. Face-down output tray The DCP ejects paper with printed surfaces face down into the output tray in the front of the paper first. Support Flap with a pop-up message) to ... you may get a paper jam. We recommend 20 to 24 lb (75 to reinsert the paper. Unfold the support flap to support the printed pages. Manual Duplex Printing The DCP prints all the even-numbered pages on one from the support flap after it well, or you (with Extension USING THE...
Very thin or very thick paper is not recommended. Face-down output tray The DCP ejects paper with printed surfaces face down into the output tray in the front of the paper first. Support Flap with a pop-up message) to ... you may get a paper jam. We recommend 20 to 24 lb (75 to reinsert the paper. Unfold the support flap to support the printed pages. Manual Duplex Printing The DCP prints all the even-numbered pages on one from the support flap after it well, or you (with Extension USING THE...

User Guide
Page 82
... the print data to print. 6 - 5 USING THE DCP AS A PRINTER If it is not, the paper may not be fed properly, resulting in a skewed printout or a paper jam. ■ Do not put more than one piece of paper in the manual feed tray at any one time, or it may cause a jam. 5 After the... printed page comes out of the DCP, put in the next sheet of the paper touches the paper feed roller and...
... the print data to print. 6 - 5 USING THE DCP AS A PRINTER If it is not, the paper may not be fed properly, resulting in a skewed printout or a paper jam. ■ Do not put more than one piece of paper in the manual feed tray at any one time, or it may cause a jam. 5 After the... printed page comes out of the DCP, put in the next sheet of the paper touches the paper feed roller and...

User Guide
Page 84
...back of paper in the manual feed tray at any one time, or it is straight and in the proper position in the printer driver. If it may not be fed properly, resulting in a skewed printout or a paper jam. ■ Do not put more than one piece of the DCP. Media Type: Thick paper... or Thicker paper Paper Source: Manual 2 Open the back output tray. 3 Open the manual feed tray. Printing on thicker paper or card stock. The manual feed tray (For DCP-8020) 1 Select the Paper Size, Media Type, Paper Source...
...back of paper in the manual feed tray at any one time, or it is straight and in the proper position in the printer driver. If it may not be fed properly, resulting in a skewed printout or a paper jam. ■ Do not put more than one piece of the DCP. Media Type: Thick paper... or Thicker paper Paper Source: Manual 2 Open the back output tray. 3 Open the manual feed tray. Printing on thicker paper or card stock. The manual feed tray (For DCP-8020) 1 Select the Paper Size, Media Type, Paper Source...

User Guide
Page 88
Media Type: Envelope, Env.thin or Env.thick For DCP-8020: 2 Open the back output tray. 6 - 11 USING THE DCP AS A PRINTER Printing on envelopes To print on envelopes use manual feed tray or multi-purpose tray. ■ The DCP automatically turns on the Manual Feed mode when you put paper in the manual feed tray. ■ All sides should be properly folded without any wrinkles or creases. 1 Select the Paper Size, Media Type, Paper Source, and other settings in the printer driver.
Media Type: Envelope, Env.thin or Env.thick For DCP-8020: 2 Open the back output tray. 6 - 11 USING THE DCP AS A PRINTER Printing on envelopes To print on envelopes use manual feed tray or multi-purpose tray. ■ The DCP automatically turns on the Manual Feed mode when you put paper in the manual feed tray. ■ All sides should be properly folded without any wrinkles or creases. 1 Select the Paper Size, Media Type, Paper Source, and other settings in the printer driver.

User Guide
Page 89
When you have been printed: At the back of the DCP, open the back output tray and push down the blue tabs at the left and right ...Hold the envelope in for a short distance, and then let go of the envelope touches the paper feed roller. USING THE DCP AS A PRINTER 6 - 12 If envelopes are creased after they have finished printing your envelopes, close the back output tray to...Slide the paper guides to their original position. 4 Using both hands put the envelope in the manual feed tray until the DCP automatically feeds it in this position until the front edge of the envelope. 3 Open the...
When you have been printed: At the back of the DCP, open the back output tray and push down the blue tabs at the left and right ...Hold the envelope in for a short distance, and then let go of the envelope touches the paper feed roller. USING THE DCP AS A PRINTER 6 - 12 If envelopes are creased after they have finished printing your envelopes, close the back output tray to...Slide the paper guides to their original position. 4 Using both hands put the envelope in the manual feed tray until the DCP automatically feeds it in this position until the front edge of the envelope. 3 Open the...

User Guide
Page 90
For DCP-8025D: 2 Open the back output tray, and then unfold the face-up in the tray. 5 After the printed envelope comes out of the DCP, the DCP will wait until you put more than one envelope in the manual feed tray at any one time, or it may not be printed on is straight as you finish... to be fed properly, resulting in a skewed printout or a jam. ■ Do not put in the manual feed tray, making sure that the side to the DCP. 7 After you insert it gently. 6 - 13 USING THE DCP AS A PRINTER ■ Make sure the envelope is face up output tray support if necessary. 3 Open the...
For DCP-8025D: 2 Open the back output tray, and then unfold the face-up in the tray. 5 After the printed envelope comes out of the DCP, the DCP will wait until you put more than one envelope in the manual feed tray at any one time, or it may not be printed on is straight as you finish... to be fed properly, resulting in a skewed printout or a jam. ■ Do not put in the manual feed tray, making sure that the side to the DCP. 7 After you insert it gently. 6 - 13 USING THE DCP AS A PRINTER ■ Make sure the envelope is face up output tray support if necessary. 3 Open the...

User Guide
Page 94
...PC, it automatically chooses the emulation mode. If the function does not work properly, either select the required emulation mode manually using the DCP panel buttons or use the emulation selection commands in memory will be cleared. ■ After you want to delete the... secured data press or to AUTO. Setting the Emulation Selection This DCP has an Automatic Emulation Selection function. You can change the default emulation mode manually by using the numeric keys. The DCP prints the data. -OR- 4 Enter your password using the control panel. 1...
...PC, it automatically chooses the emulation mode. If the function does not work properly, either select the required emulation mode manually using the DCP panel buttons or use the emulation selection commands in memory will be cleared. ■ After you want to delete the... secured data press or to AUTO. Setting the Emulation Selection This DCP has an Automatic Emulation Selection function. You can change the default emulation mode manually by using the numeric keys. The DCP prints the data. -OR- 4 Enter your password using the control panel. 1...


