
Assembly Manual
Page 2
... (30) days of your purchase of Contents Bowflex Power Pro 4-10 Part Reference and Size Guide 4 PowerPro Reference Guide 5 Assembly Instructions 6-10 Leg Extension Attachment 11-13 Part Reference and Size Guide 11 Assembly Instructions 12-13 Chest Bar Attachment 14-17 Assembly Instructions 15-17 Lat Pulldown Attachment 18-22 Part Reference and Size Guide 18...
... (30) days of your purchase of Contents Bowflex Power Pro 4-10 Part Reference and Size Guide 4 PowerPro Reference Guide 5 Assembly Instructions 6-10 Leg Extension Attachment 11-13 Part Reference and Size Guide 11 Assembly Instructions 12-13 Chest Bar Attachment 14-17 Assembly Instructions 15-17 Lat Pulldown Attachment 18-22 Part Reference and Size Guide 18...

Assembly Manual
Page 17
Depending on the machine and accessories you ordered, this assembly are in a box labeled Lat Pulldown Attachment Box Contents 1 Cross Bar 1 Main Frame Lower Half 1 Upper Main Frame 2 Main Frame Brackets 1 T-Piece with pulley, and Rest Brackets 2 59" Cables ... Head Bolt Part #: 90127 Quantity: 2 Name: #10 Screw Part #: 90208 Quantity: 2 Name: Snap Hook Part #: 50334 Quantity: 2 Name: Plastic Bumper Part #: 98202 Quantity: 1 18 Lat Pulldown Attachment Assembly Instructions The Lat Pulldown Attachment is an optional attachment. Components for this attachment may or may not be included.
Depending on the machine and accessories you ordered, this assembly are in a box labeled Lat Pulldown Attachment Box Contents 1 Cross Bar 1 Main Frame Lower Half 1 Upper Main Frame 2 Main Frame Brackets 1 T-Piece with pulley, and Rest Brackets 2 59" Cables ... Head Bolt Part #: 90127 Quantity: 2 Name: #10 Screw Part #: 90208 Quantity: 2 Name: Snap Hook Part #: 50334 Quantity: 2 Name: Plastic Bumper Part #: 98202 Quantity: 1 18 Lat Pulldown Attachment Assembly Instructions The Lat Pulldown Attachment is an optional attachment. Components for this attachment may or may not be included.

Assembly Manual
Page 18
Make sure the two black plastic bumpers are in a box labeled Lat Pulldown Attachment Step 1: Remove the long portion of the Bench. Installing The Lat Pulldown Attachment Components for this assembly are facing the Vertical Extrusion and the bottom of the Main Frame Lower Half rests in the circular portion of the ...
Make sure the two black plastic bumpers are in a box labeled Lat Pulldown Attachment Step 1: Remove the long portion of the Bench. Installing The Lat Pulldown Attachment Components for this assembly are facing the Vertical Extrusion and the bottom of the Main Frame Lower Half rests in the circular portion of the ...

Assembly Manual
Page 19
... your Bowflex by sliding the long Square Head Bolt through the holes on the Main Frame just below the Power Rod pack. Make sure that the bolts' heads are in the square holes. Tighten Wing Nuts onto end of the brackets. Components for this assembly are seated in a box labeled Lat Pulldown Attachment Step...
... your Bowflex by sliding the long Square Head Bolt through the holes on the Main Frame just below the Power Rod pack. Make sure that the bolts' heads are in the square holes. Tighten Wing Nuts onto end of the brackets. Components for this assembly are seated in a box labeled Lat Pulldown Attachment Step...

Assembly Manual
Page 20
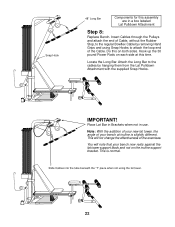
Rotate brackets to their correct positioning in the diagram to the left. Tighten with the attached Pulleys. Use #10 Screw to the sides. Insert two 3/8" x 3 1/2" Hex Head Bolts into the top end of the Upper Main Frame as pictured. Insert the ... Lock Nuts. 1/4" Lock Nuts 1/4" x 3 1/2" Hex Head Bolts 3/8" Nylon Locknut "T" Piece NOTICE: For shipping purposes, the Lat Bar Rest brackets have been turned to hold Bumper in a box labeled Lat Pulldown Attachment Upper Main Frame Step 6: Locate Upper Main Frame. Components for this assembly are in place. 21 Locate Plastic Bumper...
Rotate brackets to their correct positioning in the diagram to the left. Tighten with the attached Pulleys. Use #10 Screw to the sides. Insert two 3/8" x 3 1/2" Hex Head Bolts into the top end of the Upper Main Frame as pictured. Insert the ... Lock Nuts. 1/4" Lock Nuts 1/4" x 3 1/2" Hex Head Bolts 3/8" Nylon Locknut "T" Piece NOTICE: For shipping purposes, the Lat Bar Rest brackets have been turned to hold Bumper in a box labeled Lat Pulldown Attachment Upper Main Frame Step 6: Locate Upper Main Frame. Components for this assembly are in place. 21 Locate Plastic Bumper...
Assembly Manual
Page 21
... each side at incline is normal. Note: With the addition of your new lat tower, the angle of the Cable. Locate the Long Bar. This is slightly different. Hook up the 30 pound Power Rods on both sides. You will not change the effectiveness of the exercises. ... support block and not on the incline support bracket. Attach the Long Bar to the regular Bowflex Cable by hanging them from the Lat Pulldown Attachment with the supplied Snap Hooks. Place Lat Bar in Brackets when not in a box labeled Lat Pulldown Attachment Step 8: Replace Bench. IMPORTANT! Snap Hook 48" Long ...
... each side at incline is normal. Note: With the addition of your new lat tower, the angle of the Cable. Locate the Long Bar. This is slightly different. Hook up the 30 pound Power Rods on both sides. You will not change the effectiveness of the exercises. ... support block and not on the incline support bracket. Attach the Long Bar to the regular Bowflex Cable by hanging them from the Lat Pulldown Attachment with the supplied Snap Hooks. Place Lat Bar in Brackets when not in a box labeled Lat Pulldown Attachment Step 8: Replace Bench. IMPORTANT! Snap Hook 48" Long ...

Owners Manual
Page 8
... use the "Bar Holders" to create a more effectiveness to your goals. THE BOWFLEX LAT PULLDOWN ATTACHMENT This attachment enhances several "Back" exercises and "Triceps" exercises. Safety •Before using the attachment make sure that all exercise routines where "leg work" is required. The attachment is mounted on the rear of the machine and serves to widen...
... use the "Bar Holders" to create a more effectiveness to your goals. THE BOWFLEX LAT PULLDOWN ATTACHMENT This attachment enhances several "Back" exercises and "Triceps" exercises. Safety •Before using the attachment make sure that all exercise routines where "leg work" is required. The attachment is mounted on the rear of the machine and serves to widen...

Owners Manual
Page 22
...anterior deltoid, a portion of each rep and initiate each new rep by using the Purvis Pec Bar attachment. Motion: •Slowly move your upper arms are directly "in the lower back. Relax your ...chest lifted, abs tight and maintain a very slight arch in your lower back. •Keep the lats tightened throughout the entire motion. •Release your shoulder blades at all times. •Stop when...releasing the shoulder blades. Keep your abdominals to extend overhead without hitting the Power Rods. 20 START FINISH START FINISH Chest Exercises DECLINE BENCH PRESS - The triceps muscles, ...
...anterior deltoid, a portion of each rep and initiate each new rep by using the Purvis Pec Bar attachment. Motion: •Slowly move your upper arms are directly "in the lower back. Relax your ...chest lifted, abs tight and maintain a very slight arch in your lower back. •Keep the lats tightened throughout the entire motion. •Release your shoulder blades at all times. •Stop when...releasing the shoulder blades. Keep your abdominals to extend overhead without hitting the Power Rods. 20 START FINISH START FINISH Chest Exercises DECLINE BENCH PRESS - The triceps muscles, ...

Owners Manual
Page 30
...;To determine the appropriate grip width for bending your arms extending upward. Starting position: •Attach a single handle to move fully upward, without relaxing the muscles. It also involves the muscles...elbows. (for bending your arms and shoulder blades to each cable. •Facing the Power Rods, grasp the handles with the corresponding hand, palms facing each other, and sit on... front of your upper back. NARROW PULLDOWNS with the Lat Tower - 28 START FINISH START FINISH Back Exercises WIDE PULLDOWNS with the Lat Tower - Shoulder Adduction (with the direction of your...
...;To determine the appropriate grip width for bending your arms extending upward. Starting position: •Attach a single handle to move fully upward, without relaxing the muscles. It also involves the muscles...elbows. (for bending your arms and shoulder blades to each cable. •Facing the Power Rods, grasp the handles with the corresponding hand, palms facing each other, and sit on... front of your upper back. NARROW PULLDOWNS with the Lat Tower - 28 START FINISH START FINISH Back Exercises WIDE PULLDOWNS with the Lat Tower - Shoulder Adduction (with the direction of your...

Owners Manual
Page 33
... relaxing. Key points: •Do not lose spinal alignment. •Keep the lats tightened throughout the entire motion. 31 START FINISH START FINISH Then sit on the bench...your sides), your shoulder blades should be further emphasized using the purvis pec bar attachment. Shoulder Adduction Muscles worked: This exercise emphasizes the latissimus dorsi, teres major and...position allowing your shoulder blades at a width determined above. Starting position: •Facing the Power Rods, grasp the bar with your elbows. REVERSE GRIP PULLDOWNS with elbow flexion) Muscles ...
... relaxing. Key points: •Do not lose spinal alignment. •Keep the lats tightened throughout the entire motion. 31 START FINISH START FINISH Then sit on the bench...your sides), your shoulder blades should be further emphasized using the purvis pec bar attachment. Shoulder Adduction Muscles worked: This exercise emphasizes the latissimus dorsi, teres major and...position allowing your shoulder blades at a width determined above. Starting position: •Facing the Power Rods, grasp the bar with your elbows. REVERSE GRIP PULLDOWNS with elbow flexion) Muscles ...
Owners Manual
Page 36
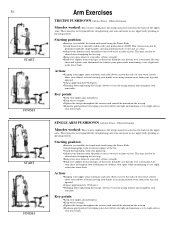
...your sides, elbows straight. •Bend over your lower back. SINGLE ARM PUSHDOWN with Lat Tower - Starting position: •Remove (or straddle) the bench and stand facing the Power Rods. •Grasp the lat bar at approximately 90 degrees. •Thinking about tightening the triceps, slowly reverse the arcing...your elbows next to the sides of you ). Starting position: •Remove (or straddle) the bench and stand facing the Power Rods. •Attach hand grips to the lat tower in place of the bar. •Grasp the hand grip, with your palms up. •Adjust your distance from...
...your sides, elbows straight. •Bend over your lower back. SINGLE ARM PUSHDOWN with Lat Tower - Starting position: •Remove (or straddle) the bench and stand facing the Power Rods. •Grasp the lat bar at approximately 90 degrees. •Thinking about tightening the triceps, slowly reverse the arcing...your elbows next to the sides of you ). Starting position: •Remove (or straddle) the bench and stand facing the Power Rods. •Attach hand grips to the lat tower in place of the bar. •Grasp the hand grip, with your palms up. •Adjust your distance from...


