User Manual in English
Page 1
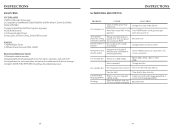
... BV9362BI 6.2 And Warmly Suggestion 04 Notice Item 05 Features 06 1.Front Panel Function Instruction 07 2.Basic Function 08 3.Remote Control Function 10 4.Main menu touch operation 12 5.RDS User Operation 16 6.Radio Operation 17 7.Audio 19 8.Disc Play Touch Operation 20 9.DVD Basic Operation 25 10.VCD Basic Operation 35 11.CD Basic Operation 38 12.MP3/USB/SD Operation 40 13.Bluetooth Function Instruction 41 14.IPOD READY 43 15.Other Play Mode 46 16.Trouble Shooting 47 17.Wiring Diagram 48 18.Specifications...
... BV9362BI 6.2 And Warmly Suggestion 04 Notice Item 05 Features 06 1.Front Panel Function Instruction 07 2.Basic Function 08 3.Remote Control Function 10 4.Main menu touch operation 12 5.RDS User Operation 16 6.Radio Operation 17 7.Audio 19 8.Disc Play Touch Operation 20 9.DVD Basic Operation 25 10.VCD Basic Operation 35 11.CD Basic Operation 38 12.MP3/USB/SD Operation 40 13.Bluetooth Function Instruction 41 14.IPOD READY 43 15.Other Play Mode 46 16.Trouble Shooting 47 17.Wiring Diagram 48 18.Specifications...
User Manual in English
Page 2
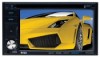
Welcome 18.SPECIFICATIONS Amp Rating European frequency range USA frequency range European frequency range USAfrequency range 80 WattsX4 Channels 87.5-107.9MHz 20-30dBuv 522-1620kHz 530-1710kHz 04 49
Welcome 18.SPECIFICATIONS Amp Rating European frequency range USA frequency range European frequency range USAfrequency range 80 WattsX4 Channels 87.5-107.9MHz 20-30dBuv 522-1620kHz 530-1710kHz 04 49
User Manual in English
Page 3
..., the LCD will be allowed to view your car. Right front speaker (+/-) ● Yellow - 12 V Constant ● White/White black - Ground wire ● Purple/Purple black - Power Antenna / Remote Amp Turn On ● Green/Green black - When the parking brake is connected to a 12 Volts battery, not connected to a 24 Volts battery. If not, the screen will not be connected to the parking brake system of your video. This is equipped with black tip: rear USB connection (optional) Note: The "PARKING BRAKE" wire must...
..., the LCD will be allowed to view your car. Right front speaker (+/-) ● Yellow - 12 V Constant ● White/White black - Ground wire ● Purple/Purple black - Power Antenna / Remote Amp Turn On ● Green/Green black - When the parking brake is connected to a 12 Volts battery, not connected to a 24 Volts battery. If not, the screen will not be connected to the parking brake system of your video. This is equipped with black tip: rear USB connection (optional) Note: The "PARKING BRAKE" wire must...
User Manual in English
Page 4
... DVD PLAYER 1.MPEG-4 Decoder Technology 2.Compatible with MP4(AVI/5.X),DVD(DVD-R/DVD-RW),VCD,SVCD,CD-RW, WMA,MP3,JPEG 3.Supporting Multiles Subtitles,Angles,Languages 4.Child lock function 5.4-Channel Audio Output 6.Pause, play, UP/Down, Stop, Zoom, PBC Function RADIO 1.AM/FM Radio Tuner 2.30 Radio Preset Stations (18FM, 12AM) BULETOOTH FUNCTION 1.Bluetooth wireless transfers 2.Displaying bluetooth paring and connection status, call status, and caller's ID 3.Fast performance, fast connection, accurate and sensible search of devices...
... DVD PLAYER 1.MPEG-4 Decoder Technology 2.Compatible with MP4(AVI/5.X),DVD(DVD-R/DVD-RW),VCD,SVCD,CD-RW, WMA,MP3,JPEG 3.Supporting Multiles Subtitles,Angles,Languages 4.Child lock function 5.4-Channel Audio Output 6.Pause, play, UP/Down, Stop, Zoom, PBC Function RADIO 1.AM/FM Radio Tuner 2.30 Radio Preset Stations (18FM, 12AM) BULETOOTH FUNCTION 1.Bluetooth wireless transfers 2.Displaying bluetooth paring and connection status, call status, and caller's ID 3.Fast performance, fast connection, accurate and sensible search of devices...
User Manual in English
Page 5
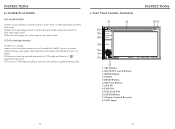
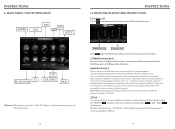
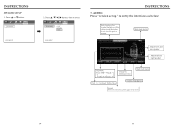
15.OTHER PLAY MODE 46 1 9 12 2 3 4 5 6 7 8 1.SRC Button 2.MUTE/TFT on/off Button 3.MODE Button 4.SD Slot 5.RESET Button 6.SEL/VOL Button 7.AUX IN 8.USB Slot 9.Disk Load Slot 10.OPEN Button 11.Remote Control Receiver 12.MIC Input 10 11 07
15.OTHER PLAY MODE 46 1 9 12 2 3 4 5 6 7 8 1.SRC Button 2.MUTE/TFT on/off Button 3.MODE Button 4.SD Slot 5.RESET Button 6.SEL/VOL Button 7.AUX IN 8.USB Slot 9.Disk Load Slot 10.OPEN Button 11.Remote Control Receiver 12.MIC Input 10 11 07
User Manual in English
Page 6
... high-capacity date in ipod player and switch to the ipod player's instruction manual. About "ipod" players operation instruction, please refer to ipod mode, and enter the ipod UI screen. The setting instruction as the picture bleow. Unless the unit will be restored to the initial state. 6.SEL/VOL Button Turn this button can adjust the mode according to "ipod"" operation mode. Sorry for the inconvenience. 08 45 At that time ipod player will never play the video file. Bluetooth 4.SD Slot This is...
... high-capacity date in ipod player and switch to the ipod player's instruction manual. About "ipod" players operation instruction, please refer to ipod mode, and enter the ipod UI screen. The setting instruction as the picture bleow. Unless the unit will be restored to the initial state. 6.SEL/VOL Button Turn this button can adjust the mode according to "ipod"" operation mode. Sorry for the inconvenience. 08 45 At that time ipod player will never play the video file. Bluetooth 4.SD Slot This is...
User Manual in English
Page 7
... eject the disc 11.Remote Control Receiver 12.MIC Input Bluetooth MIC input. 4. During the unit playing the video, "ipod" player must set as Video mode, if not the unit only with audio but not video. 44 09 It shows like the PIC 3 below. 7. 8.USB Slot 9.Disk Load Slot Opening for disks to inter the category. After that, touch any part of the touch screen, then touch the "MOD" on the main menu and the unit will switch to " ipod "operation mode...
... eject the disc 11.Remote Control Receiver 12.MIC Input Bluetooth MIC input. 4. During the unit playing the video, "ipod" player must set as Video mode, if not the unit only with audio but not video. 44 09 It shows like the PIC 3 below. 7. 8.USB Slot 9.Disk Load Slot Opening for disks to inter the category. After that, touch any part of the touch screen, then touch the "MOD" on the main menu and the unit will switch to " ipod "operation mode...
User Manual in English
Page 9
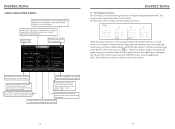
to connect and touch 6.Call logs Under Bluetooth mode, press call logs button will enter call , Touch to refuse to Bluetooth hand-free function interface. 4.Incoming display If there is an incoming call logs interface, as following: (1)Press [dialed calls] function position, you will search telephone number which you have dialed. (2)Press [received calls] function position, you will search telephone number which you have missed. 42...
to connect and touch 6.Call logs Under Bluetooth mode, press call logs button will enter call , Touch to refuse to Bluetooth hand-free function interface. 4.Incoming display If there is an incoming call logs interface, as following: (1)Press [dialed calls] function position, you will search telephone number which you have dialed. (2)Press [received calls] function position, you will search telephone number which you have missed. 42...
User Manual in English
Page 10
Under any mode(radio, DVD etc. Touch to hang-up . if there is an incoming call period, press "CHANGE" will switch from current statue to Bluetooth. Note: if Bluetooth equipment matching with Bluetooth cell phone.. [operation way] Set your cell phone, the unit will let phone sound switch between speaker of unit and speaker of Phone. 12 41 13. 1.Enter/exit Touch on display to input telephone number. After Bluetooth equipment of the equipment within 20seconds. Please...
Under any mode(radio, DVD etc. Touch to hang-up . if there is an incoming call period, press "CHANGE" will switch from current statue to Bluetooth. Note: if Bluetooth equipment matching with Bluetooth cell phone.. [operation way] Set your cell phone, the unit will let phone sound switch between speaker of unit and speaker of Phone. 12 41 13. 1.Enter/exit Touch on display to input telephone number. After Bluetooth equipment of the equipment within 20seconds. Please...
User Manual in English
Page 14
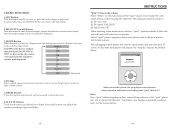
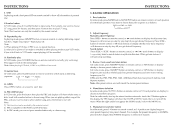
Press TA, When TA is on , it means the unit is strong RDS signals output. Press this button to choose radio channels'name, please refer to article 19 pages function. 5.RDS USER OPERATION ST/PROG FM1 87.50MHz 87.50MHz 90.00MHz 98.00MHz 106.00MHz 108.00MHz 87.5MHz Press PTY, when PTY is on , it means there is automatically track RDS radio channels 16 37 Press "SEL" to enter the audio inferface, Please refer to details user manual.
Press TA, When TA is on , it means the unit is strong RDS signals output. Press this button to choose radio channels'name, please refer to article 19 pages function. 5.RDS USER OPERATION ST/PROG FM1 87.50MHz 87.50MHz 90.00MHz 98.00MHz 106.00MHz 108.00MHz 87.5MHz Press PTY, when PTY is on , it means there is automatically track RDS radio channels 16 37 Press "SEL" to enter the audio inferface, Please refer to details user manual.
User Manual in English
Page 15
When playing VCD disk, if PBC is on, RDM will not work . This function can be worked by the remote control 36 Longer PROG MONO 17 6.
When playing VCD disk, if PBC is on, RDM will not work . This function can be worked by the remote control 36 Longer PROG MONO 17 6.
User Manual in English
Page 16
... on opening and waits for traffic emergency report. 1)PTY: RDS button, press once will keep remaining on stereo playing mode. 5. RDS 10. 1. EON (RDS Mark) Indicate main unit is auto tracking RDS channel. 3. TA: In RDS mode, press this button shortly can output TA signal, and check RDS channel is exist or not, if no RDS signal TFT will show music mode POP, press 1-6 function memory button...
... on opening and waits for traffic emergency report. 1)PTY: RDS button, press once will keep remaining on stereo playing mode. 5. RDS 10. 1. EON (RDS Mark) Indicate main unit is auto tracking RDS channel. 3. TA: In RDS mode, press this button shortly can output TA signal, and check RDS channel is exist or not, if no RDS signal TFT will show music mode POP, press 1-6 function memory button...
User Manual in English
Page 17
7. Press "version set up " to entry the interfaces as below: Press once loud on, press again to turn off. 34 19
7. Press "version set up " to entry the interfaces as below: Press once loud on, press again to turn off. 34 19

User Manual in English
Page 20
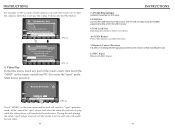
In DVD interface, touch setup" "button into the audio/video setup interface as following. AUDIO SETTING ON TOUCH SCREEN pop 22 31
In DVD interface, touch setup" "button into the audio/video setup interface as following. AUDIO SETTING ON TOUCH SCREEN pop 22 31

User Manual in English
Page 22
Calibration to re-gain touch 24 29
Calibration to re-gain touch 24 29


