User Manual
Page 3
... the unit, indicate this player is a class laser product, only use weak laser and no hazardous radiation outside of the unit. 1.Read through this instruction manual before installation and use. 2.Do not open the cover or touch any kind of uninsulated dangerous voltage within an equilateral triangle, is intended to alert...
... the unit, indicate this player is a class laser product, only use weak laser and no hazardous radiation outside of the unit. 1.Read through this instruction manual before installation and use. 2.Do not open the cover or touch any kind of uninsulated dangerous voltage within an equilateral triangle, is intended to alert...
User Manual
Page 5
... connecting the wire. 4. Do not install the detachable panel before installation. 2. If you have turned down the volume. * Ensure that the audio is not under mute. SOME FUNCTION BUTTONS DO NOT WORK * Turn off until the car has been driven for negative terminal of the battery ... it into several blocks, so that the fuse is condensation inside the Lens, it . 2. The Trouble Shooting Please read the user s manual carefully before using all the suggestions, please contact the company or the technical service center authorized by the suggestions mentioned below. For the sake of...
... connecting the wire. 4. Do not install the detachable panel before installation. 2. If you have turned down the volume. * Ensure that the audio is not under mute. SOME FUNCTION BUTTONS DO NOT WORK * Turn off until the car has been driven for negative terminal of the battery ... it into several blocks, so that the fuse is condensation inside the Lens, it . 2. The Trouble Shooting Please read the user s manual carefully before using all the suggestions, please contact the company or the technical service center authorized by the suggestions mentioned below. For the sake of...

User Manual
Page 10
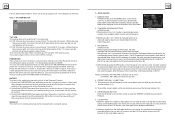
Front Right Speaker (+) 4. Front Left Speaker (-) 7. FIRSTLY CONNECT THE POWER LINES, SPEAKER LINES AND AUTO ANTENNA ACCORDING TO MANUAL REQUIREMENT, THEN INSTALL THE SLIDING METAL HOUSING IN A CAR ACCORDING TO THE DIAGRAM. There are 4 modes in all as follows: STEREO, MONO L, MONO R, MIX ... MODE It is the minimum; if you set it to be FULL, the Peak-to be OFF, the Peak-toPeak value is for selecting a desired audio output mode for the left and right ways of the Fixed ISO Female Connector FUSE 10 A CONNECTOR A 1. 2. 3. 4. Rear Left Speaker (+) 8. THE UNIT CHASSIS WEARS ...
Front Right Speaker (+) 4. Front Left Speaker (-) 7. FIRSTLY CONNECT THE POWER LINES, SPEAKER LINES AND AUTO ANTENNA ACCORDING TO MANUAL REQUIREMENT, THEN INSTALL THE SLIDING METAL HOUSING IN A CAR ACCORDING TO THE DIAGRAM. There are 4 modes in all as follows: STEREO, MONO L, MONO R, MIX ... MODE It is the minimum; if you set it to be FULL, the Peak-to be OFF, the Peak-toPeak value is for selecting a desired audio output mode for the left and right ways of the Fixed ISO Female Connector FUSE 10 A CONNECTOR A 1. 2. 3. 4. Rear Left Speaker (+) 8. THE UNIT CHASSIS WEARS ...
User Manual
Page 13
.... 4:3 PS: Choose the item when connecting a TV set a new password that you should get the password in mind and cut out, and display in the Manual. Select the RATING item and then press the > button to enter it, then use the direction buttons to select your desired radio band of FM1... remote control or on the small monitor of the Parental Control. PASSWORD This setup item is for making all . Before the other persons see the Manual, you like : Select the PASSWORD item and then press the > button to enter it , then input the password mentioned above, and then press the OK...
.... 4:3 PS: Choose the item when connecting a TV set a new password that you should get the password in mind and cut out, and display in the Manual. Select the RATING item and then press the > button to enter it, then use the direction buttons to select your desired radio band of FM1... remote control or on the small monitor of the Parental Control. PASSWORD This setup item is for making all . Before the other persons see the Manual, you like : Select the PASSWORD item and then press the > button to enter it , then input the password mentioned above, and then press the OK...


