User Manual in English
Page 2
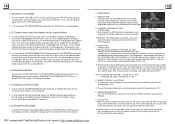
... Frequency 530KHz - 1710KHz(US) 522KHz - 1620KHz(EU) PDF created with laws, drivers should not watch video or operate the video device while driving. 6. Specification General Specification Power Supply Requirement DC 12V Maximum Power Output 4 x 80W(measured at DC 14.4 V) Dimensions(w x h x d 7"W x 2"H x 6.5"D DVD Deck Specification Format DVD/VCD/MPEG 4/JPEG//MP3/WMA/CD Video System NTSC Audio System 24 bit/96KHz Loading System Auto Loading Mounting Angle 0 to comply with FinePrint...
... Frequency 530KHz - 1710KHz(US) 522KHz - 1620KHz(EU) PDF created with laws, drivers should not watch video or operate the video device while driving. 6. Specification General Specification Power Supply Requirement DC 12V Maximum Power Output 4 x 80W(measured at DC 14.4 V) Dimensions(w x h x d 7"W x 2"H x 6.5"D DVD Deck Specification Format DVD/VCD/MPEG 4/JPEG//MP3/WMA/CD Video System NTSC Audio System 24 bit/96KHz Loading System Auto Loading Mounting Angle 0 to comply with FinePrint...
User Manual in English
Page 3
... ELECTRIC SHOCK, DO NOT REMOVE COVER (OR BACK). BLACK AND WHITE PICTURE OR SCREEN ROLLING * Ensure that you have any of the components exposed out of the unit, only for qualified technicians. 3.Do not expose the unit under mute. If so, leave the player off for a station. REMOTE CONTROL IS INSENSITIVE OR DOES NOT WORK * Check the batteries of remote control and make sure that they are...
... ELECTRIC SHOCK, DO NOT REMOVE COVER (OR BACK). BLACK AND WHITE PICTURE OR SCREEN ROLLING * Ensure that you have any of the components exposed out of the unit, only for qualified technicians. 3.Do not expose the unit under mute. If so, leave the player off for a station. REMOTE CONTROL IS INSENSITIVE OR DOES NOT WORK * Check the batteries of remote control and make sure that they are...
User Manual in English
Page 4
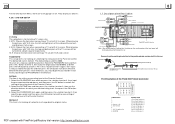
Before Operation 4 1.1 Glossary 4 1.2 Precautions 4 1.3 Maintenance and Cleaning of Discs 5 1.4 Battery Information of the Remote Control 5 1.5 The Remote Control Description 6 1.6 Locations and Names of the Controls 7 1.7 Description of the Rear Cabinet 8 1.8 Unit Installation 9 2. Basic Disc, USB or MMC/SD Operation 14 4.1 Begin Playback 16 4.2 Pause Playback 16 4.3 Stop Playback 16 4.4 Select Chapter/Track with the UP/DN or the >>|/| Common Operation 10 3. Radio Operation 12 4. Contents 1.
Before Operation 4 1.1 Glossary 4 1.2 Precautions 4 1.3 Maintenance and Cleaning of Discs 5 1.4 Battery Information of the Remote Control 5 1.5 The Remote Control Description 6 1.6 Locations and Names of the Controls 7 1.7 Description of the Rear Cabinet 8 1.8 Unit Installation 9 2. Basic Disc, USB or MMC/SD Operation 14 4.1 Begin Playback 16 4.2 Pause Playback 16 4.3 Stop Playback 16 4.4 Select Chapter/Track with the UP/DN or the >>|/| Common Operation 10 3. Radio Operation 12 4. Contents 1.
User Manual in English
Page 5
... LOCK setup menu for example, the theme part of 4 digit. The unit is switched on TV. Do not allow the speaker wires to be a certain rating level with SETUP MENU on the DVD feature of a same movie according to the vehicle metal. Can set the DVD player(include software player in PC) to be shorted together when the unit is designed for a while to evaporate. 3. Do not use...
... LOCK setup menu for example, the theme part of 4 digit. The unit is switched on TV. Do not allow the speaker wires to be a certain rating level with SETUP MENU on the DVD feature of a same movie according to the vehicle metal. Can set the DVD player(include software player in PC) to be shorted together when the unit is designed for a while to evaporate. 3. Do not use...
User Manual in English
Page 6
... set it up before using the remote control for selecting audio output mode DYNAMIC RANGE After selecting the compression mode of LINE OUT, set the item, so you set it in a car parked in the Remote Control: 1.Before using . 3. There are 4 modes in all as caliduct, or leave it to direct sunlight, or nearby heat sources such as follows: STEREO, MONO L, MONO R, MIX MONO. 1.3 Maintenance and Cleaning of signal...
... set it up before using the remote control for selecting audio output mode DYNAMIC RANGE After selecting the compression mode of LINE OUT, set the item, so you set it in a car parked in the Remote Control: 1.Before using . 3. There are 4 modes in all as caliduct, or leave it to direct sunlight, or nearby heat sources such as follows: STEREO, MONO L, MONO R, MIX MONO. 1.3 Maintenance and Cleaning of signal...
User Manual in English
Page 7
... video output. There are 3 modes: LT/RT, STEREO, VSS. STEREO: If you choose the item, when playing a media recorded with 5.1 channels, the main channel speakers can output audio signal with vivid theatre effect. HUE It is for adjusting the hue of the video output. 4.25.5 SPEAKER SETUP DOWNMIX It is no center speaker and subwoofer. PDF created with 5.1 channels, it will output the left and right channels of stereo signal. when outputting audio signal...
... video output. There are 3 modes: LT/RT, STEREO, VSS. STEREO: If you choose the item, when playing a media recorded with 5.1 channels, the main channel speakers can output audio signal with vivid theatre effect. HUE It is for adjusting the hue of the video output. 4.25.5 SPEAKER SETUP DOWNMIX It is no center speaker and subwoofer. PDF created with 5.1 channels, it will output the left and right channels of stereo signal. when outputting audio signal...
User Manual in English
Page 8
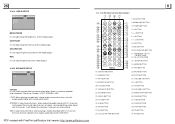
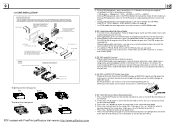
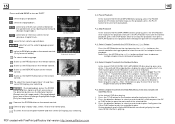
... the Unit Chassis Facet After removing the Front Panel 1. LED INDICATOR 24. AV IN SOCKET 23. PDF created with FinePrint pdfFactory trial version http://www.pdffactory.com SMALL MONITOR 9. EJECT BUTTON 14. 1/PLAY/PAUSE BUTTON 15. 2/INT BUTTON 16. 3/RPT BUTTON 17. 4/RDM BUTTON 18. 5/-10 BUTTON 19. 6/+10 BUTTON 20. IR REMOTE SENSOR 10. RESET BUTTON 22. USB SOCKET 21. RELEASE BUTTON 4. SEL BUTTON AND VOL KNOB 7. MENU LANG...
... the Unit Chassis Facet After removing the Front Panel 1. LED INDICATOR 24. AV IN SOCKET 23. PDF created with FinePrint pdfFactory trial version http://www.pdffactory.com SMALL MONITOR 9. EJECT BUTTON 14. 1/PLAY/PAUSE BUTTON 15. 2/INT BUTTON 16. 3/RPT BUTTON 17. 4/RDM BUTTON 18. 5/-10 BUTTON 19. 6/+10 BUTTON 20. IR REMOTE SENSOR 10. RESET BUTTON 22. USB SOCKET 21. RELEASE BUTTON 4. SEL BUTTON AND VOL KNOB 7. MENU LANG...
User Manual in English
Page 9
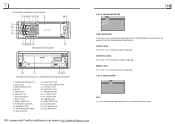
... AV IN WHITE L YELLOW VIDEO Fixed ISO Female Connector Rear View Camera BLACK YELLOW Note: After connecting the Parking Line, the video on the small monitor of the TV screen will be turned into a black square respectively. 16:9: Choose the item when connecting a TV set with 4:3 screen. GROUND CONNECTOR B 1. Front Right Speaker (-) 5. Before the other persons see the Manual, you should get the password in mind and cut out, and display in the Manual. Auto Antenna 6. 7. 12V...
... AV IN WHITE L YELLOW VIDEO Fixed ISO Female Connector Rear View Camera BLACK YELLOW Note: After connecting the Parking Line, the video on the small monitor of the TV screen will be turned into a black square respectively. 16:9: Choose the item when connecting a TV set with 4:3 screen. GROUND CONNECTOR B 1. Front Right Speaker (-) 5. Before the other persons see the Manual, you should get the password in mind and cut out, and display in the Manual. Auto Antenna 6. 7. 12V...
User Manual in English
Page 10
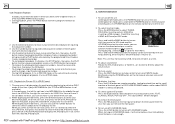
... ^ button to select a desired mode of the setup item, finally press the OK button to confirm it. * Press the < button to return to the upper level. * Press the SETUP button again or use the direction buttons to select an desired setup page. 3. FIRSTLY CONNECT THE POWER LINES, SPEAKER LINES AND AUTO ANTENNA ACCORDING TO MANUAL REQUIREMENT, THEN INSTALL THE SLIDING METAL HOUSING IN A CAR ACCORDING TO THE DIAGRAM. UNIT CHASSIS...
... ^ button to select a desired mode of the setup item, finally press the OK button to confirm it. * Press the < button to return to the upper level. * Press the SETUP button again or use the direction buttons to select an desired setup page. 3. FIRSTLY CONNECT THE POWER LINES, SPEAKER LINES AND AUTO ANTENNA ACCORDING TO MANUAL REQUIREMENT, THEN INSTALL THE SLIDING METAL HOUSING IN A CAR ACCORDING TO THE DIAGRAM. UNIT CHASSIS...
User Manual in English
Page 11
... inputting the sequence number. 3 Use the number button to input desired sequence number of title/chapter/ track with FinePrint pdfFactory trial version http://www.pdffactory.com 2. At the time, it turns off the unit. 2. Common Operation 1. To mute sound Press the MUTE button on remote control to turn off PBC mode. 4.21 Playback the Picture CD in JPEG Format 1. To select a preset EQ mode Press the EQ button to select TUNER, DISC(After inserting a disc), USB (After inserting a USB...
... inputting the sequence number. 3 Use the number button to input desired sequence number of title/chapter/ track with FinePrint pdfFactory trial version http://www.pdffactory.com 2. At the time, it turns off the unit. 2. Common Operation 1. To mute sound Press the MUTE button on remote control to turn off PBC mode. 4.21 Playback the Picture CD in JPEG Format 1. To select a preset EQ mode Press the EQ button to select TUNER, DISC(After inserting a disc), USB (After inserting a USB...
User Manual in English
Page 12
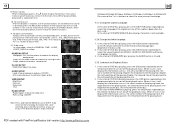
... remained time of DVD disc playing, press the OSD button repeatedly on the remote controller to choose the starting screen. In the state of the disc. 3. In the state of MP3/WMA disc playing, press the OSD button repeatedly on the remote controller to turn on /off the playback status. CLOCK SETUP VIDEO SETUP Brightness Contrast Saturation Hue AUDIO SETUP RADIO SETUP Radio region: choose the radio zone. Press one of the sound modes such as : the serial number...
... remained time of DVD disc playing, press the OSD button repeatedly on the remote controller to choose the starting screen. In the state of the disc. 3. In the state of MP3/WMA disc playing, press the OSD button repeatedly on the remote controller to turn on /off the playback status. CLOCK SETUP VIDEO SETUP Brightness Contrast Saturation Hue AUDIO SETUP RADIO SETUP Radio region: choose the radio zone. Press one of the sound modes such as : the serial number...
User Manual in English
Page 13
... the time item, then use the number buttons to input the desired time to switch between RANDOM (ON)/RANDOM OFF. RADIO interface 2) Briefly press the UP/DN button to start playback; STEREO/MONO BUTTON Press the ST button on the remote control to enlarge a certain area of the images on the small monitor of DVD disc playing, press the ANGLE button repeatedly on LCD. When in RANDOM (ON) mode, it will play from...
... the time item, then use the number buttons to input the desired time to switch between RANDOM (ON)/RANDOM OFF. RADIO interface 2) Briefly press the UP/DN button to start playback; STEREO/MONO BUTTON Press the ST button on the remote control to enlarge a certain area of the images on the small monitor of DVD disc playing, press the ANGLE button repeatedly on LCD. When in RANDOM (ON) mode, it will play from...
User Manual in English
Page 14
... AF switching mode is almost inaudible in Disc Play mode, it is selected, the radio checks the signal strength of DVD disc playback: Press the RPT button to resume normal playback. The interval of checking time of normal program. (When AF flash on , SEEK, (SCAN), AUTO MEMORY function can be displayed on LCD, it will search for the weak station. When traffic announcement is transmitted: 1).If the unit is...
... AF switching mode is almost inaudible in Disc Play mode, it is selected, the radio checks the signal strength of DVD disc playback: Press the RPT button to resume normal playback. The interval of checking time of normal program. (When AF flash on , SEEK, (SCAN), AUTO MEMORY function can be displayed on LCD, it will search for the weak station. When traffic announcement is transmitted: 1).If the unit is...
User Manual in English
Page 15
... your desired track to turn on the PBC function, it will play from the unit, then press the EJECT button to eject disc, and then remove the disc and flip up the front panel till hearing a clip. 2. In CD mode, the TITLE, PBC, MENU buttons are disabled. 4.7 Terminate the Playback 1. Press the RELEASE button to play . Press the number buttons to select your desired file, finally press the...
... your desired track to turn on the PBC function, it will play from the unit, then press the EJECT button to eject disc, and then remove the disc and flip up the front panel till hearing a clip. 2. In CD mode, the TITLE, PBC, MENU buttons are disabled. 4.7 Terminate the Playback 1. Press the RELEASE button to play . Press the number buttons to select your desired file, finally press the...
User Manual in English
Page 16
... direction buttons on the Remote Control. (Except music & image mode.);During playback, press one of them to change theplayback angle. (Only for music mode.) : To select audio language. press the STOP button twice to full stop the playback, then press the PLAY button to RDM play your selecting. 4.2 Pause Playback In the state of DVD/VCD/CD/MP3/WMA disc playing, press the PAUSE button on IR remote controller to...
... direction buttons on the Remote Control. (Except music & image mode.);During playback, press one of them to change theplayback angle. (Only for music mode.) : To select audio language. press the STOP button twice to full stop the playback, then press the PLAY button to RDM play your selecting. 4.2 Pause Playback In the state of DVD/VCD/CD/MP3/WMA disc playing, press the PAUSE button on IR remote controller to...


