
User Manual
Page 2
......3 Control Panel Button Locations...4 Gerneral Operations...5 Turn Unit On/Off...5 Adjust Volume(VOL)...5 Adjust Menu Options (SEL)...5 Change The Source (SRC)...5 2 Zone Function (Zone A / Zone B)...5 Setting The Clock (CLK)...5 Mute On/Off (MUTE)...5 Reset System (RESET)...5 Radio Operation...6 Switch Between US And EU Frequency 6 Change Bands (BND)...6 Manual Tuning...6 Auto Seek Tuning...6 Auto Store / Recall Preset Staion (AMS 6 Store / Recall Preset Station (1~6)...6 Local / DX Reception...6 Stereo / Mono Reception...6 DVD/CD/MP3/USB Operation...7-9 Insert and Eject Disc/USB...7 Play...
......3 Control Panel Button Locations...4 Gerneral Operations...5 Turn Unit On/Off...5 Adjust Volume(VOL)...5 Adjust Menu Options (SEL)...5 Change The Source (SRC)...5 2 Zone Function (Zone A / Zone B)...5 Setting The Clock (CLK)...5 Mute On/Off (MUTE)...5 Reset System (RESET)...5 Radio Operation...6 Switch Between US And EU Frequency 6 Change Bands (BND)...6 Manual Tuning...6 Auto Seek Tuning...6 Auto Store / Recall Preset Staion (AMS 6 Store / Recall Preset Station (1~6)...6 Local / DX Reception...6 Stereo / Mono Reception...6 DVD/CD/MP3/USB Operation...7-9 Insert and Eject Disc/USB...7 Play...
User Manual
Page 3
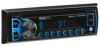
... confirm the accessories in park and the parking brake is moving. Do not use solvents or thinners such a petrol/benzene or cleaners. • After removing a disc from the disc center with a clean, soft, dry and lint-free cloth. Mounting Sleeve 5. User Manual 4. 12Pin PWR/SPK Harness 6. The DVD video functions will only view or operate when vehicle is in the package before using this DVD player while the vehicle...
... confirm the accessories in park and the parking brake is moving. Do not use solvents or thinners such a petrol/benzene or cleaners. • After removing a disc from the disc center with a clean, soft, dry and lint-free cloth. Mounting Sleeve 5. User Manual 4. 12Pin PWR/SPK Harness 6. The DVD video functions will only view or operate when vehicle is in the package before using this DVD player while the vehicle...
User Manual
Page 4
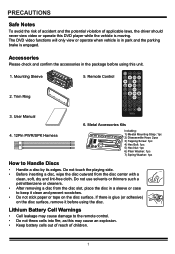
...rear part of the main unit will remain into the vehicle dash opening. 2. Make wiring connections, as illustrated, to ensure than the front part of the chassis using the hardware indicated. 4. Mount Radio Refer to the "Installation Diagram" to remove the chassis from the mounting sleeve, remove... disconnect the battery negative terminal. 2. INSTALLATION Prepare Radio 1. Remove the transport screws. 3. Insert radio into the left and right side of the chassis, as illustrated in the "Wiring Diagram." 5. Before you want to install the unit. 1. Remove chassis from ...
...rear part of the main unit will remain into the vehicle dash opening. 2. Make wiring connections, as illustrated, to ensure than the front part of the chassis using the hardware indicated. 4. Mount Radio Refer to the "Installation Diagram" to remove the chassis from the mounting sleeve, remove... disconnect the battery negative terminal. 2. INSTALLATION Prepare Radio 1. Remove the transport screws. 3. Insert radio into the left and right side of the chassis, as illustrated in the "Wiring Diagram." 5. Before you want to install the unit. 1. Remove chassis from ...
User Manual
Page 5
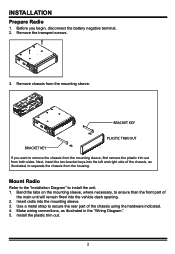
... ! - Wiring Connections WIRING DIAGRAM CAUTION +12V DC NEGATIVE GROUND Radio Antenna 15 15A 1. Green: Subwoofer Output Socket 8. Remove the metal strap from the main unit. 3. Red: Front Right PRE-AMP Output 7. Insert a bracket key into the left and right side of the main unit and draw the unit out of the Main Unit 1. Red: Rear Right PRE-AMP Output GND - (Black) Power B+ (Yellow) ACC + (Red) ANT + (Blue) Purple Purple/Black Gray Gray/Black White White/Black Green Green/Black Rear Right Speaker Front Right Speaker...
... ! - Wiring Connections WIRING DIAGRAM CAUTION +12V DC NEGATIVE GROUND Radio Antenna 15 15A 1. Green: Subwoofer Output Socket 8. Remove the metal strap from the main unit. 3. Red: Front Right PRE-AMP Output 7. Insert a bracket key into the left and right side of the main unit and draw the unit out of the Main Unit 1. Red: Rear Right PRE-AMP Output GND - (Black) Power B+ (Yellow) ACC + (Red) ANT + (Blue) Purple Purple/Black Gray Gray/Black White White/Black Green Green/Black Rear Right Speaker Front Right Speaker...

User Manual
Page 6
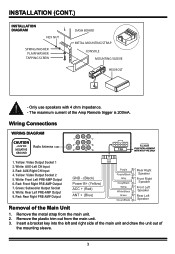
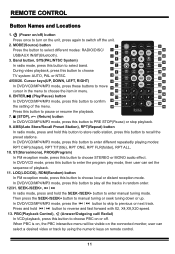
...fast forward) button 13. EJECT button 15. IR remote sensor 17. Reset button 4 INT (intro), Preset station 2 button 6. SEL (select/menu) button and VOL (volume) knob 3. RDM (random), Preset station 4 button 8. -10(previous 10 tracks), previous folder, Zone A (Front Speaker) button 9. +10(next 10 tracks), next folder, Zone B (Rear Speaker) button 10. Hands-free Microphone 14. CLK (clock setting), MUTE button, (end call ) button 4. (pause/play), Preset station 1 button 5. USB Port 19. RPT (repeat), Preset station 3 button 7. Disc slot 16. AUX IN (auxiliary input) jack 20...
...fast forward) button 13. EJECT button 15. IR remote sensor 17. Reset button 4 INT (intro), Preset station 2 button 6. SEL (select/menu) button and VOL (volume) knob 3. RDM (random), Preset station 4 button 8. -10(previous 10 tracks), previous folder, Zone A (Front Speaker) button 9. +10(next 10 tracks), next folder, Zone B (Rear Speaker) button 10. Hands-free Microphone 14. CLK (clock setting), MUTE button, (end call ) button 4. (pause/play), Preset station 1 button 5. USB Port 19. RPT (repeat), Preset station 3 button 7. Disc slot 16. AUX IN (auxiliary input) jack 20...
User Manual
Page 7
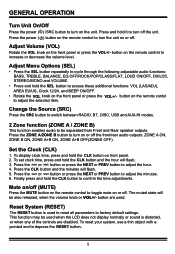
...+/- This function may be used when the LCD does not display normally or sound is used . To set clock time, press and hold the CLK button and the hour will 5. Mute on/off (MUTE) Press the MUTE button on the remote control to toggle mute on front panel. 2. Press the power ( ) button on the remote control to turn on the front panel or press the VOL+/- button on the unit. Reset System (RESET) The RESET button is distorted...
...+/- This function may be used when the LCD does not display normally or sound is used . To set clock time, press and hold the CLK button and the hour will 5. Mute on/off (MUTE) Press the MUTE button on the remote control to toggle mute on front panel. 2. Press the power ( ) button on the remote control to turn on the front panel or press the VOL+/- button on the unit. Reset System (RESET) The RESET button is distorted...
User Manual
Page 8
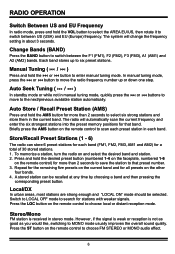
... to save the station to that band. However, if the signal is weak or reception is received in stereo mode. The radio will change the frequency setting in manual tuning mode, quickly press the or buttons to move to move the radio frequency number up to enter manual tuning mode. To memorize a station, turn the radio on the remote control to choose FM STEREO or MONO audio effect. 6 Store/Recall Preset Stations (1 - 6) The radio can be...
... to save the station to that band. However, if the signal is weak or reception is received in stereo mode. The radio will change the frequency setting in manual tuning mode, quickly press the or buttons to move to move the radio frequency number up to enter manual tuning mode. To memorize a station, turn the radio on the remote control to choose FM STEREO or MONO audio effect. 6 Store/Recall Preset Stations (1 - 6) The radio can be...
User Manual
Page 9
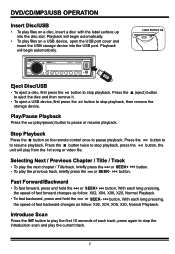
... play on a USB device, open the USB port cover and insert the USB storage device into the disc slot. Press the (eject) button to eject the disc and then remove it. • To eject a USB device, press the button to stop playback, press the unit will play from the 1st song or video file. Introduce Scan Press the INT button to pause or resume playback. Label Surface Up Eject Disc/USB • To eject a disc, press the button to...
... play on a USB device, open the USB port cover and insert the USB storage device into the disc slot. Press the (eject) button to eject the disc and then remove it. • To eject a USB device, press the button to stop playback, press the unit will play from the 1st song or video file. Introduce Scan Press the INT button to pause or resume playback. Label Surface Up Eject Disc/USB • To eject a disc, press the button to...
User Manual
Page 10
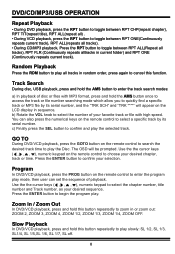
... to play mode, then user can also press the numerical keys on the remote control to select the chapter number, title number and Track number. Program In DVD/VCD playback, press the PROG button on the LCD display in or zoom out: ZOOM 2, ZOOM 3, ZOOM 4, ZOOM 1/2, ZOOM 1/3, ZOOM 1/4, ZOOM OFF. Press the ENTER button to choose your desired chapter, track or time. Track Search During disc, USB...
... to play mode, then user can also press the numerical keys on the remote control to select the chapter number, title number and Track number. Program In DVD/VCD playback, press the PROG button on the LCD display in or zoom out: ZOOM 2, ZOOM 3, ZOOM 4, ZOOM 1/2, ZOOM 1/3, ZOOM 1/4, ZOOM OFF. Press the ENTER button to choose your desired chapter, track or time. Track Search During disc, USB...

User Manual
Page 11
... switch to the AUX input mode, then you have plugged such a player into the AUX IN jack with a audio input cable. The titles of DVD disc will be displayed on the front panel, and a pair audio auxiliary input RCA connector at the same time, otherwise, it is recorded with audio output from external devices. User can listen to music from an MP3 music player. AUXILIARY INPUT OPERATION This car radio is equipped an external auxiliary input jack (3.5mm) on the connected monitor. Note: The number of audio if the DVD disc is compatible...
... switch to the AUX input mode, then you have plugged such a player into the AUX IN jack with a audio input cable. The titles of DVD disc will be displayed on the front panel, and a pair audio auxiliary input RCA connector at the same time, otherwise, it is recorded with audio output from external devices. User can listen to music from an MP3 music player. AUXILIARY INPUT OPERATION This car radio is equipped an external auxiliary input jack (3.5mm) on the connected monitor. Note: The number of audio if the DVD disc is compatible...
User Manual
Page 12
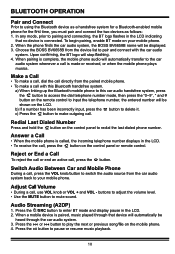
... telephone number displays in the LCD indicating that no device is paired, music played through that device will stop 4. buttons to adjust the volume level. • Use the MUTE button to pause or resume music playback. 10 Press the or button to play the next or previous on the control panel to this Bluetooth handsfree system. Press the button to mute sound. BLUETOOTH OPERATION Pair and Connect Prior to delete it. When the phone the car audio system, the BOSS BV6658B...
... telephone number displays in the LCD indicating that no device is paired, music played through that device will stop 4. buttons to adjust the volume level. • Use the MUTE button to pause or resume music playback. 10 Press the or button to play the next or previous on the control panel to this Bluetooth handsfree system. Press the button to mute sound. BLUETOOTH OPERATION Pair and Connect Prior to delete it. When the phone the car audio system, the BOSS BV6658B...
User Manual
Page 13
.../MP3 mode, press this button to select different modes: RADIO/DISC/ USB/AUX IN/BT(Bluetooth). 3. When PBC is on, the PBC interactive menu will be visible on the connected monitor, user can set the sequence of the menu. SEEK-/SEEK+, / In radio mode, press and hold the SEEK-/SEEK+ button to choose 29 TV system: AUTO, PAL or NTSC. 4/5/8/26. During video playback, press this button to recall the preset stations...
.../MP3 mode, press this button to select different modes: RADIO/DISC/ USB/AUX IN/BT(Bluetooth). 3. When PBC is on, the PBC interactive menu will be visible on the connected monitor, user can set the sequence of the menu. SEEK-/SEEK+, / In radio mode, press and hold the SEEK-/SEEK+ button to choose 29 TV system: AUTO, PAL or NTSC. 4/5/8/26. During video playback, press this button to recall the preset stations...
User Manual
Page 14
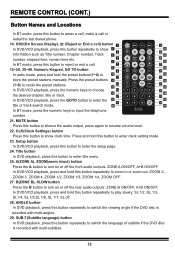
... the preset buttons (1~6) to input the telephone number. 21. REMOTE CONTROL (CONT.) Button Names and Locations In BT mode, press this button to anser a call, make a call . 15~20, 35~40. In BT mode, press the numeric keys to recall the preset stations. OSD(On Screen Display), (Reject or End a call) button In DVD/VCD playback, press this button repeatedly to switch the language of subtitle if the DVD disc is recorded...
... the preset buttons (1~6) to input the telephone number. 21. REMOTE CONTROL (CONT.) Button Names and Locations In BT mode, press this button to anser a call, make a call . 15~20, 35~40. In BT mode, press the numeric keys to recall the preset stations. OSD(On Screen Display), (Reject or End a call) button In DVD/VCD playback, press this button repeatedly to switch the language of subtitle if the DVD disc is recorded...
User Manual
Page 15
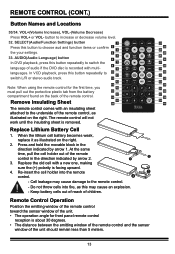
... DVD disc is facing upward. 4. Note: When using the remote control for front panel remote control reception is removed. In VCD playback, press this button to the remote control. ! - Remove Insulating Sheet The remote control comes with multi- 29 languages. SELECT(Audio/Function Settings) button Press this button repeatedly to switch the language of the unit should remain less than 5 meters. 13 When the lithium cell battery becomes weak, replace it as this button...
... DVD disc is facing upward. 4. Note: When using the remote control for front panel remote control reception is removed. In VCD playback, press this button to the remote control. ! - Remove Insulating Sheet The remote control comes with multi- 29 languages. SELECT(Audio/Function Settings) button Press this button repeatedly to switch the language of the unit should remain less than 5 meters. 13 When the lithium cell battery becomes weak, replace it as this button...
User Manual
Page 16
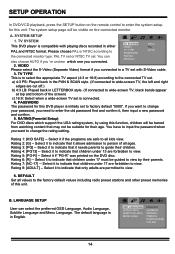
... including radio preset stations and other preset memories of this DVD player is initially set to TV TYPE PASSWORD AUTO the connected monitor type: PAL TV set or NTSC TV set is to select the appropriate TV aspect (4:3 or 16:9) according to view. 6. Select it needs parents to view. SETUP OPERATION In DVD/VCD playback, press the SETUP button on the remote control to a TV set with playing discs recorded in English. VIDEO Please select the S-Video (Separate Video) format if...
... including radio preset stations and other preset memories of this DVD player is initially set to TV TYPE PASSWORD AUTO the connected monitor type: PAL TV set or NTSC TV set is to select the appropriate TV aspect (4:3 or 16:9) according to view. 6. Select it needs parents to view. SETUP OPERATION In DVD/VCD playback, press the SETUP button on the remote control to a TV set with playing discs recorded in English. VIDEO Please select the S-Video (Separate Video) format if...
User Manual
Page 17
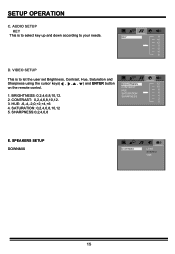
AUDIO SETUP KEY This is to your needs. CONTRAST 10 HUE 8 SATURATION 6 1. BRIGHTNESS: 0,2,4,6,8,10,12. SATURATION: 0,2,4,6,8,10,12 5. VIDEO SETUP This is to select key up and down according to let the user set Brightness, Contrast, Hue, Saturation and Sharpness using the cursor keys( , , , ) and ENTER button BRIGHTNESS 12 on the remote control. CONTRAST: 0,2,4,6,8,10,12. 3. HUE: -6,-4,-2,0,+2,+4,+6 2 0 4. SPEAKERS SETUP DOWNMIX DOWNMIX LT/RT STEREO VSS 15 SETUP OPERATION C. KEY # +4 +2 0 -2 -4 b D. SHARPNESS 4 2. SHARPNESS:0,2,4,6,8 E.
AUDIO SETUP KEY This is to your needs. CONTRAST 10 HUE 8 SATURATION 6 1. BRIGHTNESS: 0,2,4,6,8,10,12. SATURATION: 0,2,4,6,8,10,12 5. VIDEO SETUP This is to select key up and down according to let the user set Brightness, Contrast, Hue, Saturation and Sharpness using the cursor keys( , , , ) and ENTER button BRIGHTNESS 12 on the remote control. CONTRAST: 0,2,4,6,8,10,12. 3. HUE: -6,-4,-2,0,+2,+4,+6 2 0 4. SPEAKERS SETUP DOWNMIX DOWNMIX LT/RT STEREO VSS 15 SETUP OPERATION C. KEY # +4 +2 0 -2 -4 b D. SHARPNESS 4 2. SHARPNESS:0,2,4,6,8 E.
User Manual
Page 19
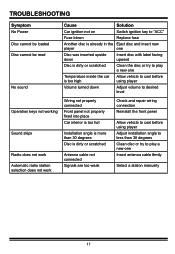
... using player Volume turned down Adjust volume to desired level Operation keys not working Wiring not properly connected Front panel not properly into place Car interior is too hot Sound skips Installation angle is more than 30 degrees Disc is dirty or scratched Radio does not work Automatic radio station selection does not work Antenna cable not connected Signals are too weak Check and repair wiring connection Reinstall the front panel Allow vehicle to cool before using player Adjust installation...
... using player Volume turned down Adjust volume to desired level Operation keys not working Wiring not properly connected Front panel not properly into place Car interior is too hot Sound skips Installation angle is more than 30 degrees Disc is dirty or scratched Radio does not work Automatic radio station selection does not work Antenna cable not connected Signals are too weak Check and repair wiring connection Reinstall the front panel Allow vehicle to cool before using player Adjust installation...


